MAB BIZ Solution Products Help:
The Guide for using the MAB BIZ Products is avalible below you can drive it to your desire concerns. The MAB ERP and Service Solutions guide have been designed as per now which will reflect the performing flow of the software where you will resolve all youe queries.
MAB BIZ SOLUTIONS


Stocks
STOCK
Stock Management module is created to record and manage all the inventory present and demands ahead.
This guide will direct you to the perfect mmanagement of the Stock Administration Under MAB Biz ERP.
In stock you will keep all record of inventory from purchases requisition & ordering to consumption
in individual pages. The Stock button on left top corner will direct you to the following segments.
Before selecting the Stock check below requirements to completed
MAB BIZ SOLUTIONS


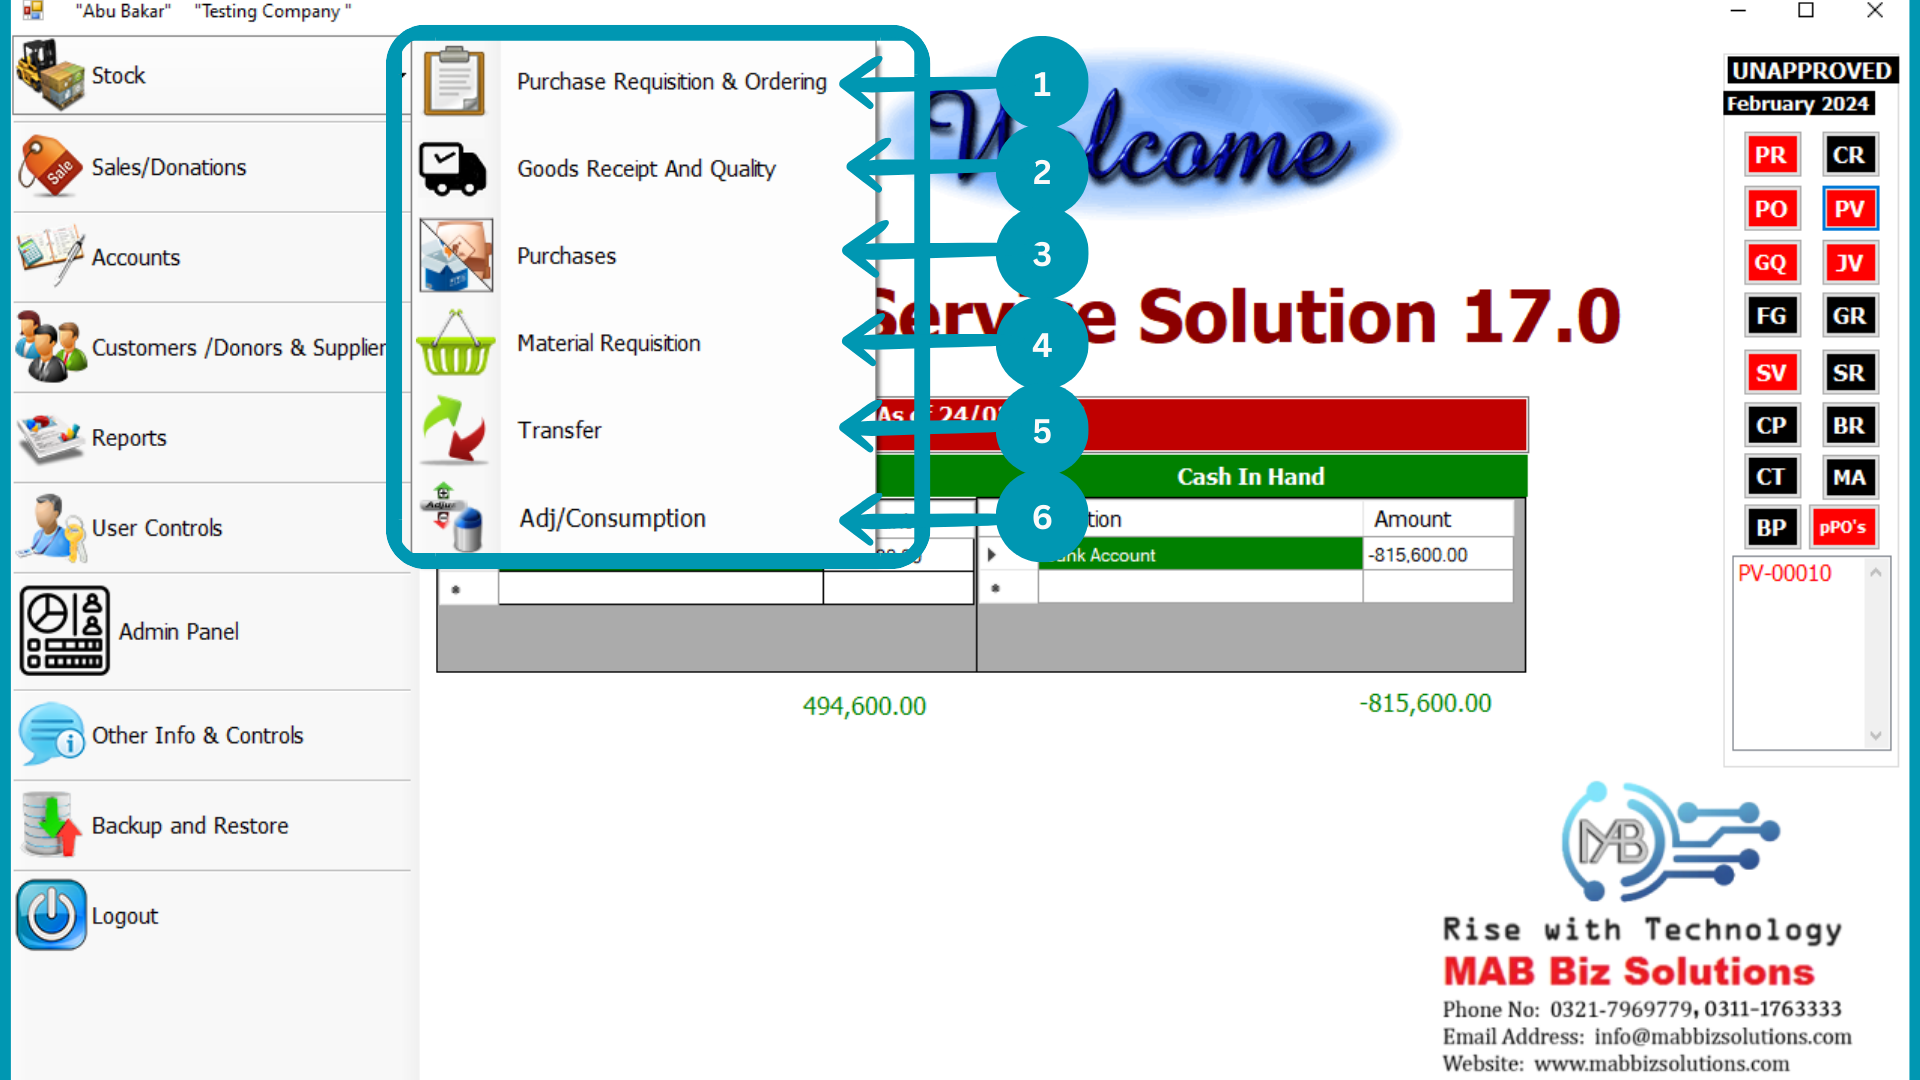
Purchases Requisition & Ordering
Purchases Requisition & Ordering
This Department is design to meet future requirements to run the organization smoothly. Purchase Requisition address the requirements and time period within which the required inventory have to be available for use.
Explanation of Purchase Requisition Design
- Purchase Requisition
- PR View
- Purchase Ordering
- PO View
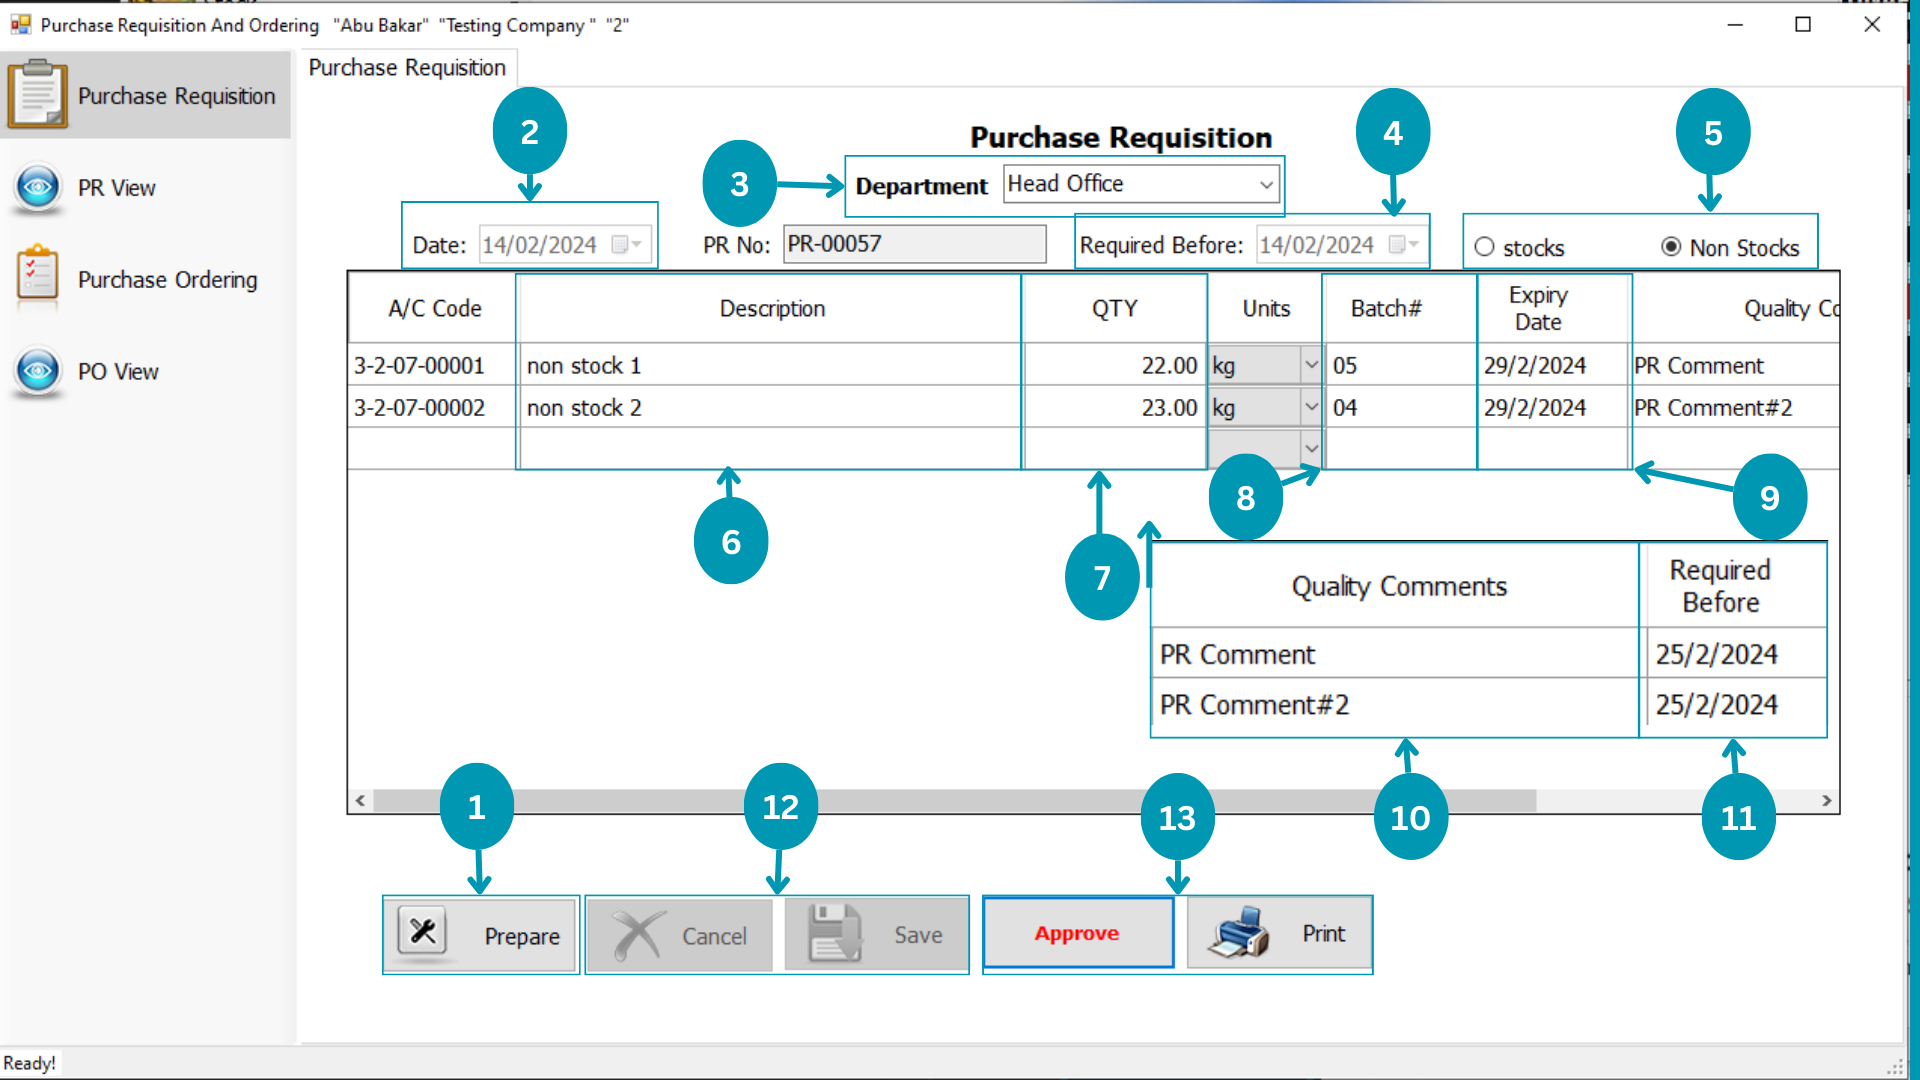
Purchases Requisition
 >
>
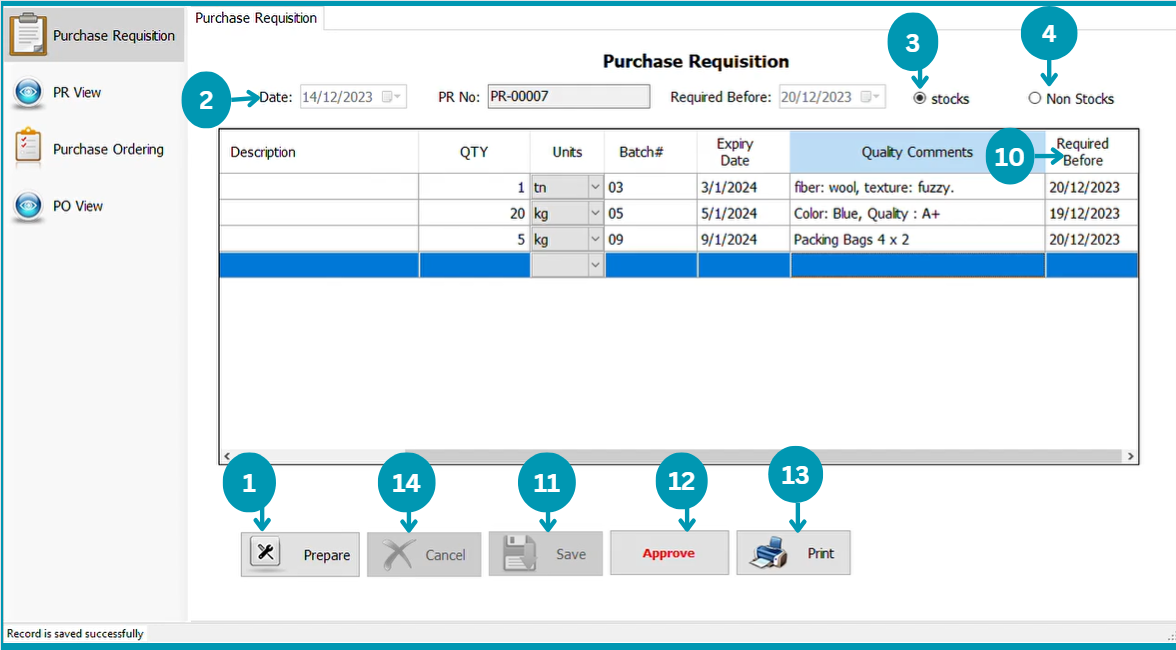
| 01 | 
|
|---|---|
| 02 | 
|
| 03 | 
|
| 04 | 
|
| 05 | 
|
| 06 | 
|
| 07 | 
|
| 08 | 
|
| 09 | 
|
| 10 | 
|
| 11 | 
|
| 12 | 
|
| 13 | 
|
| 14 | 
|
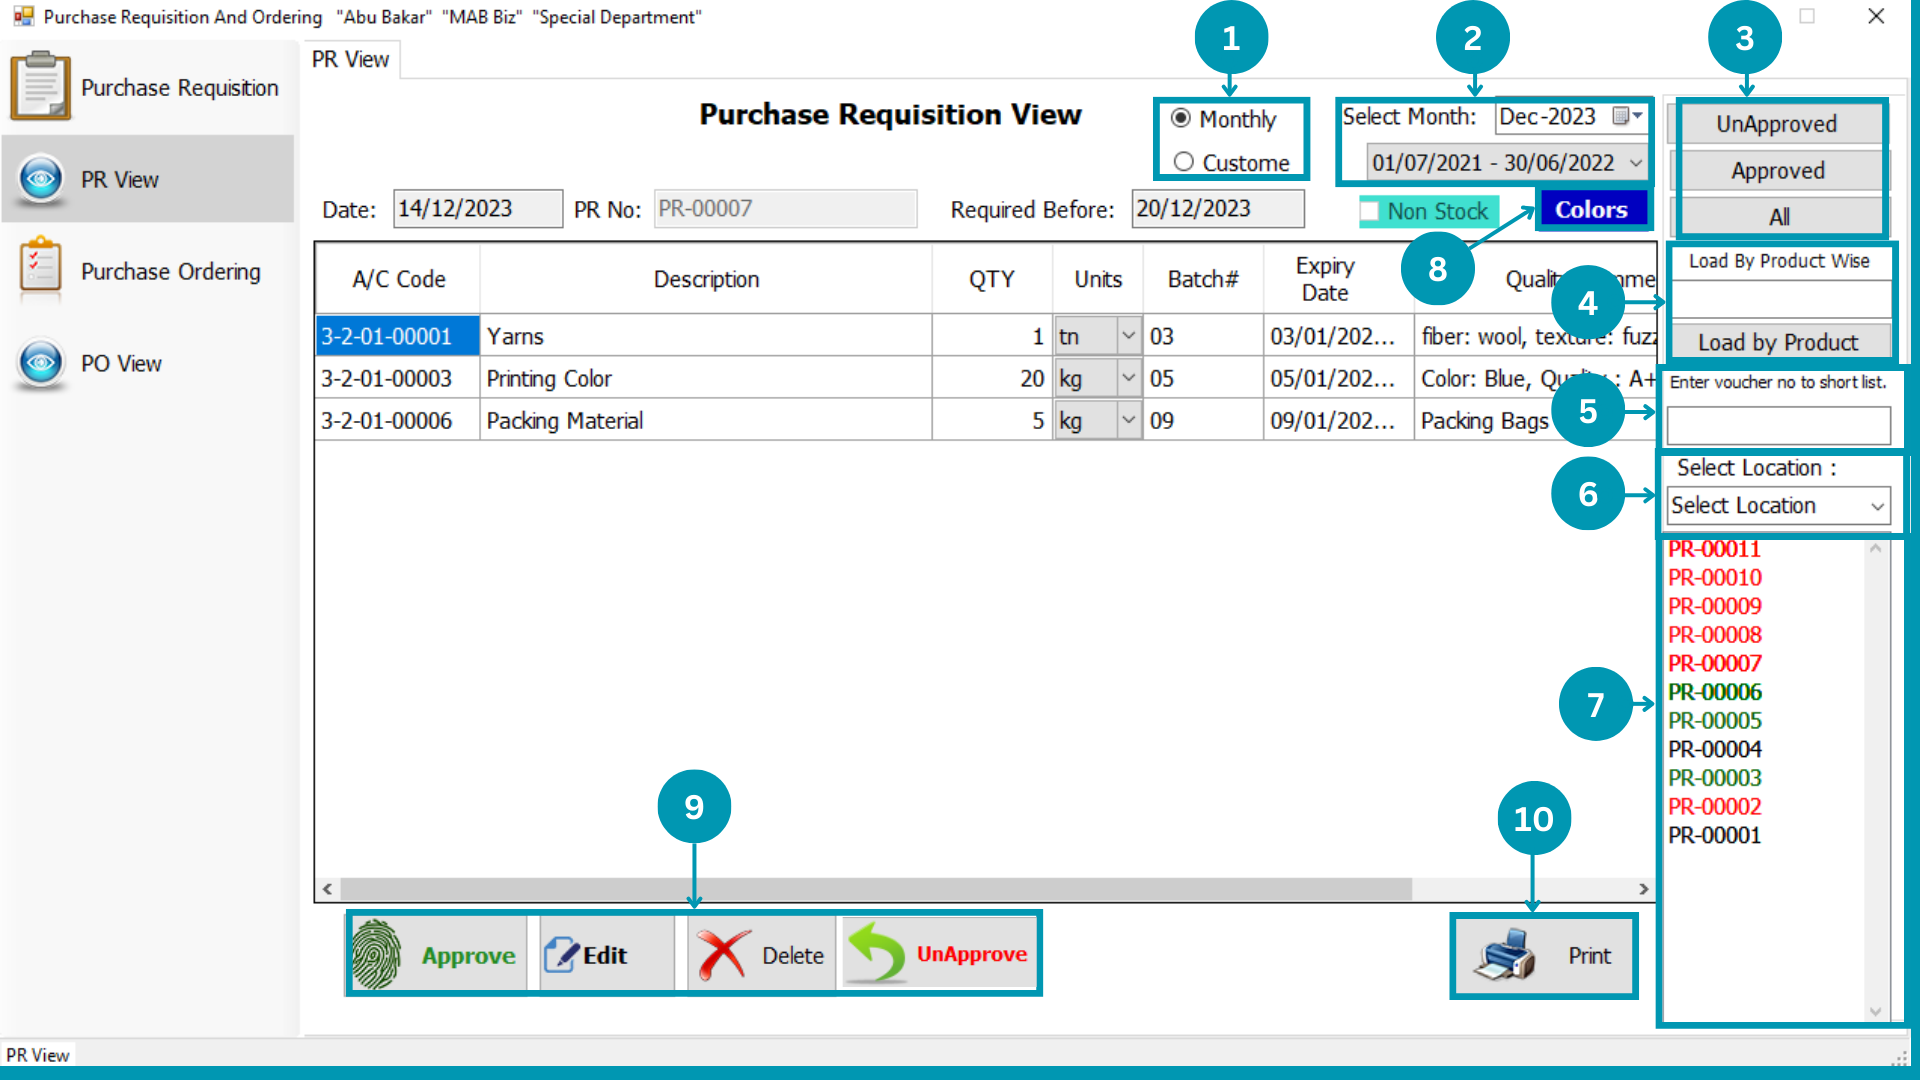
Purchases Requisition View
| 01 | 
|
| 02 | 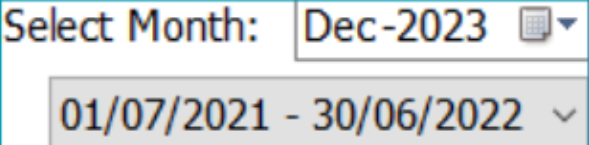
|
| 03 | 
|
| 04 | 
|
| 05 | 
|
| 06 | 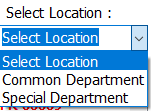
|
| 07 | 
|
| 08 | 
|
| 09 | 
|
| 10 | 
|
Purchases Ordering
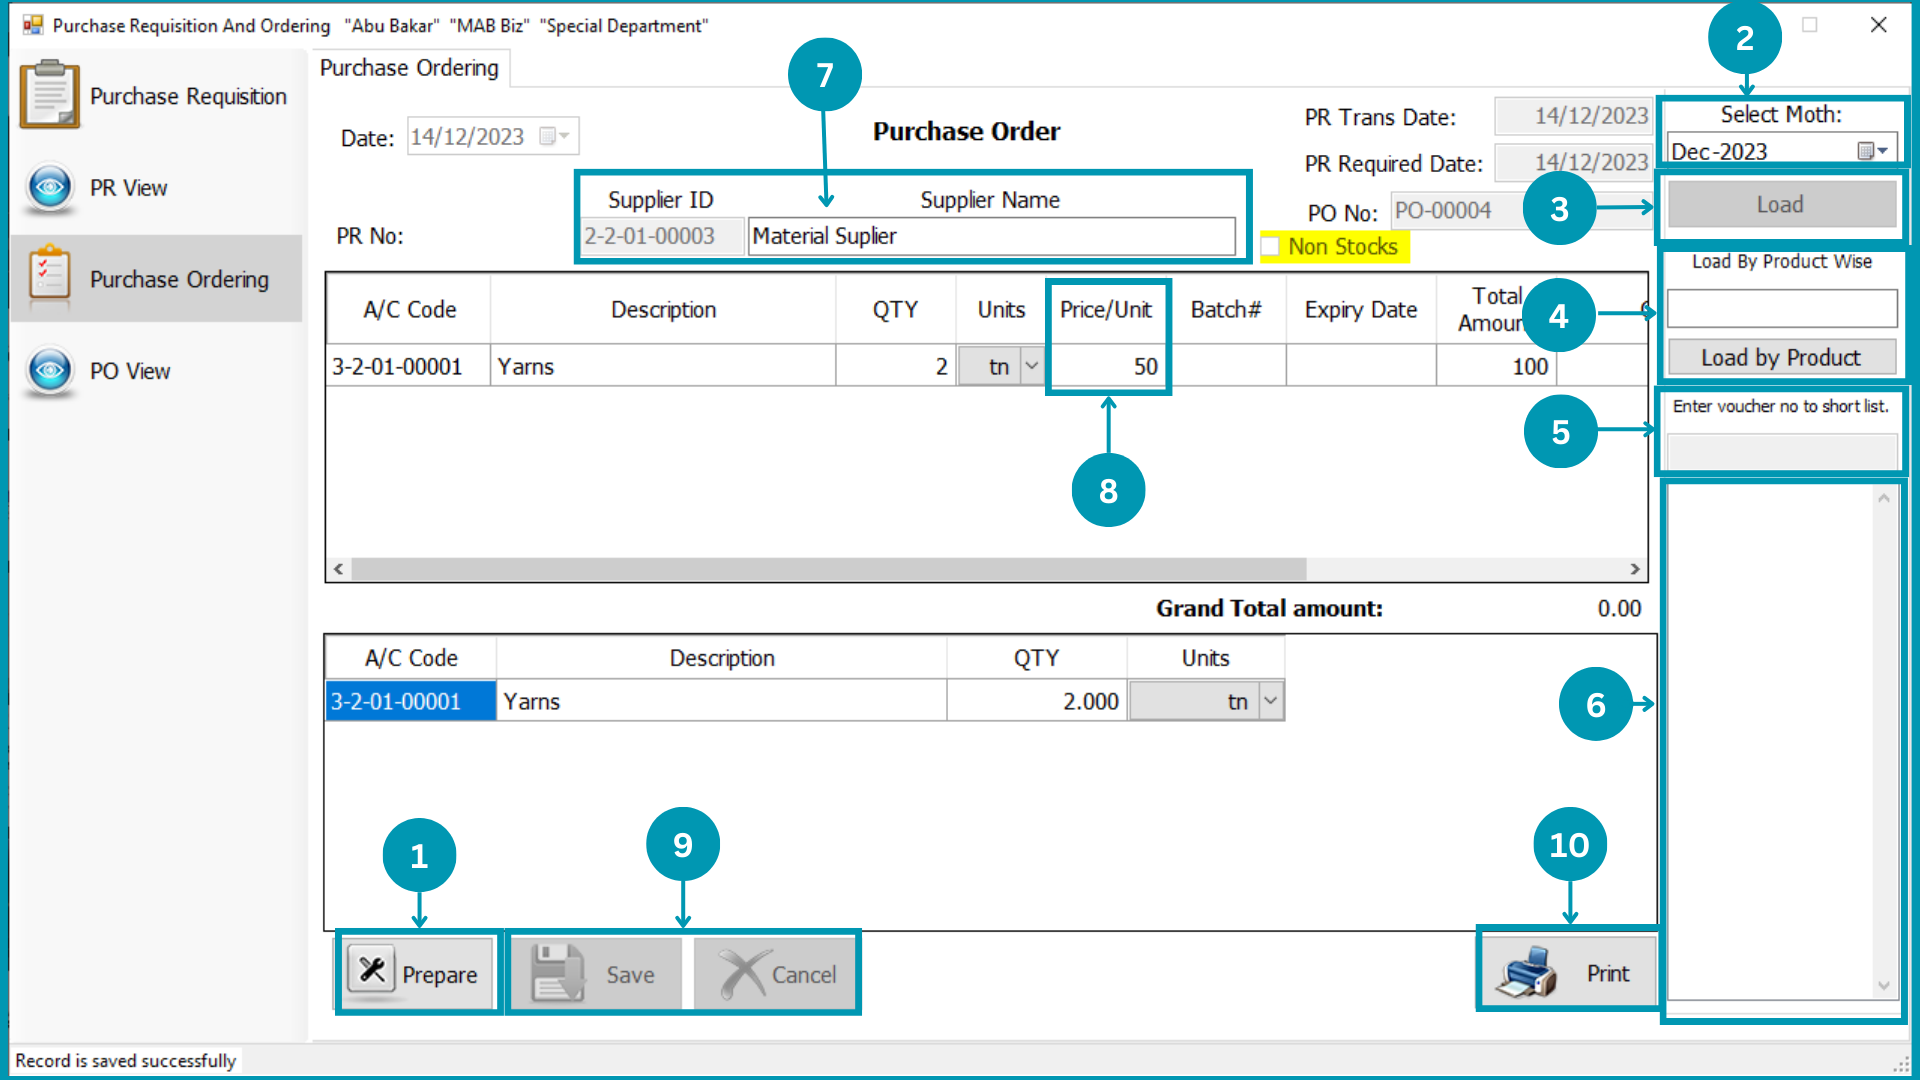
| 01 |
|
| 02 | 
|
| 03 | 
|
| 04 |
|
| 05 |
|
| 06 | 
|
| 07 | 
|
| 08 | 
|
| 09 |
|
| 10 |
|
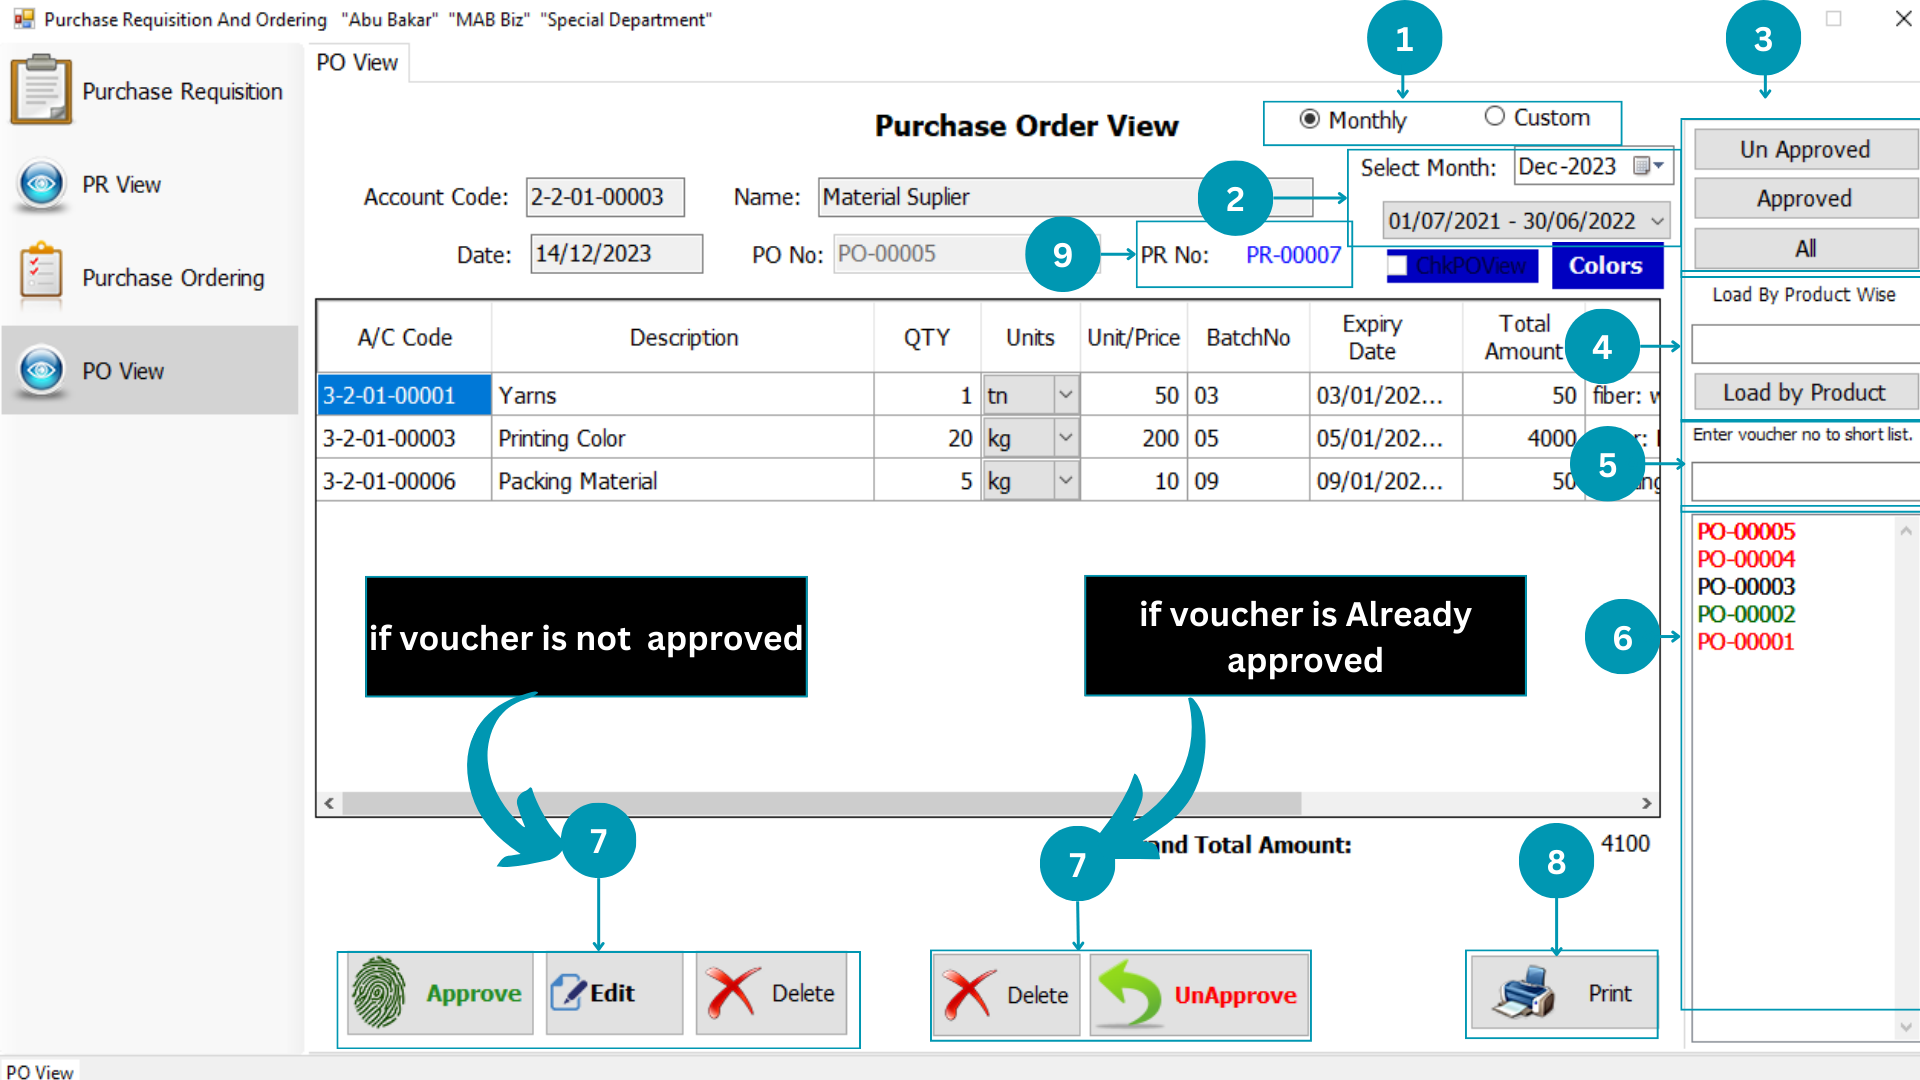
Purchases Ordering View
| 01 |
|
| 02 |
|
| 03 |
|
| 04 |
|
| 05 |
|
| 06 | 
|
| 07 |
|
| 08 |
|
MAB BIZ SOLUTIONS
Goods Receipt and Quality
Goods Receipt And Quality
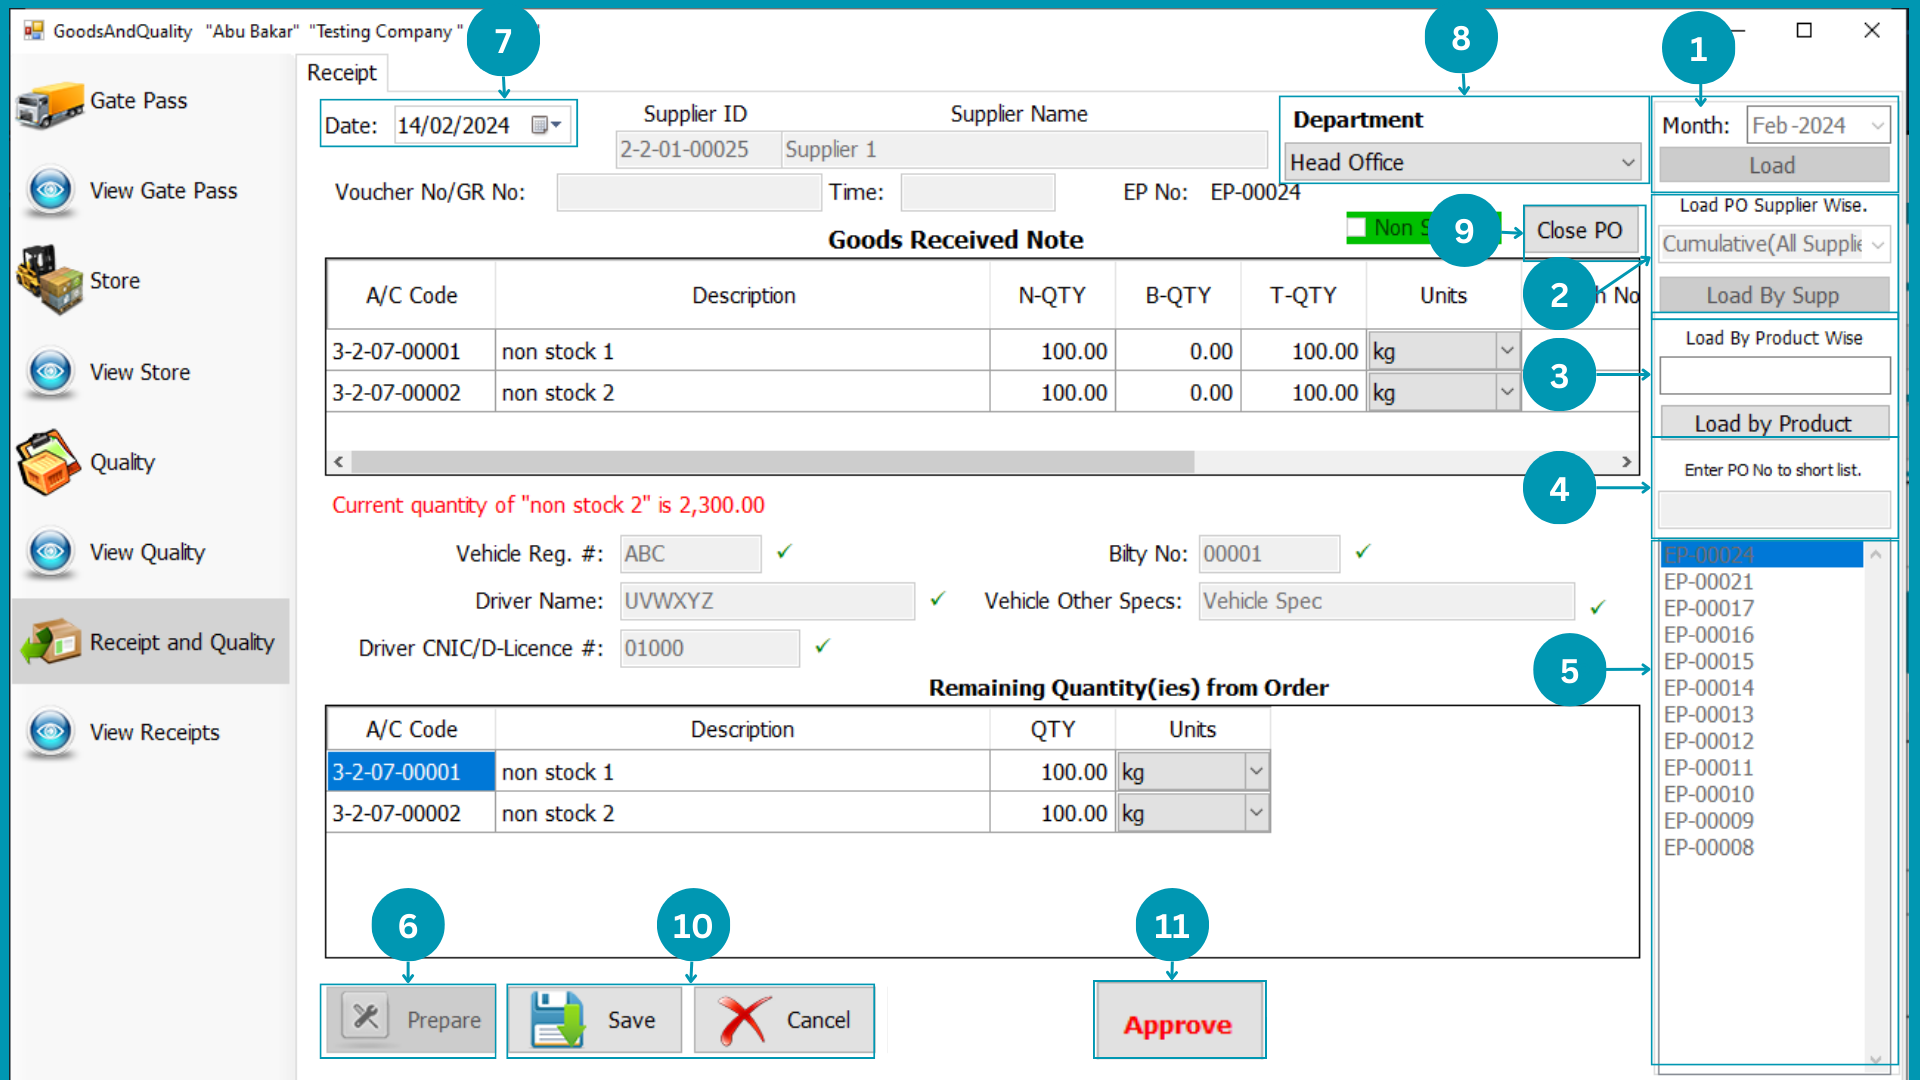
Goods Receipt and Quality indicates the receipt process after Purchase Ordering. In this module you will pass through receiving goods from gate to generate receipt to accepted Purchase.
Following pages usage is explained in this segment
- Gate Pass
- View Gate Pass
- Store
- View Store
- Receipt and Quality
- View Receipts
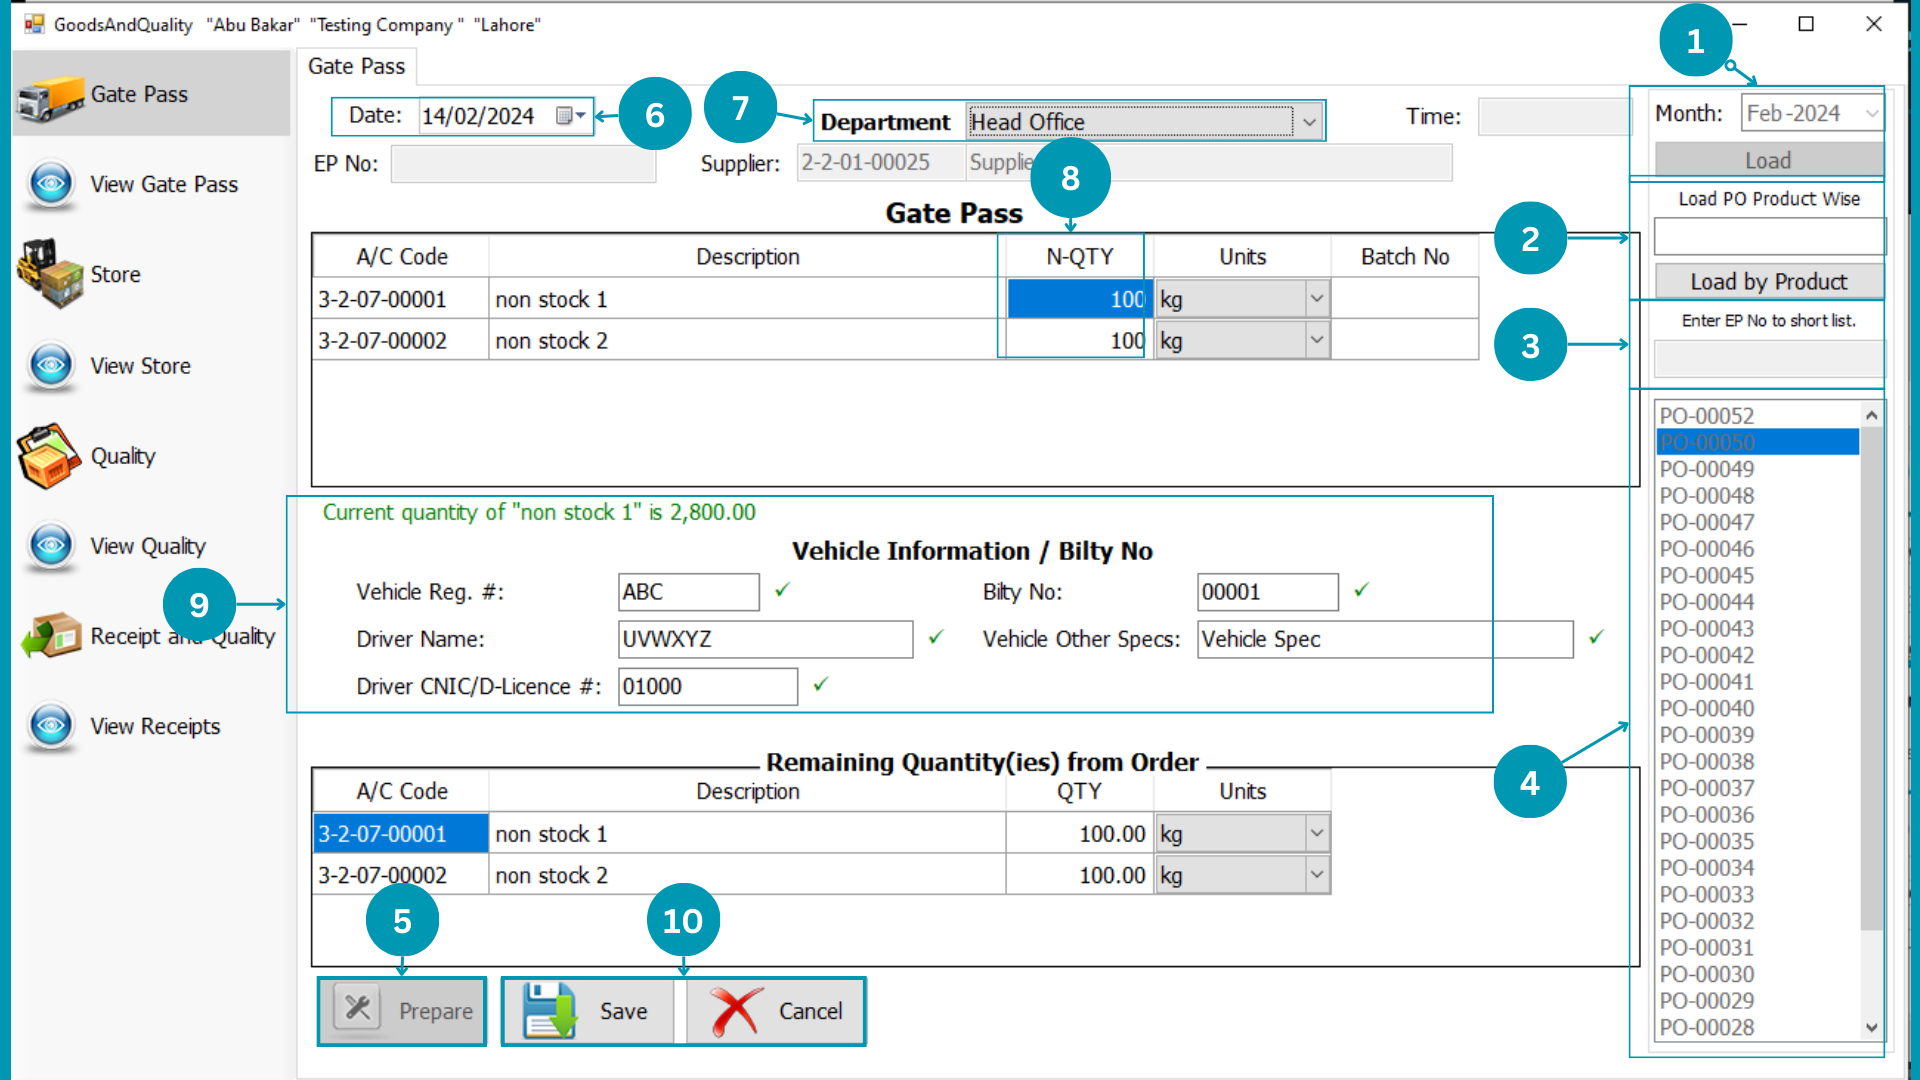
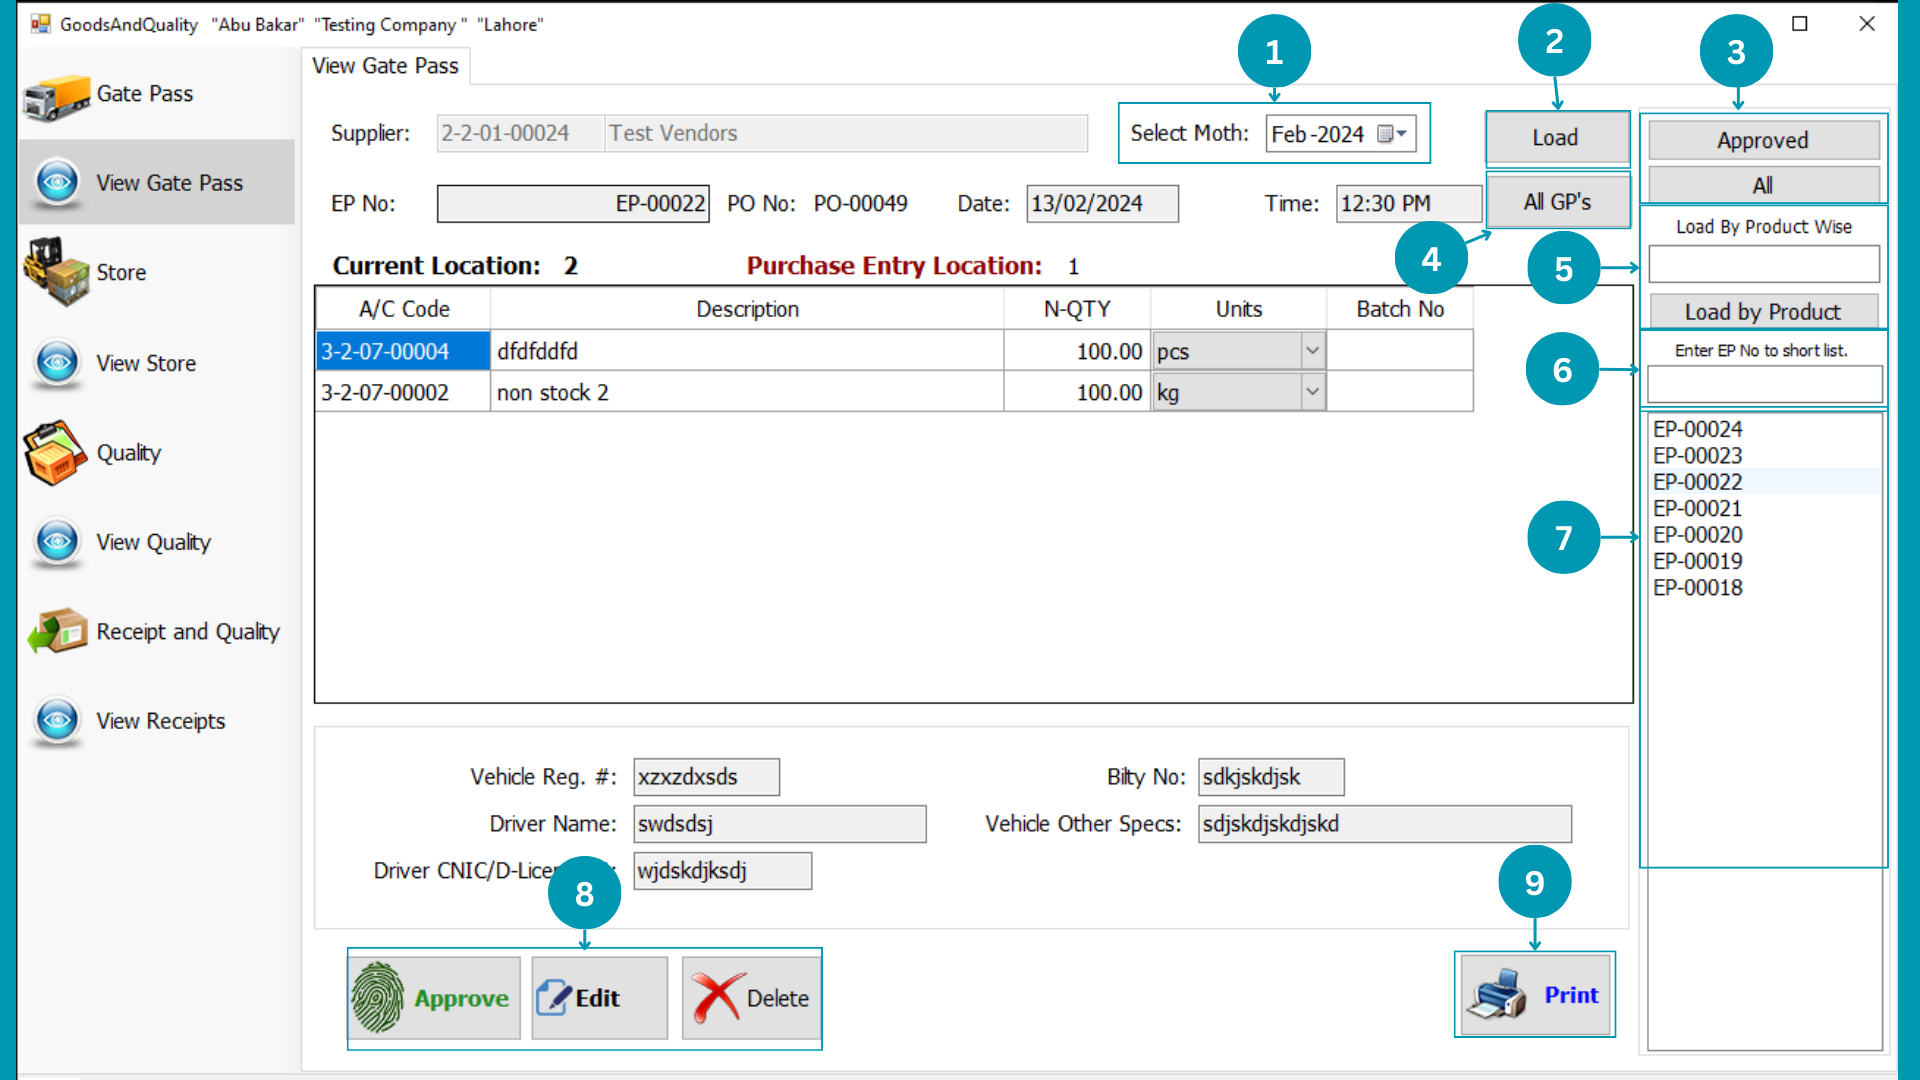
Gate Pass
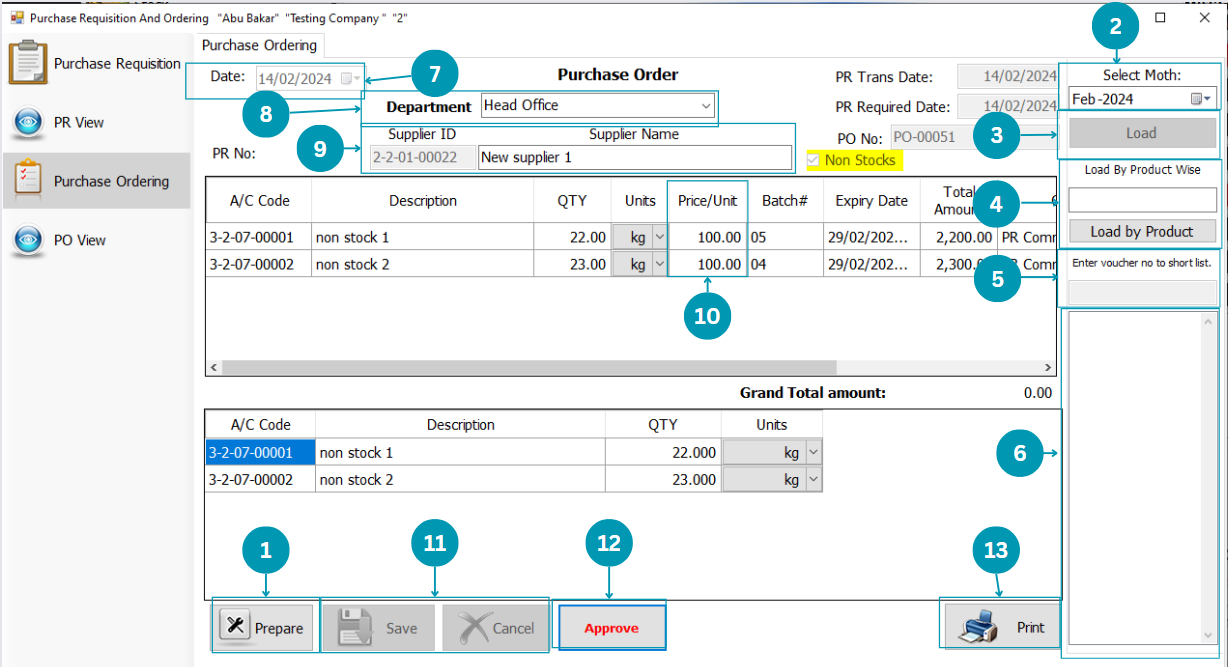
| 01 | Click
on “Prepare” to start data entry. |
| 02 |
|
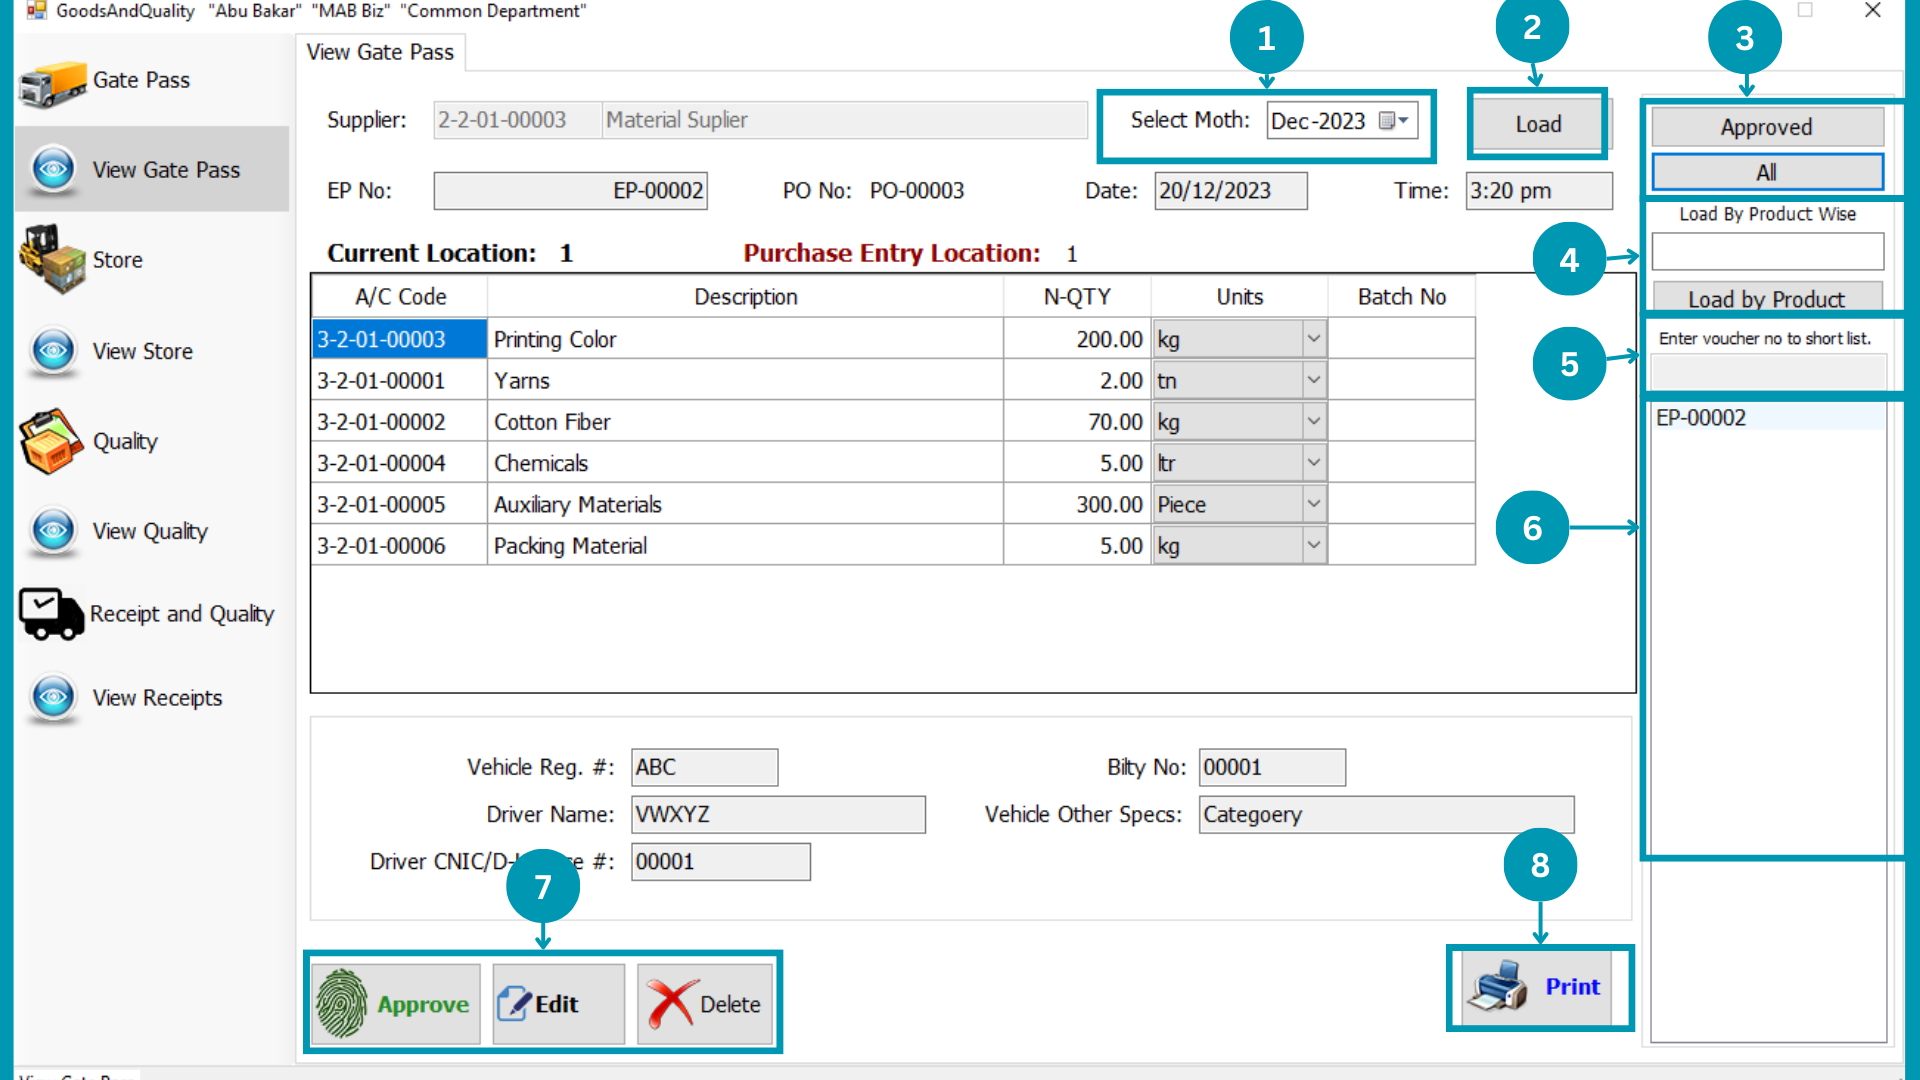
| 03 |  Select
Month and click load PO to view avalible Purchasing Ordering Vouchers of that months. Select
Month and click load PO to view avalible Purchasing Ordering Vouchers of that months. |
| 04 |  Write
“Product Name” to filter Purchase Requisition of specific product. Write
“Product Name” to filter Purchase Requisition of specific product.
|
| 05 | Enter the
Specific Voucher Number to view a specific Product Order.
|
| 06 |  Click on
voucher number to check entry made against that specific voucher. Click on
voucher number to check entry made against that specific voucher. |
| 07 | |
| 08 |  Fill
details of receiving vehicle in this section for record. Fill
details of receiving vehicle in this section for record. |
| 09 |  Hit
the Save Or Cancel Button. Hit
the Save Or Cancel Button. |
Gate Pass View
| 01 | 
|
| 02 | Click Load
to load all Gate Passes. |
| 03 | Select
Type (Approved, Unapproved or both) of Gate Passes to view. |
| 04 | Write
“Product Name” to filter Gate Passes of specific product.
|
| 05 | Enter the
Specific Voucher Number to view a specific Gate Pass.
|
| 06 |  Click
on voucher number to check entry made against that specific voucher. Click
on voucher number to check entry made against that specific voucher. |
| 07 |  Click your desire Button Approve, Edit and Delete.
|
| 08 | Print the
viewing Gate pass by Clicking Print.
|
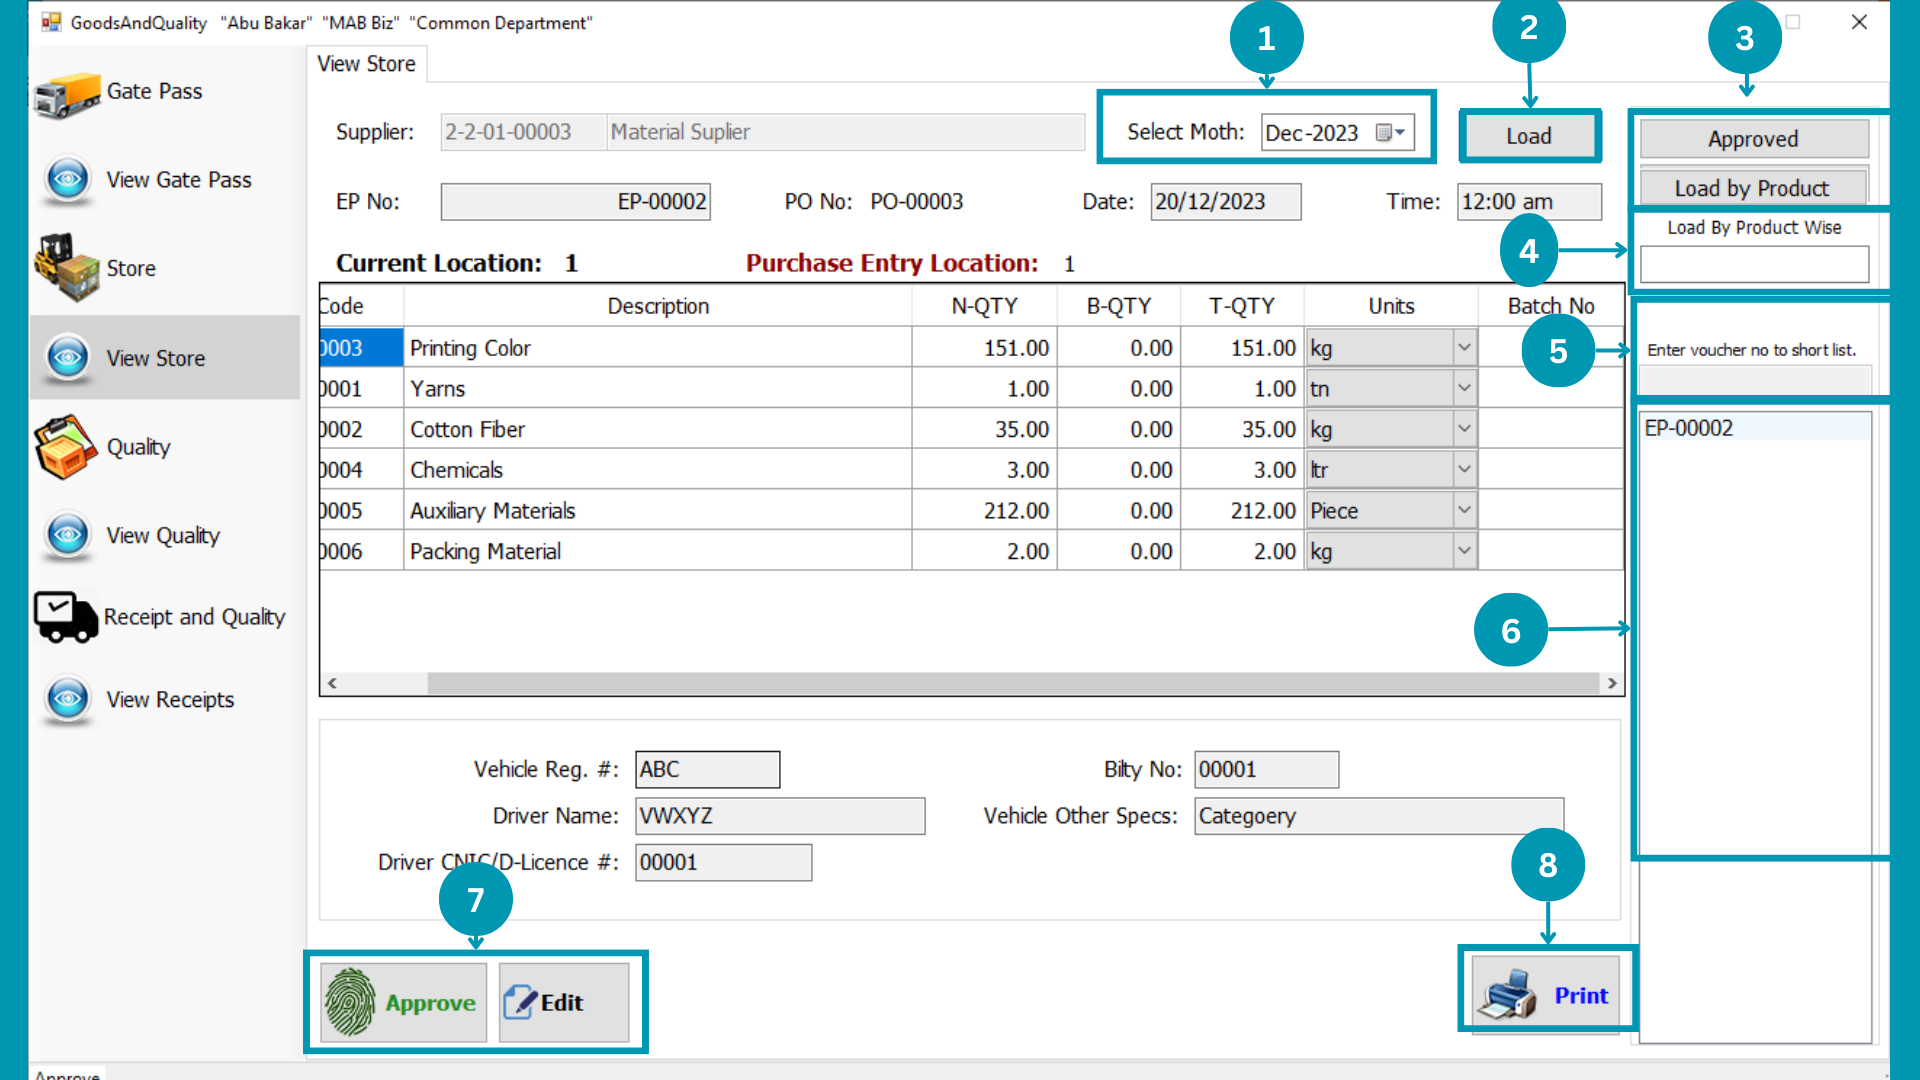
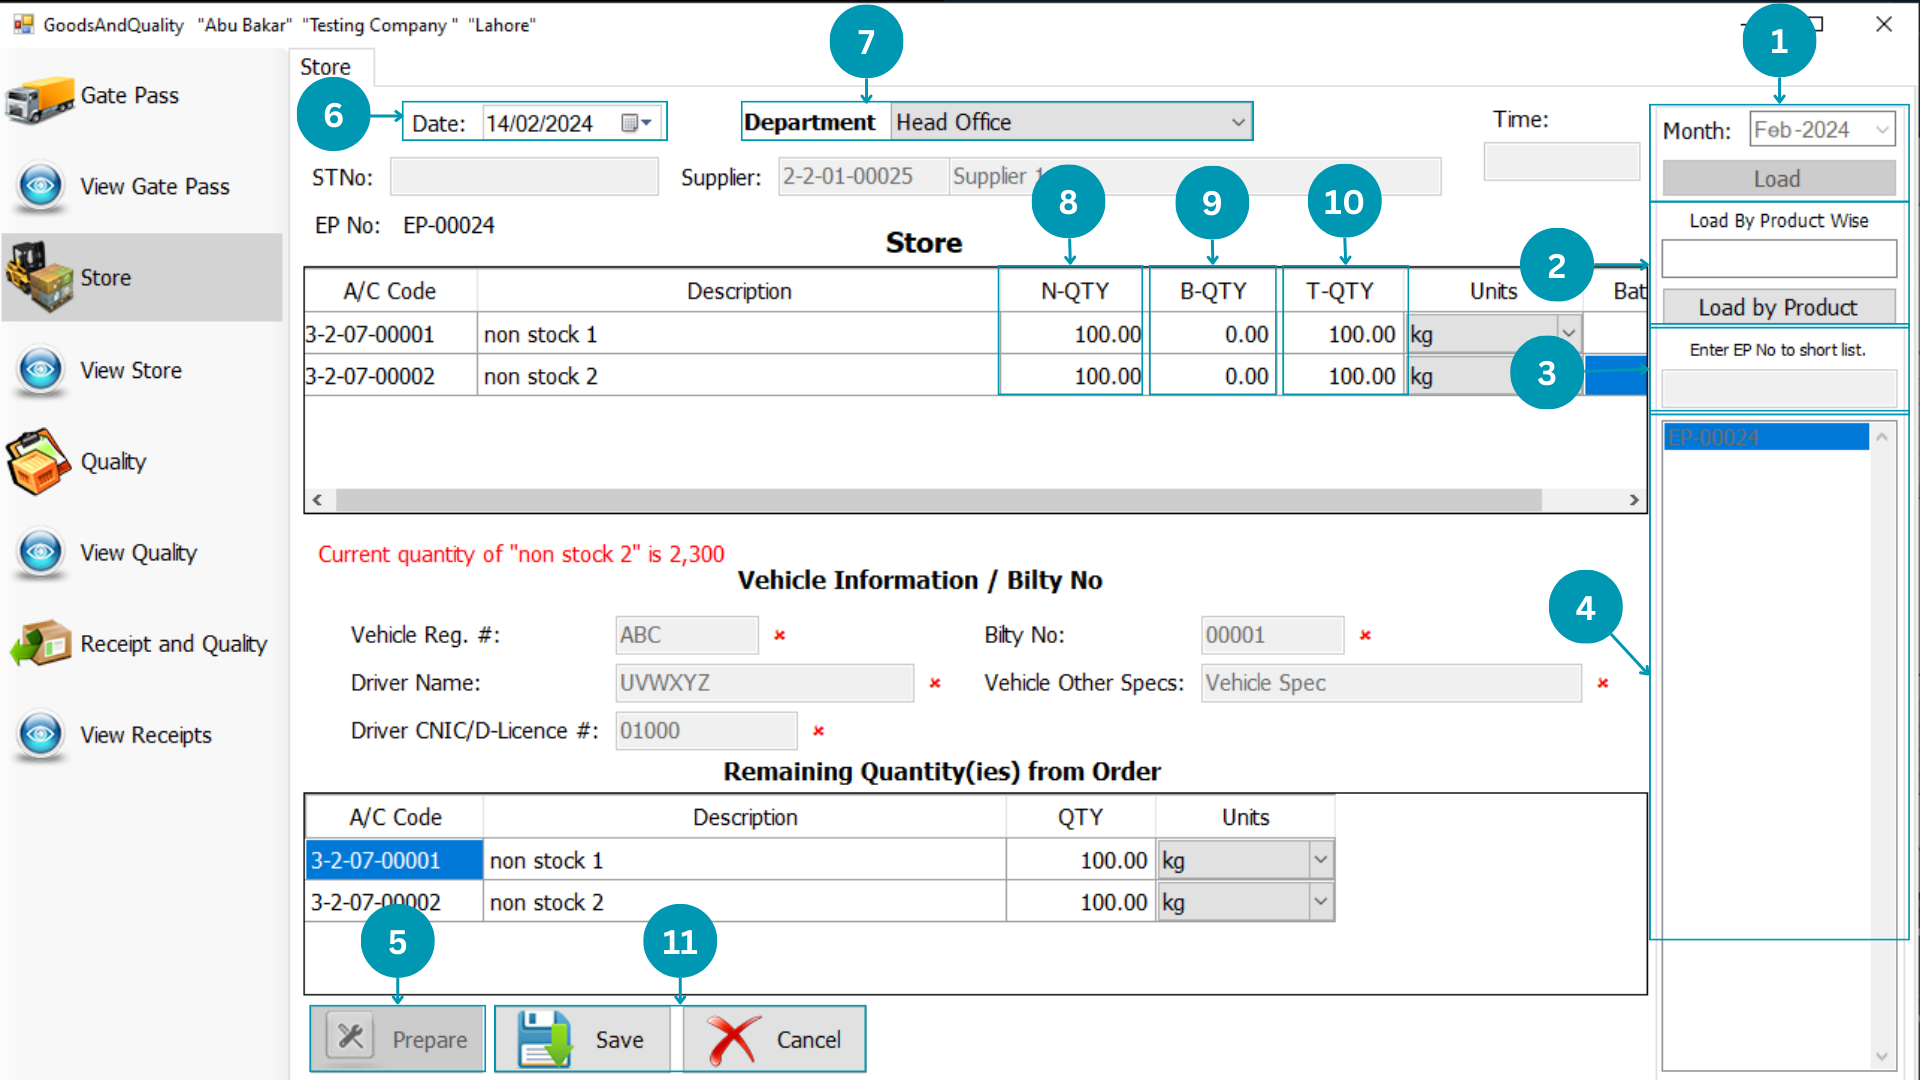
Store
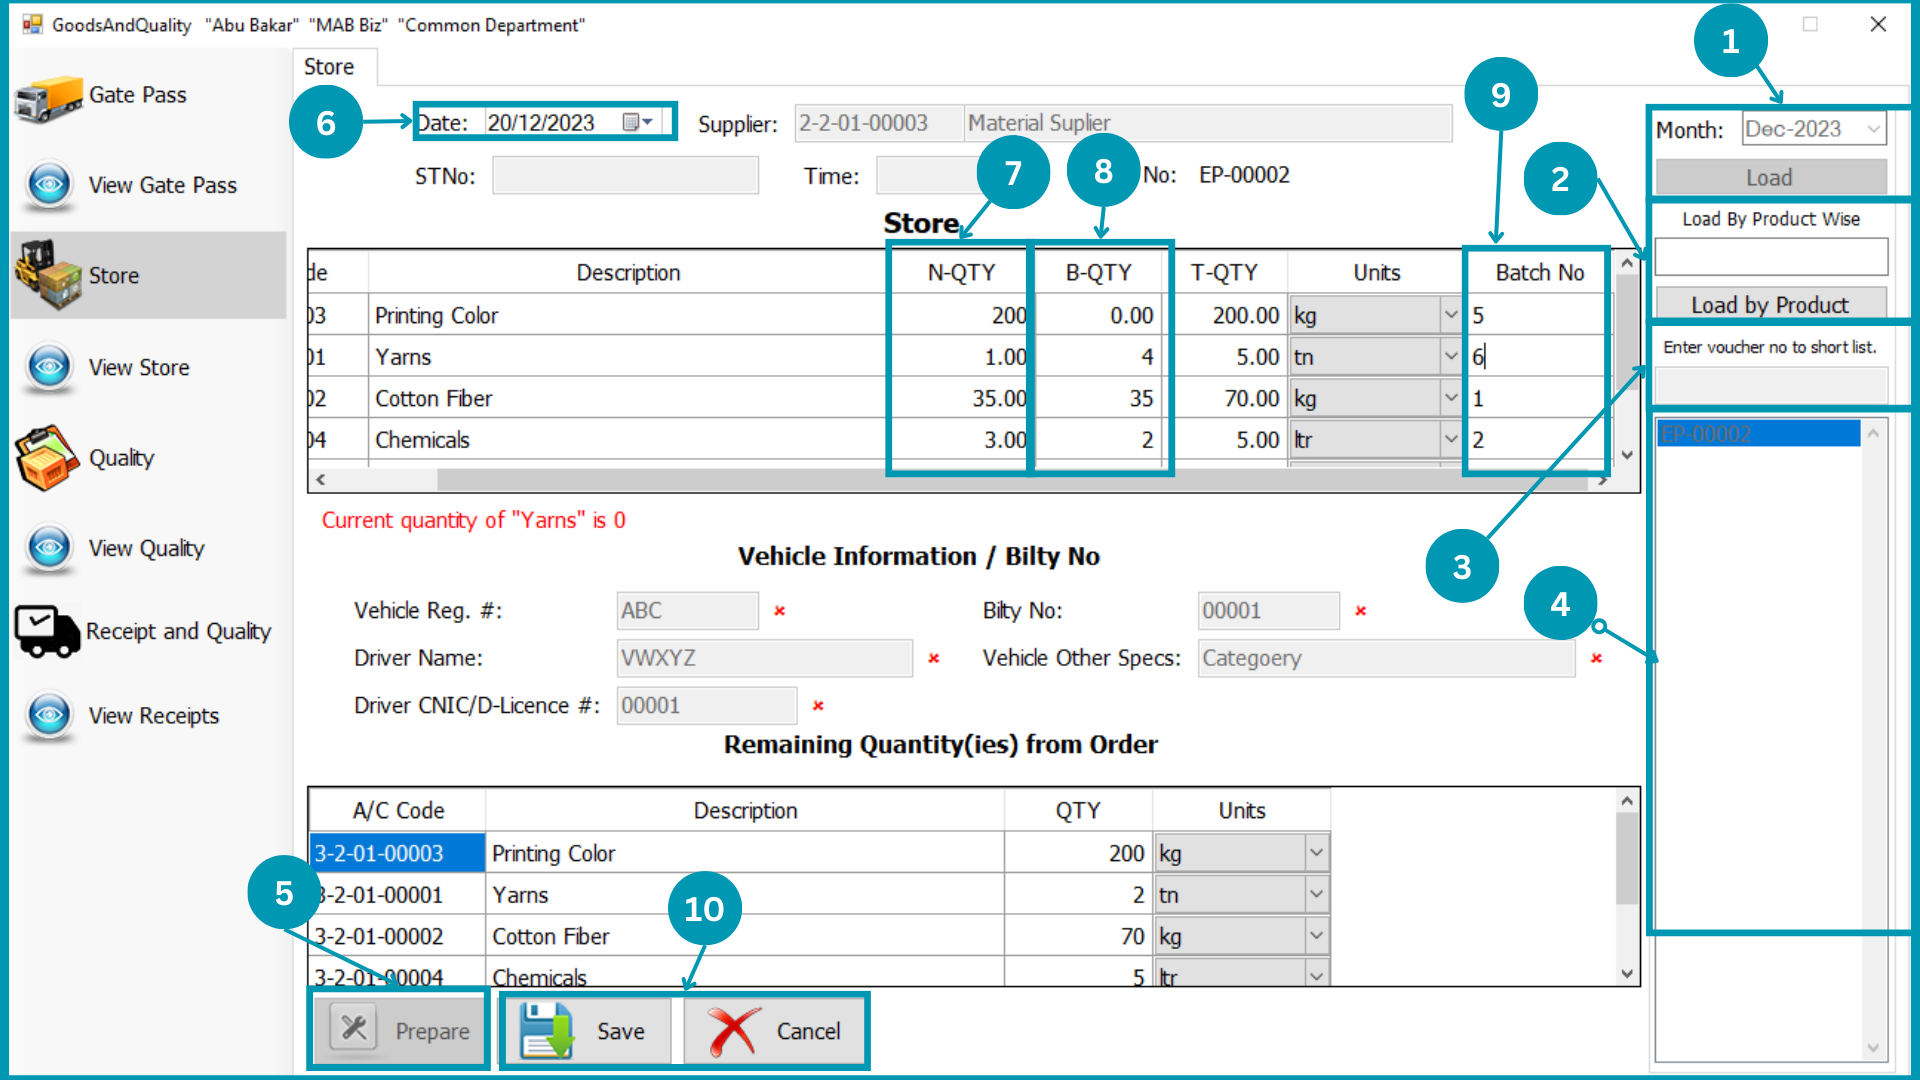
| 01 |  Select Specific month to view all Approved GPs of that month and hit load.
 |
| 02 | Write
“Product Name” to filter Gate Passes of specific product.
|
| 03 | Enter the
Specific Voucher Number to view a specific Gate Pass.
|
| 04 | Click
on voucher number to check entry made against that specific voucher. |
| 05 | Click
on “Prepare” to start data entry. |
| 06 | Select
Transaction date
|
| 07 | |
| 08 |  Write the
Quantity-Best Received of selected Product. Write the
Quantity-Best Received of selected Product. |
| 09 | Write
Batch Number in Batch# column.
|
| 10 | Hit
the Save Or Cancel Button. |
Store View
| 01 |
|
| 02 | Click Load
to load all Gate Passes. |
| 03 |  Select
Type (Approved, Unapproved or both) of Gate Passes to view. Select
Type (Approved, Unapproved or both) of Gate Passes to view. |
| 04 | Write
“Product Name” to filter Gate Passes of specific product.
|
| 05 | Enter the
Specific Voucher Number to view a specific Gate Pass.
|
| 06 | Click
on voucher number to check entry made against that specific voucher. |
| 07 | 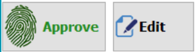 Click
your desire Button Approve and Edit. Click
your desire Button Approve and Edit.
|
| 08 | Print the
viewing Store Statement by Clicking Print.
|
Quality
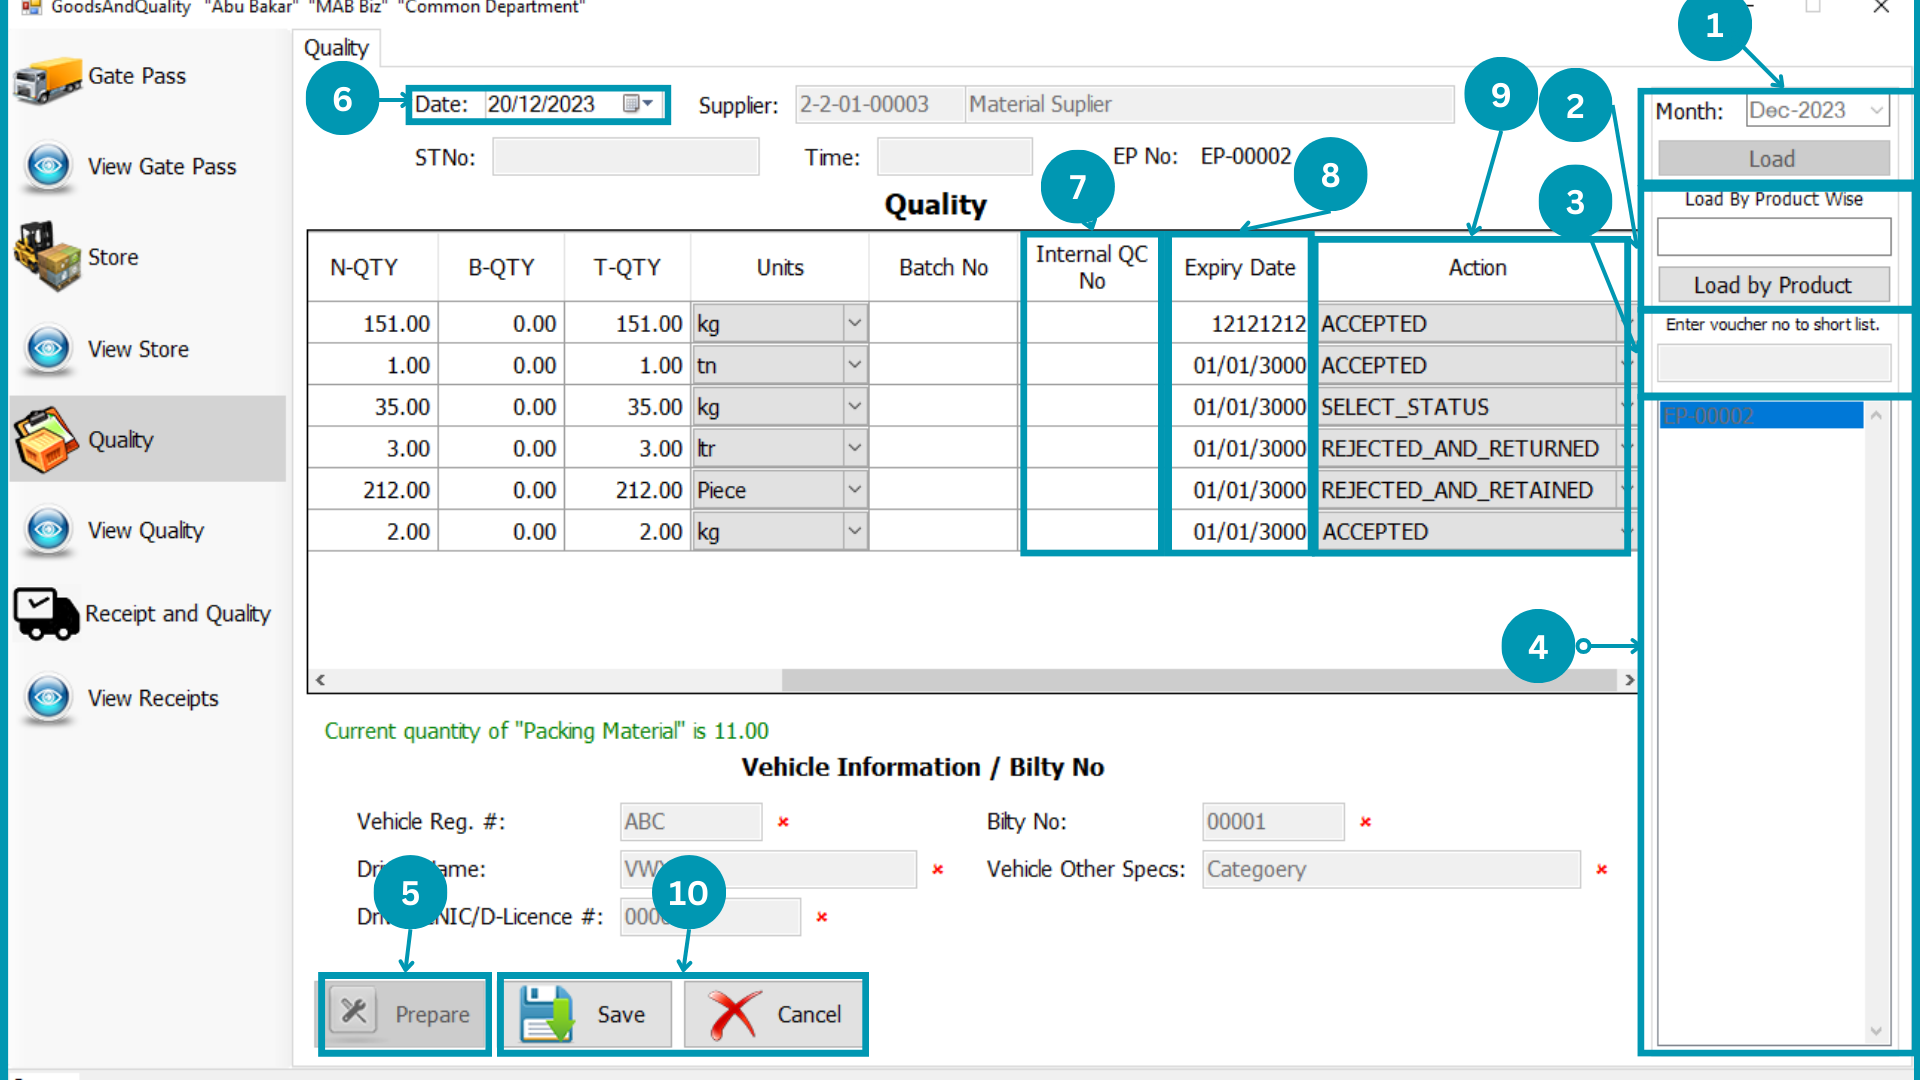
| 01 |
Select Specific month to view all Approved GPs of that month and hit load. |
| 02 | Write
“Product Name” to filter Gate Passes of specific product.
|
| 03 | Enter the
Specific Voucher Number to view a specific Gate Pass.
|
| 04 | Click
on voucher number to check entry made against that specific voucher. |
| 05 | Click
on “Prepare” to start data entry. |
| 06 | Select
Transaction date
|
| 07 |  Write
there internal QC number. Write
there internal QC number. |
| 08 | Write Expiry date of received material
in this column.
|
| 09 | 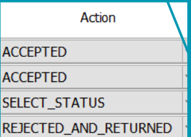 Select
Action of Acceptance against product. Select
Action of Acceptance against product. |
| 10 | Hit
the Save Or Cancel Button. |
Quality View
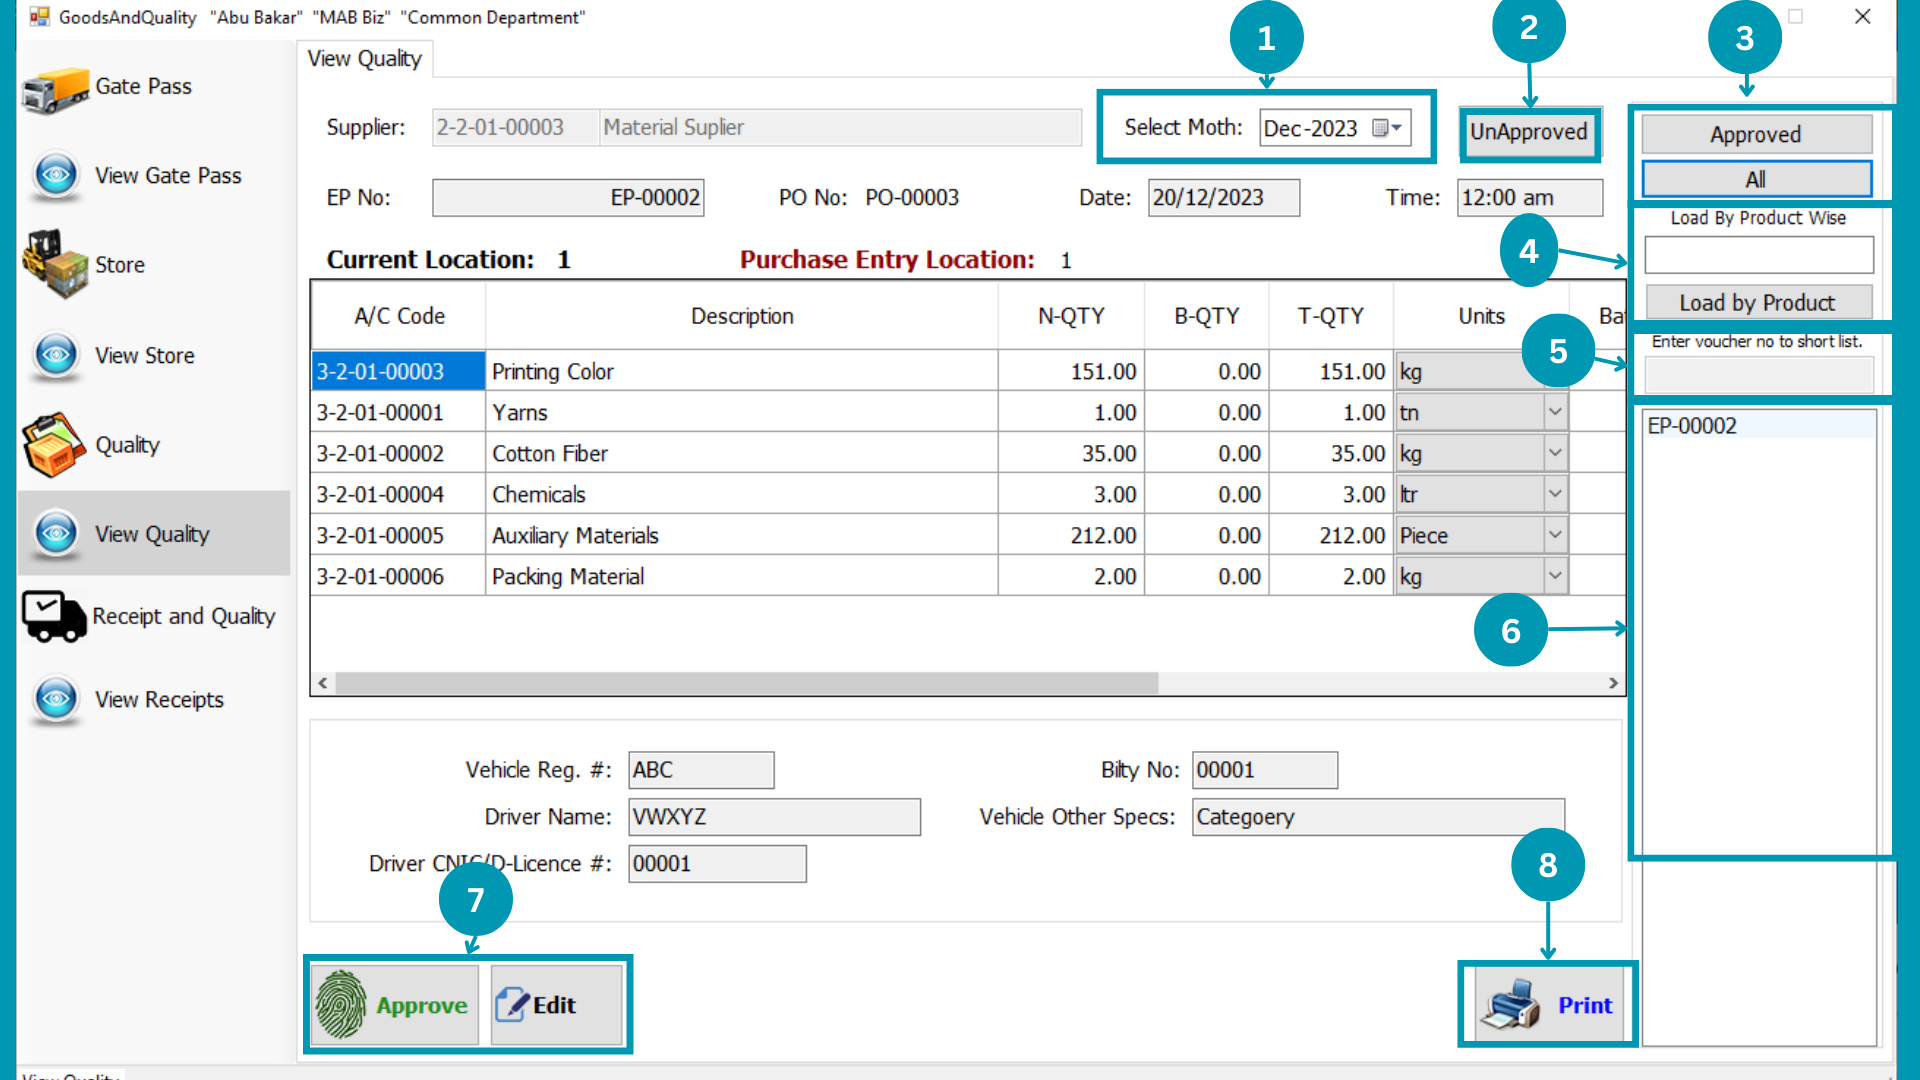
| 01 | Select
Specific month to view Quality Record of that month.
|
| 02 |  Click on Unapprove unapproved quality
vouchers list will load. Click on Unapprove unapproved quality
vouchers list will load. |
| 03 | Select
Type (Approved, Unapproved or both) of Quality Product to view.
|
| 04 | Write
“Product Name” to filter Quality Product of specific product.
|
| 05 | nter the
Specific Voucher Number to view a specific Quality Product.
|
| 06 | Click
on voucher number to check entry made against that specific voucher. |
| 07 |
Click your desire Button Approve and Edit. |
| 08 | Print the
viewing Quality Statement by Clicking Print.
|
Receipt And Quality

| 01 | Select
Specific month to view all Approved POs of that month and hit load. |
| 02 | Select
Location to view all vouchers in that specific Location.
|
| 03 |  Select
supplier for purchase order. Select
supplier for purchase order.
|
| 04 | Write
“Product Name” to filter Purchase Requisition of specific product.
|
| 05 | Enter the
Specific Voucher Number to view a specific Product Requisition.
|
| 06 |  Click
on voucher number to check entry made against that specific voucher. Click
on voucher number to check entry made against that specific voucher. |
| 07 | Click
on “Prepare” to start data entry. |
| 08 | |
| 09 | ite the
Quantity-Best Received of selected Product
|
| 10 | Fill
details of receiving vehicle in this section for record.
|
| 11 | Hit the
Save Button. |
| 12 |
Approve the requisition to initiate the purchase order.
|
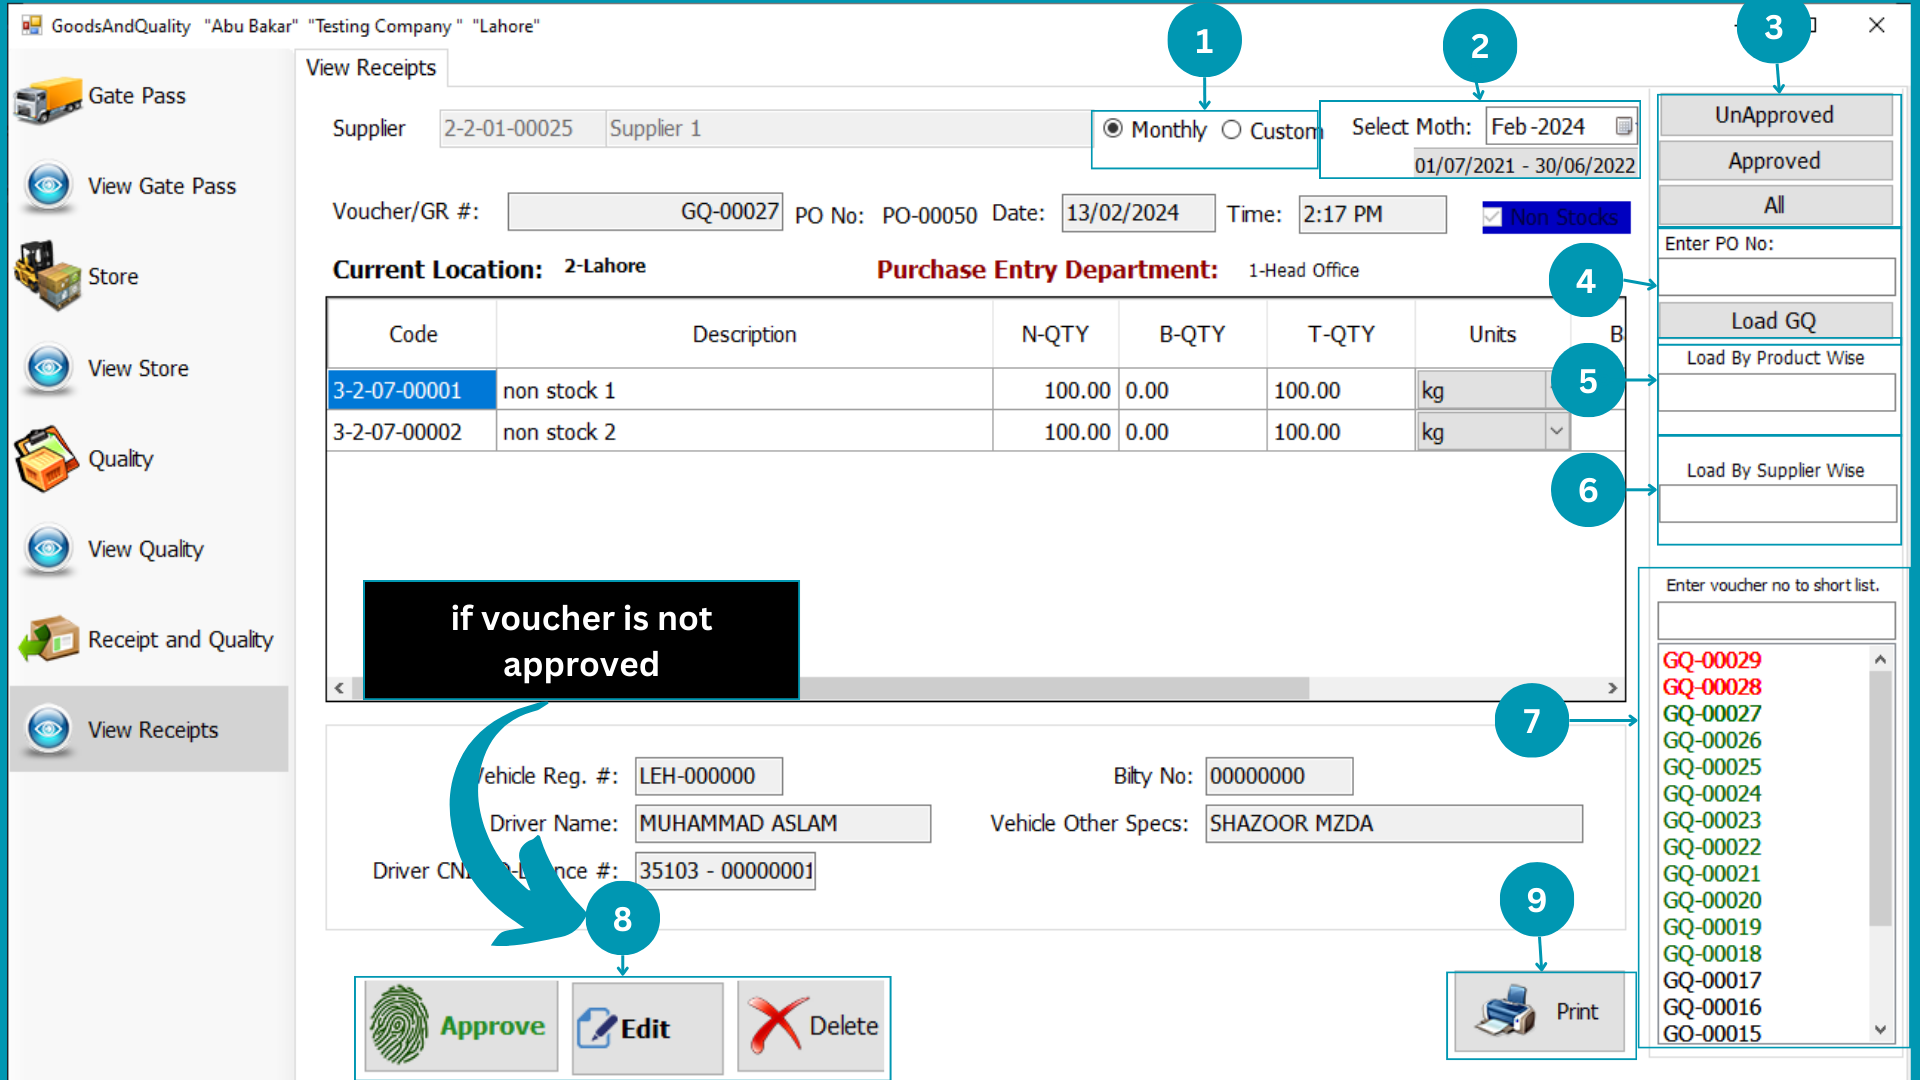
View Receipts
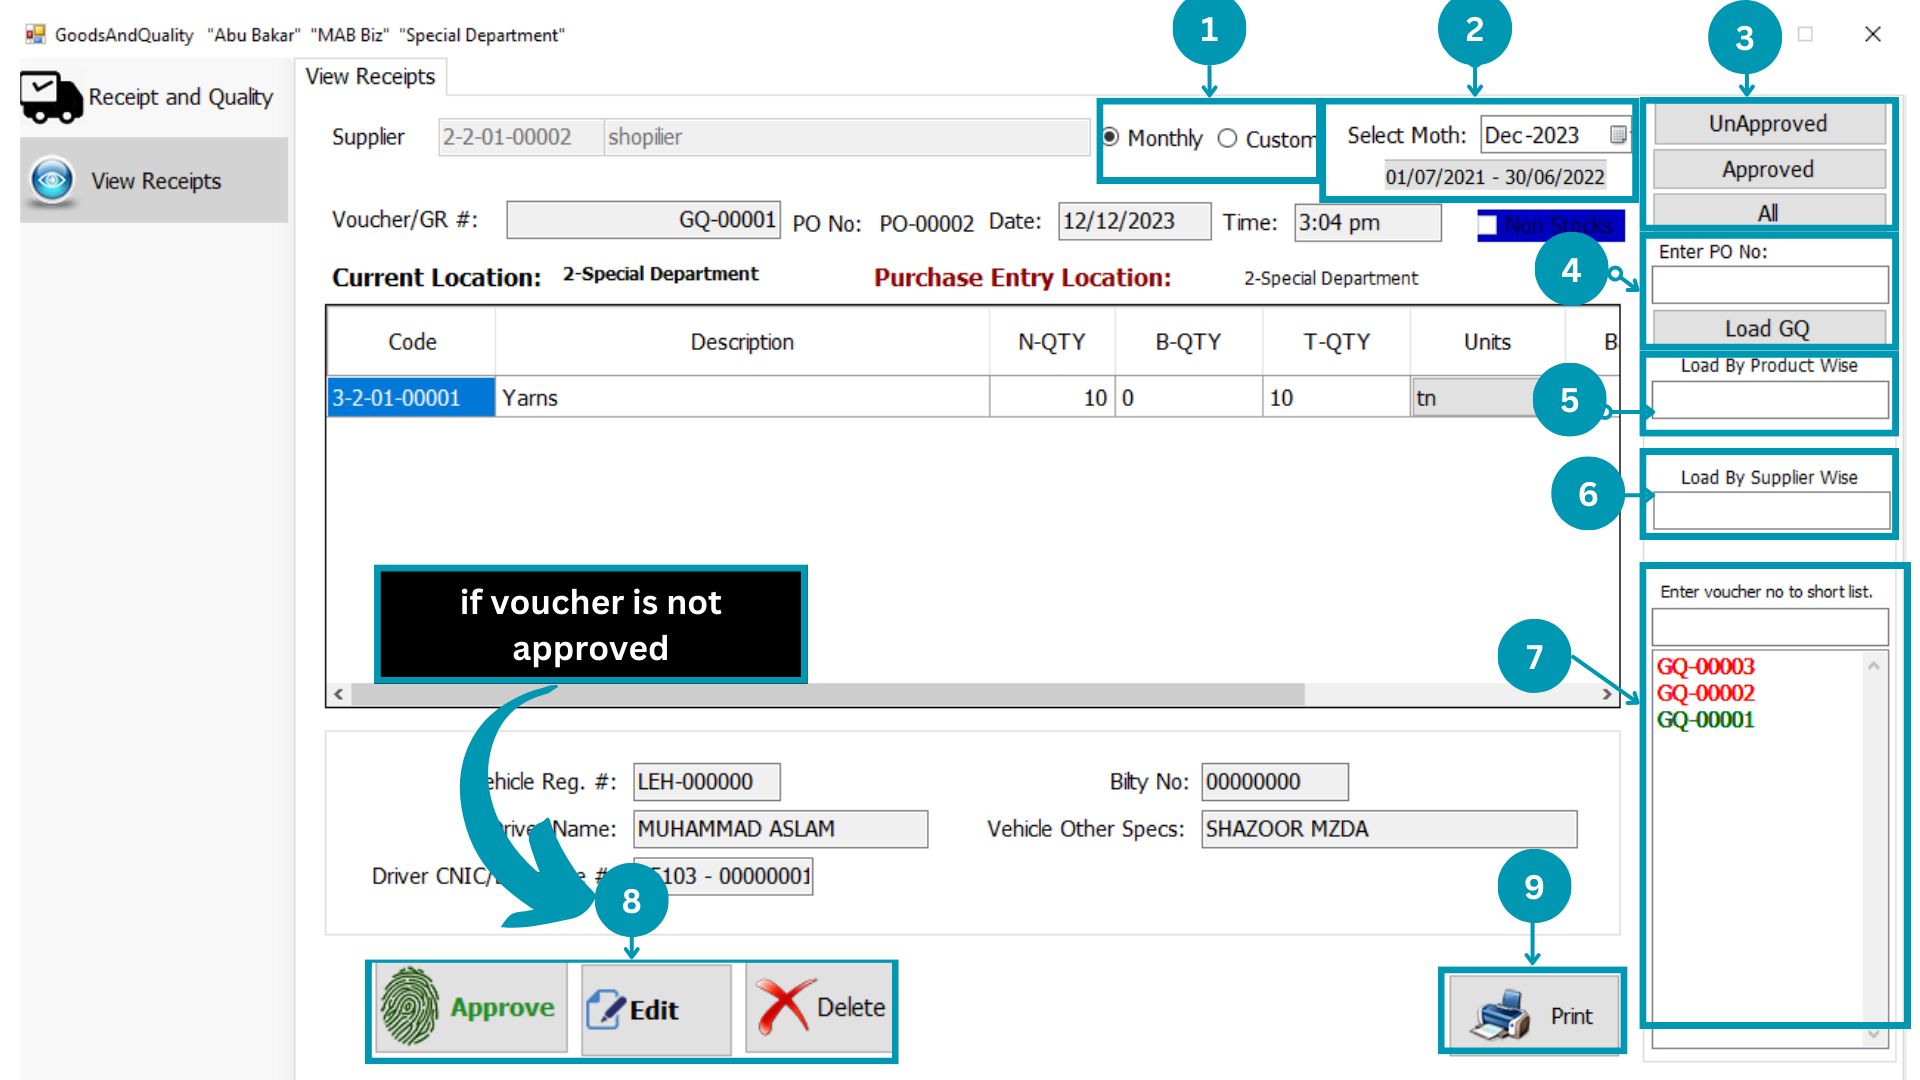
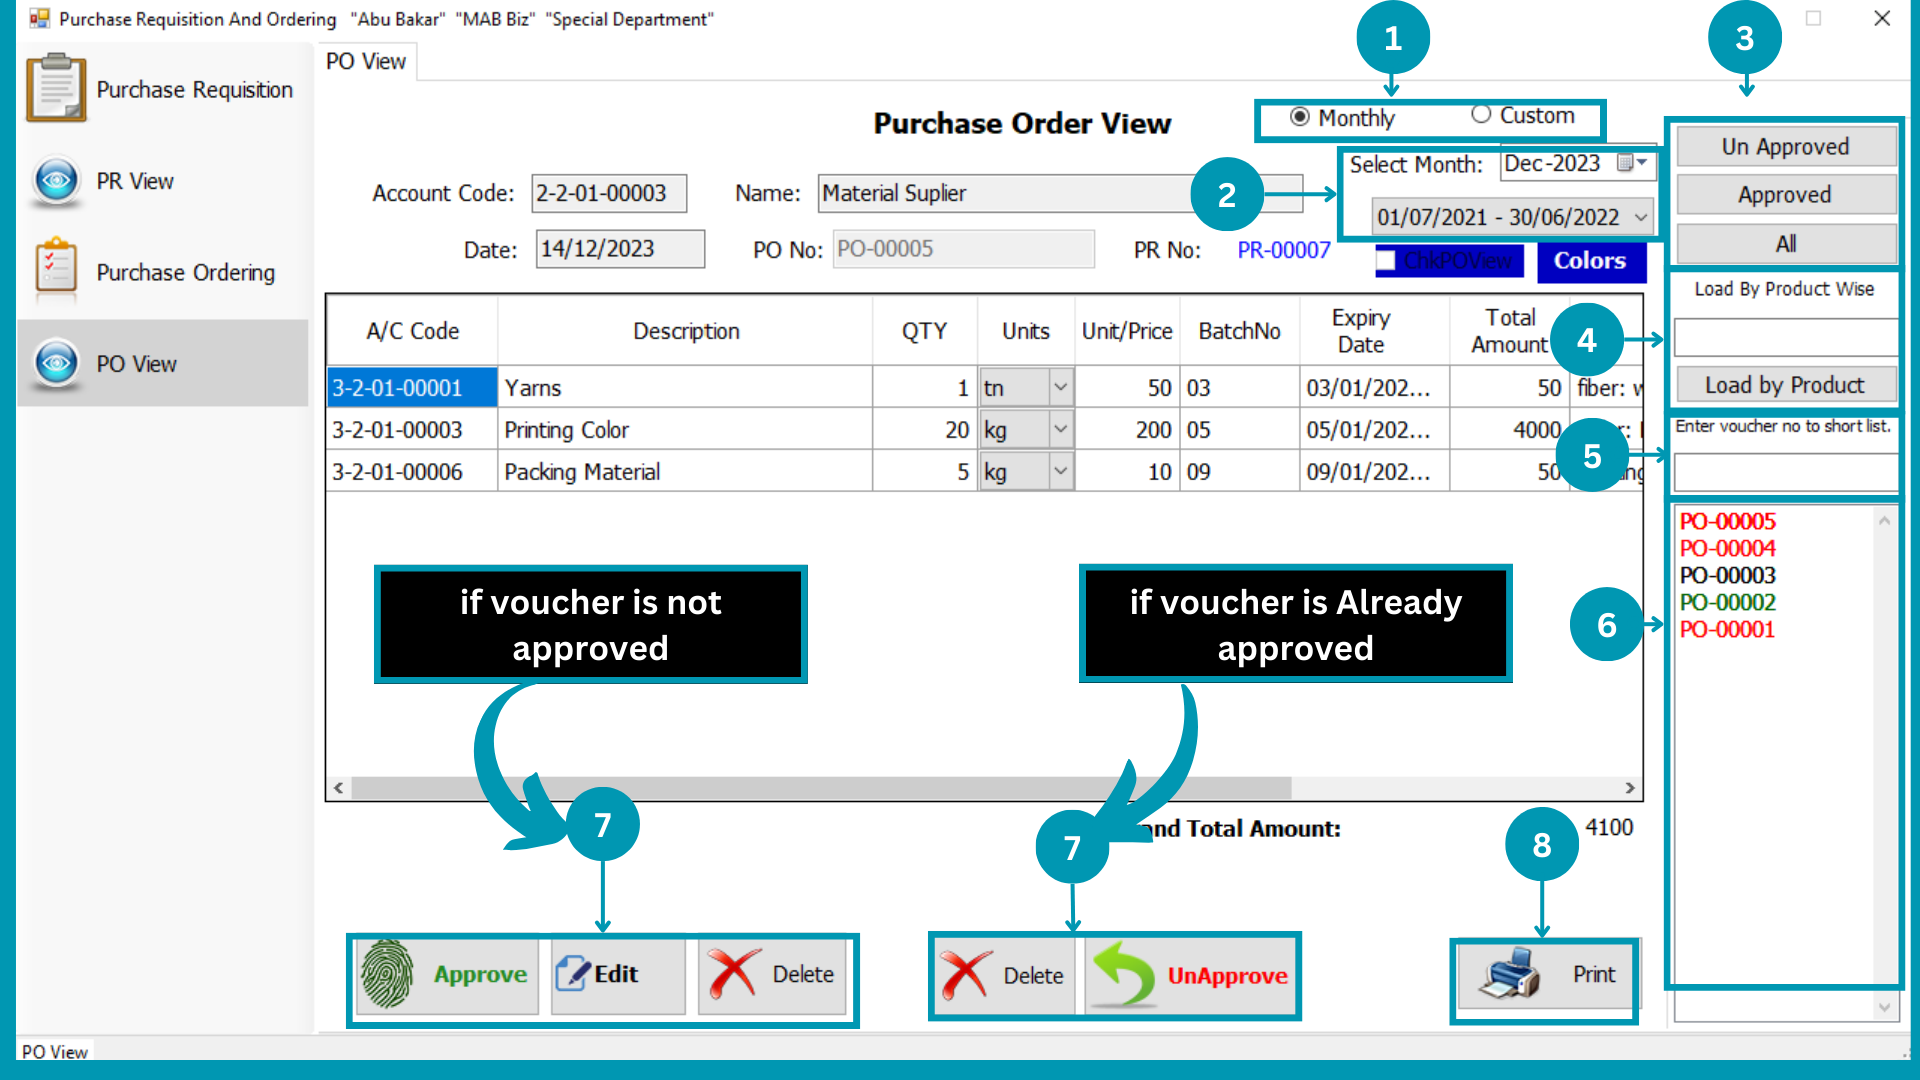
| 01 |  Select “Monthly” to view month wise Purchase Requisition; or select “Custom” to view
Financial Period wise Purchase Requisition.
Select “Monthly” to view month wise Purchase Requisition; or select “Custom” to view
Financial Period wise Purchase Requisition.
|
| 02 | Select
relevant “Month or Financial Period”.
|
| 03 | Select
Type (Approved, Unapproved or both) of Purchase Requisition to view. |
| 04 |  Enter the
Specific Voucher Number to view a specific Product Requisition. Enter the
Specific Voucher Number to view a specific Product Requisition.
|
| 05 |  Write
“Product Name” to filter Purchase Requisition of specific product. Write
“Product Name” to filter Purchase Requisition of specific product.
|
| 06 |  Select
Supplier filter by particular supplier data. Select
Supplier filter by particular supplier data.
|
| 07 | 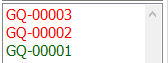 Click
on voucher number to check entry made against that specific voucher. Click
on voucher number to check entry made against that specific voucher. |
| 08 |
Approve the requisition to initiate the purchase order.
|
| 09 | Press
Print to get print of it.
|
MAB BIZ SOLUTIONS
Purchases
Purchases
Purchase is simply the process of paying an item to take possession after quality check.So the purchase could be done by cash which will paid on time by cash page and credit purchase would be written over credit page as well the return will be treated against approved Voucher/GRN No.
Following pages usage is explained in this segment
- Credit
- Cash
- Returns
- View Invoices
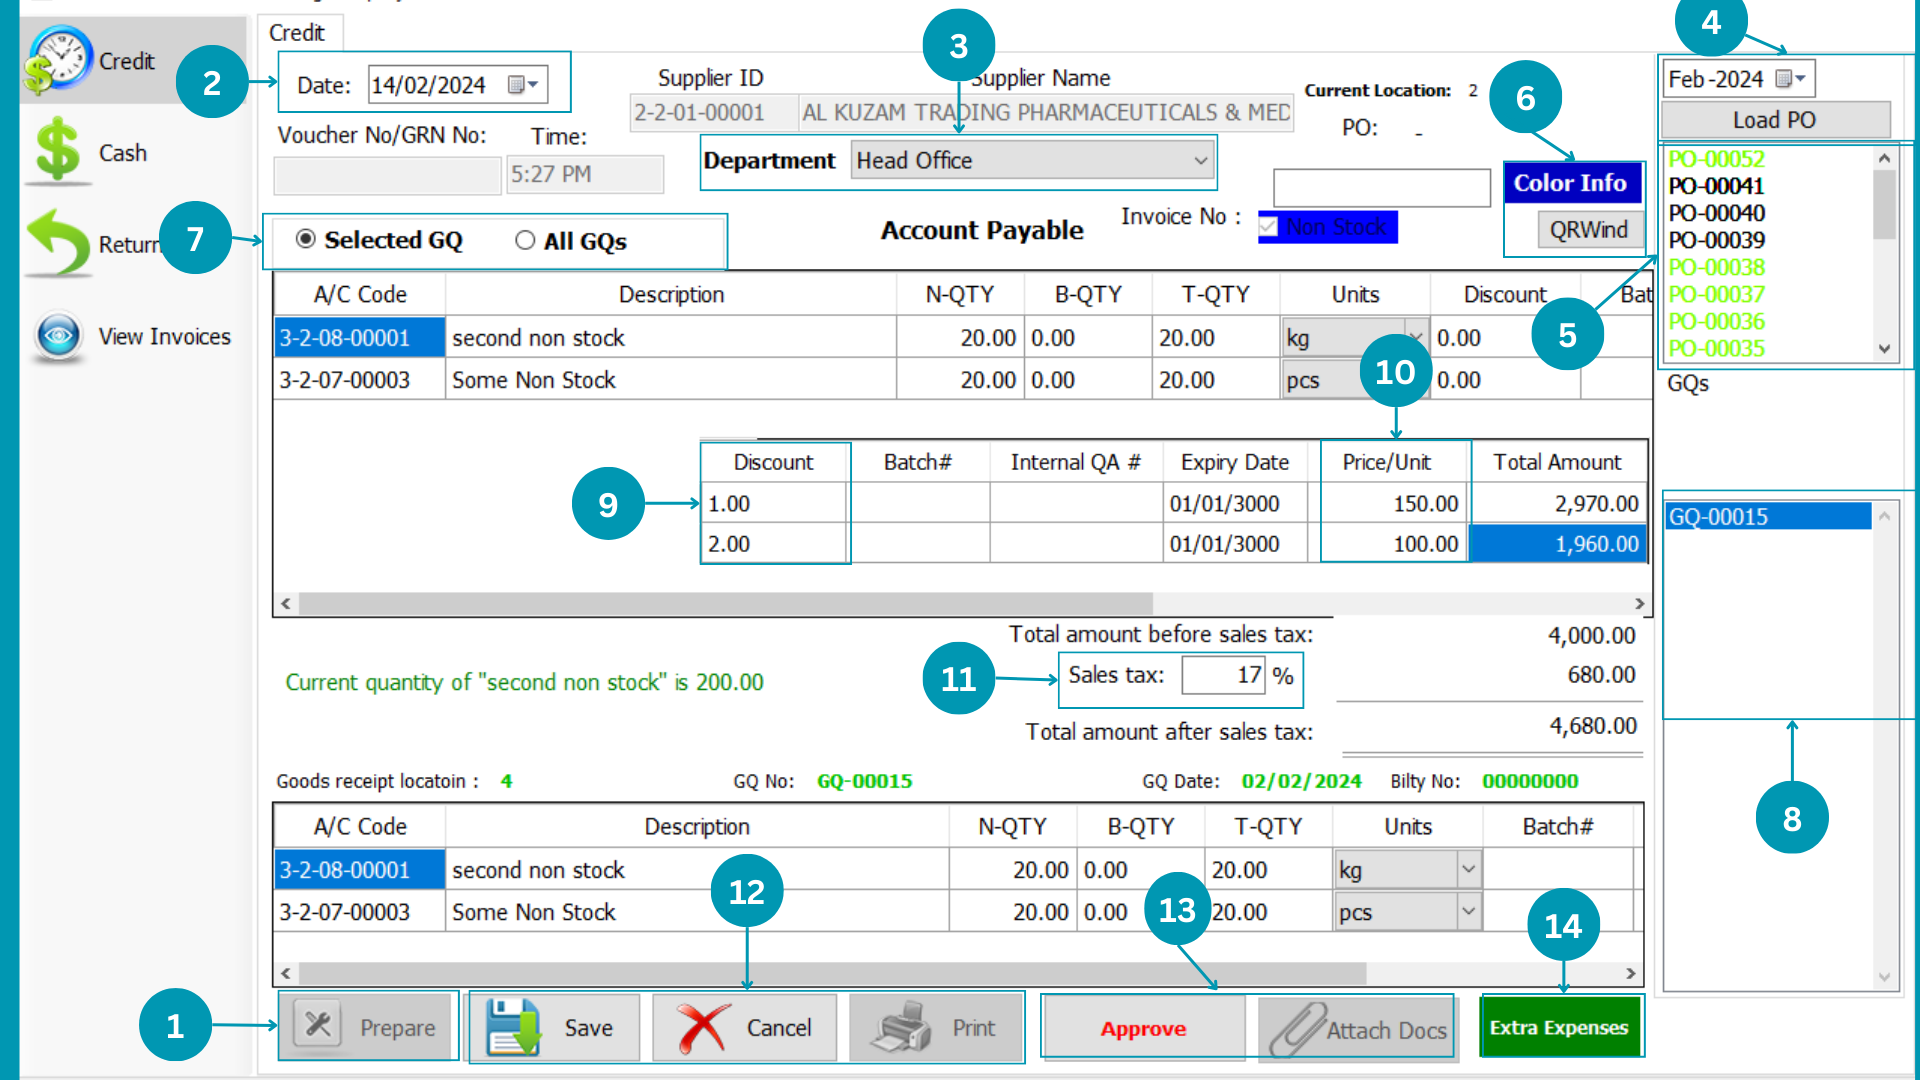
Credit Purchases
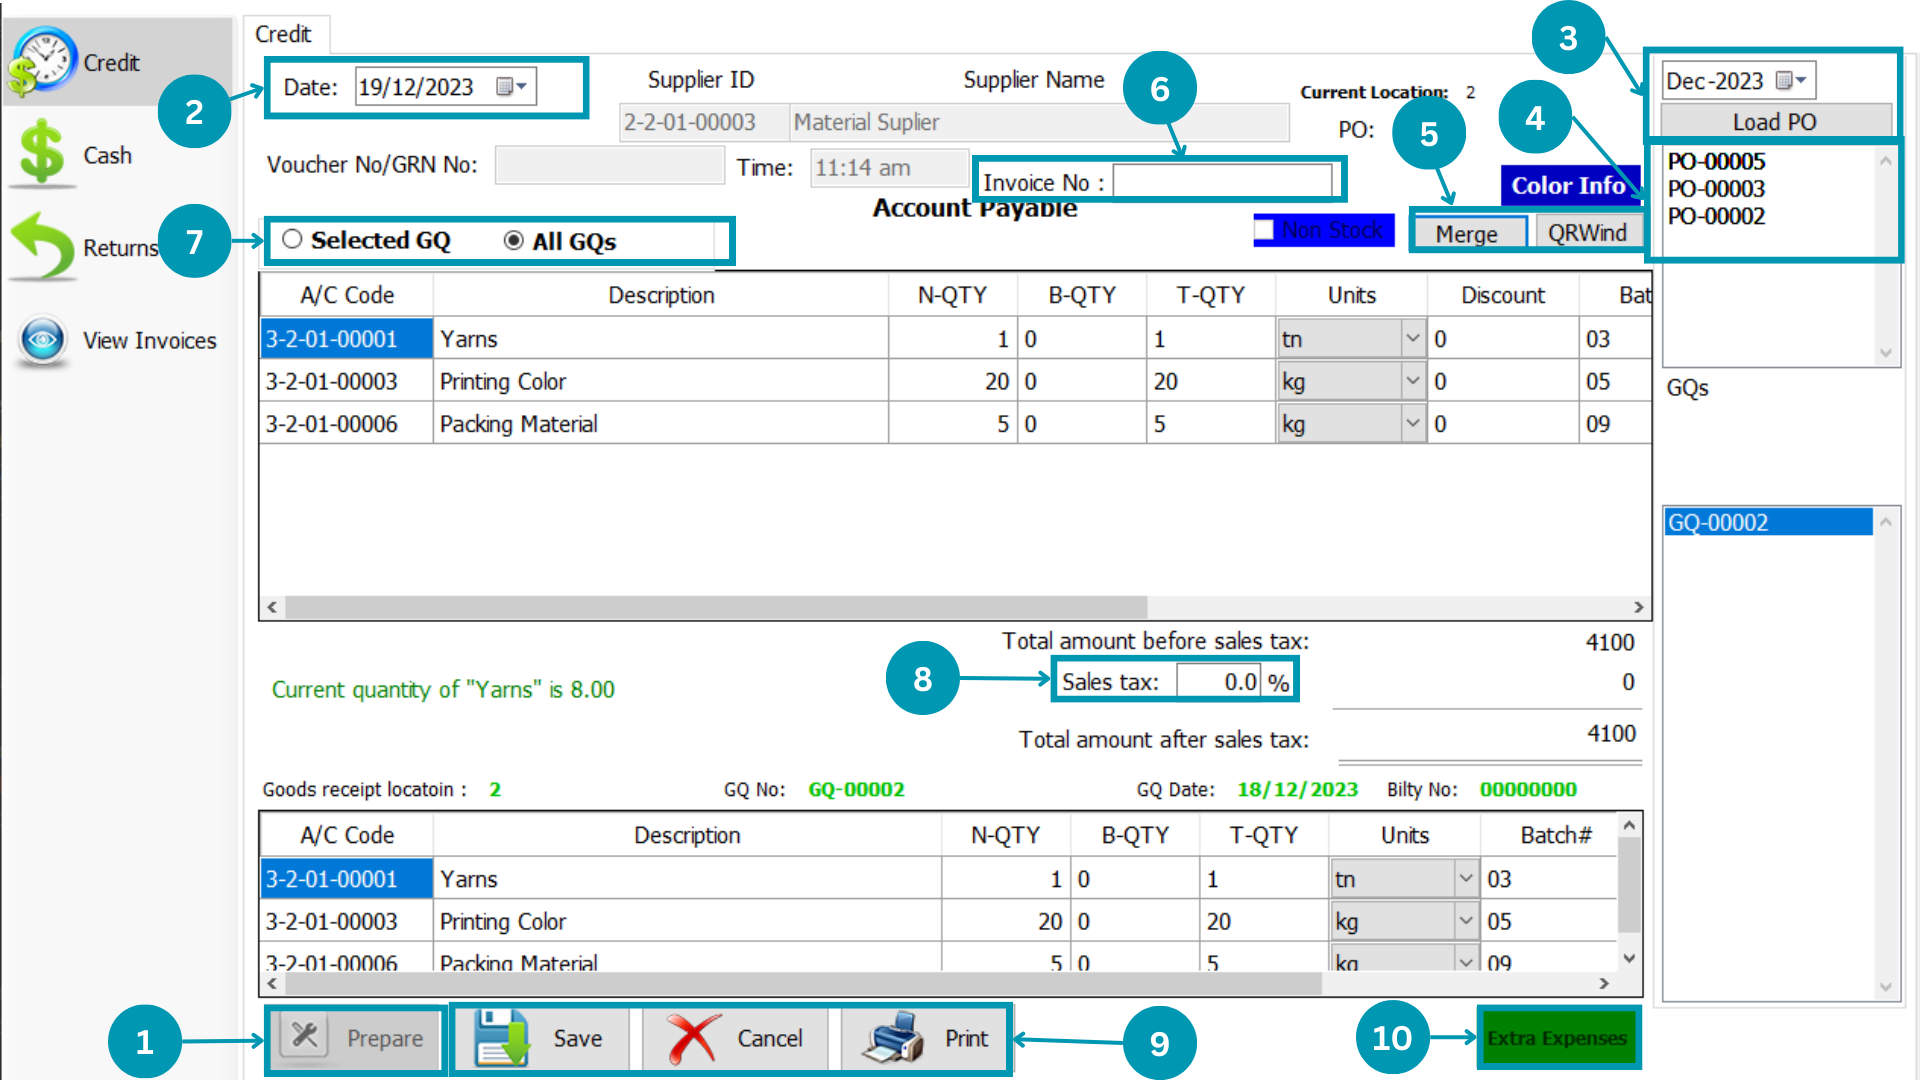
| 01 | Click
on “Prepare” to start data entry |
| 02 | Select
Transaction date.
|
| 03 | Select
Specific month to view all Approved GQs of that month and hit load. |
| 04 | Click on
voucher number to check entry made against that specific voucher.
|
| 05 |  You can
Merge Add QRWind here if you selected ALL GQs from 7 Number block. You can
Merge Add QRWind here if you selected ALL GQs from 7 Number block.
|
| 06 |  Write
Manual Voucher Number. Write
Manual Voucher Number.
|
| 07 |  Select
GQ and All GQ's. Select
GQ and All GQ's.
|
| 08 |  Write
Applied Sale Tax. Write
Applied Sale Tax.
|
| 09 |  Hit the
Save Cancel Or Print Button. Hit the
Save Cancel Or Print Button. |
| 10 |  Write
the extra expenses. Write
the extra expenses.
|
Cash Purchases
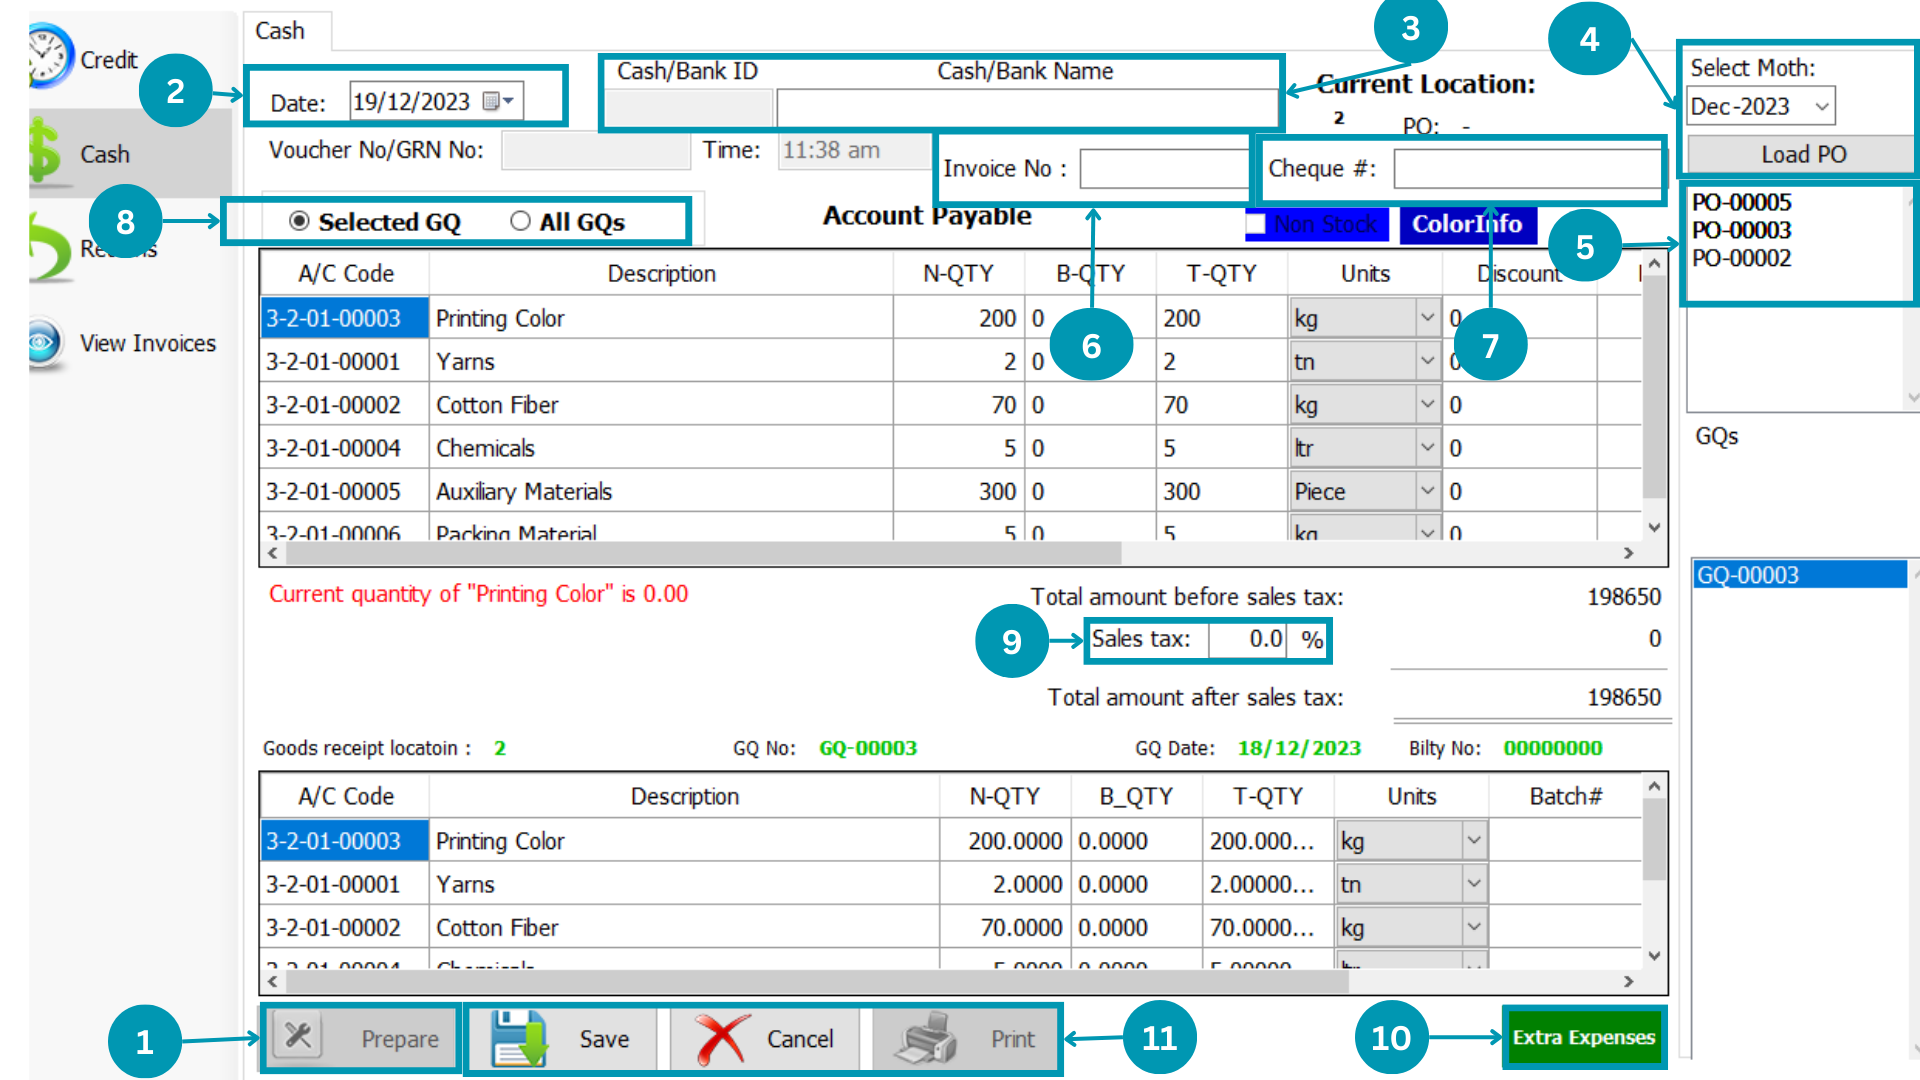
| 01 | Click
on “Prepare” to start data entry |
| 02 | Select
Transaction date.
|
| 03 |  Select Bank/Cask Head of account while paying cash on stock receipt.
 |
| 04 | Select
Specific month to view all Approved GQs of that month and hit load.
|
| 05 | Select
PO Number from list to make payment.
|
| 06 | Write
Manual Voucher Number.
|
| 07 |  Write
Check Number #. Write
Check Number #.
|
| 08 | Select
GQ and All GQ's.
|
| 09 | Write
Applied Sale Tax.
|
| 10 | Write
the extra expenses.
|
| 11 | Hit the
Save Cancel Or Print Button. |
Return Purchases

| 01 | Click
on “Prepare” to start data entry. |
| 02 |  Enter
Voucher Number of returned purchase. Enter
Voucher Number of returned purchase. |
| 03 | Select
month of purchase to load that voucher .
|
| 04 | Click Load
to load Purchase Voucher. |
| 05 |  Write the
returned quantity in respective columns with sign "-". Write the
returned quantity in respective columns with sign "-". |
| 06 | Hit the
Save Cancel Or Print Button. |
View Invoices

| 01 | 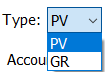 Select
Type of the Invoice from PV, GR. Select
Type of the Invoice from PV, GR.
|
| 02 | Select “Monthly” to view month wise
Purchase Requisition; or select “Custom” to view Financial Period wise Purchase Requisition.
|
| 03 | Select
relevant “Month or Financial Period”.
|
| 04 | Click Load
to load all Purchase Invoices. |
| 05 |  Select Type (Approved or Unapproved ) of Purchase Invoices to view.
|
| 06 | Enter the
Specific Voucher Number to view a specific Product Invoices.
|
| 07 |  Click
on voucher number to check entry made against that specific voucher. Click
on voucher number to check entry made against that specific voucher. |
| 08 | Click
your desire Button Approve, Edit, Delete and Unapprove.
|
| 09 | Print the
viewing Quality Statement by Clicking Print.
|
MAB BIZ SOLUTIONS
Material Requisition
Material Requisition
In Material requisition, Material is required from one department/location to other Department/Location with-in company.
Following pages usage is explained in this segment
- Request
- View Request
Request
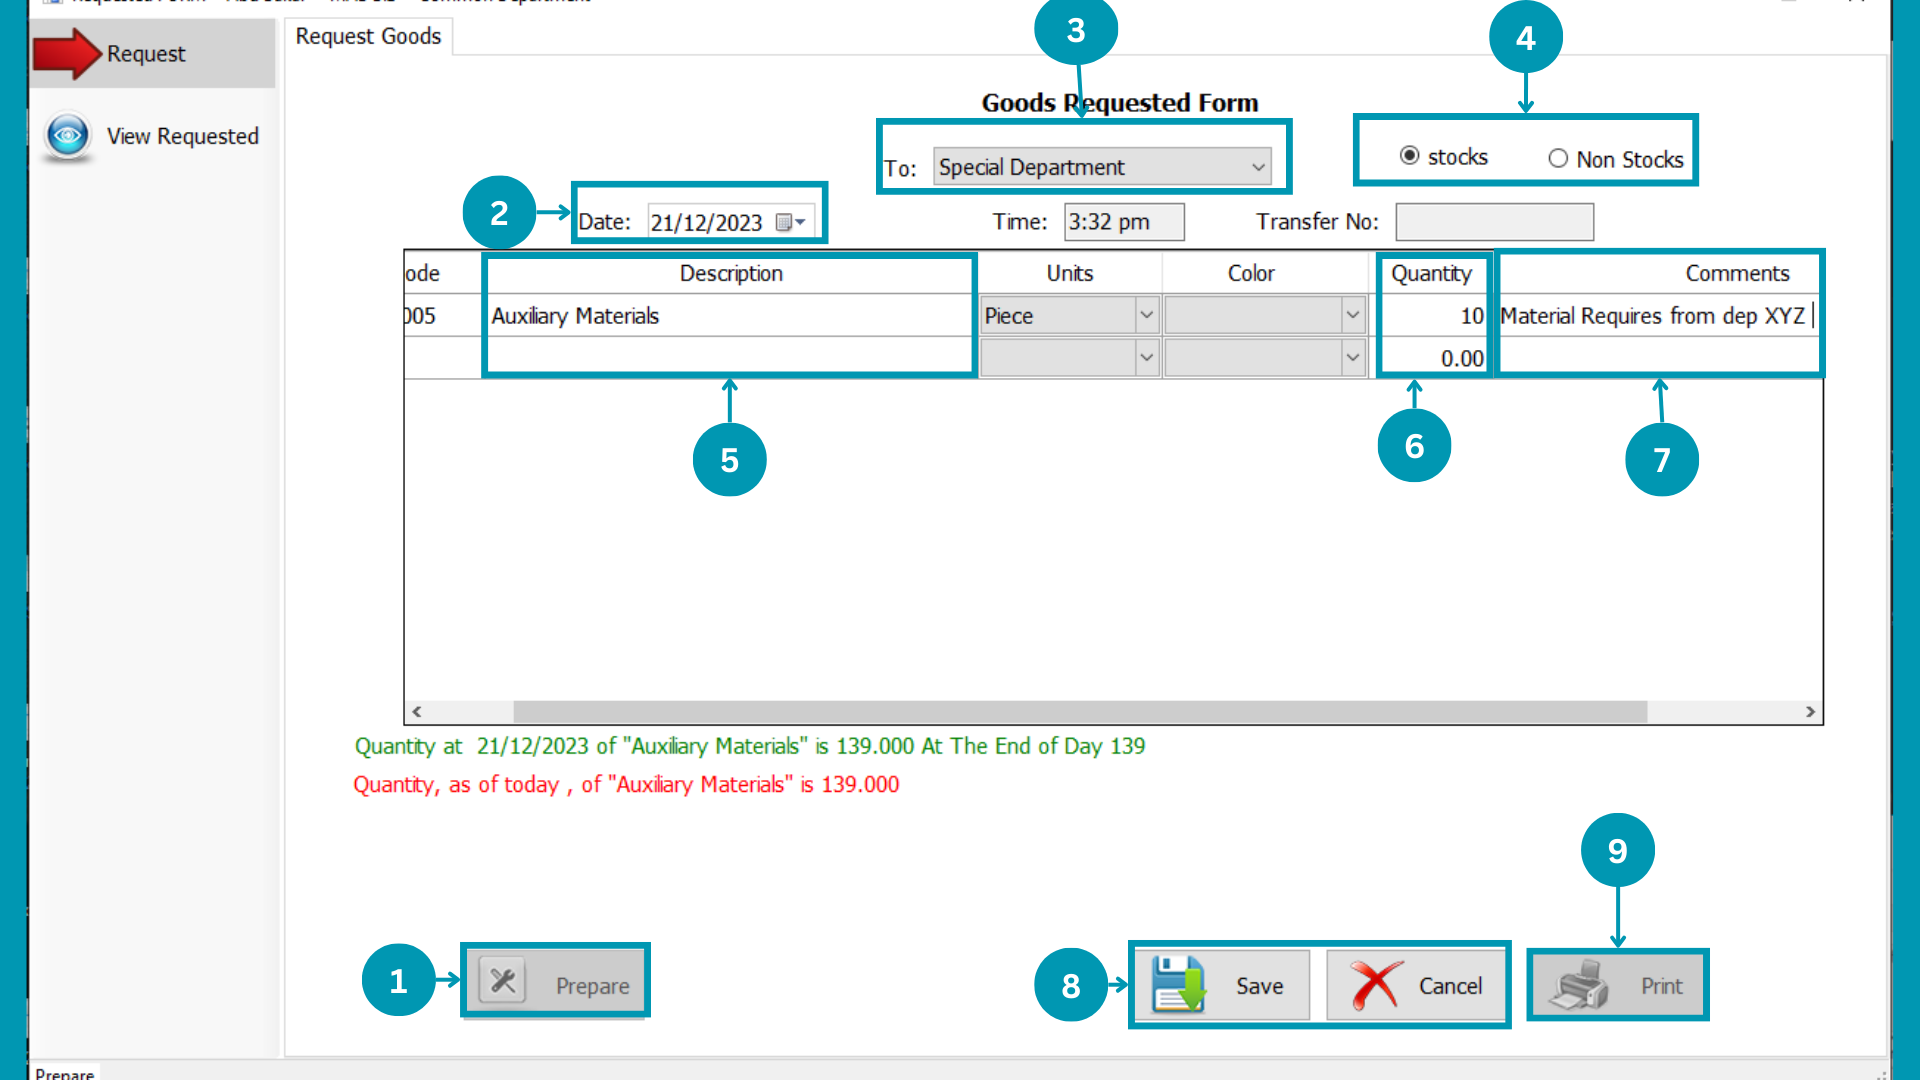
| 01 | Click
on “Prepare” to start data entry. |
| 02 | Select
Transaction date.
|
| 03 |  Select
Department to send request of stock. Select
Department to send request of stock. |
| 04 |  Select
“Stock or Non-Stock” Select
“Stock or Non-Stock”
|
| 05 |  Press
Space and select required product. Press
Space and select required product. |
| 06 |  Enter the
required quantity for each unit. Enter the
required quantity for each unit. |
| 07 |  Write there
the comment you want to pass with request. Write there
the comment you want to pass with request.
|
| 08 | Hit
the Save Or Cancel Button. |
| 09 | Print the
viewing Required Statement by Clicking Print.
|
View Request
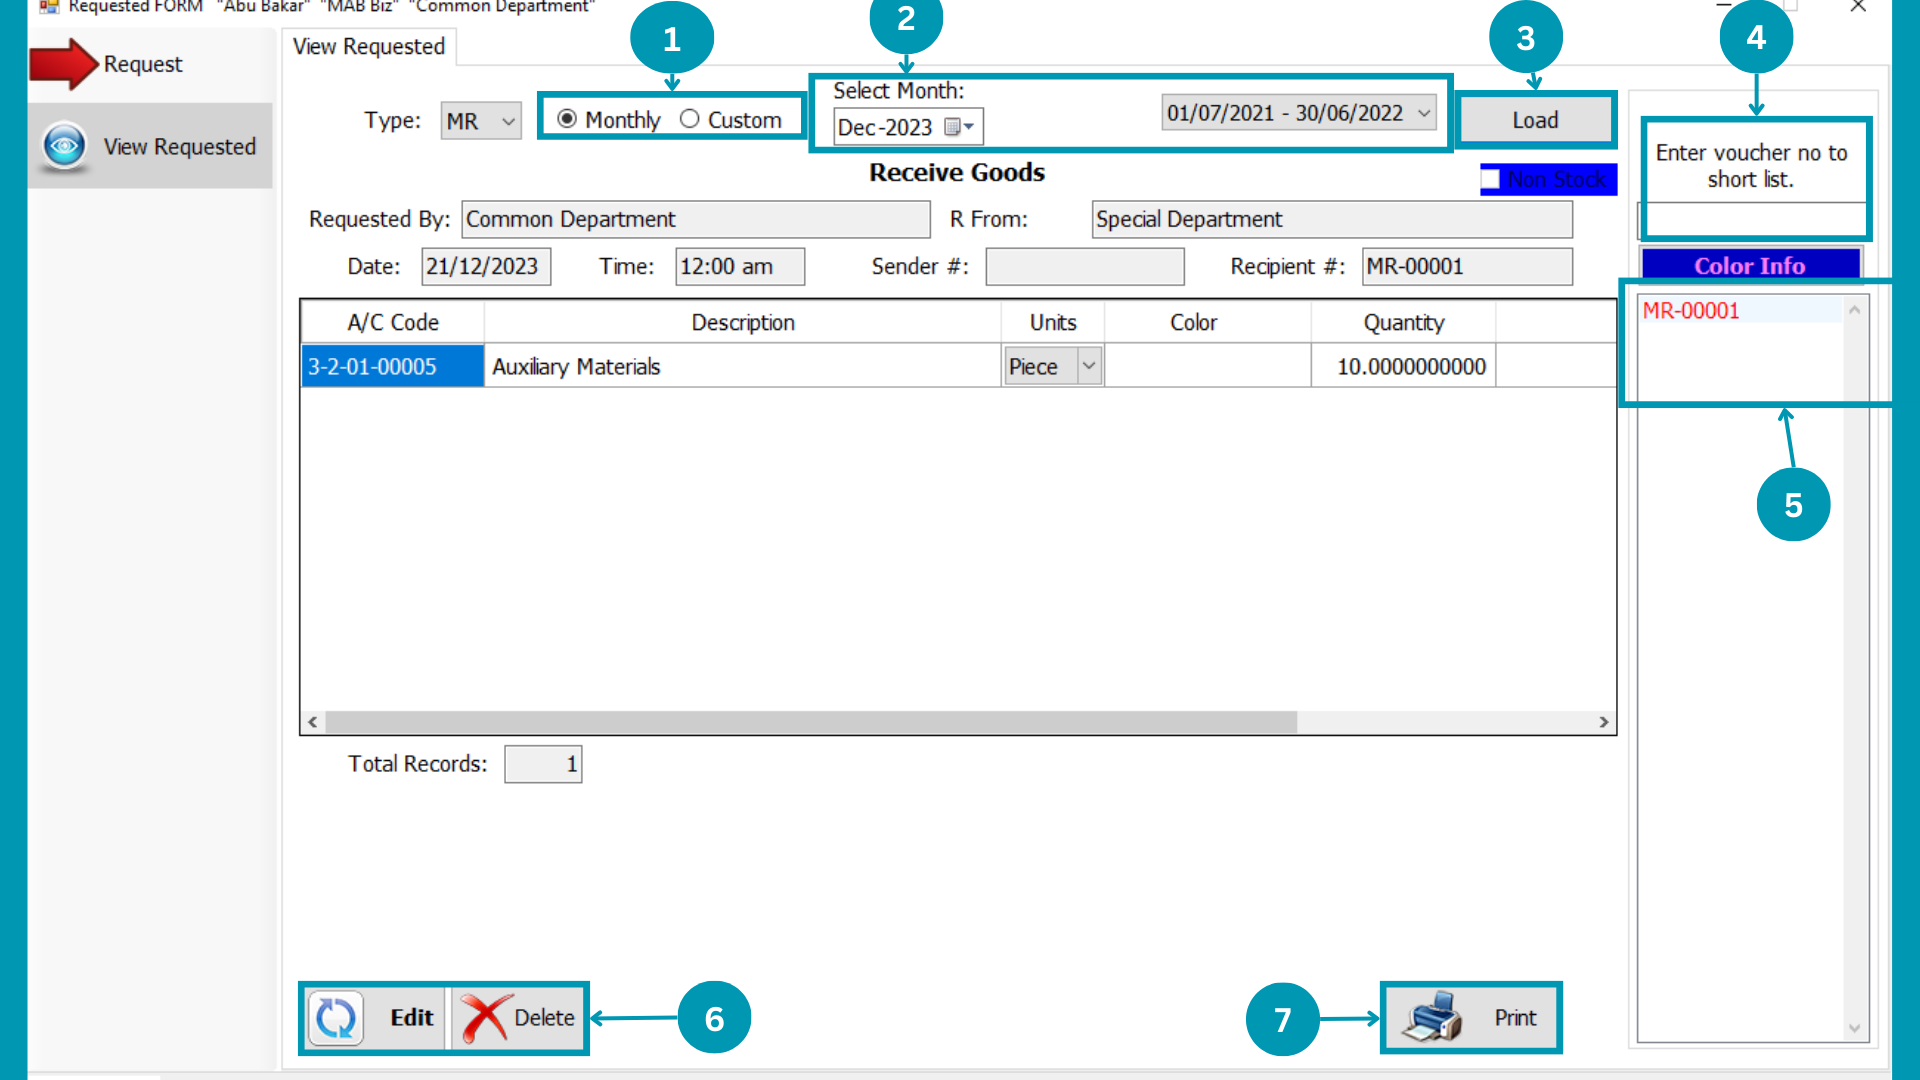
| 01 | Select “Monthly” to view month wise
Material Requisition; or select “Custom” to view Financial Period wise Material Requisition.
|
| 02 | Select
relevant “Month or Financial Period”.
|
| 03 | Click
Load to load all Required Statements. |
| 04 | Enter the
Specific Voucher Number to view a specific Material Requisition.
|
| 05 |  Click on
voucher number to check entry made against that specific voucher. Click on
voucher number to check entry made against that specific voucher. |
| 06 |  Hit the
Edit Or Delete button. Hit the
Edit Or Delete button.
|
| 07 | Print
the viewing Request Statement by Clicking Print.
|
MAB BIZ SOLUTIONS
Transfer
Transfer
Transferring the Raw material from one location to other will treated here. With-in a company buying material from one place through nearest location.
Following pages usage is explained in this segment
- Sender
- Recipient
- View Transfers
Sender
| 01 | Click
on “Prepare” to start data entry. |
| 02 | Select
Transaction date.
|
| 03 | Select
Department to whom send stock.
|
| 04 | Select
“Stock or Non-Stock”.
|
| 05 | Click Load
to load all Required Statements. |
| 06 | Click
on voucher number to check entry made against that specific voucher. |
| 07 | Press
Space and select product. |
| 08 |  Enter
the required quantity for each unit. Enter
the required quantity for each unit.
|
| 09 | Fill
details of Sending vehicle in this section for record.
|
| 10 | Hit the
Save Cancel Or Print Button. |
| 11 |  Hit the
Accounting Effect. Hit the
Accounting Effect.
|
Recipient
| 01 |  Select
Department from whom receives stock. Select
Department from whom receives stock.
|
| 02 | Select
month of which you want to view Send Goods.
|
| 03 | Click
Load to load all Send Statements. |
| 04 | Enter the
Specific Voucher Number to view a specific Send Statement.
|
| 05 | Click on
voucher number to check entry made against that specific voucher. |
| 06 | Hit the
Save and Print Button. |
| 07 | Hit the
Accounting Effect.
|
View Transfer
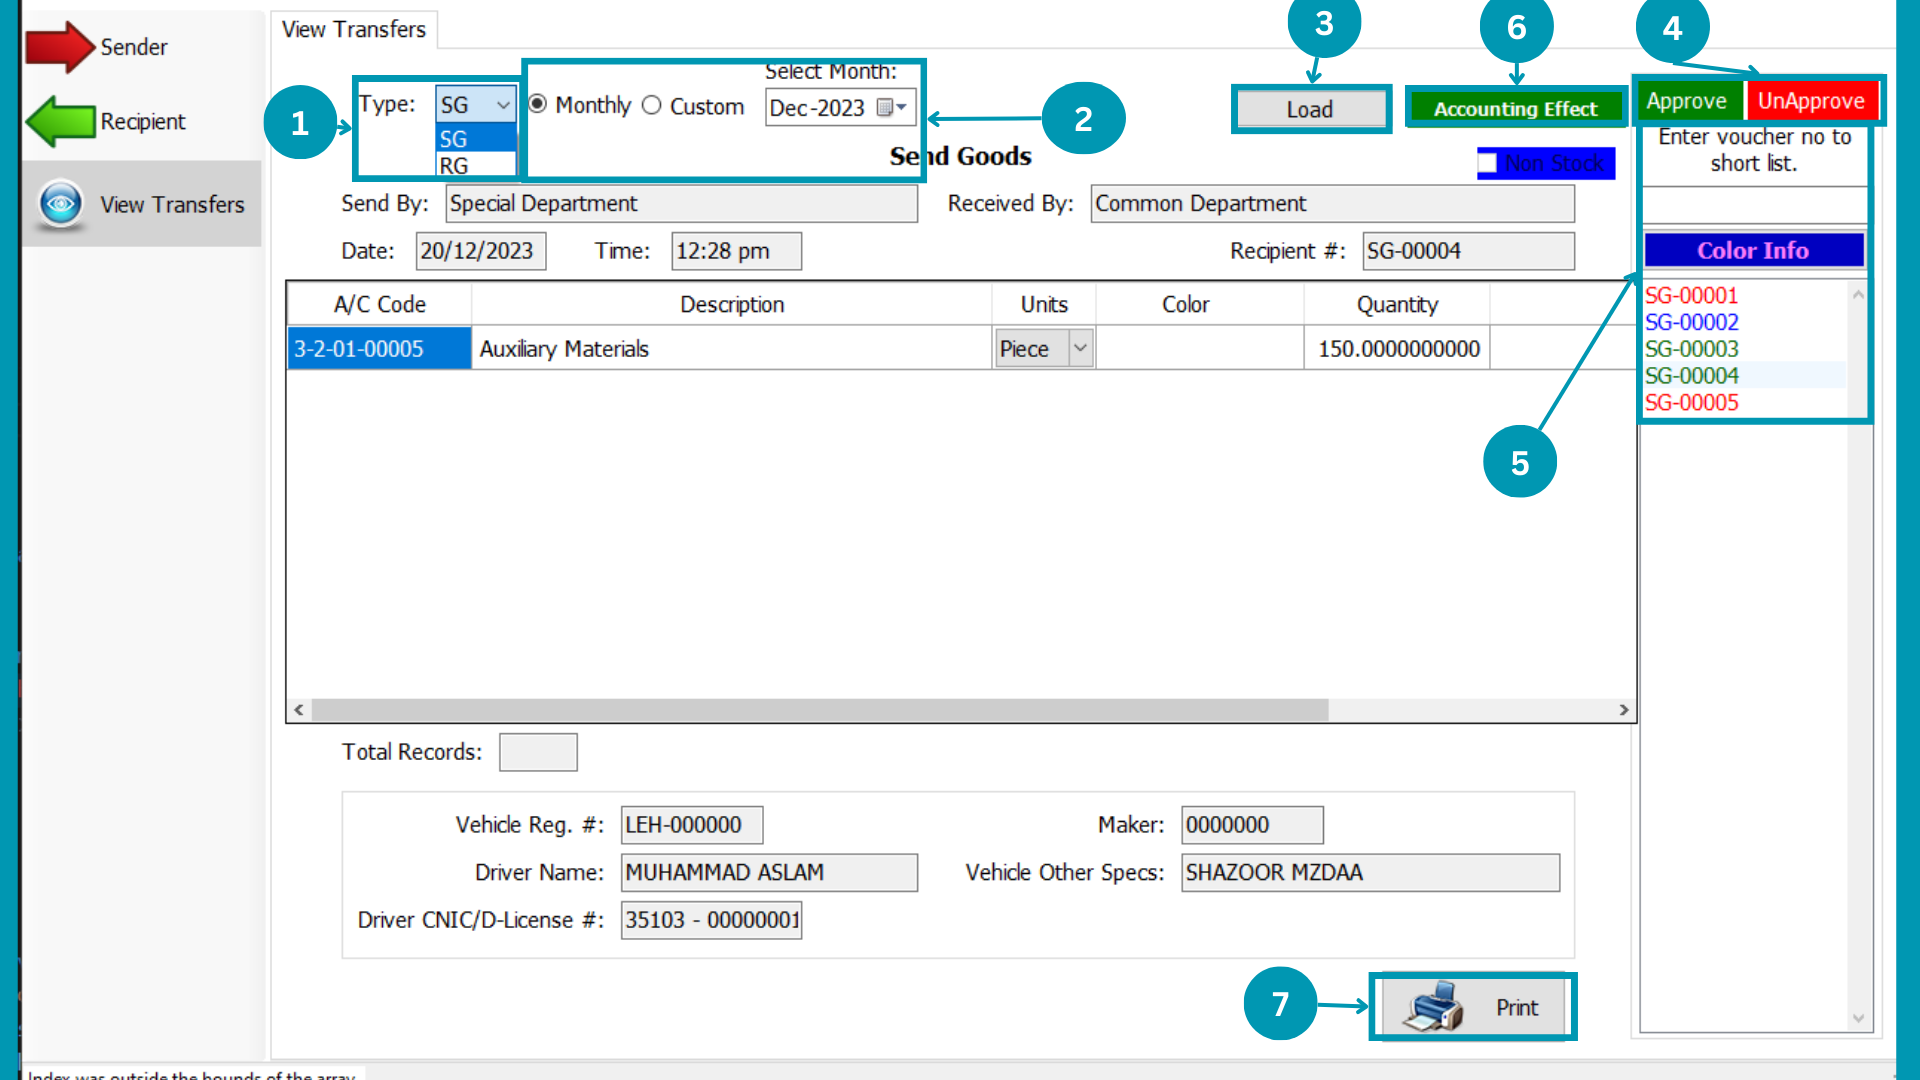
| 01 |  Select Type of the Invoice from SG,
RG. Select Type of the Invoice from SG,
RG.
|
| 02 | Select
relevant “Month or Financial Period”.
|
| 03 | Click
Load to load all Transfer Statements. |
| 04 |
Select Type (Approved, Unapproved ) of Transfer Statement to view.
|
| 05 |  Enter the
Specific Voucher Number to view a specific Transfer Statement or Select any Voucher Number
from list. Enter the
Specific Voucher Number to view a specific Transfer Statement or Select any Voucher Number
from list. |
| 06 | Hit the
Accounting Effect.
|
| 07 | Print
the viewing Required Statement by Clicking Print.
|
MAB BIZ SOLUTIONS
Consumption
Adjust/Consumption
Raw material consumption refers to the raw material that is used or consumed during a production cycle or any defined period of time. It's an important metric for manufacturers to track, especially when it comes to material management and waste management.
Following pages usage is explained in this segment
- Adjust/Consumption
- View Records
Adjust Consumption
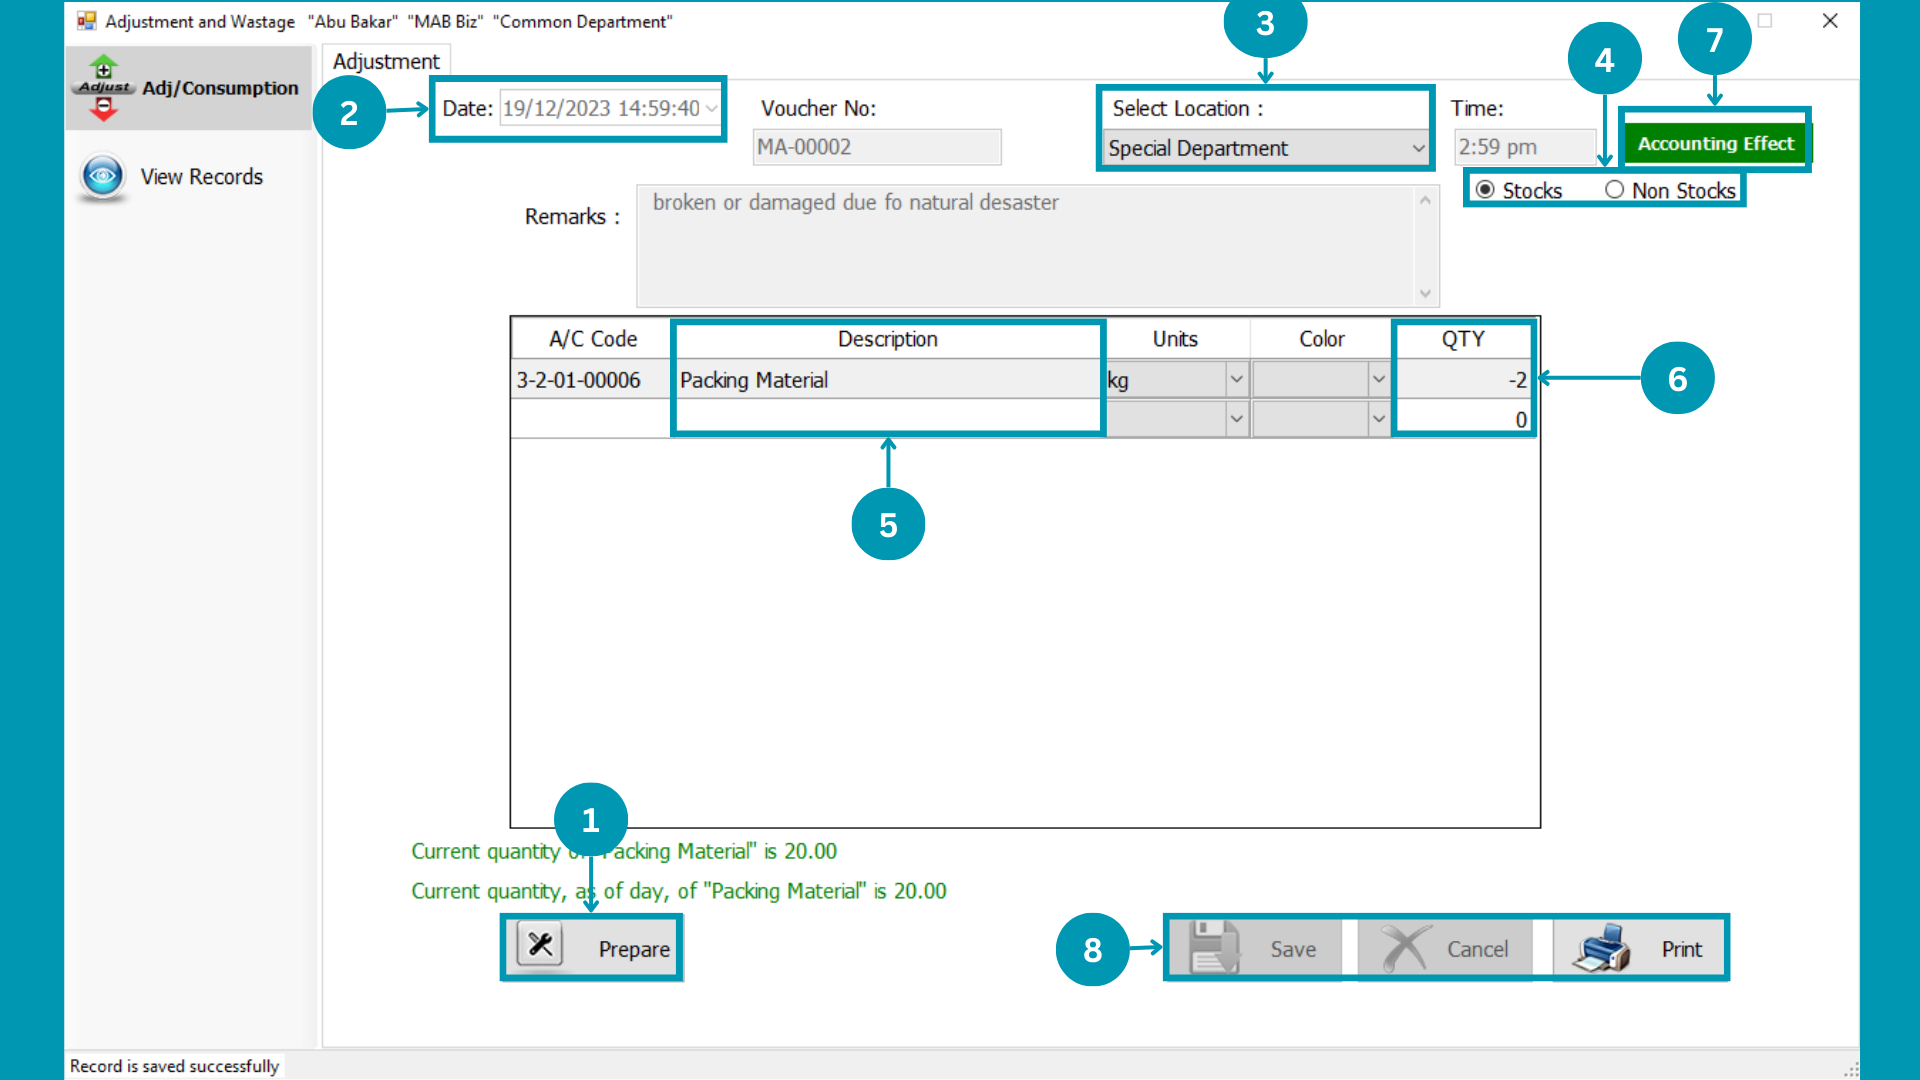
| 01 | Click
on “Prepare” to start data entry. |
| 02 | Select
Transaction date.
|
| 03 |  Select
Department of consumed stock. Select
Department of consumed stock. |
| 04 | Select
“Stock or Non-Stock”
|
| 05 | Press Space and select required
product. |
| 06 |  Enter
quantity of product Consumed with "-" sign. Enter
quantity of product Consumed with "-" sign. |
| 07 | Hit the
Accounting Effect.
|
| 08 | Hit the
Save Cancel Or Print Button. |
View Records

| 01 |  Select
Type of the Invoice from "MA". Select
Type of the Invoice from "MA".
|
| 02 | Select “Monthly” to view month wise
Material consumed; or select “Custom” to view Financial Period wise Material Consumed.
|
| 03 | Click
Load to load all Consumed Statements. |
| 04 |
Select Type (Approved or Unapproved ) of Consumed Invoices to view.
|
| 05 |  Enter
the Specific Voucher Number to view a specific Consumed Statement or Select any Voucher
Number from list. Enter
the Specific Voucher Number to view a specific Consumed Statement or Select any Voucher
Number from list. |
| 06 |  You can
view Double entries by selecting this . You can
view Double entries by selecting this .
|
| 07 |  Hit
the Save and Print Button. Hit
the Save and Print Button.
|
MAB BIZ SOLUTIONS
Manufacturing
Manufacturing
Manufacturing is the process of turning raw materials or parts into finished goods using tools.
Following pages use is explained in this segment
- Manufactured
- Recipe
- View
Manufactured
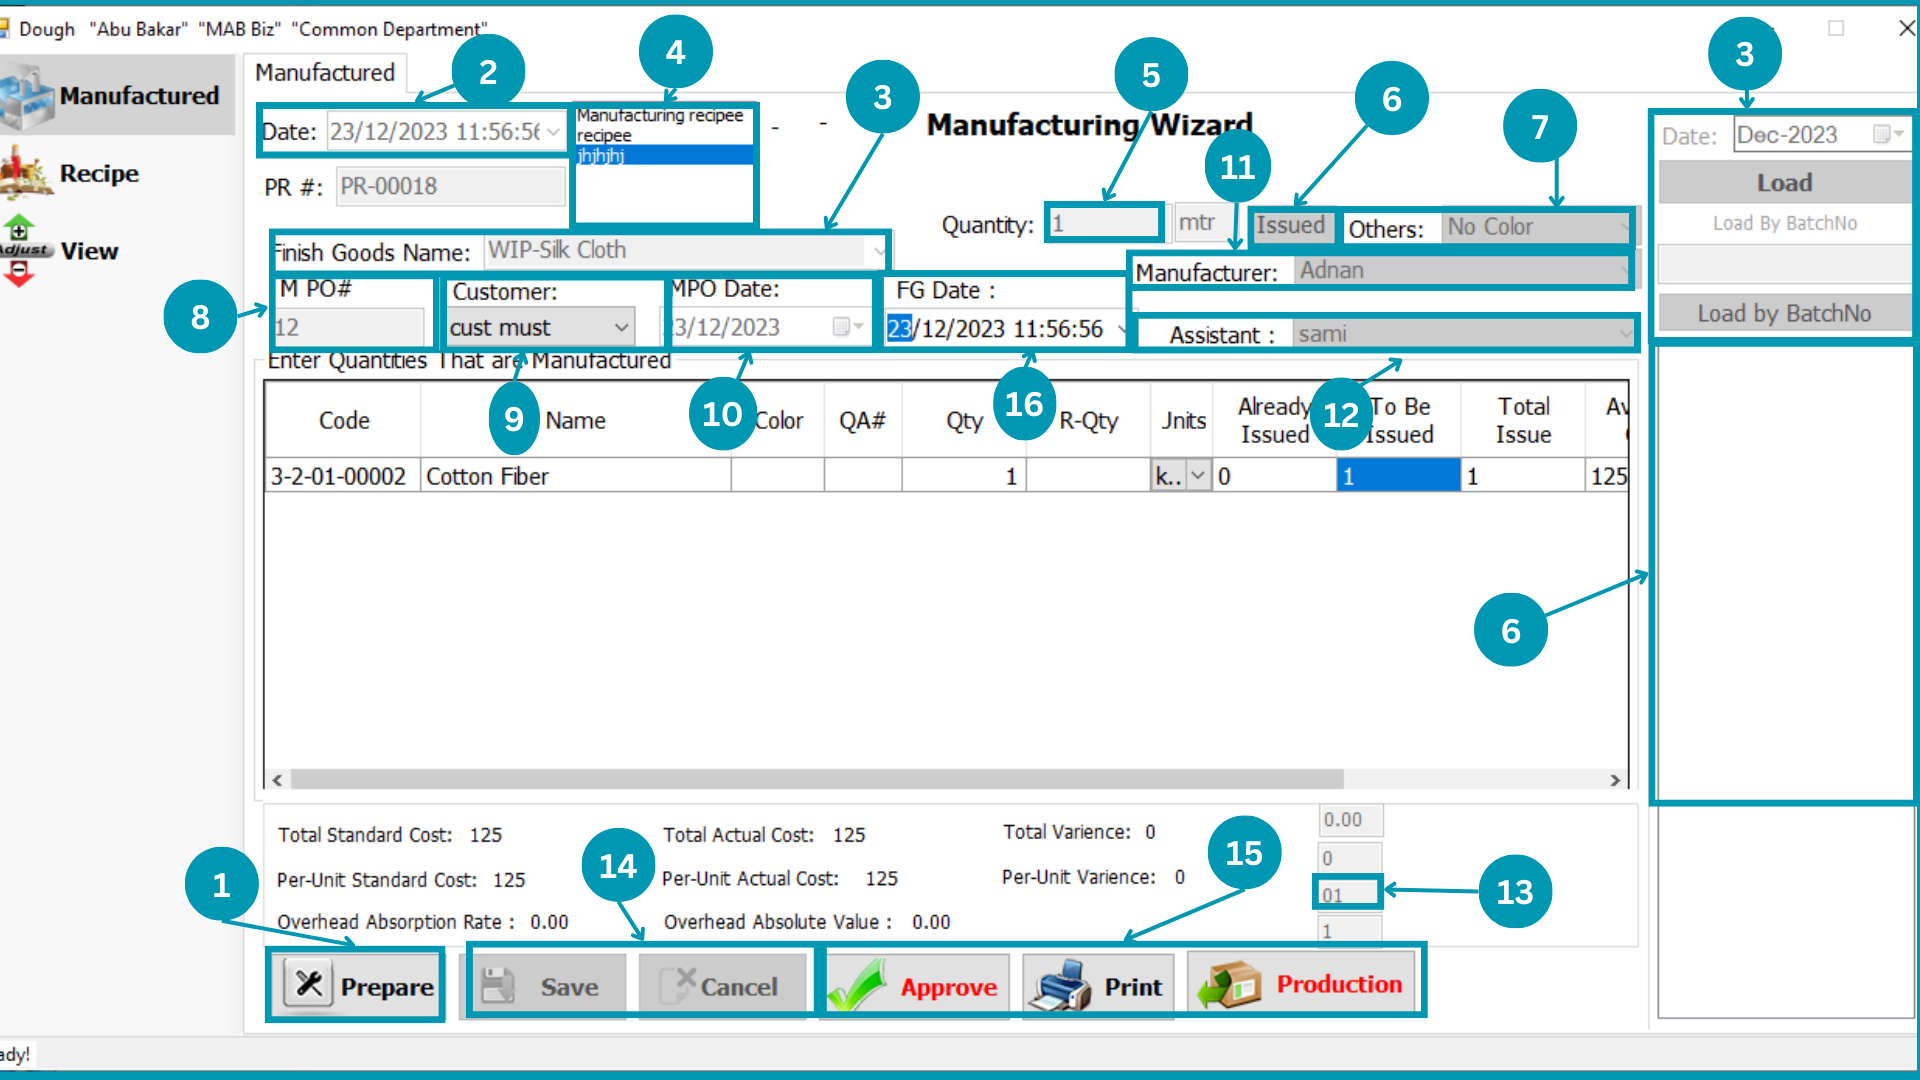
| 01 | Click
on Prepare to start writing in the table. |
| 02 | Select
Transaction date. |
| 03 | 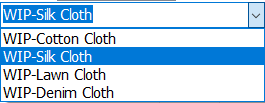 Select
Manufactured Product from list. Select
Manufactured Product from list. |
| 04 | 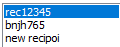 Select the recipe used to manufacture. Select the recipe used to manufacture.
|
| 05 |  Write
manufactured quantity. Write
manufactured quantity. |
| 06 |  Click on
Issued button. Click on
Issued button. |
| 07 |  Select
color in Others. Select
color in Others.
|
| 08 | 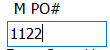 Write
Internal Manufacturing PO number. Write
Internal Manufacturing PO number.
|
| 09 | 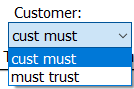 Select
the customer of Manufacturing Production. Select
the customer of Manufacturing Production.
|
| 10 |  Enter
Manufacturing PO date. Enter
Manufacturing PO date. |
| 11 |  Select
the manufacturer name. Select
the manufacturer name. |
| 12 |  Select the Assistant. Select the Assistant. |
| 13 |  Write
Per unit Variance. Write
Per unit Variance. |
| 14 | Hit
the Save Or Cancel Button. |
| 15 |  Hit
the Approve Or Print or Production Button. Hit
the Approve Or Print or Production Button. |
| 16 |  Select
the Finish Goods Date. Select
the Finish Goods Date. |
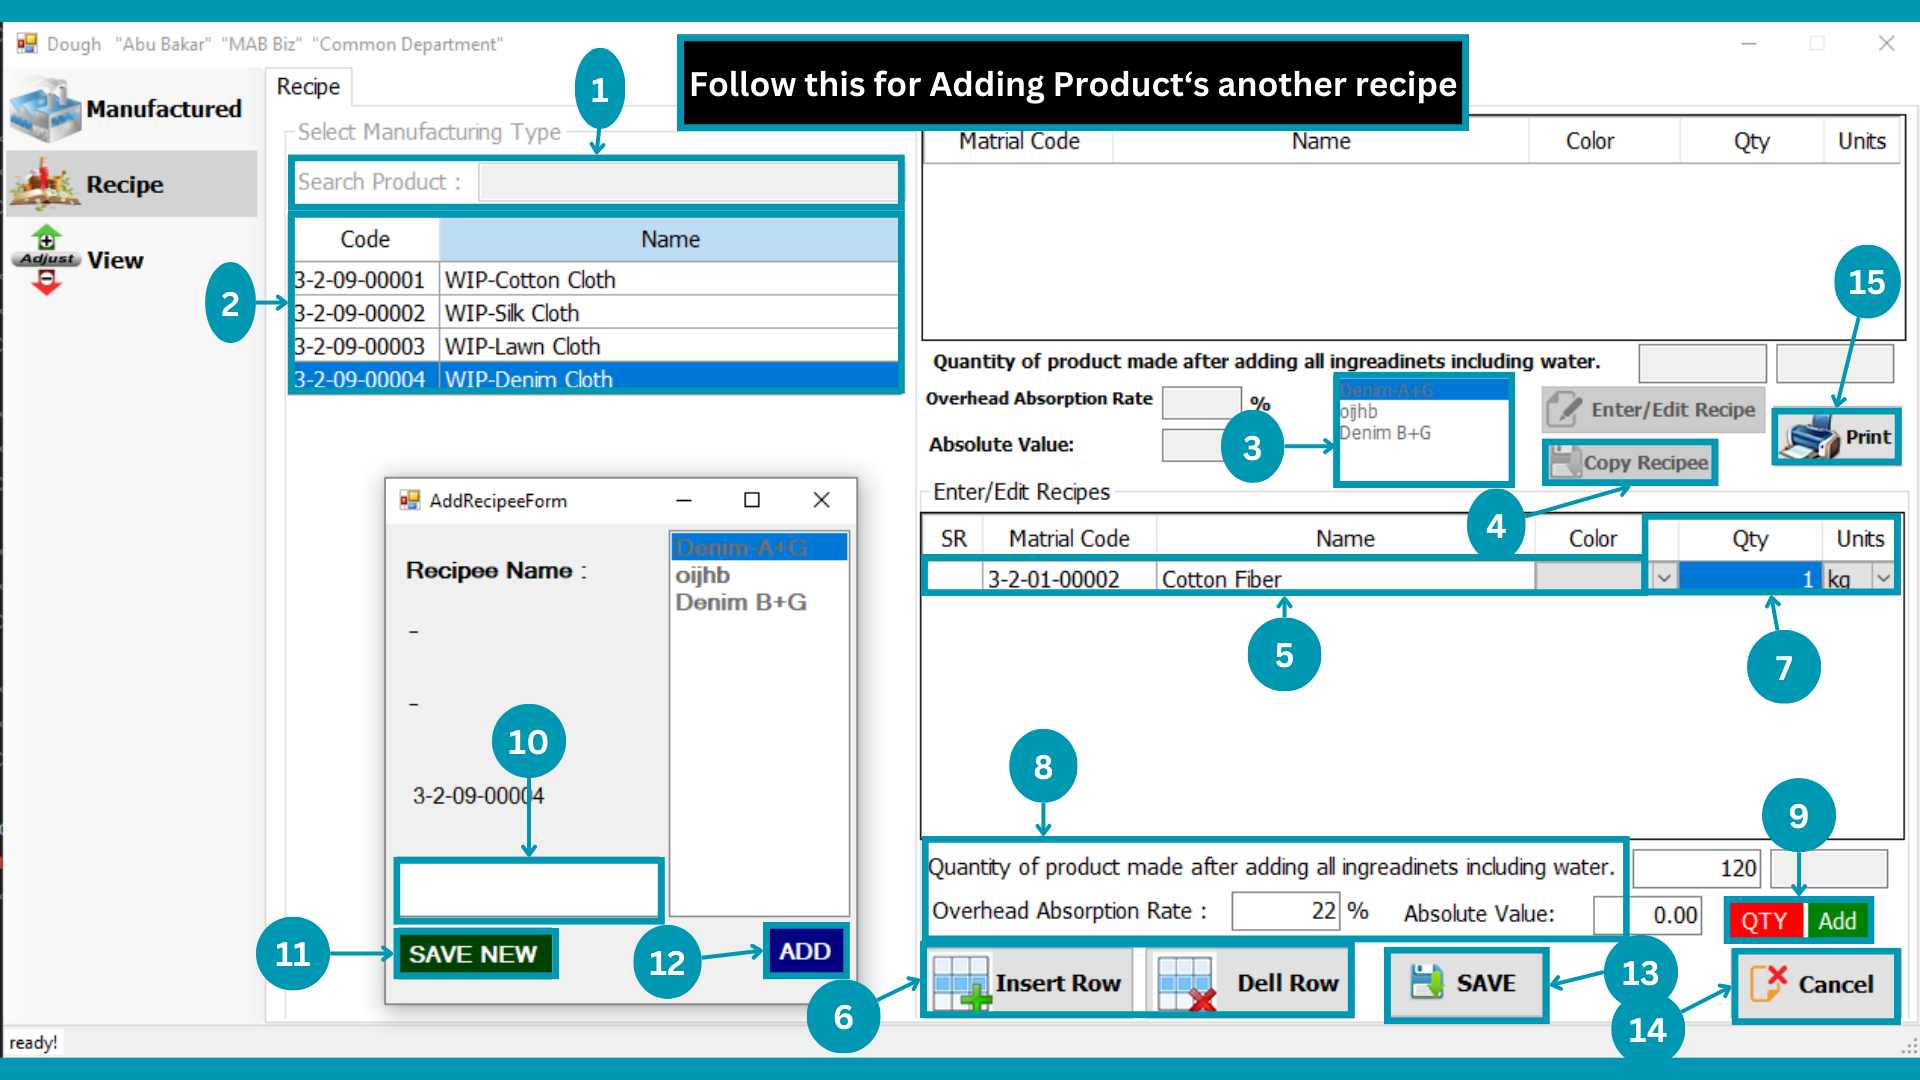
Recipe
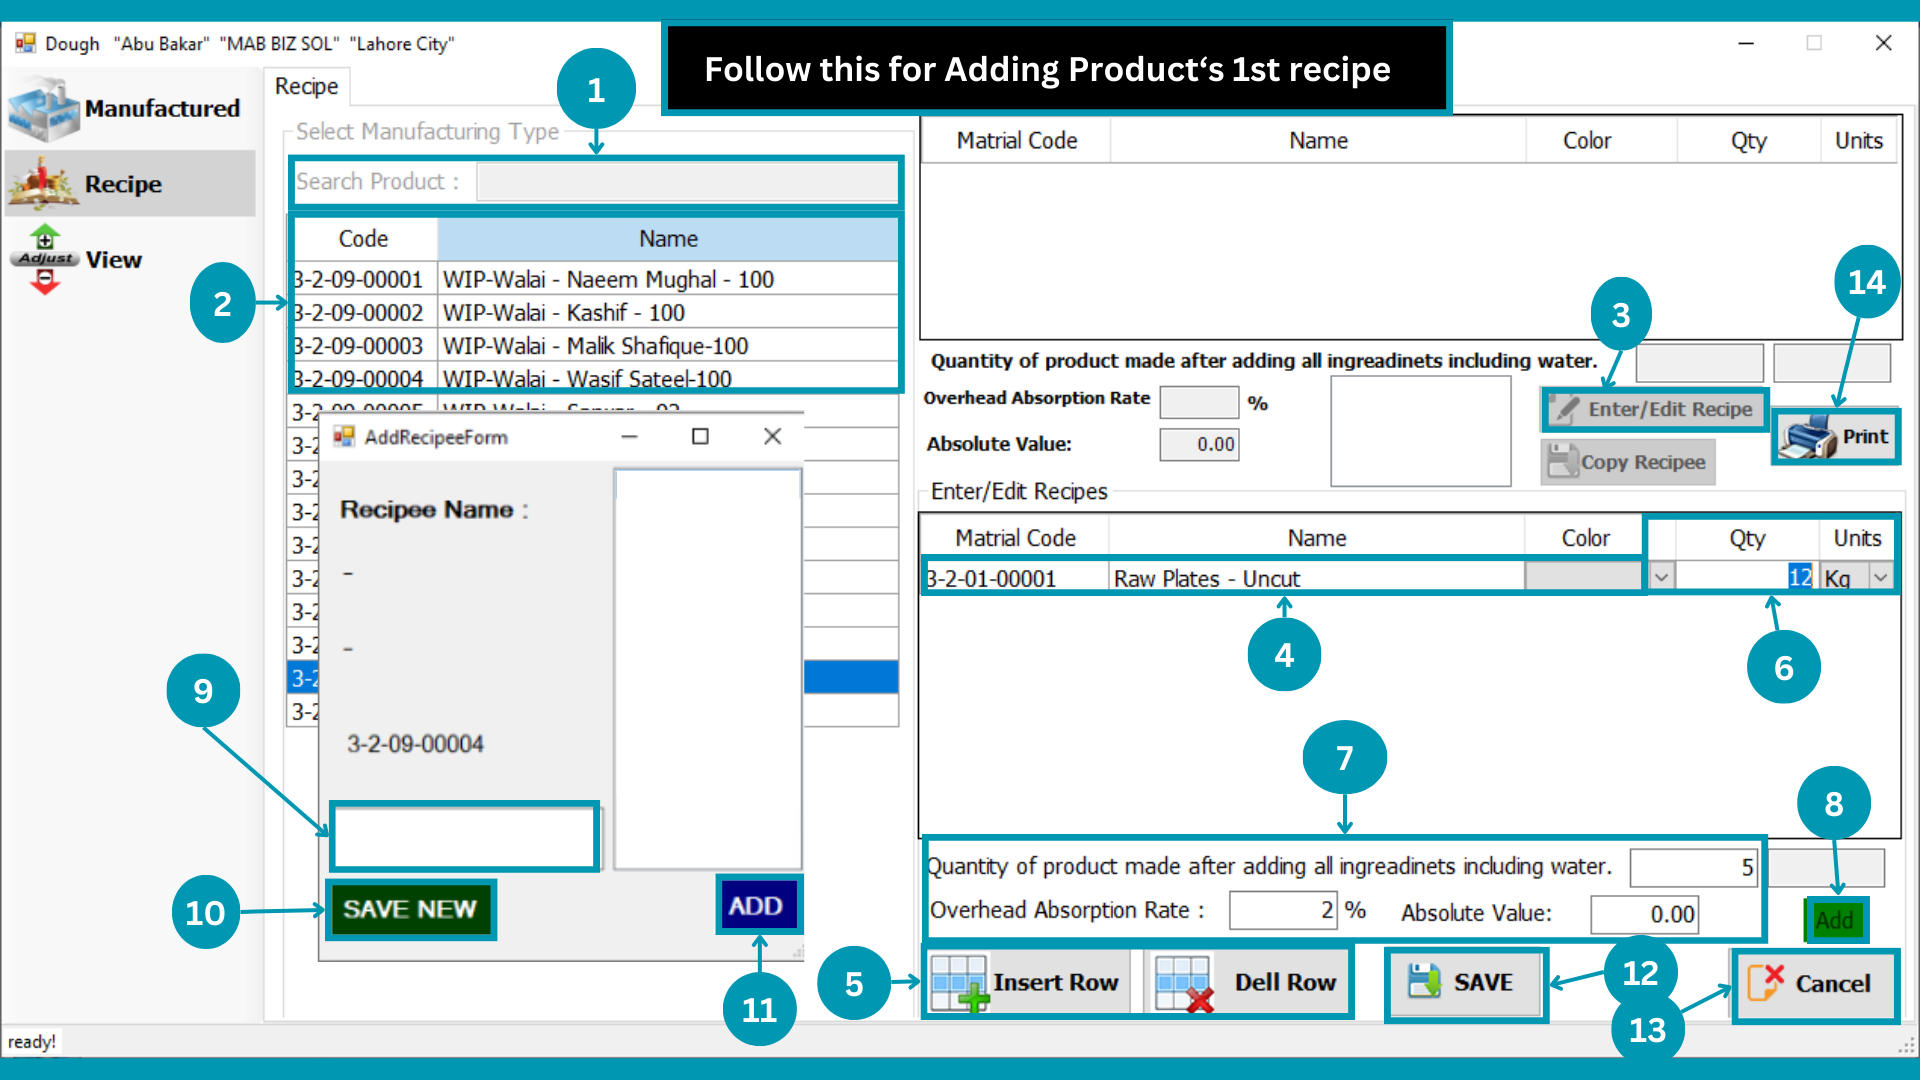
| 01 |  Search
Product and select. Search
Product and select. |
| 02 | 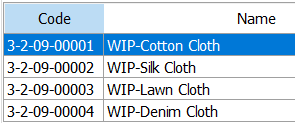 Select
Product from list. Select
Product from list. |
| 03 |  Click Enter/Edit Recipe to edit a
recipe. Click Enter/Edit Recipe to edit a
recipe. |
| 04 |  Select raw material that will be used in recipe.
 |
| 05 |  Select
Insert row and Dell row for raw materials in recipe. Select
Insert row and Dell row for raw materials in recipe. |
| 06 | Write
Quantity against raw material that will be used in recipe. |
| 07 |  Write
numbers of product that will be manufacture from this recipe and Write the Overheads here. Write
numbers of product that will be manufacture from this recipe and Write the Overheads here. |
| 08 |  Click on ADD to add new recipe. Click on ADD to add new recipe. |
| 09 |  To
add a new recipe, type its name. To
add a new recipe, type its name. |
| 10 |  Click
Save New to enter new recipe name. Click
Save New to enter new recipe name. |
| 11 |  Click
on Add button to close after adding recipes. Click
on Add button to close after adding recipes. |
| 12 | Click on
'Save' to save the recipe. |
| 13 |  Click on
'Cancel' to exit. Click on
'Cancel' to exit. |
| 14 | Click on Print button for recipe's print.
|
Recipe
| 01 | Search
Product and select. |
| 02 | Select
Product from list. |
| 03 | Select Recipe to copy and makr similar recipe.
|
| 04 |  Click
Copy recipe for recipe ingredients copy. Click
Copy recipe for recipe ingredients copy. |
| 05 |
Select raw material that will be used in recipe. |
| 06 | Select
Insert row and Dell row for raw materials in recipe. |
| 07 | Write
Quantity against raw material that will be used in recipe. |
| 08 | Write
numbers of product that will be manufacture from this recipe and Write the Overheads here. |
| 09 | Click on ADD to add new recipe. |
| 10 | To
add a new recipe, type its name. |
| 11 | Click
Save New to enter new recipe name. |
| 12 | Click
on Add button to close after adding recipes. |
| 13 | Click on
'Save' to save the recipe. |
| 14 | Click on
'Cancel' to exit. |
| 15 | Click on Print button for recipe's print.
|
view
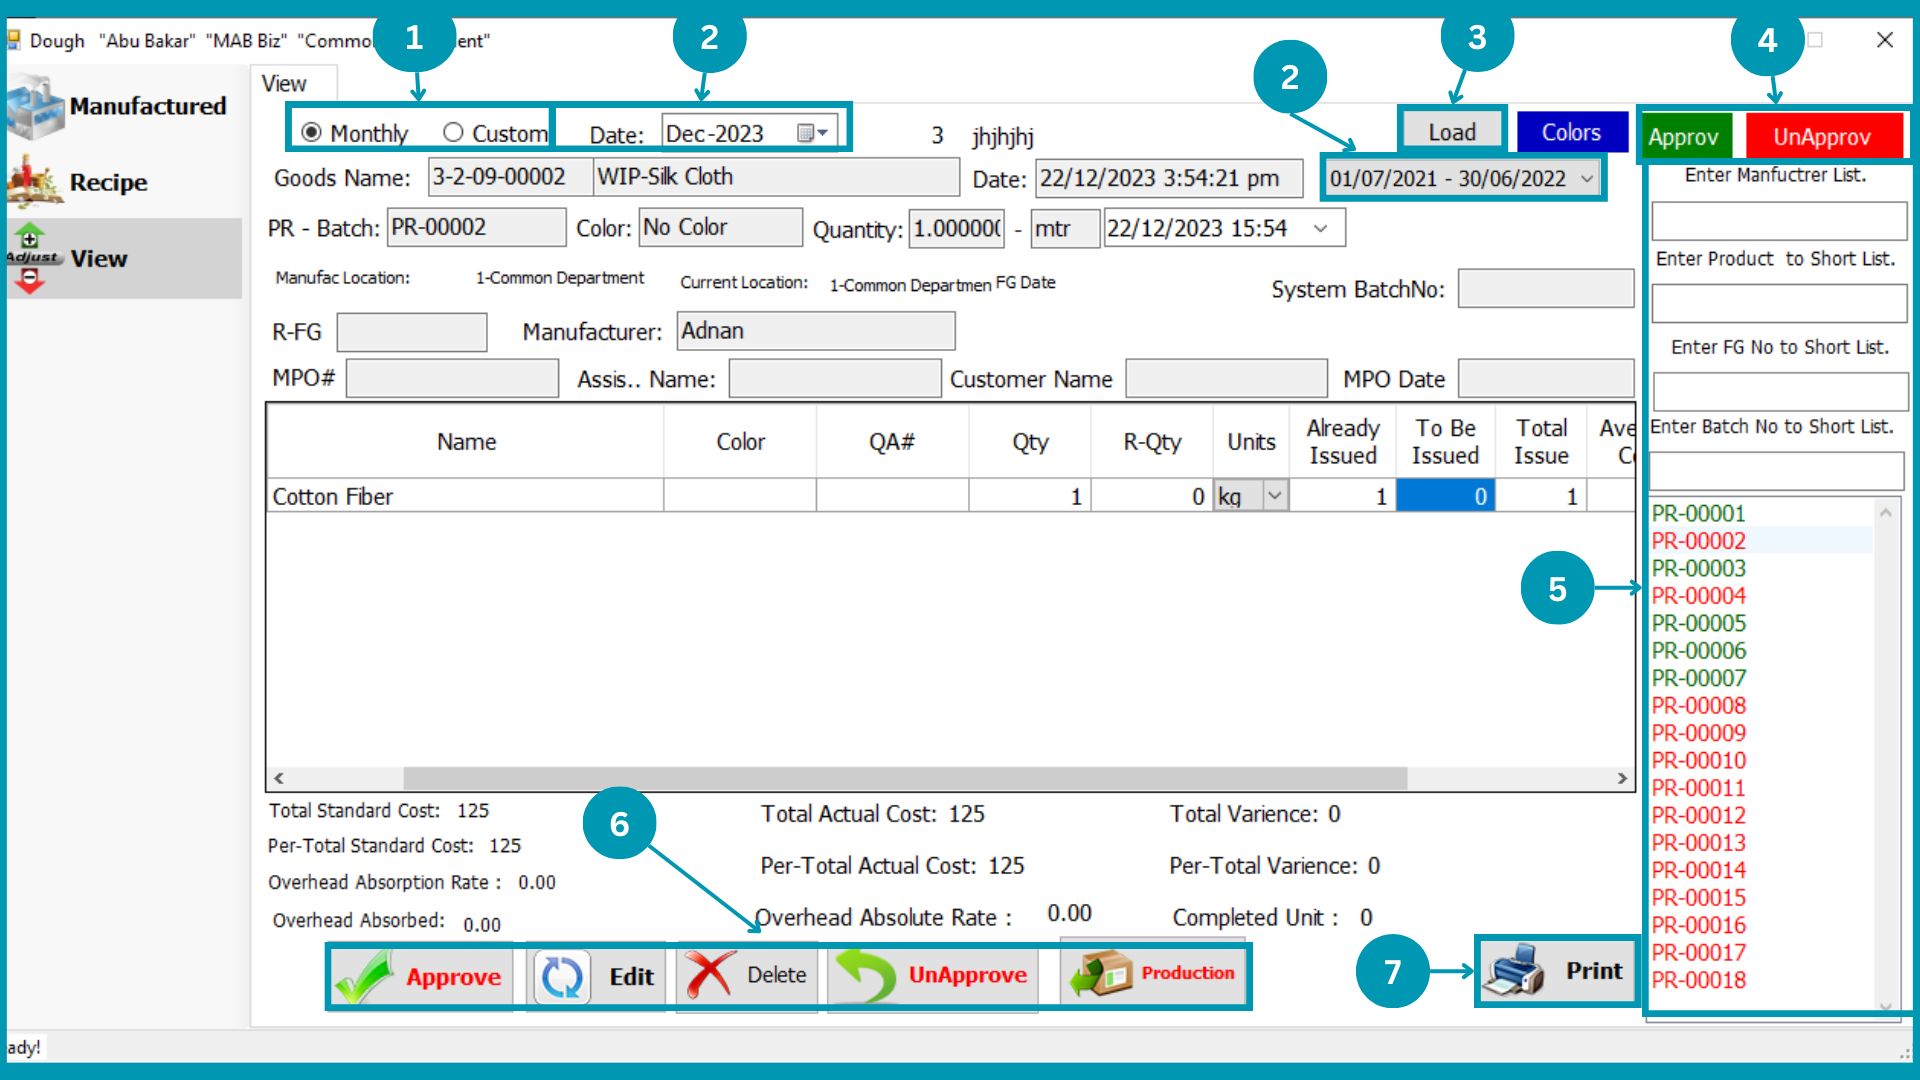
| 01 | Select “Monthly” to view month wise
Purchase Requisition; or select “Custom” to view Financial Period wise Manufactured Goods.
|
| 02 | Select
relevant “Month or Financial Period”. |
| 03 | Click
Load to load all Manufactured goods. |
| 04 | Select Type (Approved or Unapproved )
of Manufactured Goods to view. |
| 05 | 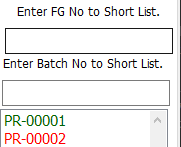 Write
relevant data in filter to shortlist the PR List or select number from list. Write
relevant data in filter to shortlist the PR List or select number from list. |
| 06 | Hit
the Approve Or Print or Production Button. |
| 07 | Press
Print to get print of it. |
MAB BIZ SOLUTIONS
Sales
Sales
All sales against customers will be treated here.
Following pages usage is explained in this segment
- Sales Order
- SO view
- Packing list
- PL View
- Credit
- Cash
- Return
- View Invoices
- Delivery Challan
Sales Order
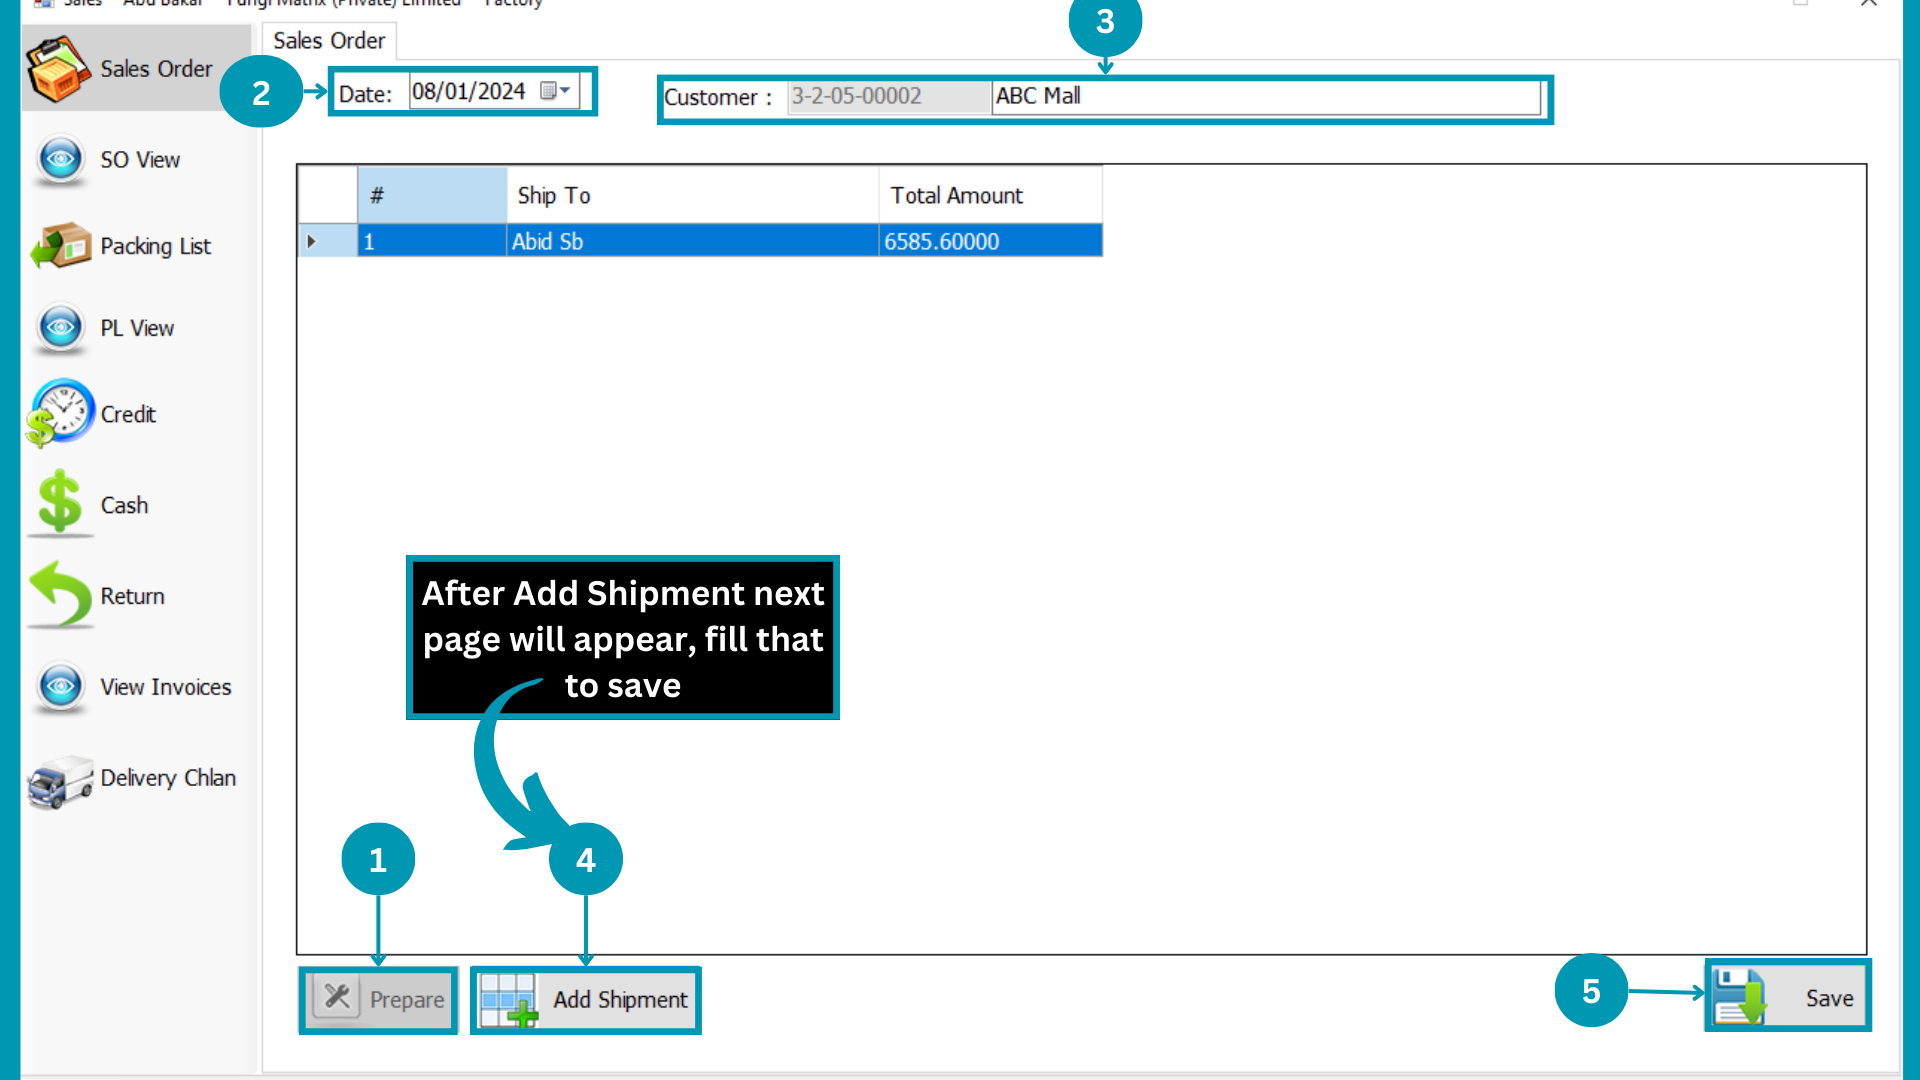
| 01 | Click
on “Prepare” to start data entry. |
| 02 |
|
| 03 |  Select Customer for sale order. Select Customer for sale order. |
| 04 |  Click
on Add Shipment And fill Shipment form to "Save" sale order. Click
on Add Shipment And fill Shipment form to "Save" sale order. |
| 05 | Hit the
Save Button. |
Add Shipment
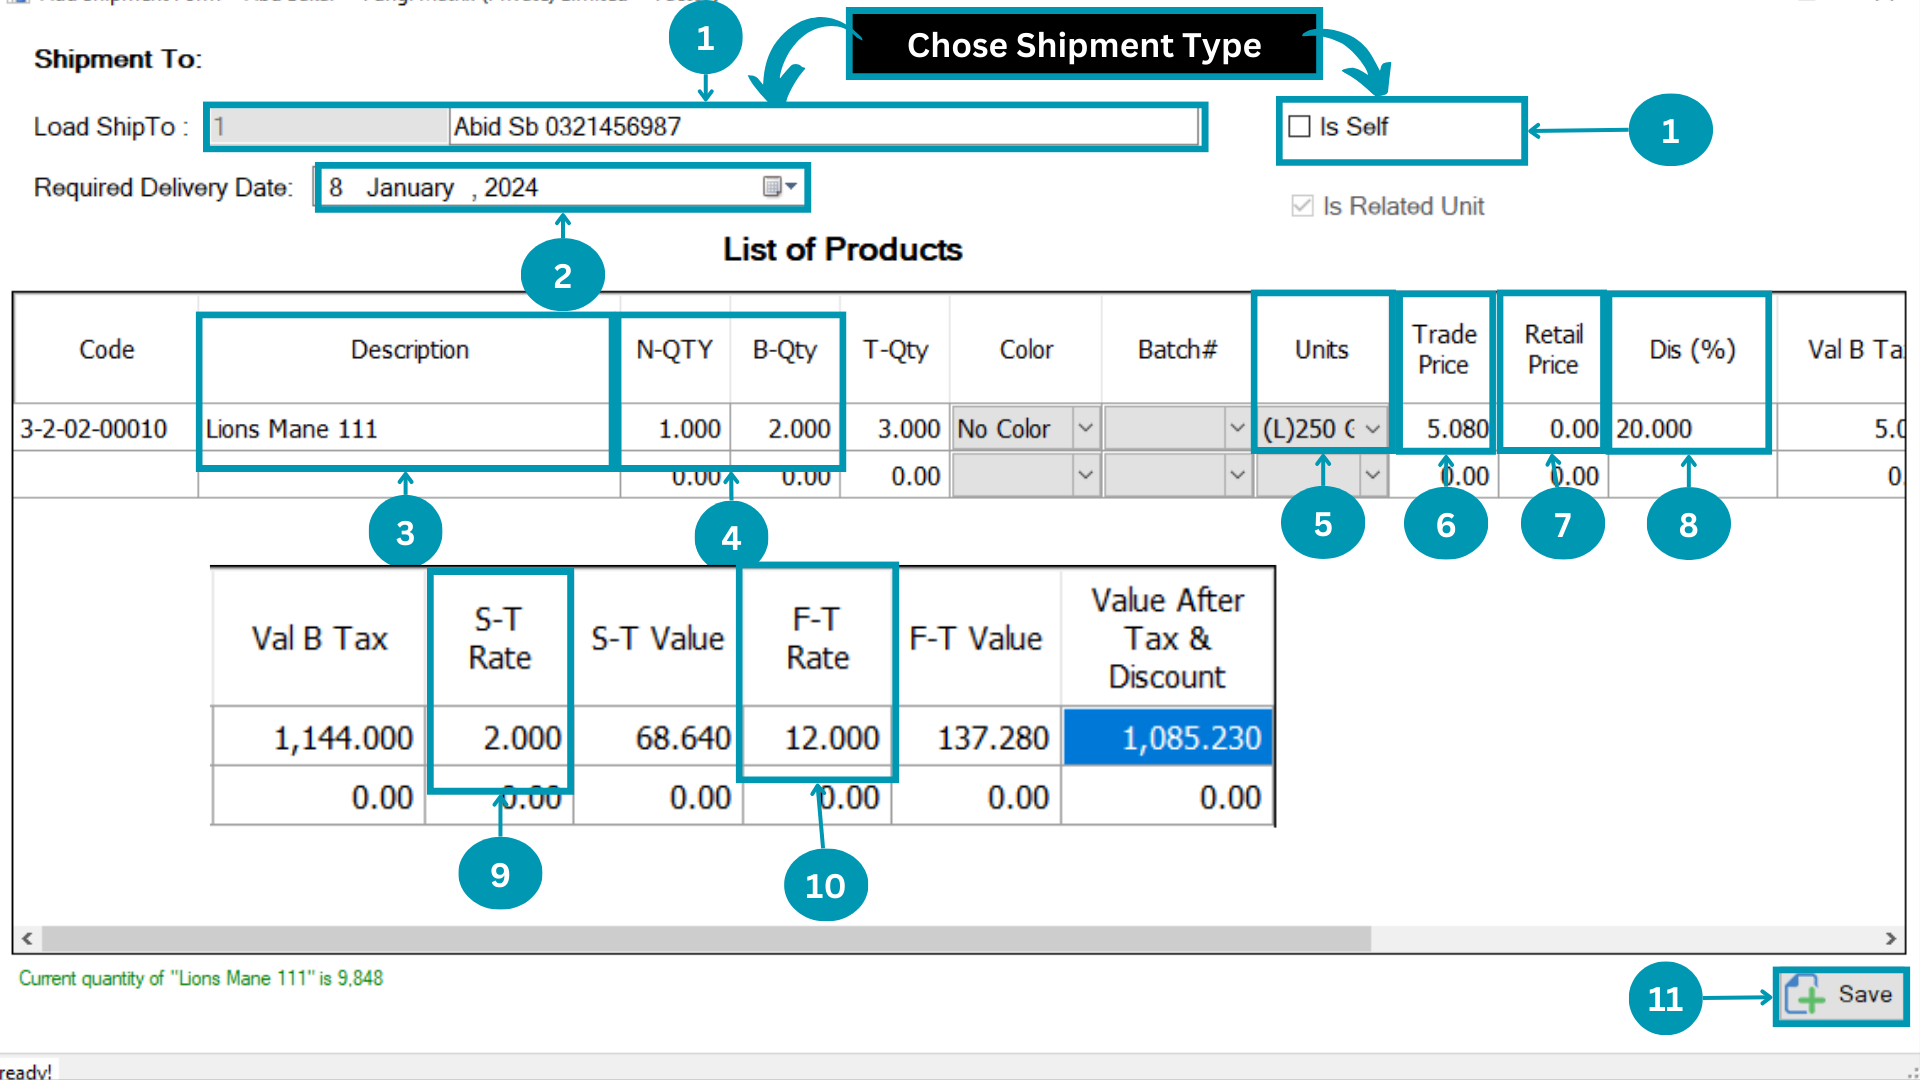
| 01 | 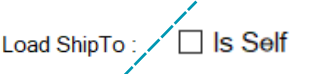 Select load ship to or check "Is Self"
box. Select load ship to or check "Is Self"
box. |
| 02 |
|
| 03 | Select manufactured product for sale
to customer. |
| 04 | Fill the
Net quantity and Bonus quantity in respective column. |
| 05 | 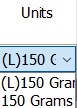 Select
respective unit of product. Select
respective unit of product. |
| 06 |  Write
Trade price of product. Write
Trade price of product.
|
| 07 |  Write
retail price. Write
retail price.
|
| 08 |  Write
Discount Percentage against product. Write
Discount Percentage against product.
|
| 09 |  Write
Sale Tax Rate on product. Write
Sale Tax Rate on product. |
| 10 |  Write
Further Tax Rate on product. Write
Further Tax Rate on product.
|
| 11 |  Hit
the Save Button. Hit
the Save Button. |
Sales Order View
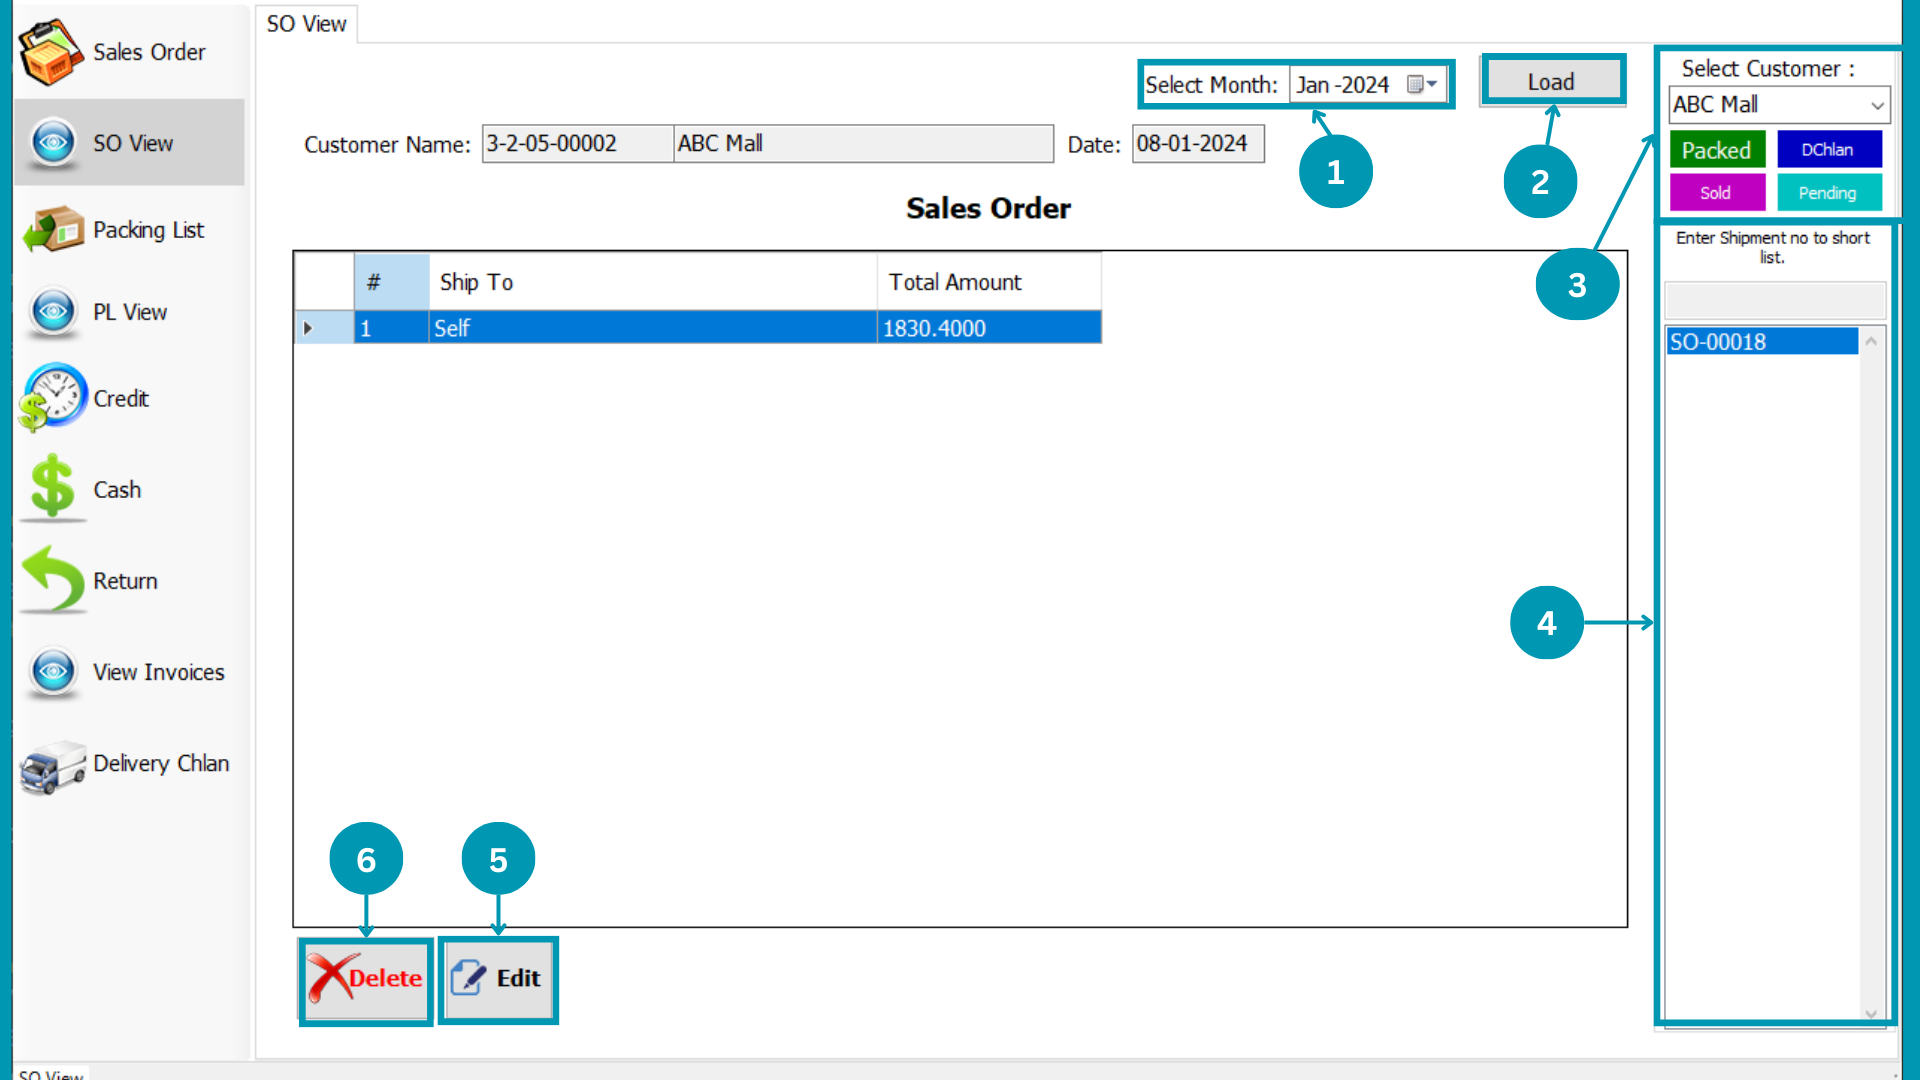
| 01 |
|
| 02 | Hit the
load Button. |
| 03 | 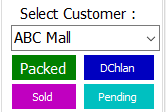 Select Specific customer and Sale
status to filter SO list. Select Specific customer and Sale
status to filter SO list.
|
| 04 | 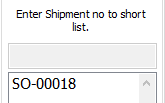 Enter specific Shipment number or
select number from list to view. Enter specific Shipment number or
select number from list to view.
|
| 05 |  Select the
"Edit" button. Select the
"Edit" button.
|
| 06 |  Select "Delete" button to delete the
SO. Select "Delete" button to delete the
SO.
|
Packing List
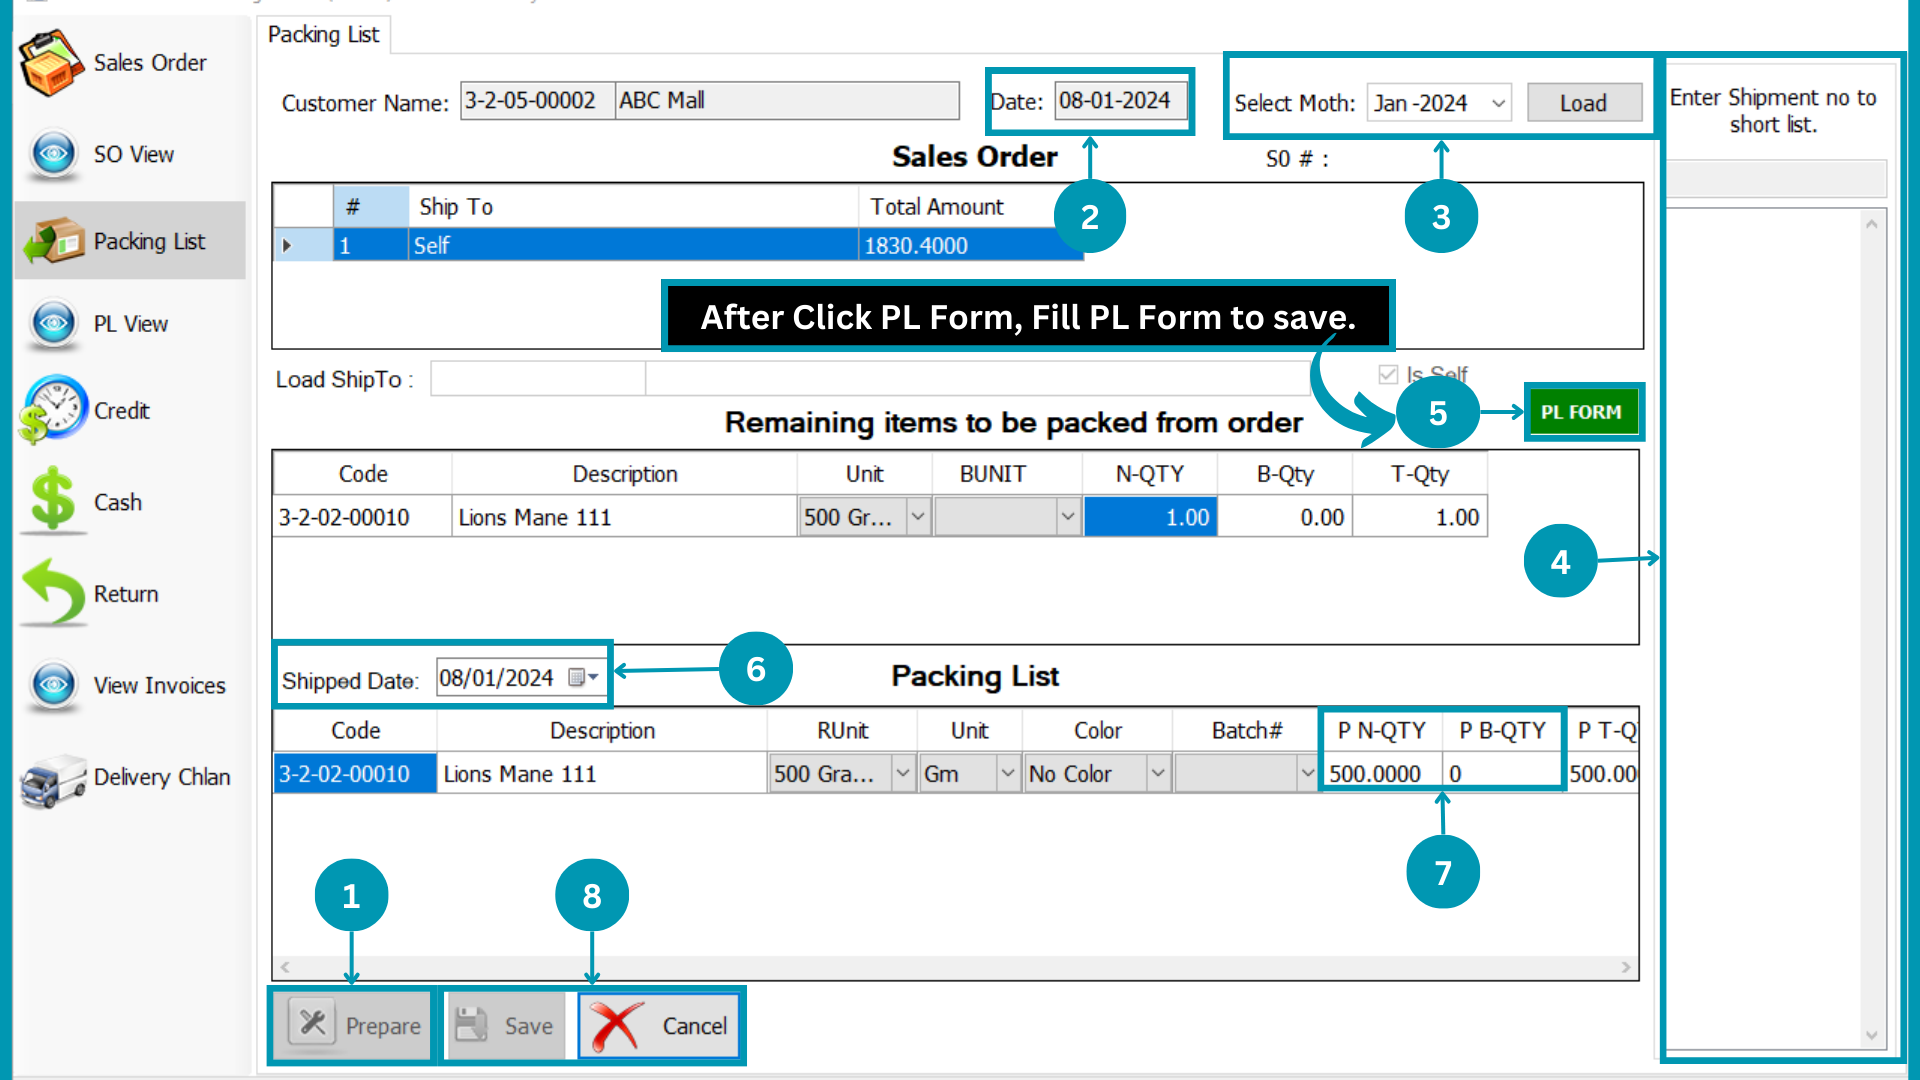
| 01 | Click
on “Prepare” to start data entry. |
| 02 |
|
| 03 | 
|
| 04 | Enter specific Shipment number or
select number from list to view.
|
| 05 |  Select PL
Form and fill that to save Packing list. Select PL
Form and fill that to save Packing list. |
| 06 |  Select
the shipped date. Select
the shipped date.
|
| 07 | 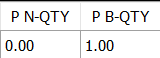 Fill the
Net quantity and Bonus quantity in respective column. Fill the
Net quantity and Bonus quantity in respective column. |
| 08 | Hit
the Save Or Cancel Button. |
Packing List Form
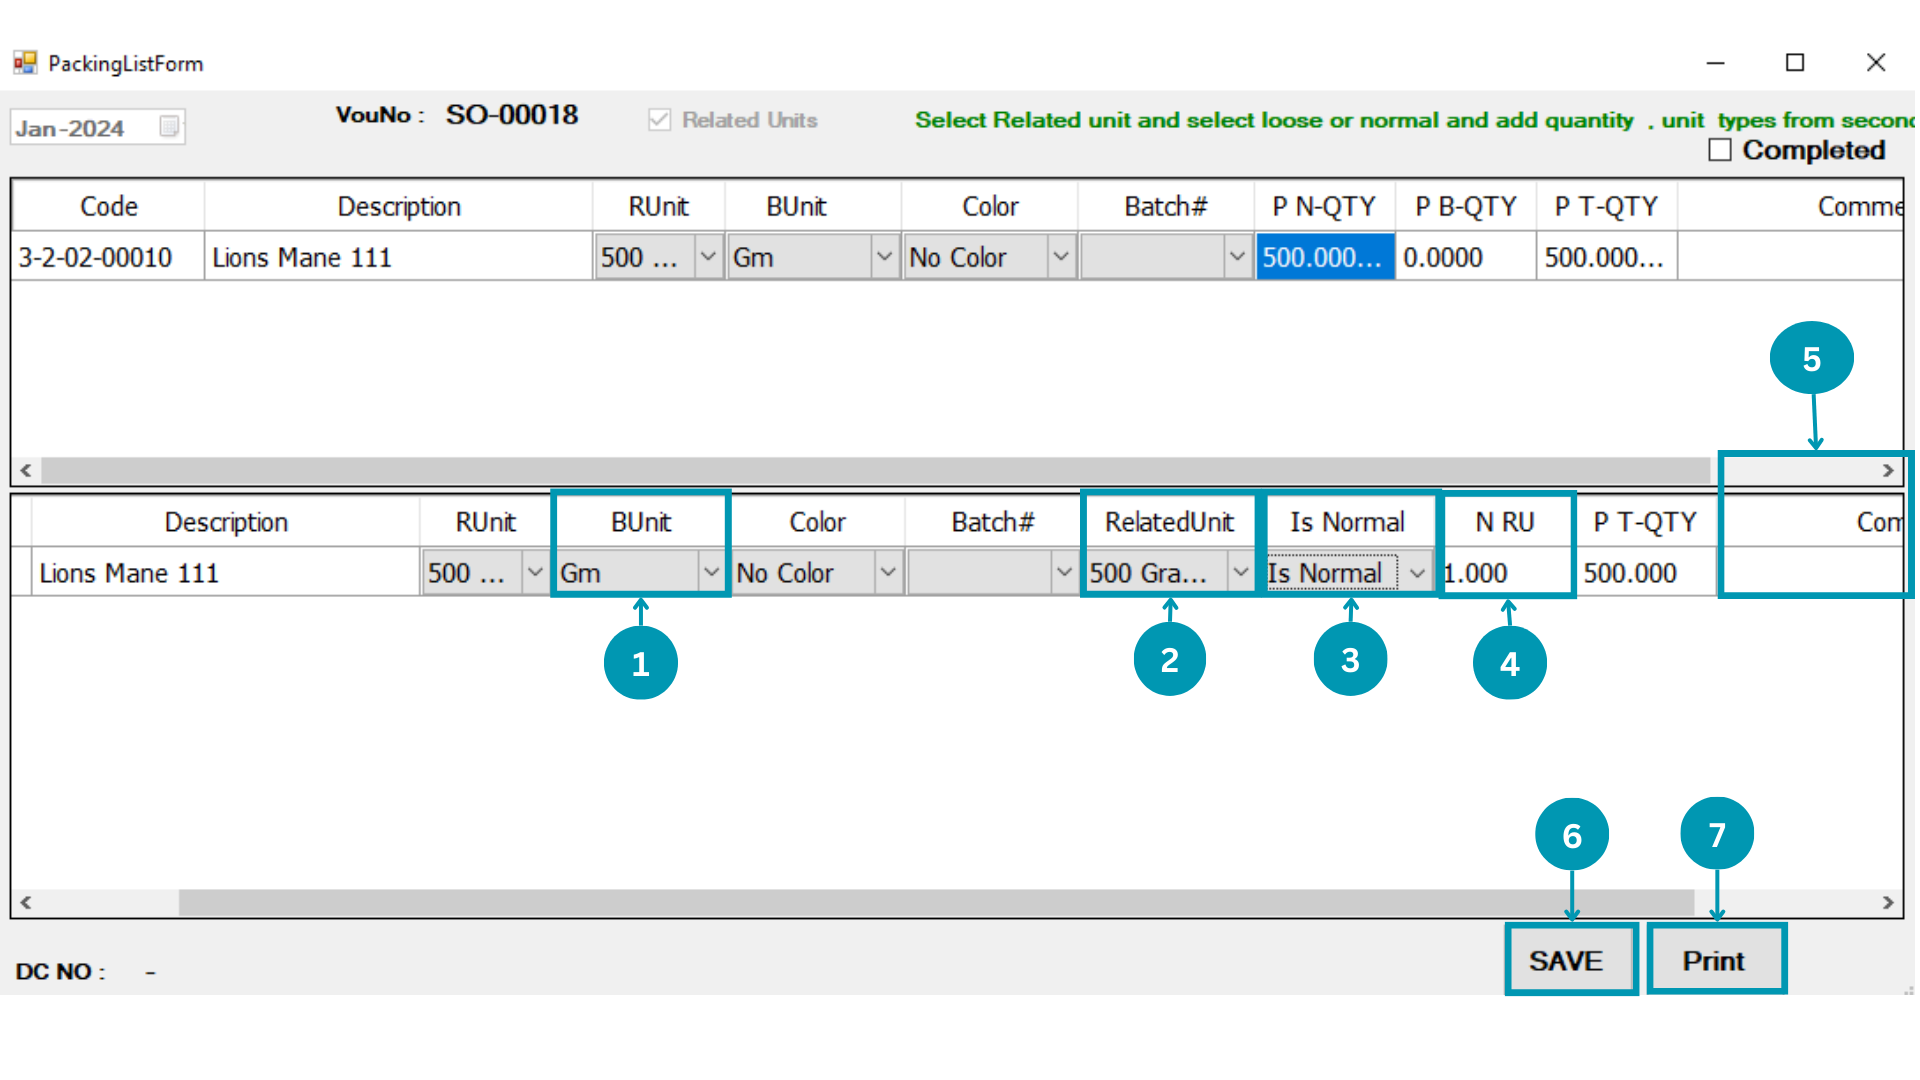
| 01 |  Select
Base Unit of item. Select
Base Unit of item. |
| 02 |  Select Related Unit of item.
 |
| 03 | 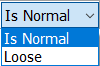 Select
the Units state from "Is Normal" or "Loose". Select
the Units state from "Is Normal" or "Loose".
|
| 04 |  Write
Number Of Related Units in which all Quantity packed. Write
Number Of Related Units in which all Quantity packed.
|
| 05 |  Write
Comments related to product packing. Write
Comments related to product packing.
|
| 06 | Hit the
Save Button. |
| 07 | Hit the
Print Button. |
Packing List View
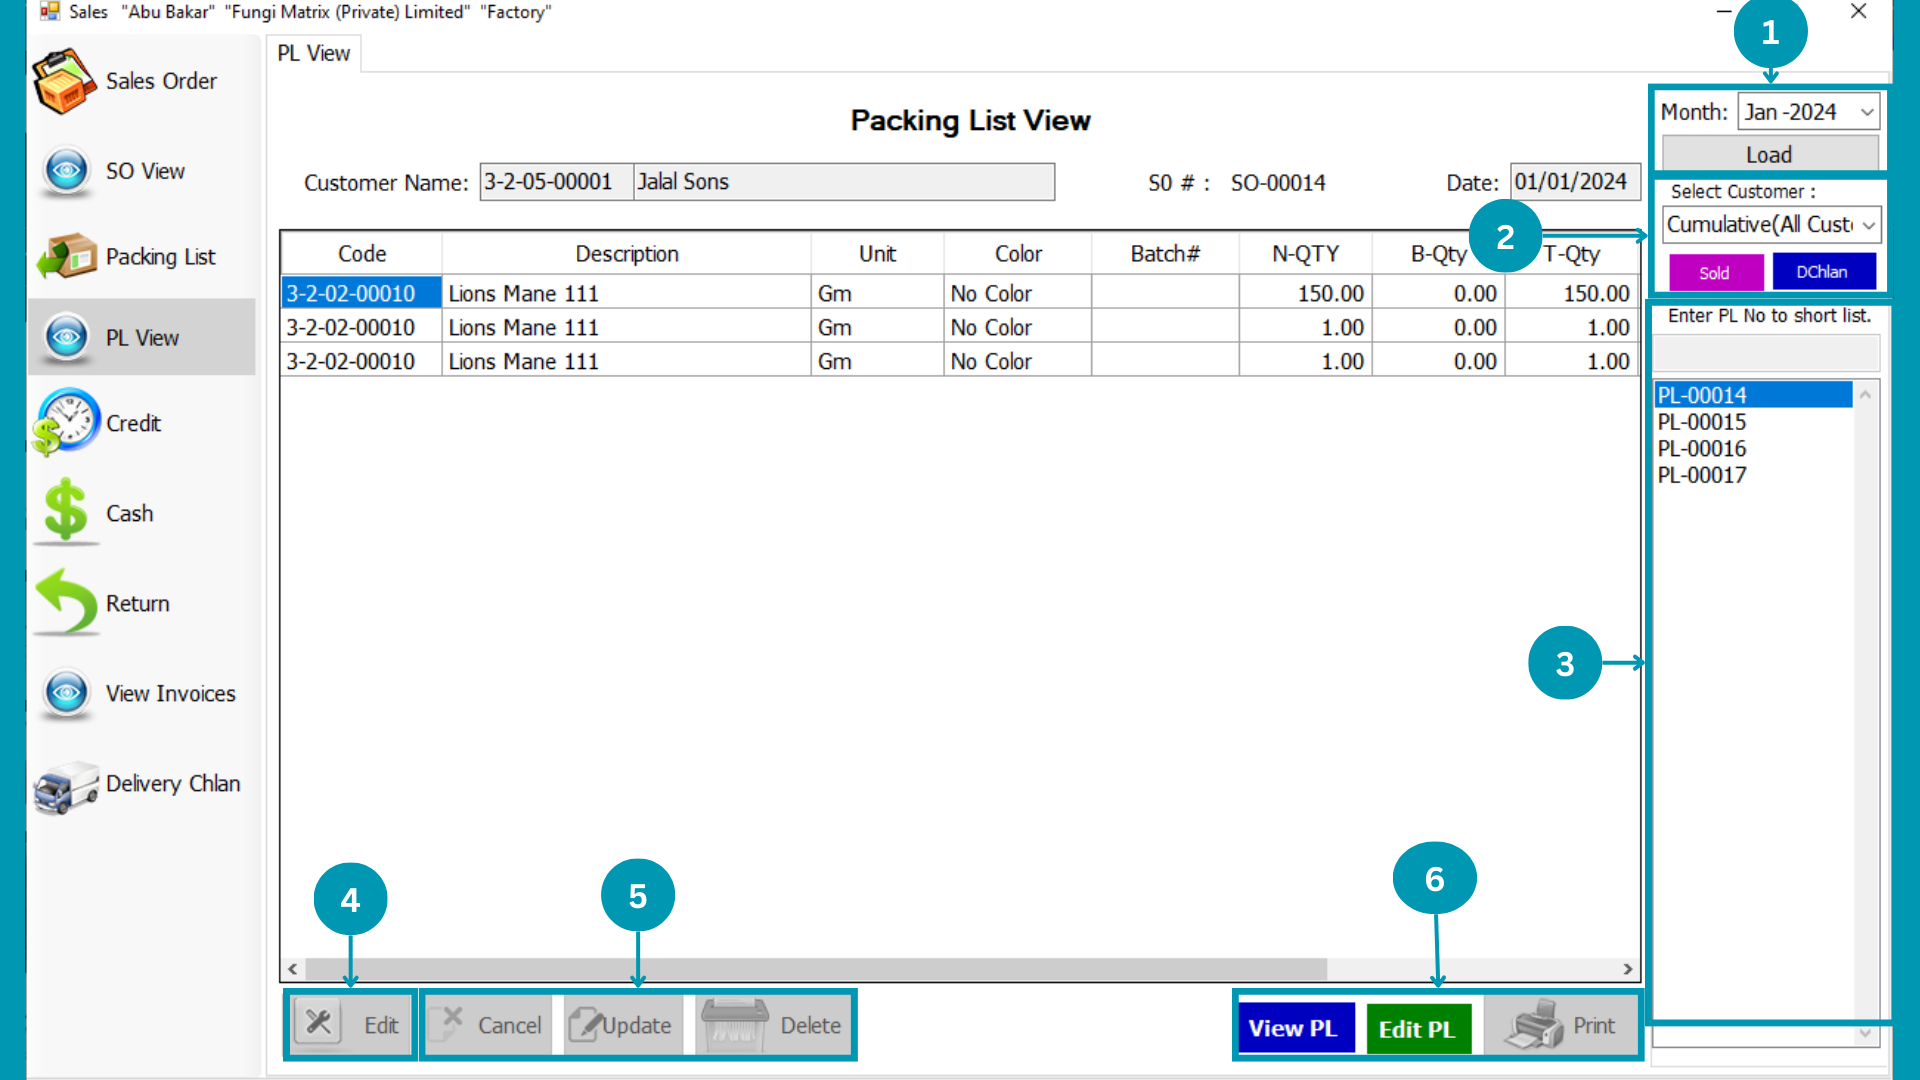
| 01 |
|
| 02 | 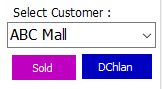 Select Specific customer and Packing status to filter PL list.
|
| 03 | 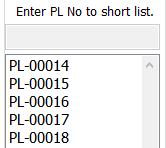 Write
“PL No” to filter Packing List of specific product or select number from list. Write
“PL No” to filter Packing List of specific product or select number from list. |
| 04 | Select the
"Edit" button.
|
| 05 |  Select the
"Cancel" or "Update" or "Delete" button. Select the
"Cancel" or "Update" or "Delete" button.
|
| 06 |  Click
your desire Button 'View PL' and 'Edit PL'. Click
your desire Button 'View PL' and 'Edit PL'.
|
Credit
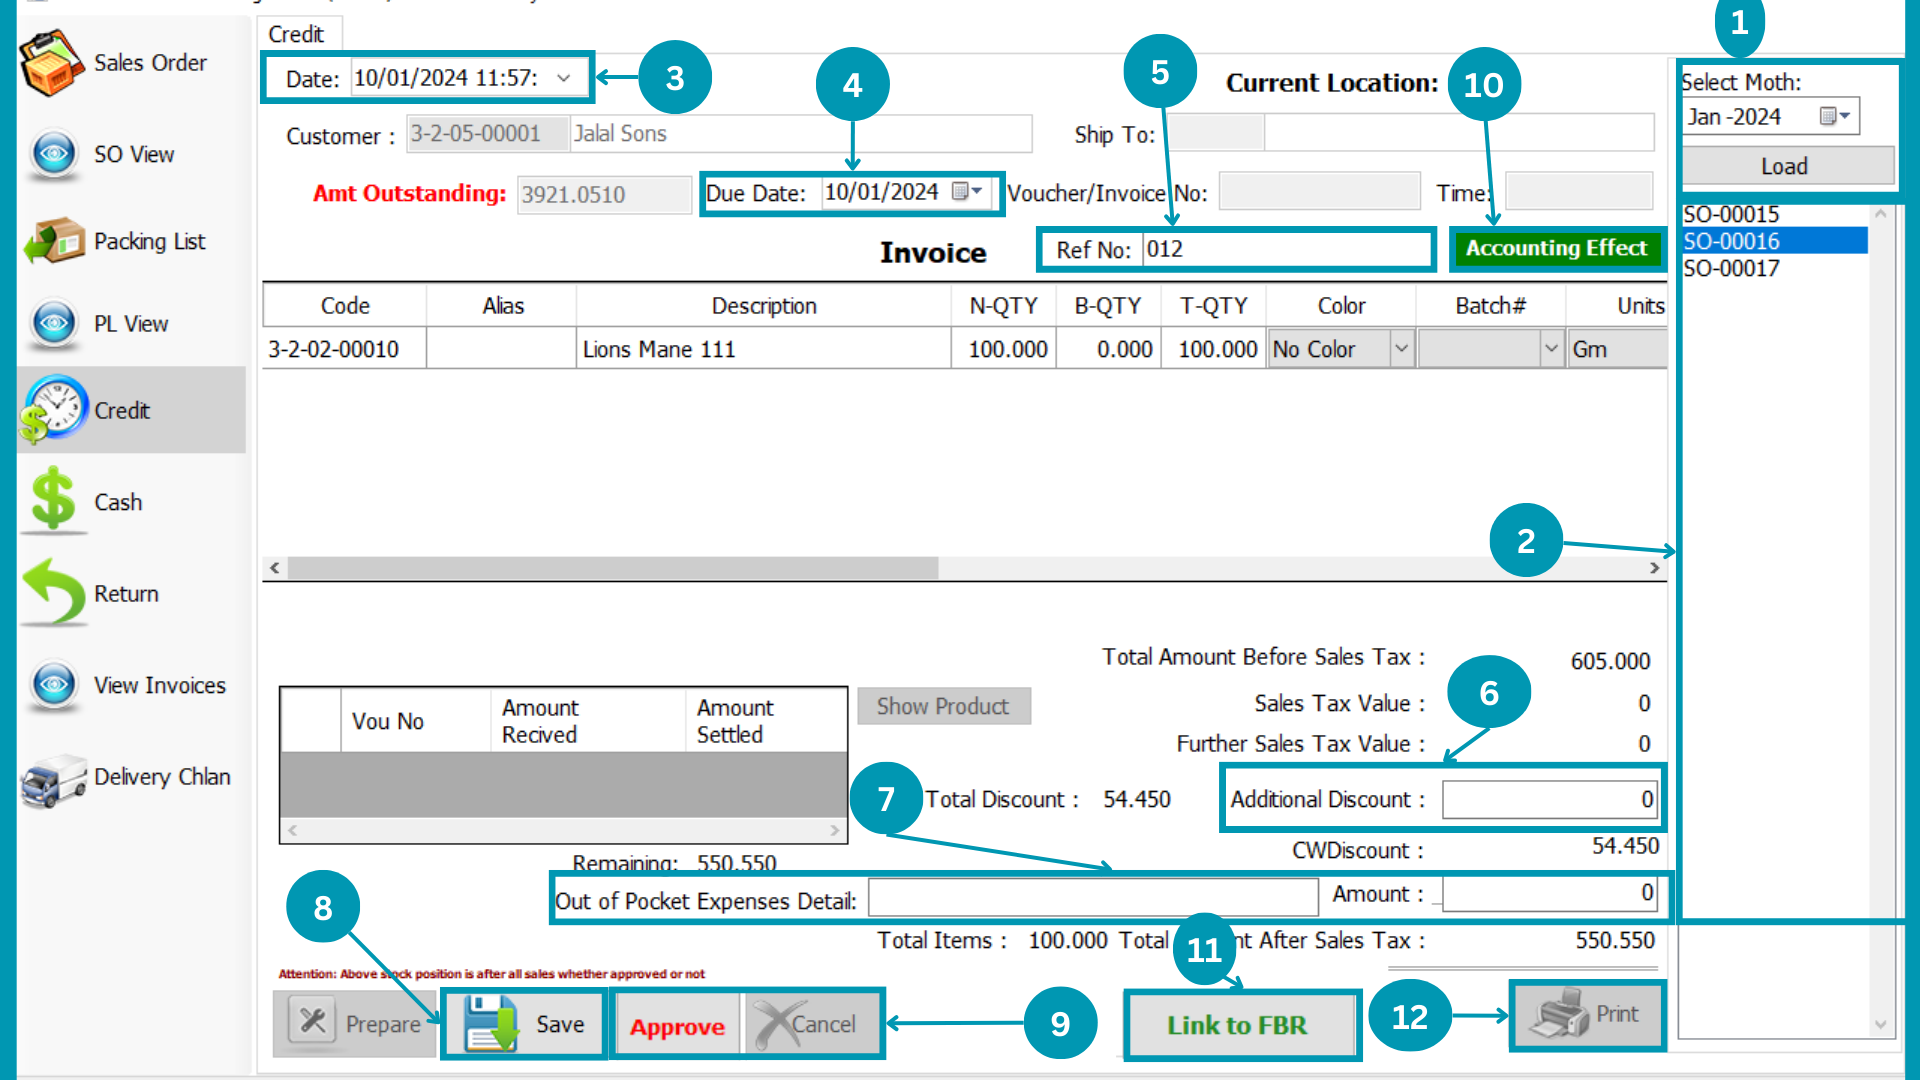
| 01 |
Select Specific month to view all Approved Sale Orders of that month and hit load. |
| 02 |  Select
SO number for credit sale. Select
SO number for credit sale.
|
| 03 | Select
Transaction date
|
| 04 |  Select
Due Date. Select
Due Date.
|
| 05 |  Add
reference Number. Add
reference Number.
|
| 06 |  If Add
Additional discount Add. If Add
Additional discount Add.
|
| 07 |  Write the
Out of pocket expense. Write the
Out of pocket expense.
|
| 08 | Click the
Save button. |
| 09 |  Click
the "Approve" or "Cancel"; Click
the "Approve" or "Cancel";
|
| 10 | Hit the
"Accounting Effect" Button. |
| 11 |  Hit the
"Link to FBR" Button. Hit the
"Link to FBR" Button. |
| 12 | Hit the
"Print" Button. |
Cash
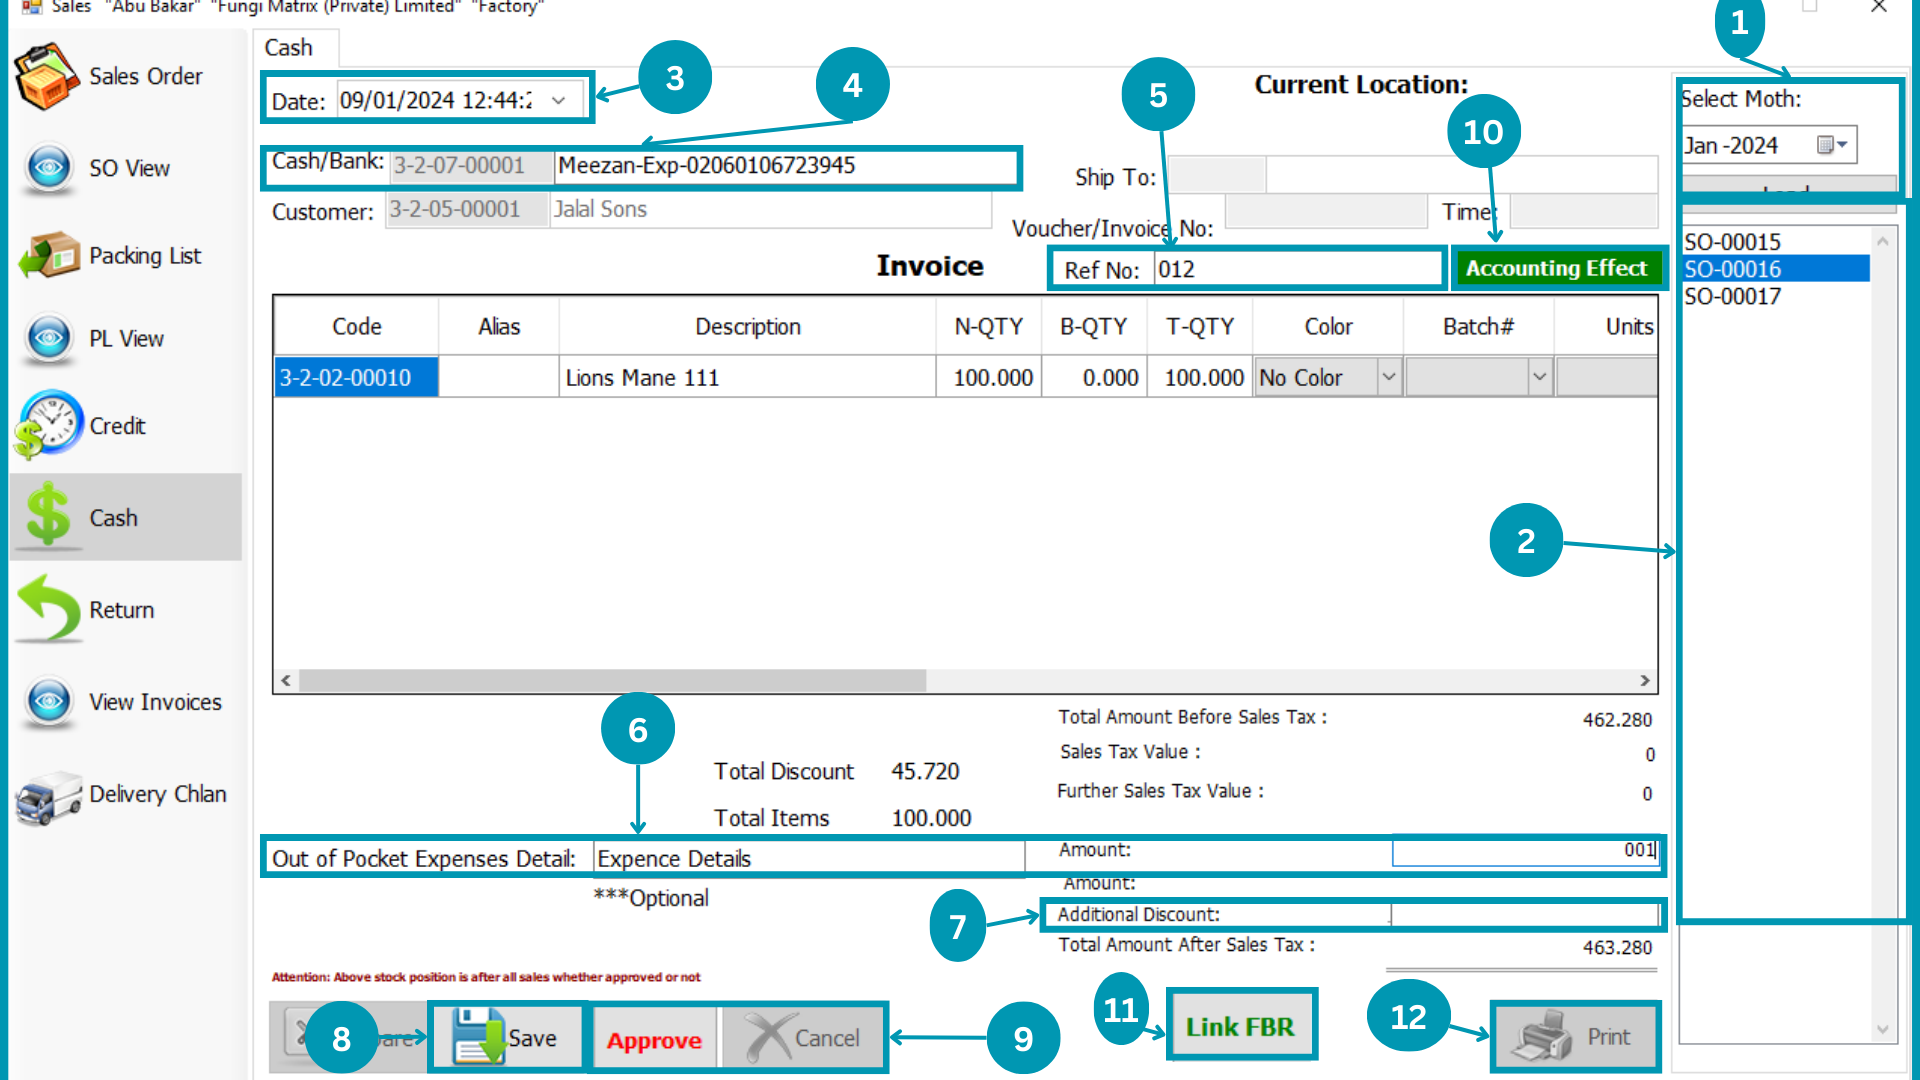
| 01 | Select
Specific month to view all Approved Sale Orders of that month and hit load. |
| 02 | Select
SO number for Cash sale.
|
| 03 | Select
Transaction Date.
|
| 04 | Select
Payment medium. |
| 05 | Enter
reference number.
|
| 06 | Write out
of pocket expenses.
|
| 07 | Write
Additional discount.
|
| 08 | Click the
save button.
|
| 09 | Click the "Approve" or "Cancel";
|
| 10 | Select
the Accounting Effect Button.
|
| 11 | Hit
the "Link to FBR" Button.
|
| 12 | Hit the
"Print" Button.
|
Return
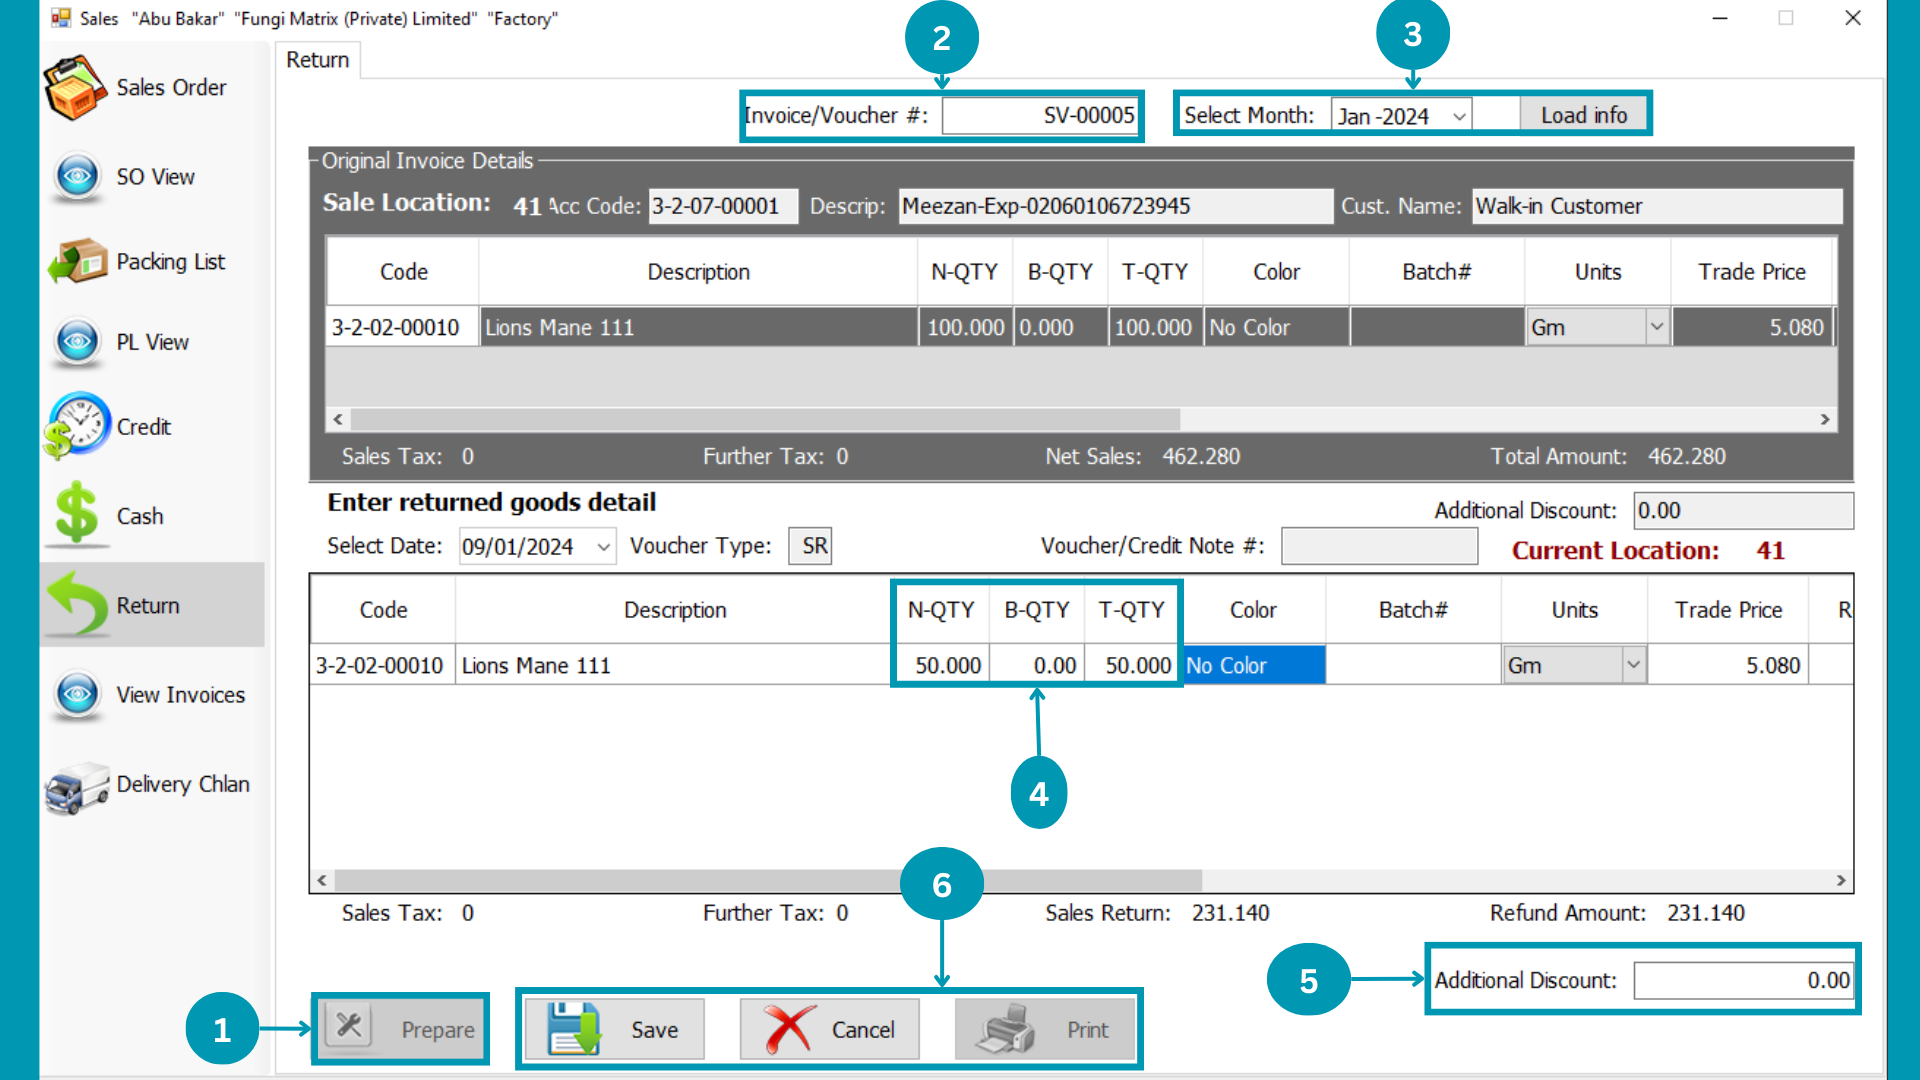
| 01 | Click
on “Prepare” to start data entry. |
| 02 |  Enter
Voucher Number of Sales. Enter
Voucher Number of Sales.
|
| 03 | Select Month of 'Sale Orders' to load
and click load.
|
| 04 | Fill the
Net quantity and Bonus quantity in respective column. |
| 05 | Write
Additional discount.
|
| 06 | Hit the
Save Or Cancel or Print Button. |
View Invoices
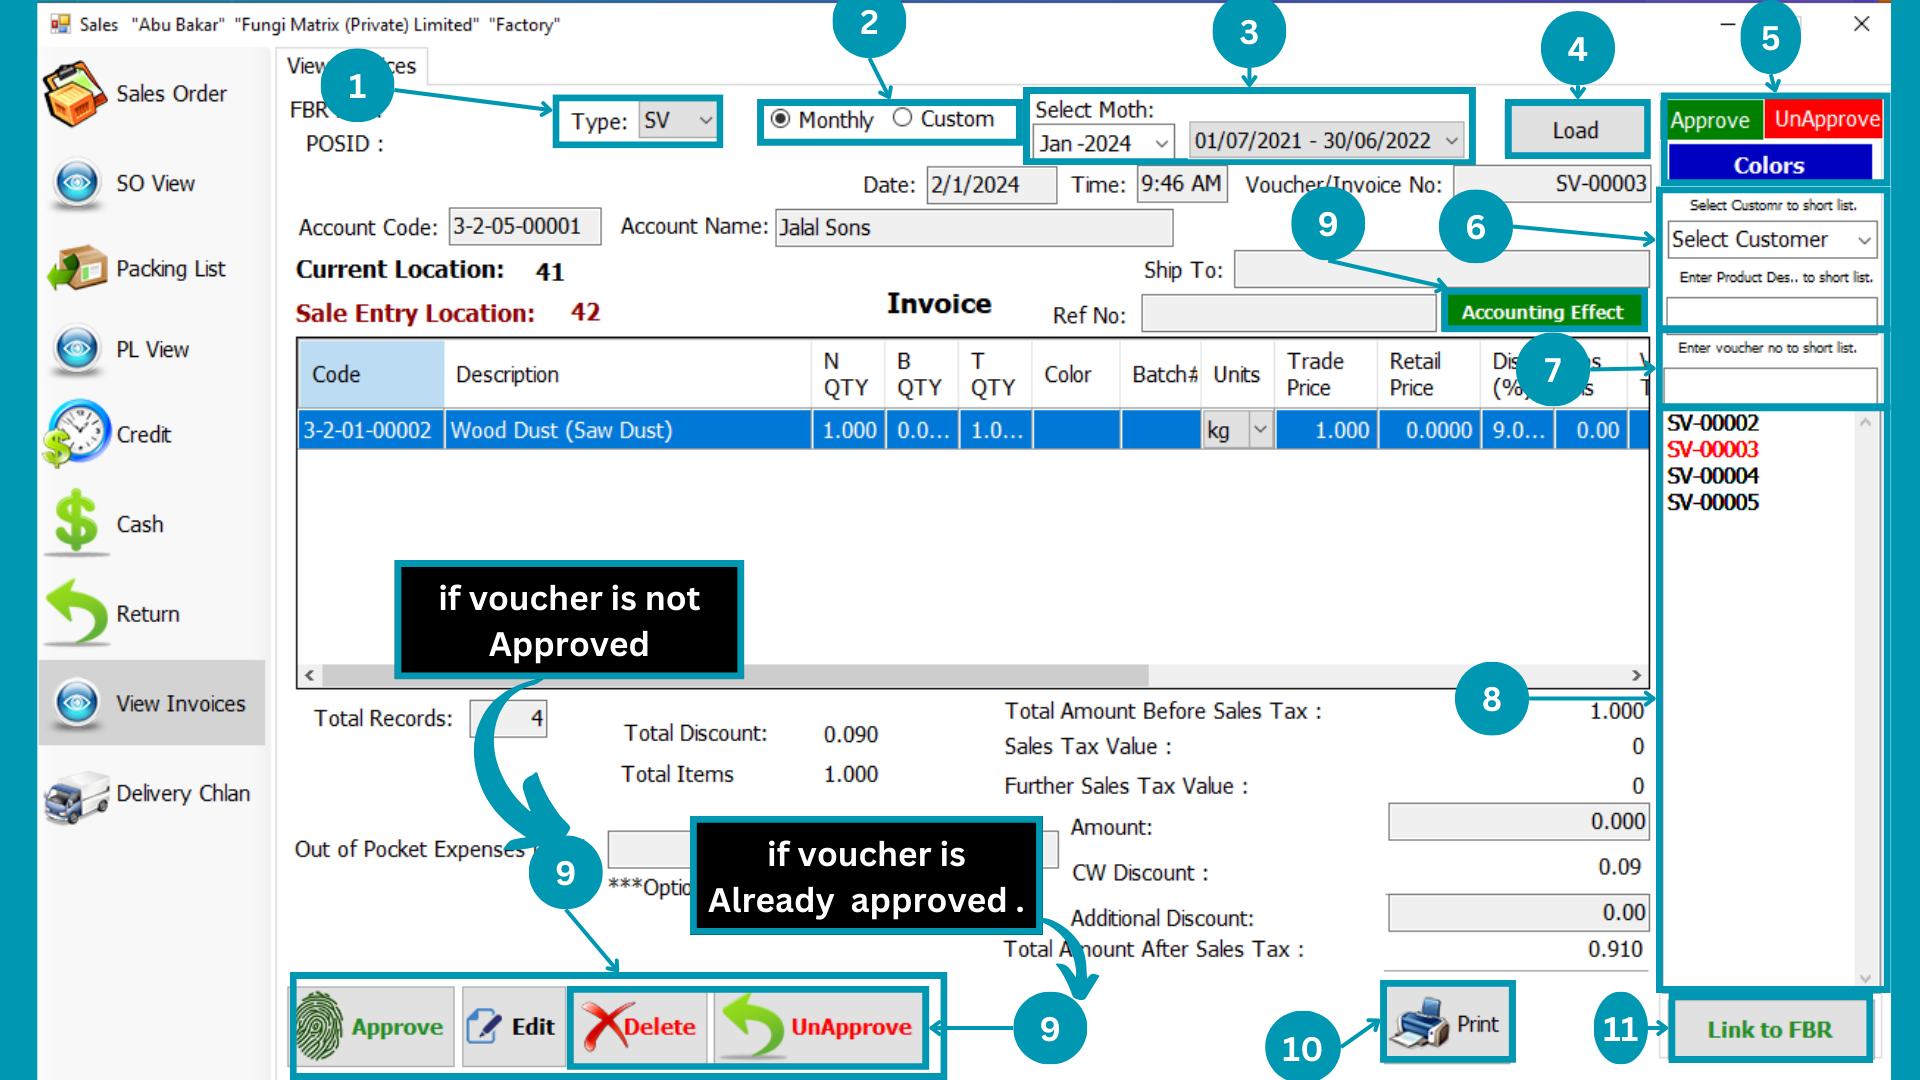
| 01 |  Select Type of the Invoice from SV, SR.
|
| 02 | Select relevant “Month or Financial
Period”.
|
| 03 | Select
“Monthly” to view month wise Purchase Requisition; or select “Custom” to view Financial
Period wise Purchase Requisition.
|
| 04 | Hit the
load Button. |
| 05 |  Select the "Approved" or "Unapproved" and Colors.
|
| 06 | 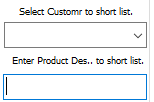 Select Specific customer and Product
Description to filter SV list. Select Specific customer and Product
Description to filter SV list.
|
| 07 | Click on
voucher number to check entry made against that specific voucher.
|
| 08 | 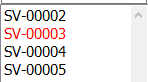 Select
SV number for sale Invoice view. Select
SV number for sale Invoice view.
|
| 09 | Hit
the Approve Or Edit Button.
|
| 10 | Press
Print to get print of it.
|
Delivery Challan
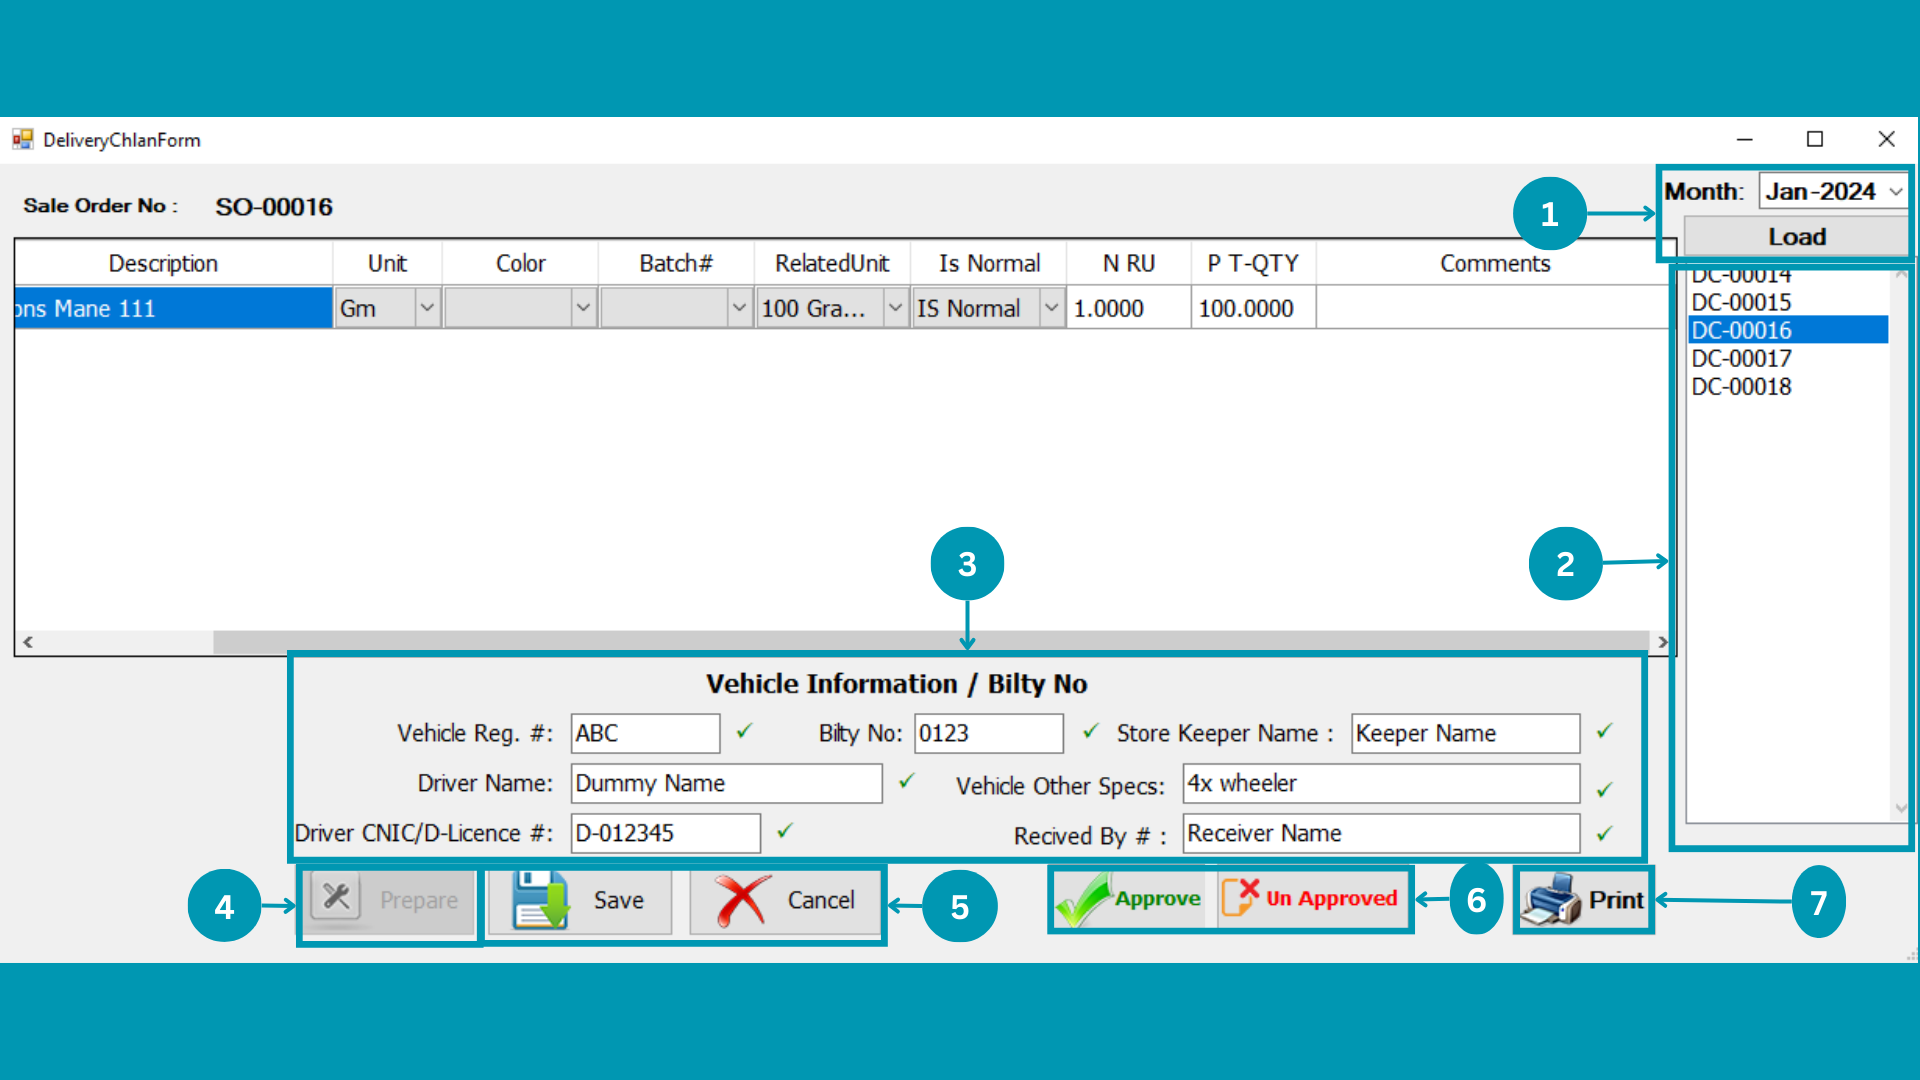
| 01 |
Select Month of 'Delivery Challan' to load and click load. |
| 02 | 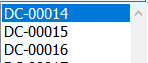 Select
DC Number from List. Select
DC Number from List. |
| 03 | Click
on “Prepare” to start data entry. |
| 04 | Write Delivery Challan Vehicle details.
|
| 05 | Hit
the Save Or Cancel or Print Button. |
| 06 |  Hit the Approved Or Unapproved Button.
|
| 07 | Press
Print to get print of it.
|
MAB BIZ SOLUTIONS
Accounts
Accounts
All the debit credit accounts entries and chart of Accounts instructions listed here.
Following pages usage is explained in this segment
- Add Voucher
- View Voucher
- Chart of Accounts
Add Voucher
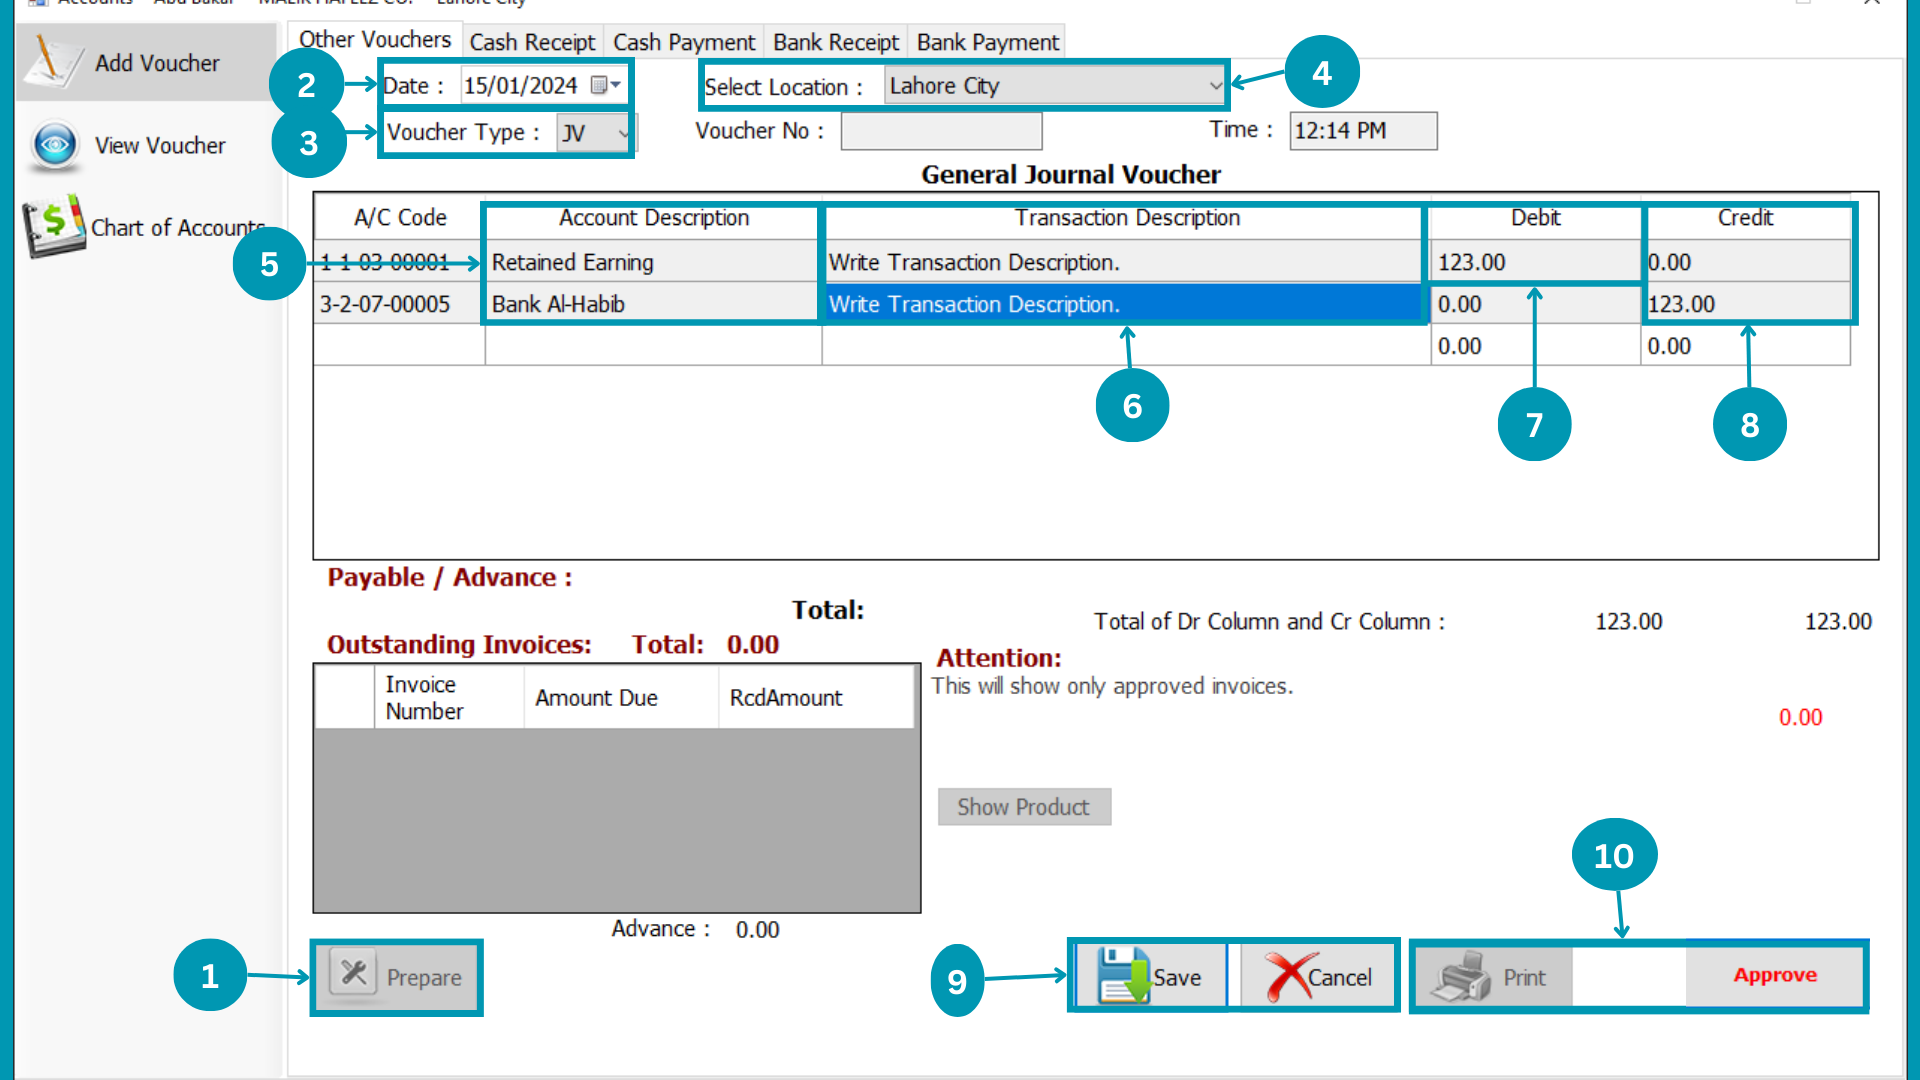
| 01 | Click on Prepare to start writing in the table. |
| 02 | Select Transaction date.
|
| 03 |  Select Type of the Invoice from JV, PC, RC, PB, RB. Select Type of the Invoice from JV, PC, RC, PB, RB. |
| 04 | 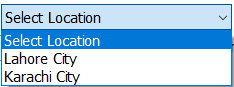 Select the Location. Select the Location. |
| 05 |  Select at least Two head of account by pressing "Space".
 |
| 06 |  Write Transaction Description beside every entry.
 |
| 07 |  If there is a head debit, write the debit amount. If there is a head debit, write the debit amount. |
| 08 |  If there is a head Credit, write the credit amount. If there is a head Credit, write the credit amount. |
| 09 |
Click the "Save" or "Cancel". |
| 10 |  Click the "Approve" or "Print";
|
Cash Receipt
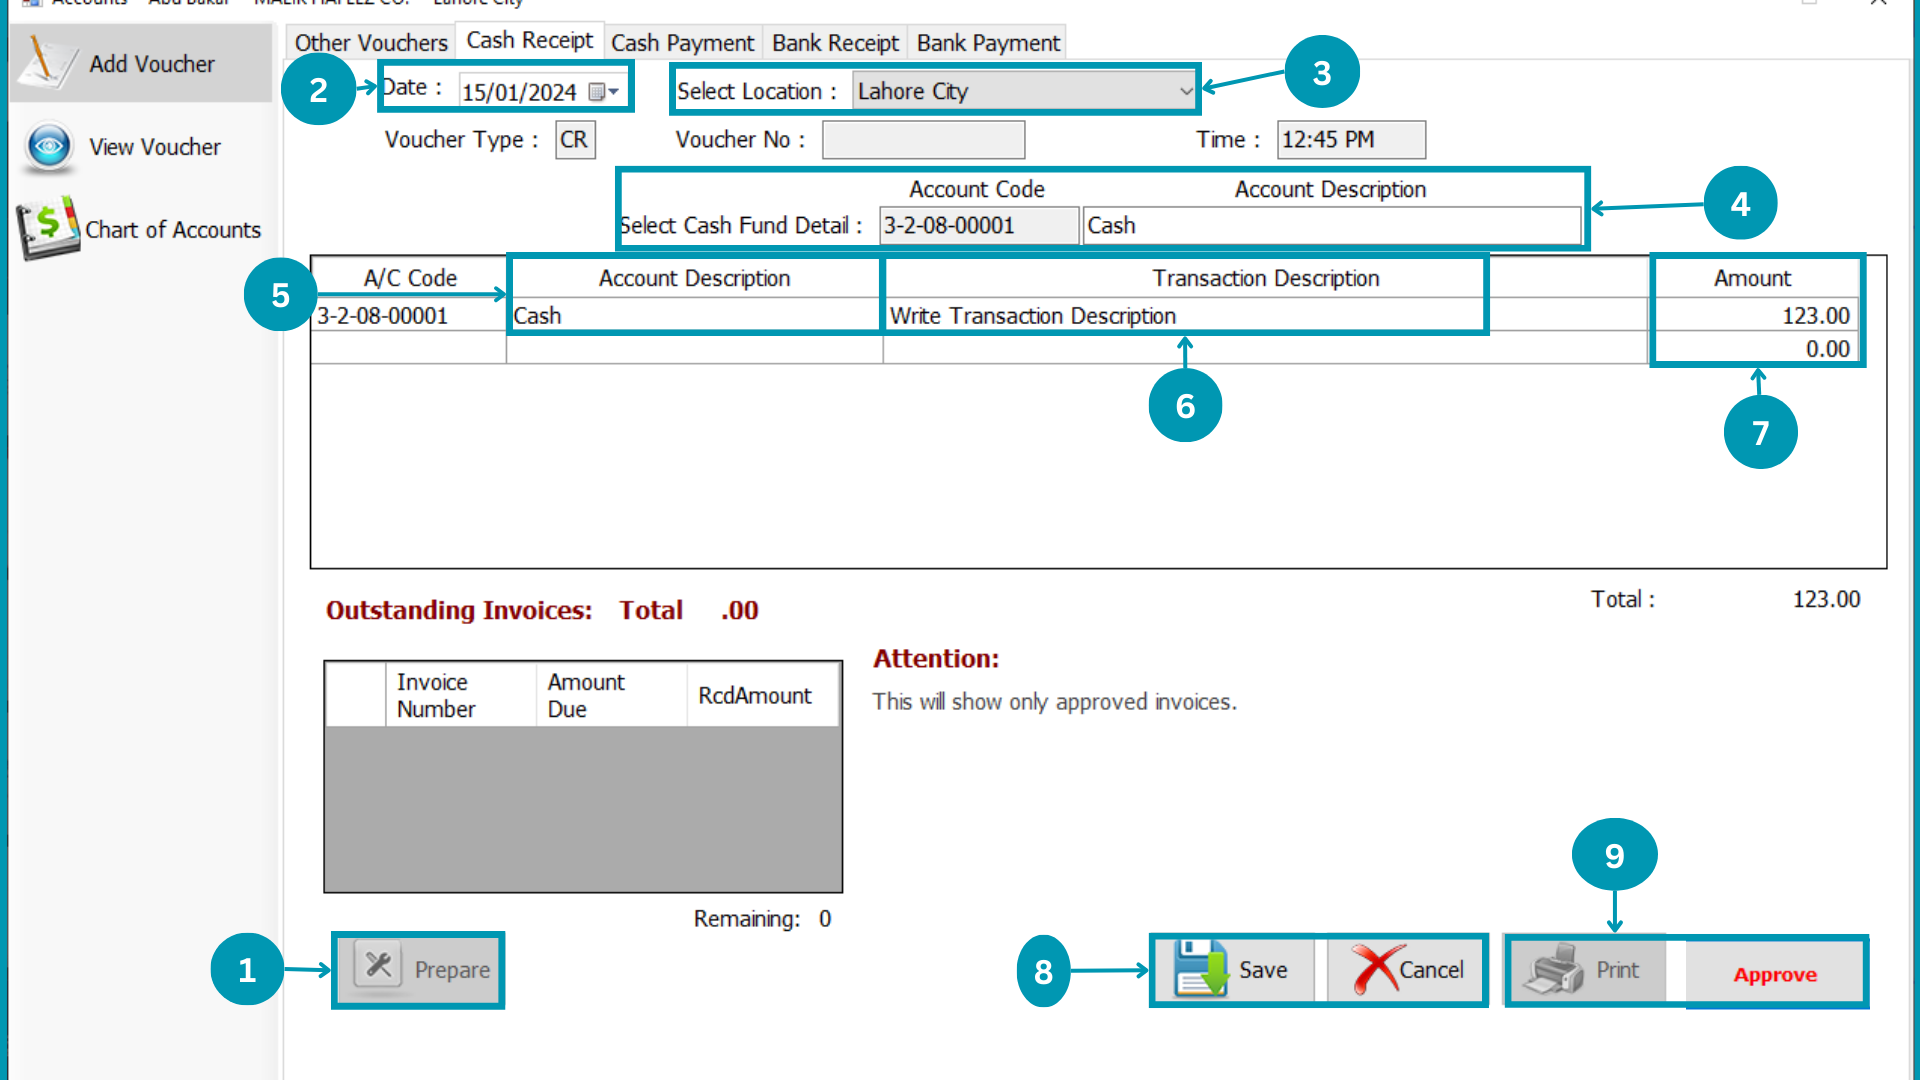
| 01 | Click on Prepare to start writing in the table. |
| 02 | Select Transaction date.
|
| 03 | Select the Location. |
| 04 |  Select Cash Fund Head. Select Cash Fund Head. |
| 05 |
Select Cash recipient by pressing "Space". |
| 06 |
Write Transaction Description beside every entry. |
| 07 |  Write the amount of cash receipt. Write the amount of cash receipt. |
| 08 |
Click the "Save" or "Cancel". |
| 09 |
Click the "Approve" or "Print";
|
Cash Payment
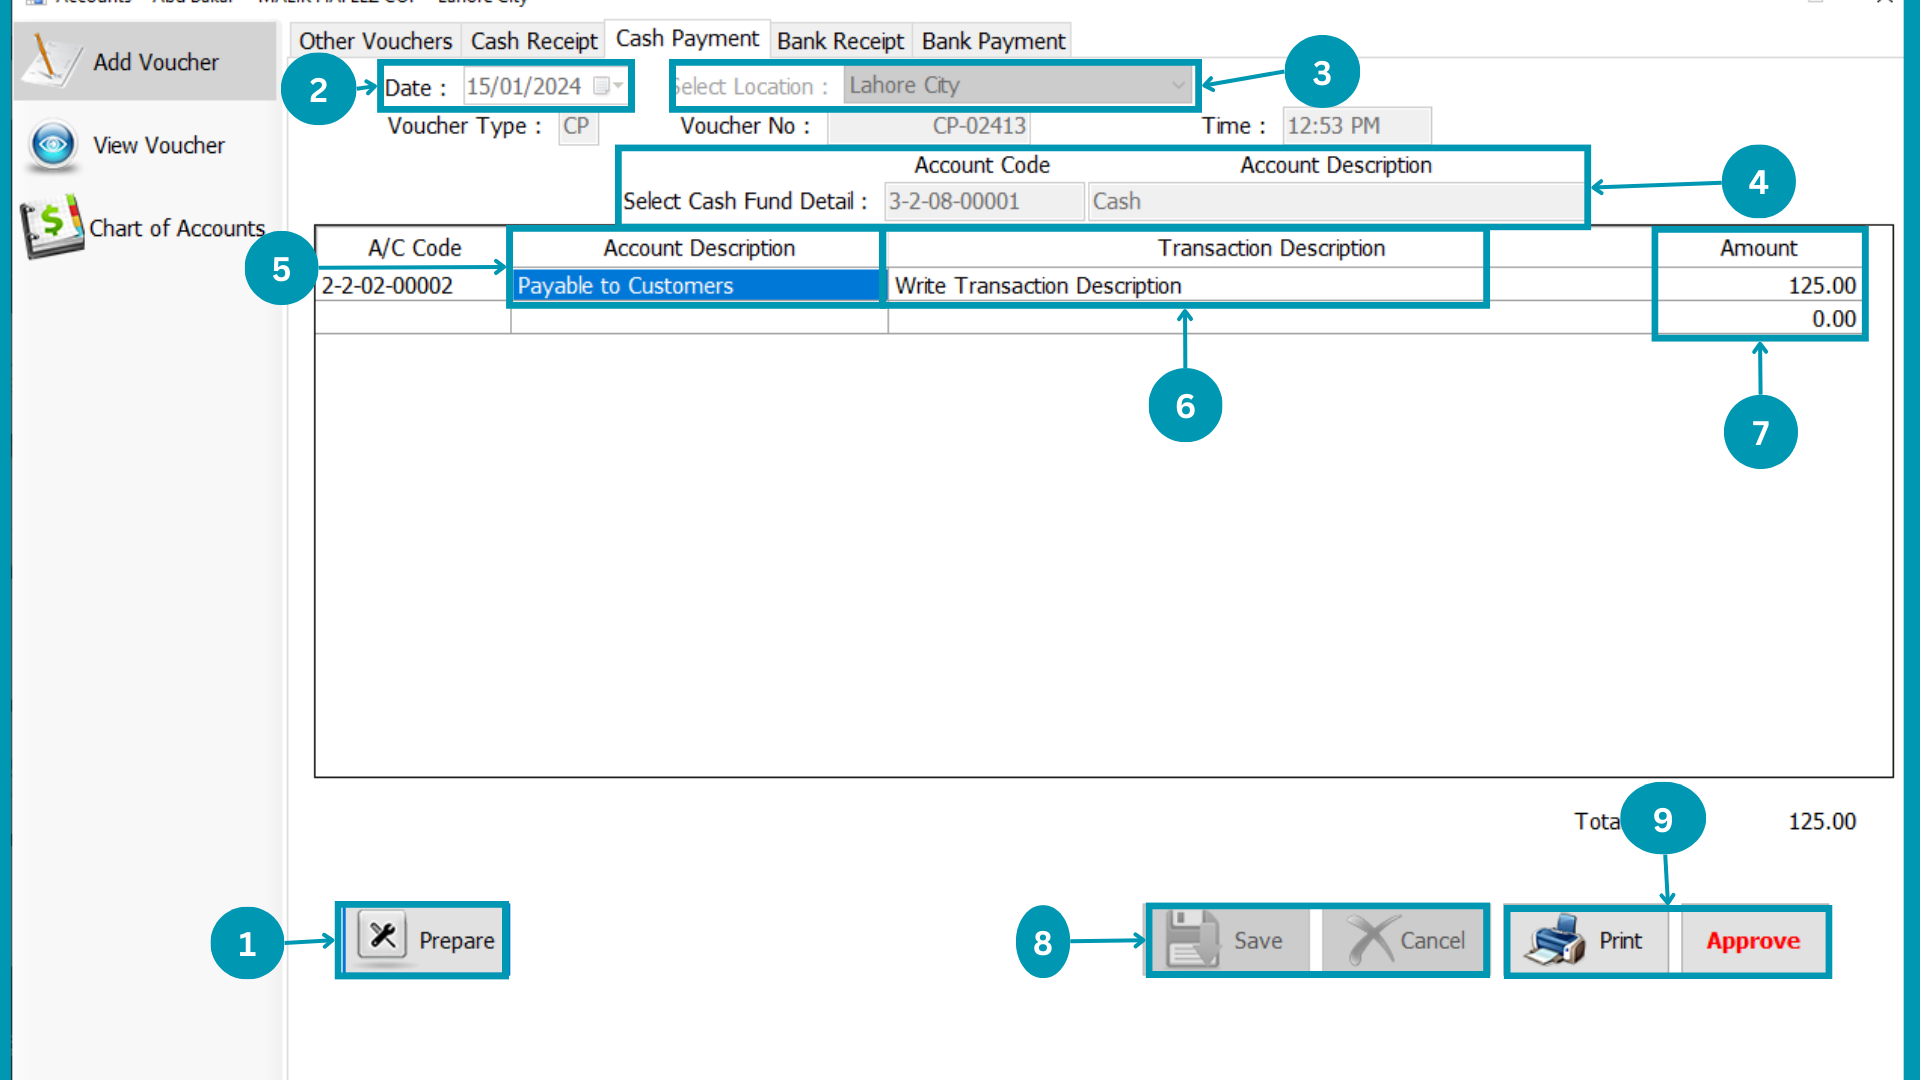
| 01 | Click on Prepare to start writing in the table. |
| 02 | Select Transaction date.
|
| 03 | Select the Location. |
| 04 | Select Cash Fund Head. |
| 05 |
Select Cash recipient by pressing "Space". |
| 06 |
Write Transaction Description beside every entry. |
| 07 | Write the amount of cash payment. |
| 08 |
Click the "Save" or "Cancel". |
| 09 |
Click the "Approve" or "Print";
|
Bank Receipt
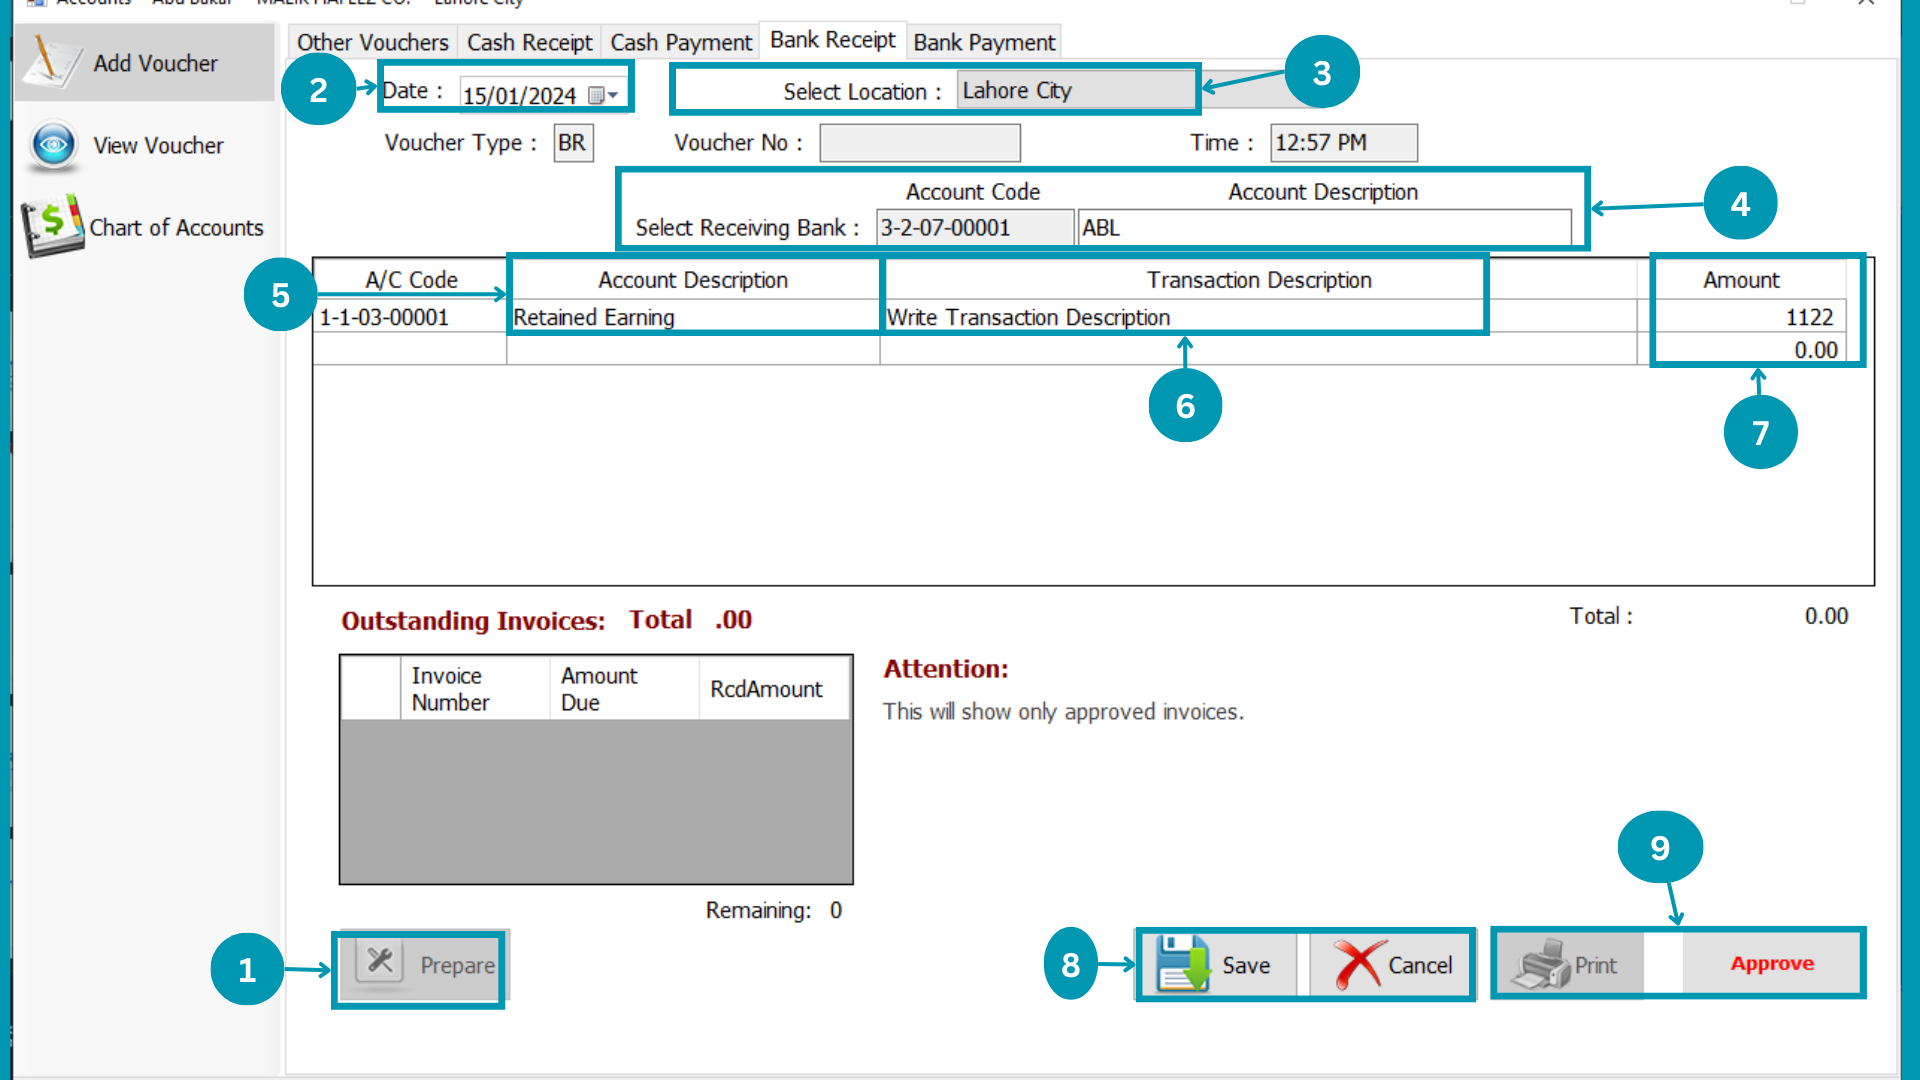
| 01 | Click on Prepare to start writing in the table. |
| 02 | Select Transaction date.
|
| 03 | Select the Location. |
| 04 |  Select Receiving bank. Select Receiving bank. |
| 05 |
Select Head for Bank receipt by pressing "Space". |
| 06 |
Write Transaction Description beside every entry. |
| 07 | Write the amount of Bank payment. |
| 08 |
Click the "Save" or "Cancel". |
| 09 |
Click the "Approve" or "Print";
|
Bank Payment
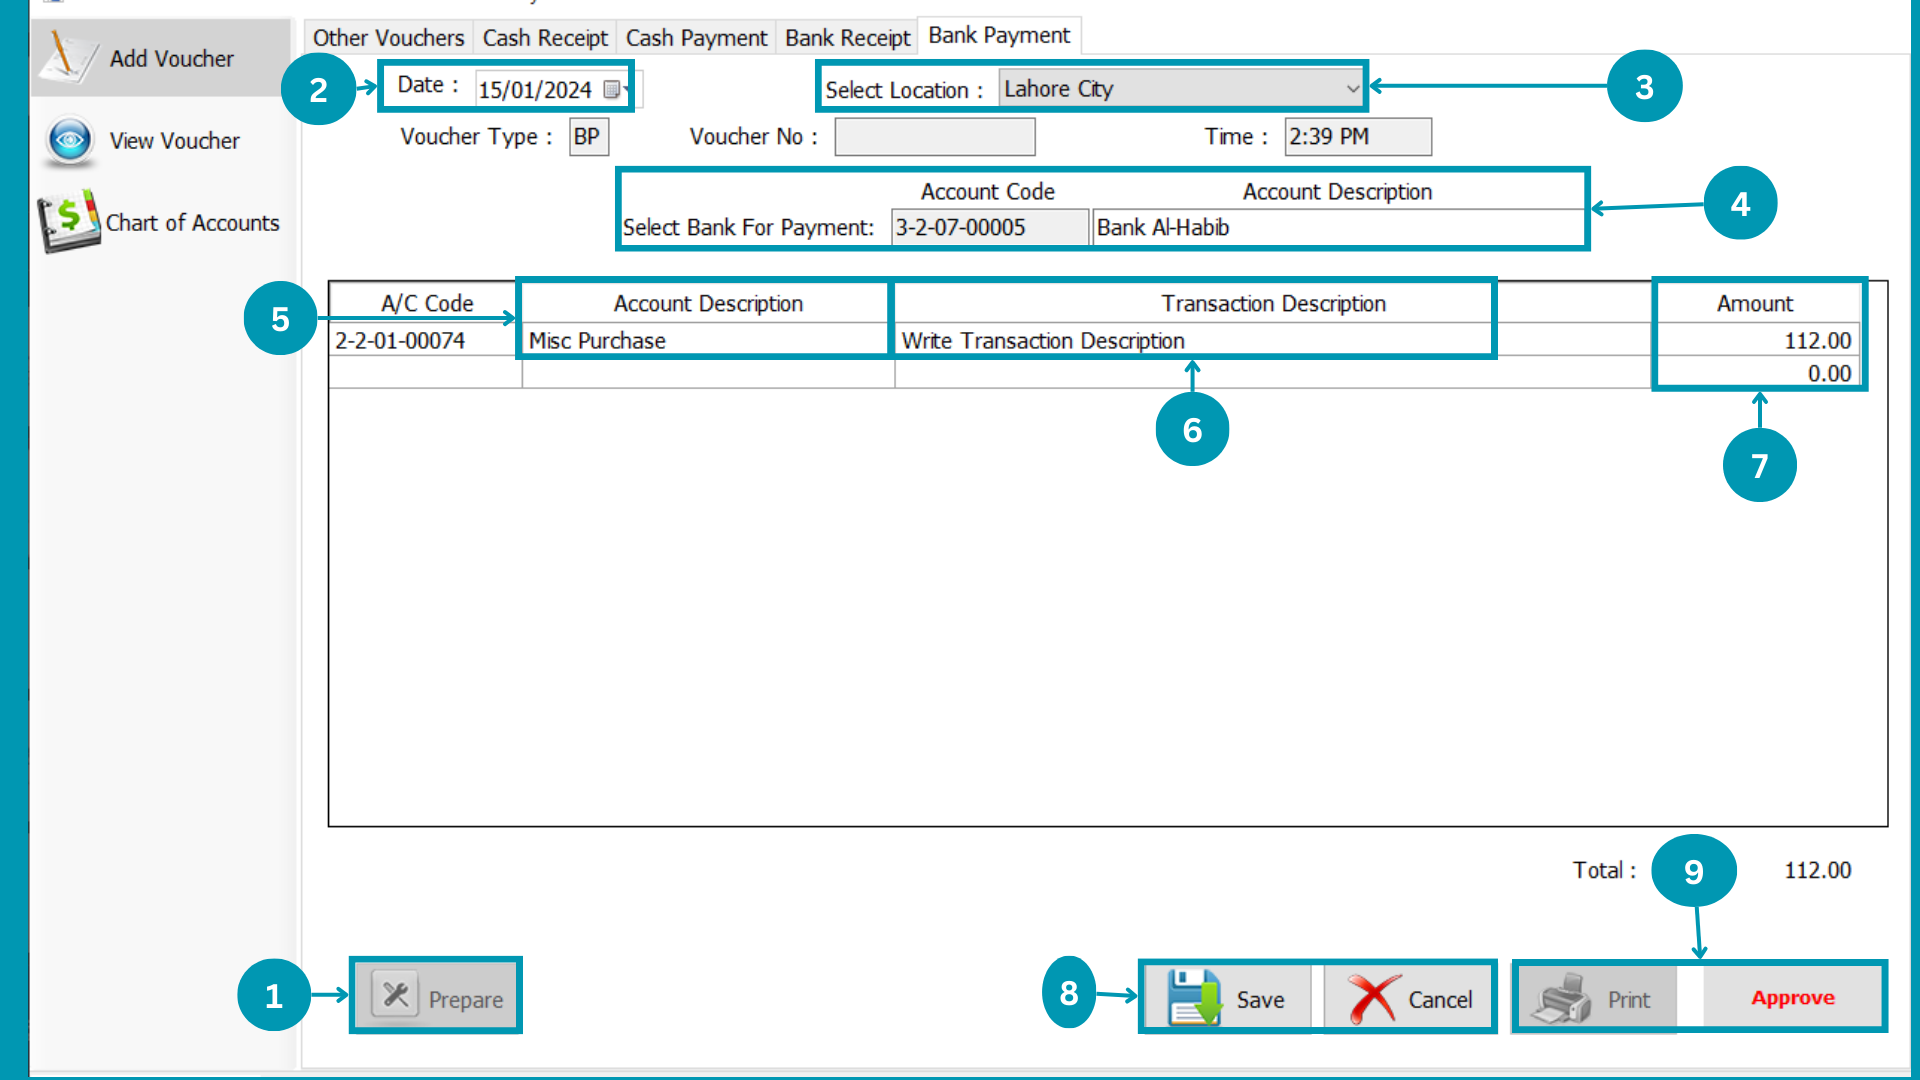
| 01 | Click on Prepare to start writing in the table. |
| 02 | Select Transaction date.
|
| 03 | Select the Location. |
| 04 | Select Receiving bank. |
| 05 |
Select Head for Bank receipt by pressing "Space". |
| 06 |
Write Transaction Description beside every entry. |
| 07 | Write the amount of Bank payment. |
| 08 |
Click the "Save" or "Cancel". |
| 09 |
Click the "Approve" or "Print";
|
View Voucher
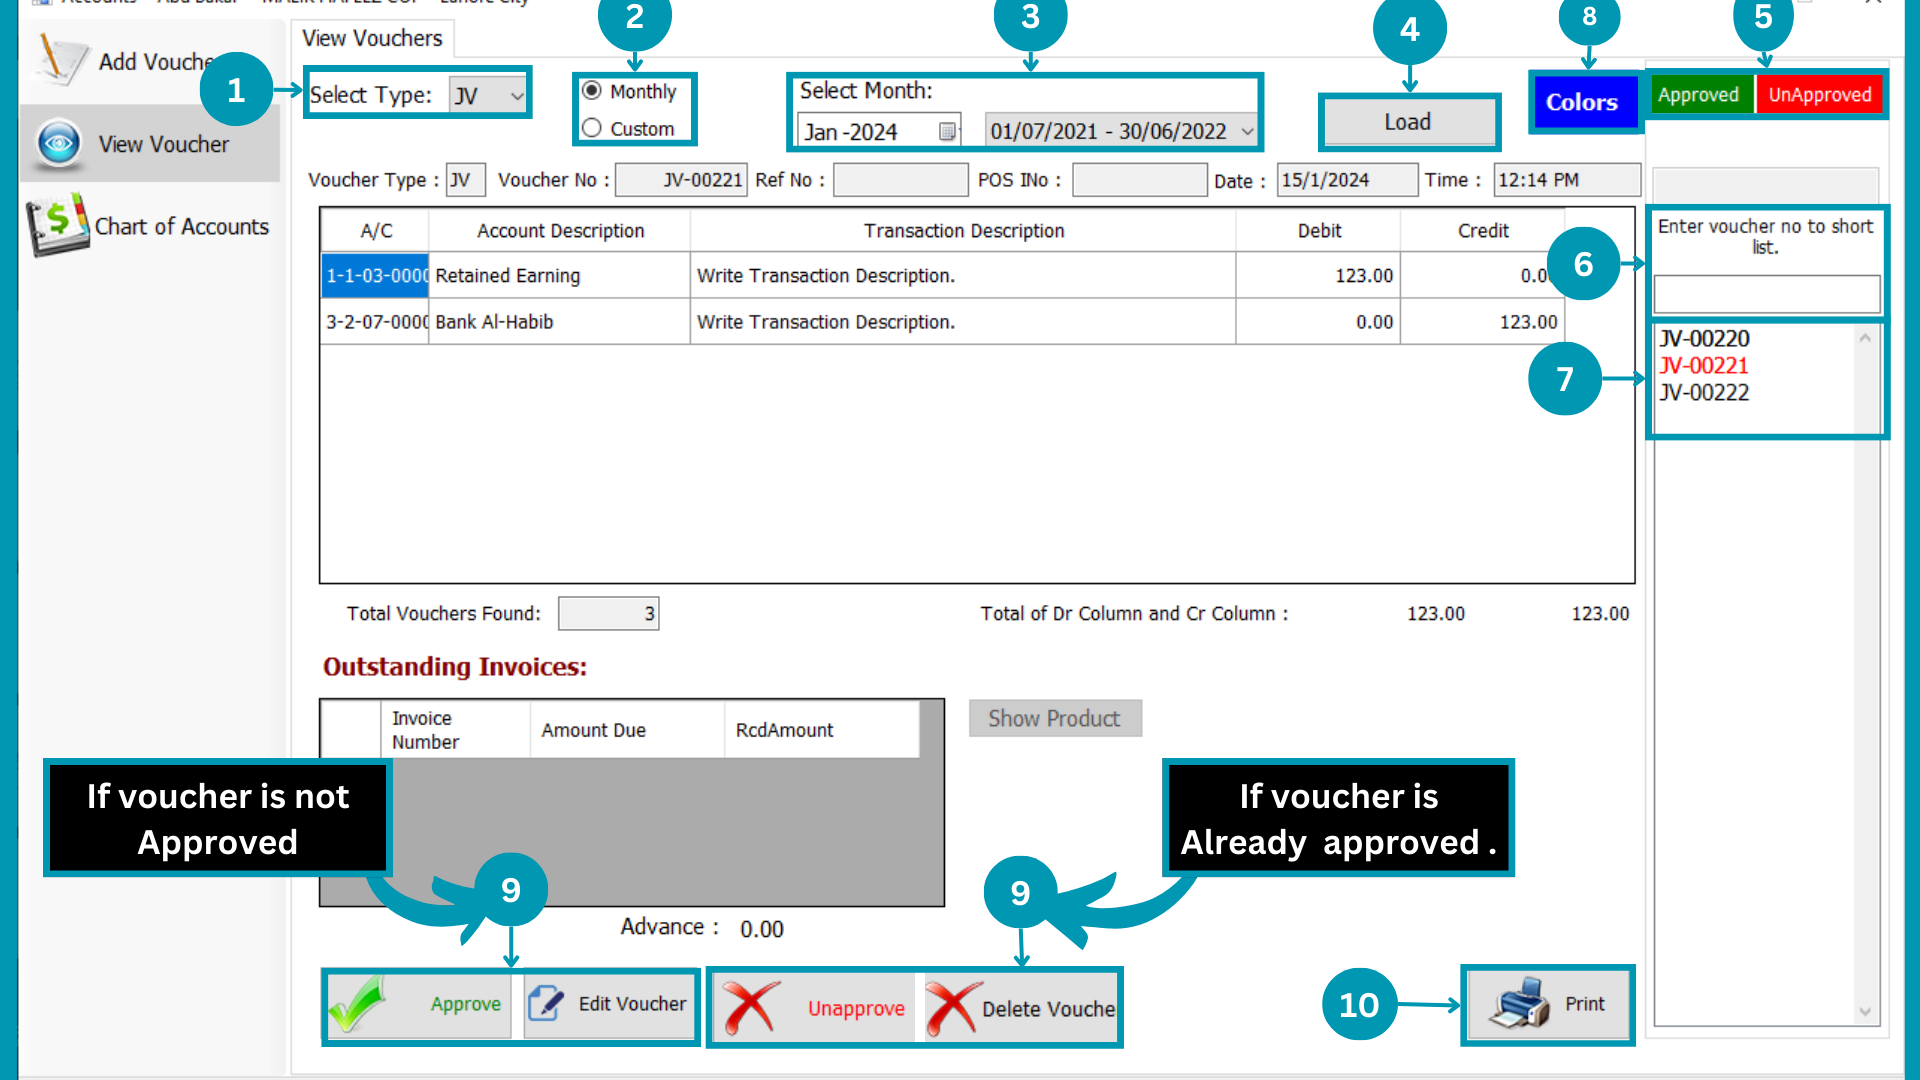
| 01 | Select Type of the Invoice from JV, PC, RC, PB, RB.
|
| 02 | Select relevant “Month or Financial Period”.
|
| 03 | Select “Monthly” to view month wise Purchase Requisition; or select “Custom” to view Financial Period wise Accounts voucher. |
| 04 | Hit the load Button. |
| 05 | Hit the Approved Or Unapproved Button.
|
| 06 |
Enter the Specific Voucher Number to view a specific Accounts Voucher. |
| 07 |  Click on voucher number to check entry made against that specific voucher. Click on voucher number to check entry made against that specific voucher. |
| 08 |
Click the "Color" button. |
| 09 |  Click the "Approve" or "Edit". If the voucher is Unapproved.
|
| 09 |  Click the "UnApprove" or "Delete". If the voucher is Already Approved.
|
| 10 |
|
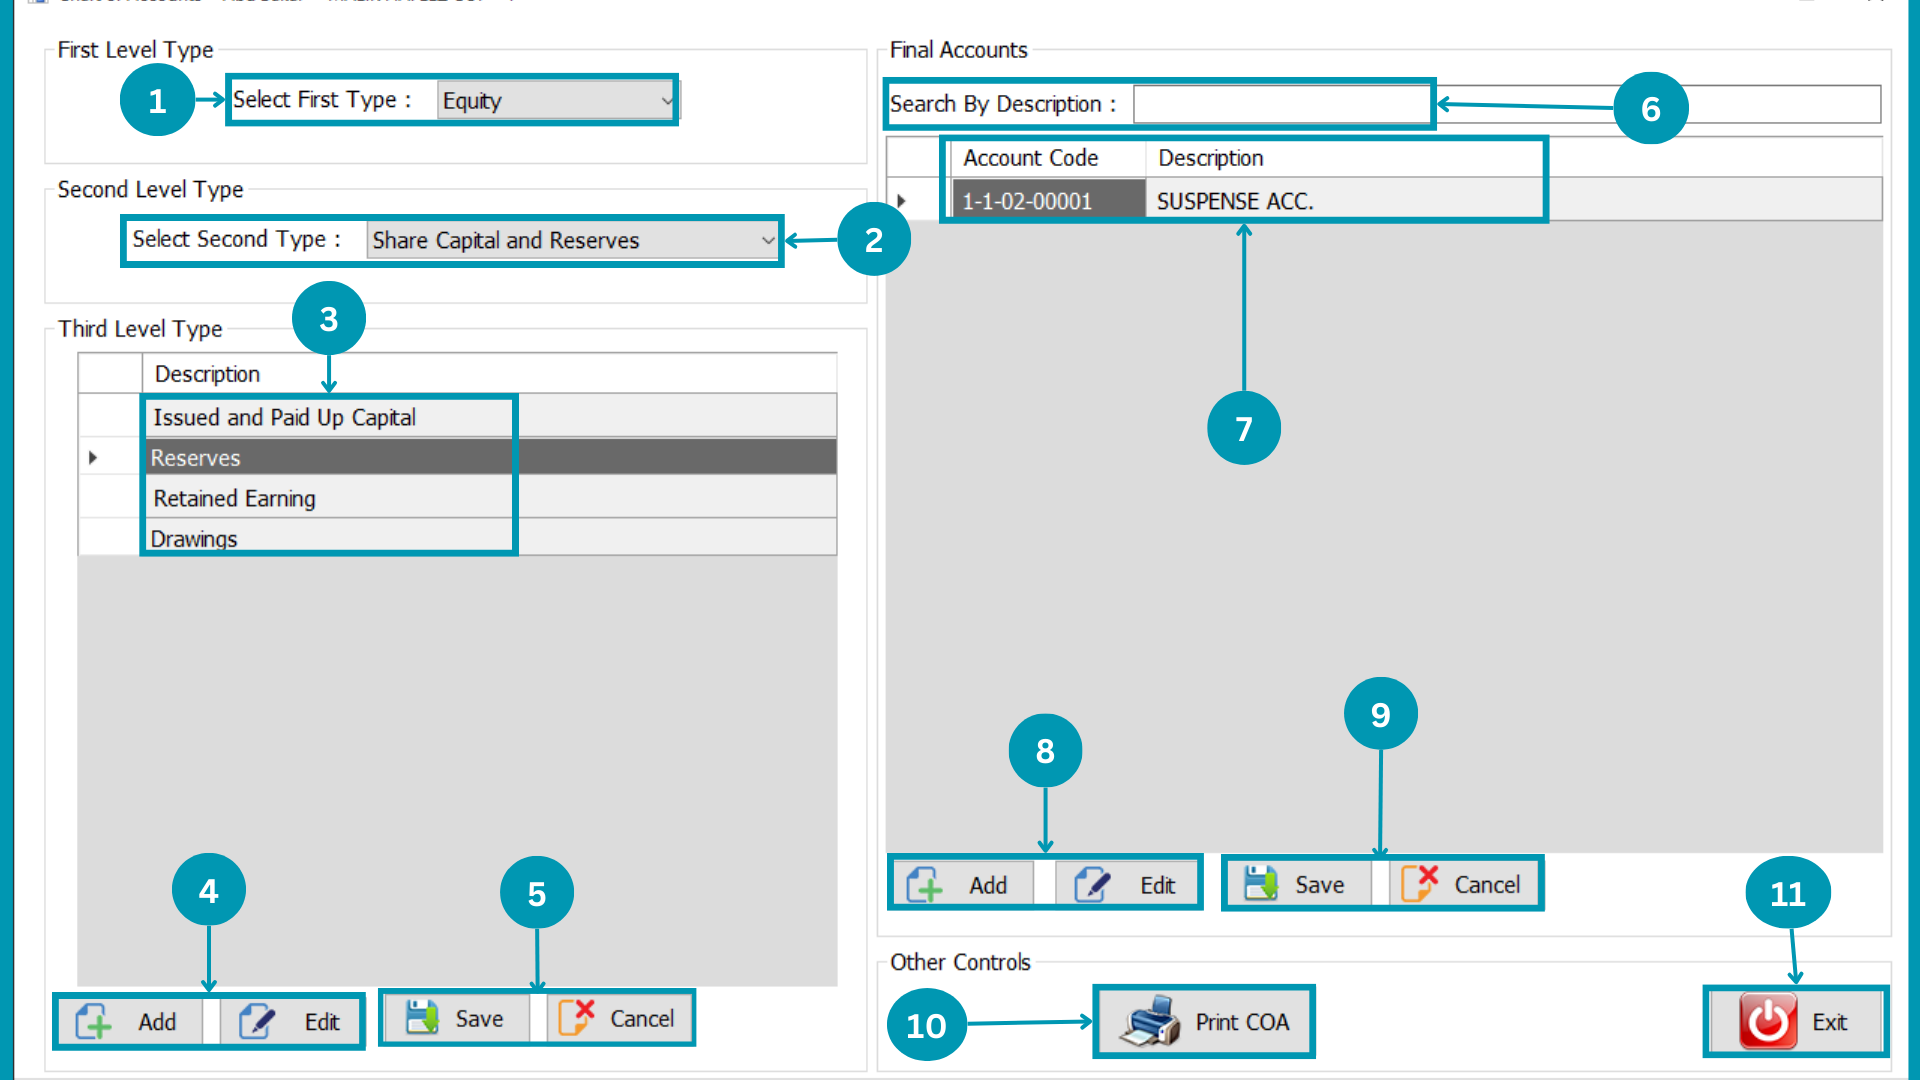
Chart of Account Equity Issued and Paid Up Capital
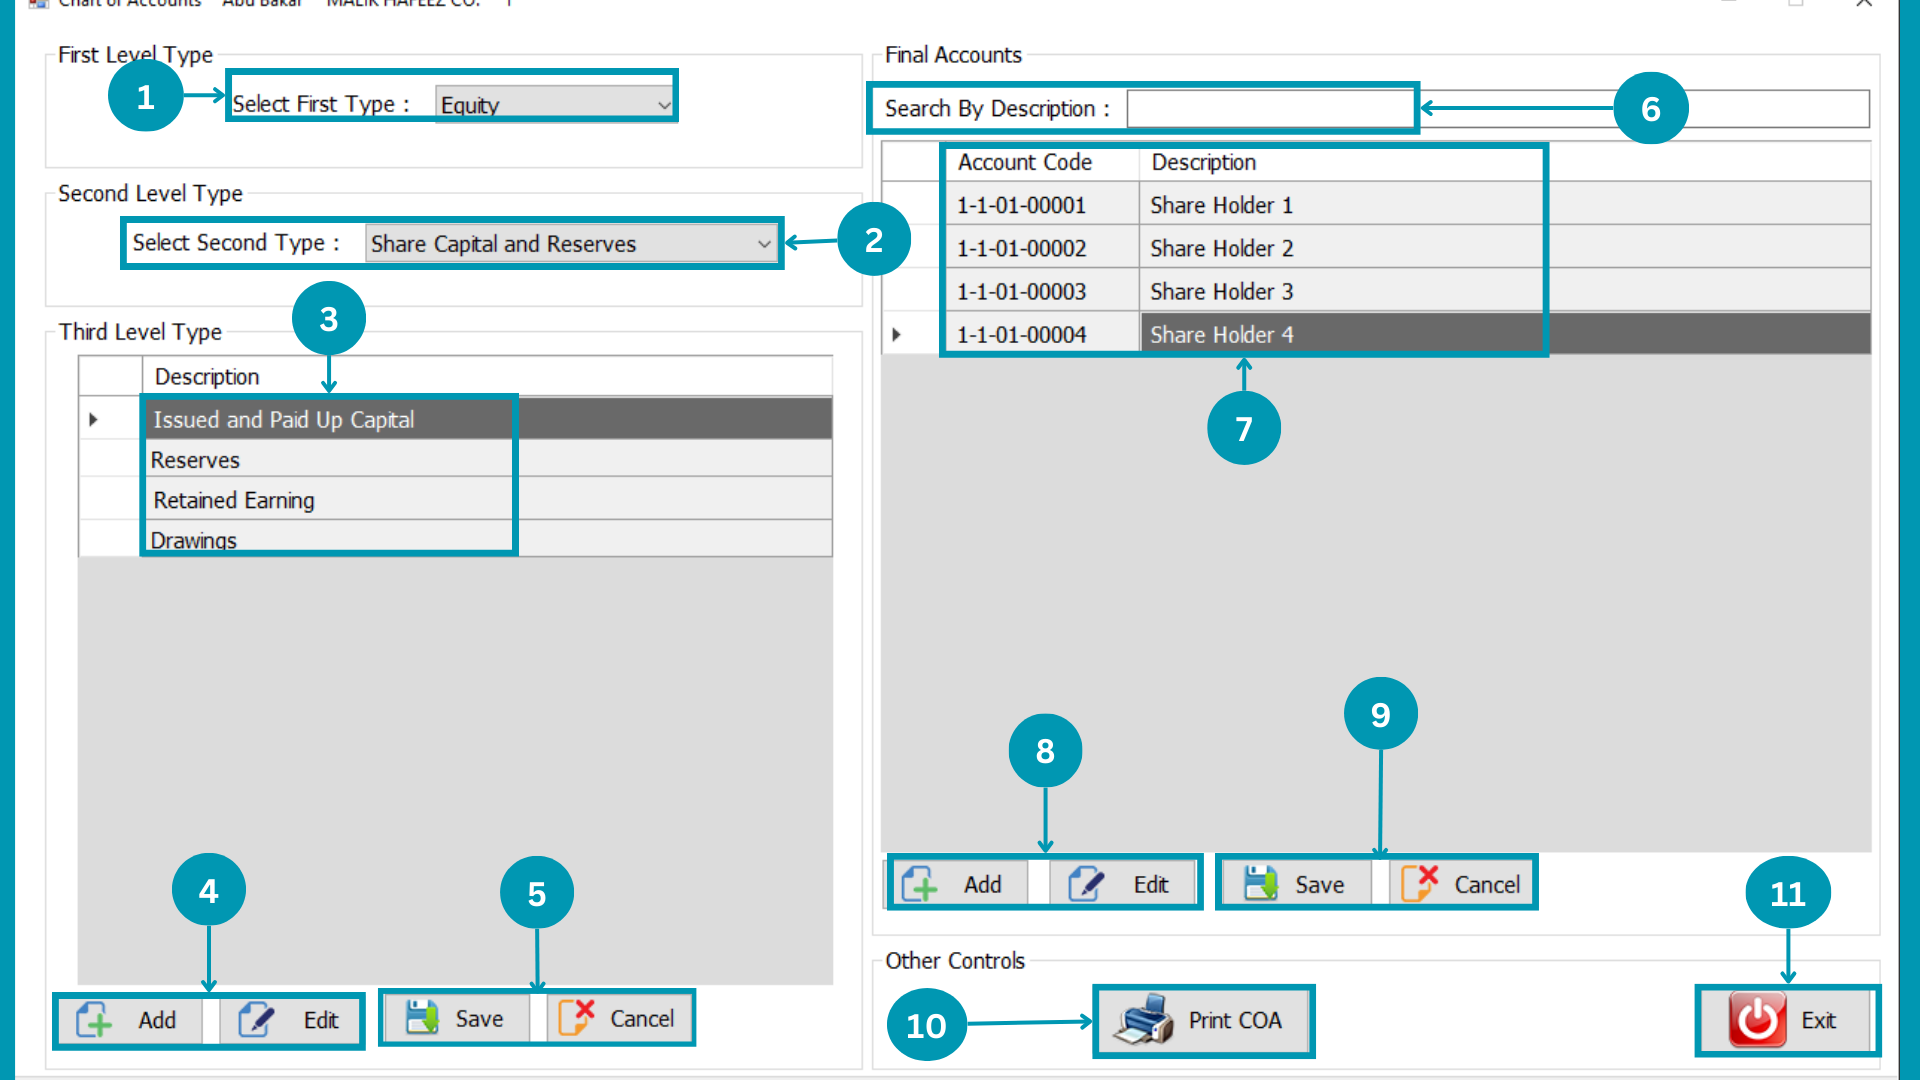
| 01 |  Select First level head of Account's type. Select First level head of Account's type.
|
| 02 |  Select Second level head of Account's type. Select Second level head of Account's type.
|
| 03 |  Select Third level head of Accounts "Issued and Paid Up Capital". Select Third level head of Accounts "Issued and Paid Up Capital".
|
| 04 |  Hit the Add Or Edit Button to change third-level heads. Hit the Add Or Edit Button to change third-level heads. |
| 05 |  After Clicking on Add or Edit Select "Save" or "Cancel" Button to close. After Clicking on Add or Edit Select "Save" or "Cancel" Button to close.
|
| 06 |  Search the Added heads by writing in the search bar
 |
| 07 |  Select Final Accounts in Issued and Paid up Capital want to Edit. Select Final Accounts in Issued and Paid up Capital want to Edit. |
| 08 |
Click Edit to rename existing head and Click Add to Enter new. |
| 09 | After Clicking on Add or Edit Select "Save" or "Cancel" Button to close.
|
| 10 | 
|
Reserves
| 01 | Select First level head of Account's type.
|
| 02 | Select Second level head of Account's type.
|
| 03 |  Select Third level head of Accounts "Reserves". Select Third level head of Accounts "Reserves".
|
| 04 | Hit the Add Or Edit Button to change third-level heads. |
| 05 | After Clicking on Add or Edit Select "Save" or "Cancel" Button to close.
|
| 06 |
Search the Added heads by writing in the search bar |
| 07 |  Select Final Accounts in Reserves want to Edit. Select Final Accounts in Reserves want to Edit. |
| 08 |
Click Edit to rename existing head and Click Add to Enter new. |
| 09 | After Clicking on Add or Edit Select "Save" or "Cancel" Button to close.
|
| 10 |
|
Retained Earning
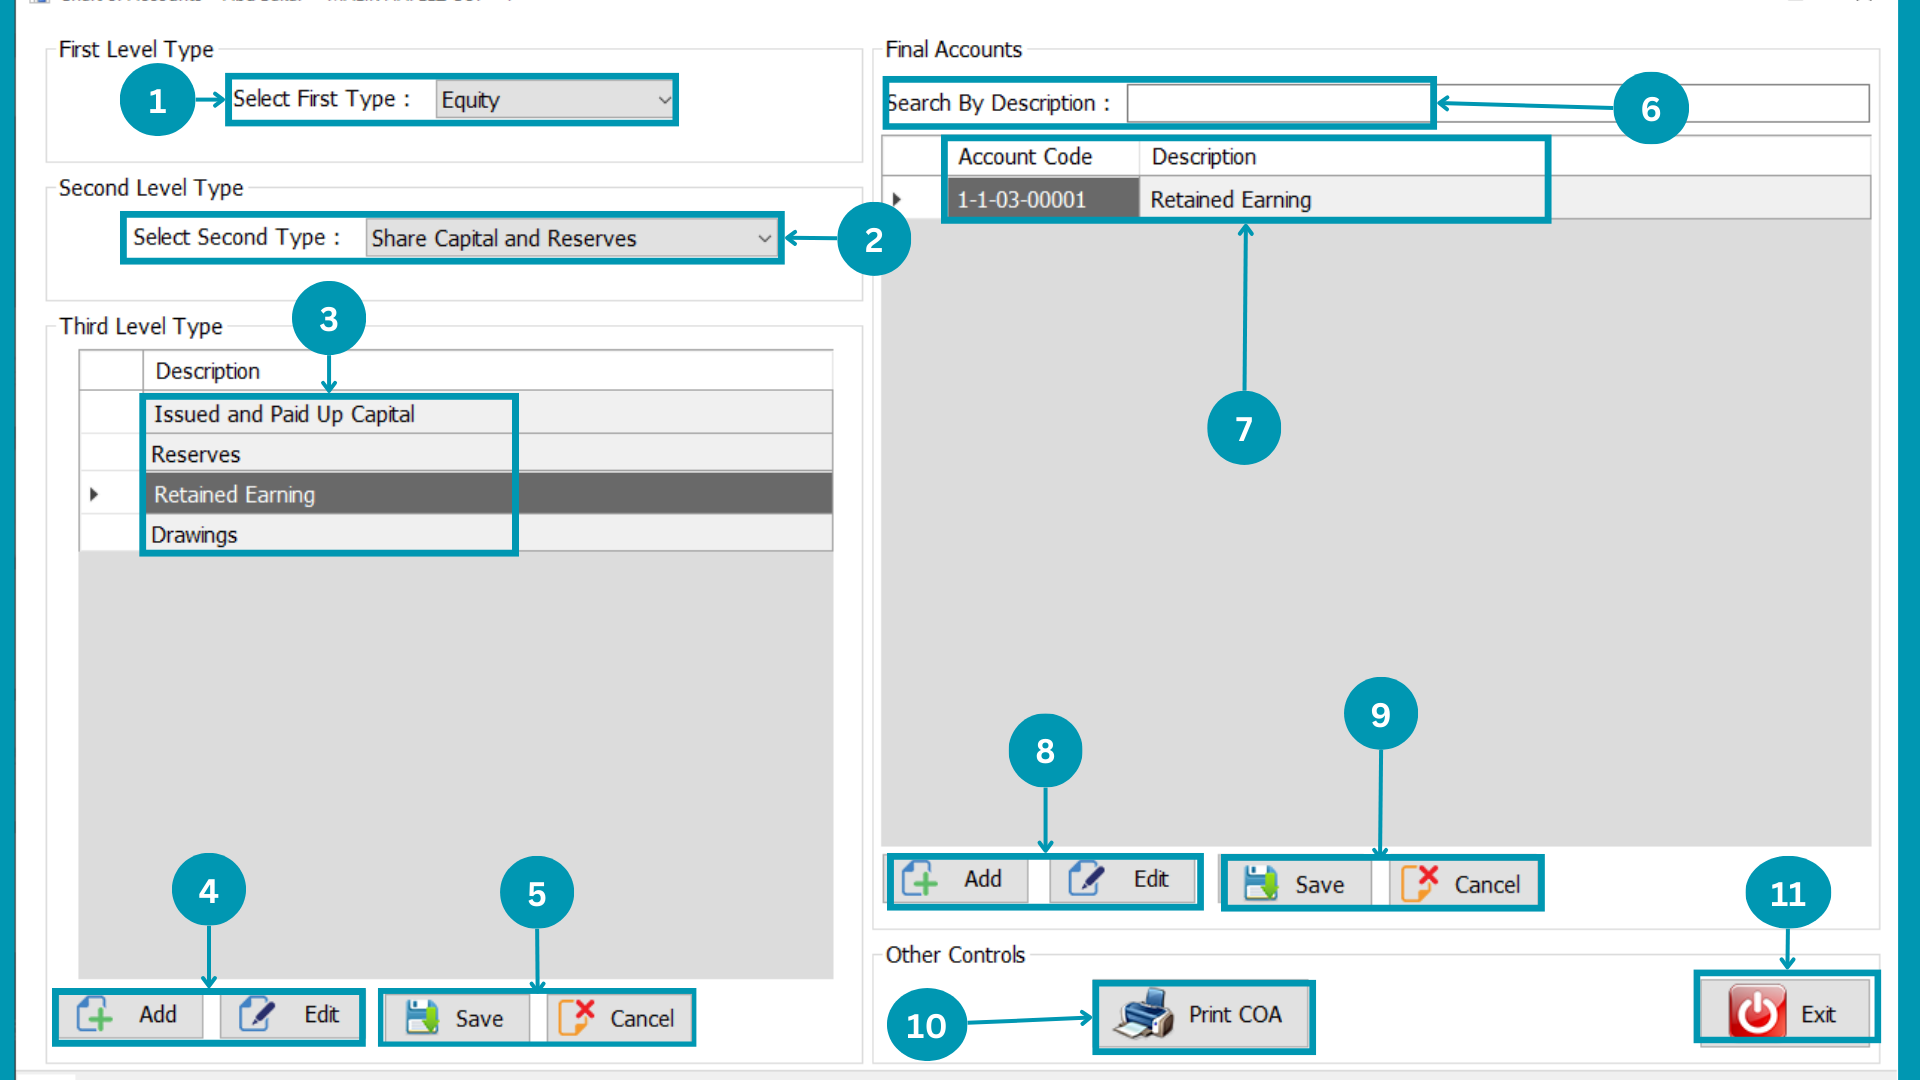
| 01 | Select First level head of Account's type.
|
| 02 | Select Second level head of Account's type.
|
| 03 |  Select Third level head of Accounts "Retained Earning". Select Third level head of Accounts "Retained Earning".
|
| 04 | Hit the Add Or Edit Button to change third-level heads. |
| 05 | After Clicking on Add or Edit Select "Save" or "Cancel" Button to close.
|
| 06 |
Search the Added heads by writing in the search bar |
| 07 |  Select Final Accounts in Retained Earning want to Edit. Select Final Accounts in Retained Earning want to Edit. |
| 08 |
Click Edit to rename existing head and Click Add to Enter new. |
| 09 | After Clicking on Add or Edit Select "Save" or "Cancel" Button to close.
|
| 10 |
|
Drawings
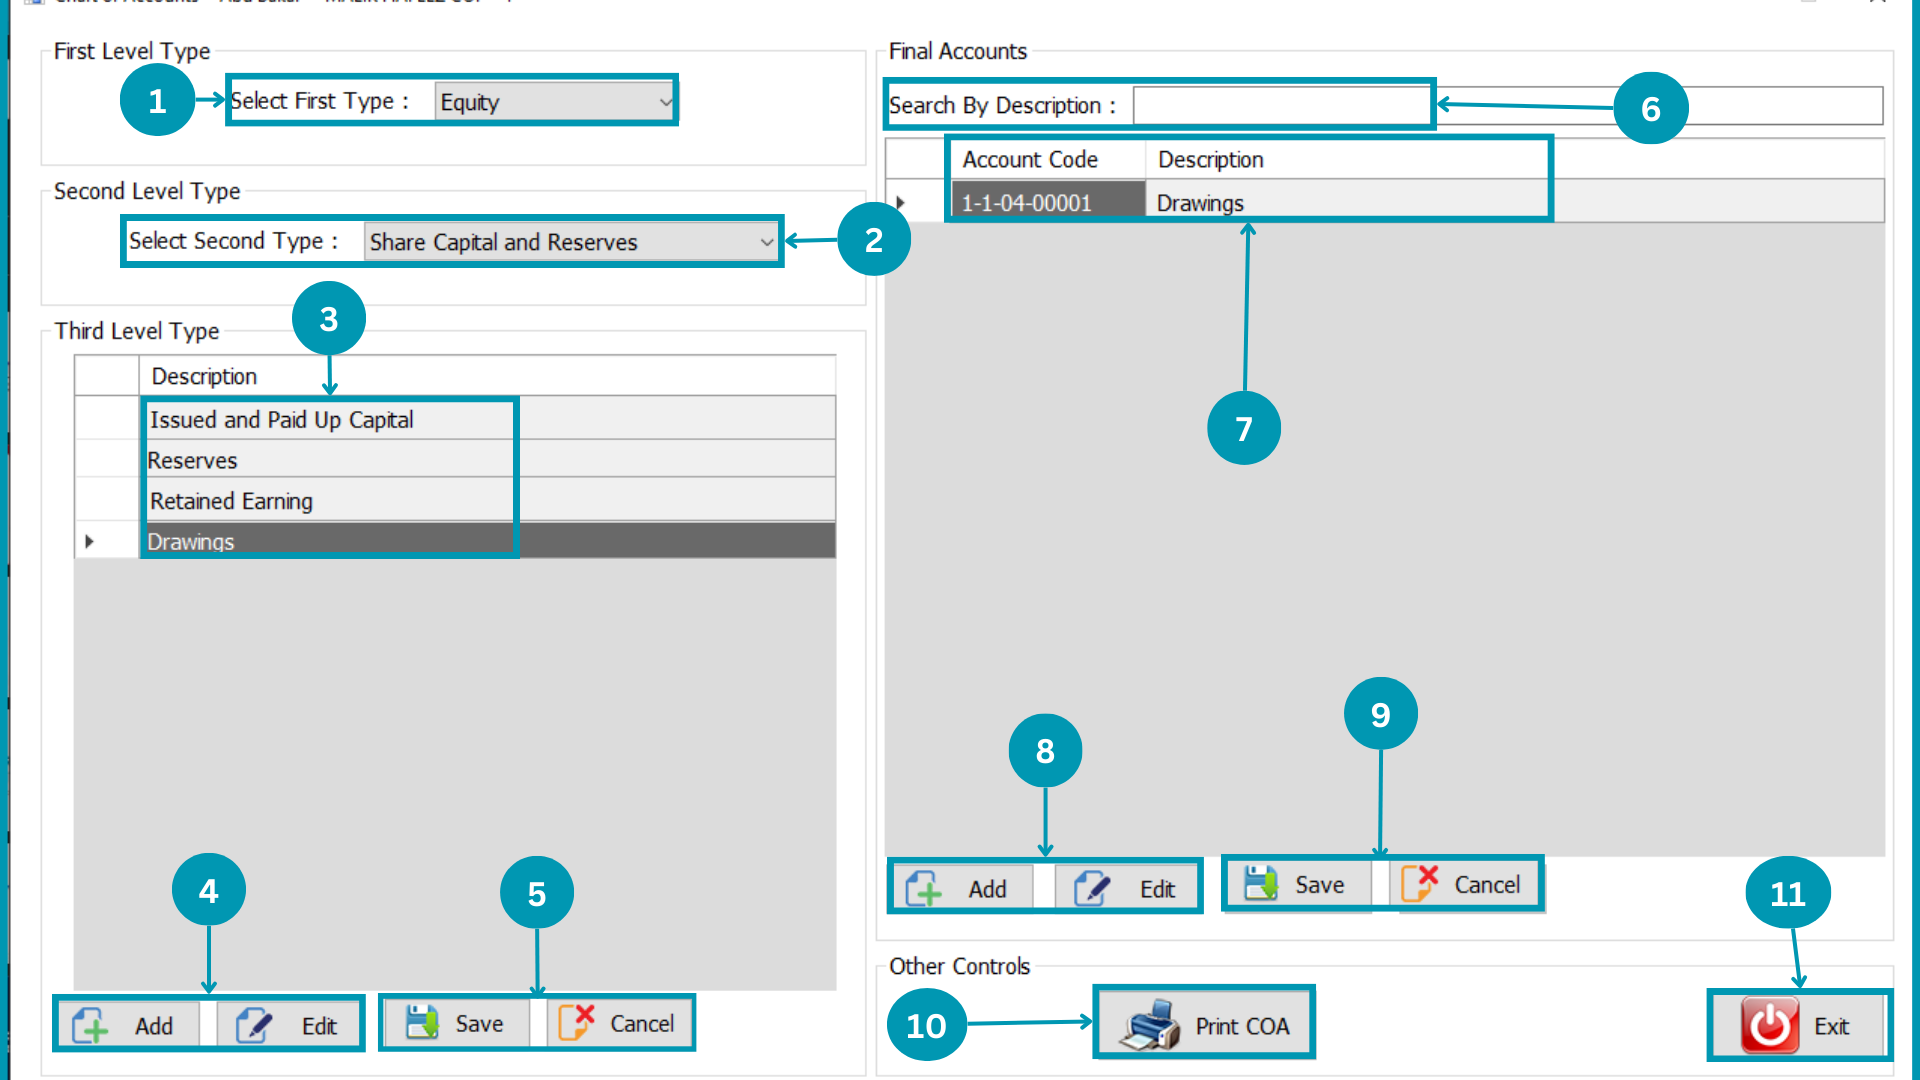
| 01 | Select First level head of Account's type.
|
| 02 | Select Second level head of Account's type.
|
| 03 |  Select Third level head of Accounts "Drawings". Select Third level head of Accounts "Drawings".
|
| 04 | Hit the Add Or Edit Button to change third-level heads. |
| 05 | After Clicking on Add or Edit Select "Save" or "Cancel" Button to close.
|
| 06 |
Search the Added heads by writing in the search bar |
| 07 |  Select Final Accounts in Drawings want to Edit. Select Final Accounts in Drawings want to Edit. |
| 08 |
Click Edit to rename existing head and Click Add to Enter new. |
| 09 | After Clicking on Add or Edit Select "Save" or "Cancel" Button to close.
|
| 10 |
|
As Same other heads of Accounts will be customize.
MAB BIZ SOLUTIONS
Customers & Suppliers
Customers & Suppliers
Customers wise mechanism of treatment and Customers & Suppliers details will be explained in this set.
Following pages usage is explained in this segment
- Customers
- Suppliers
- Cash Customers
- Settings
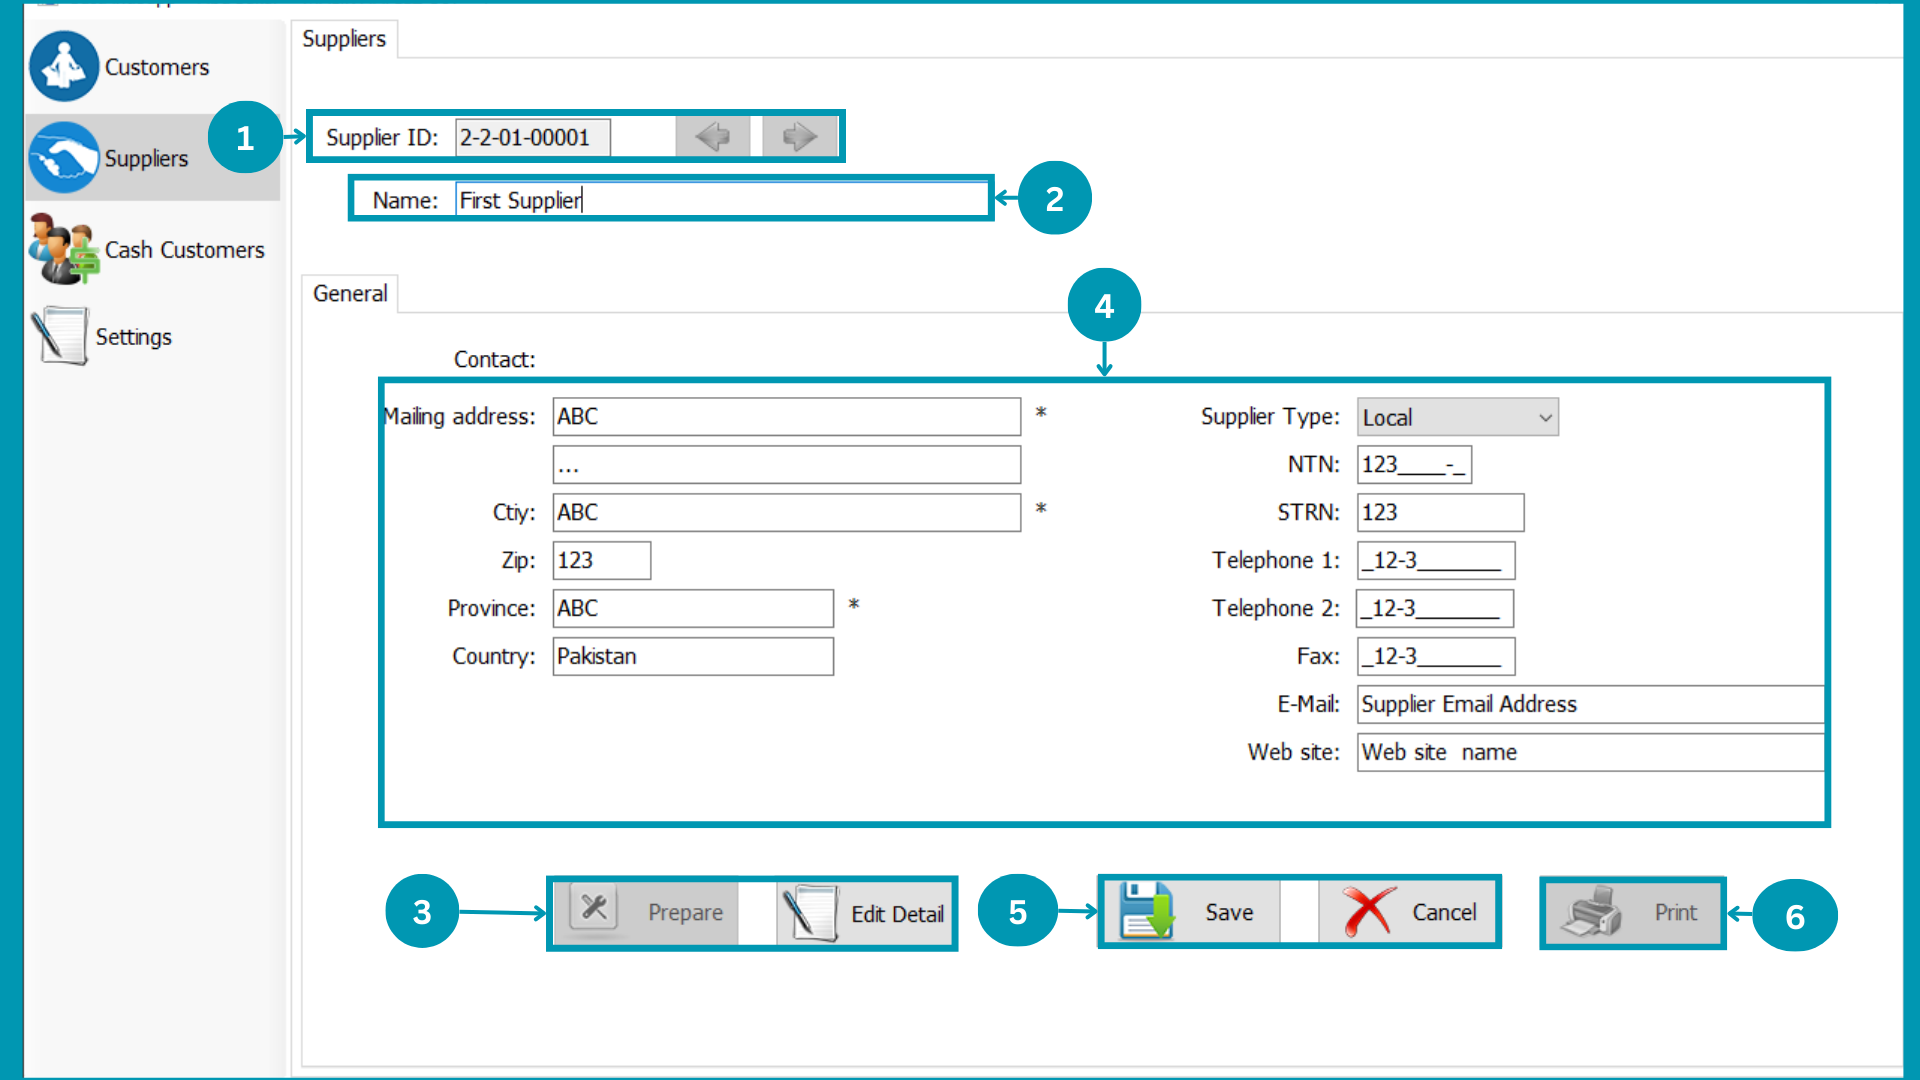
Customers-Generals
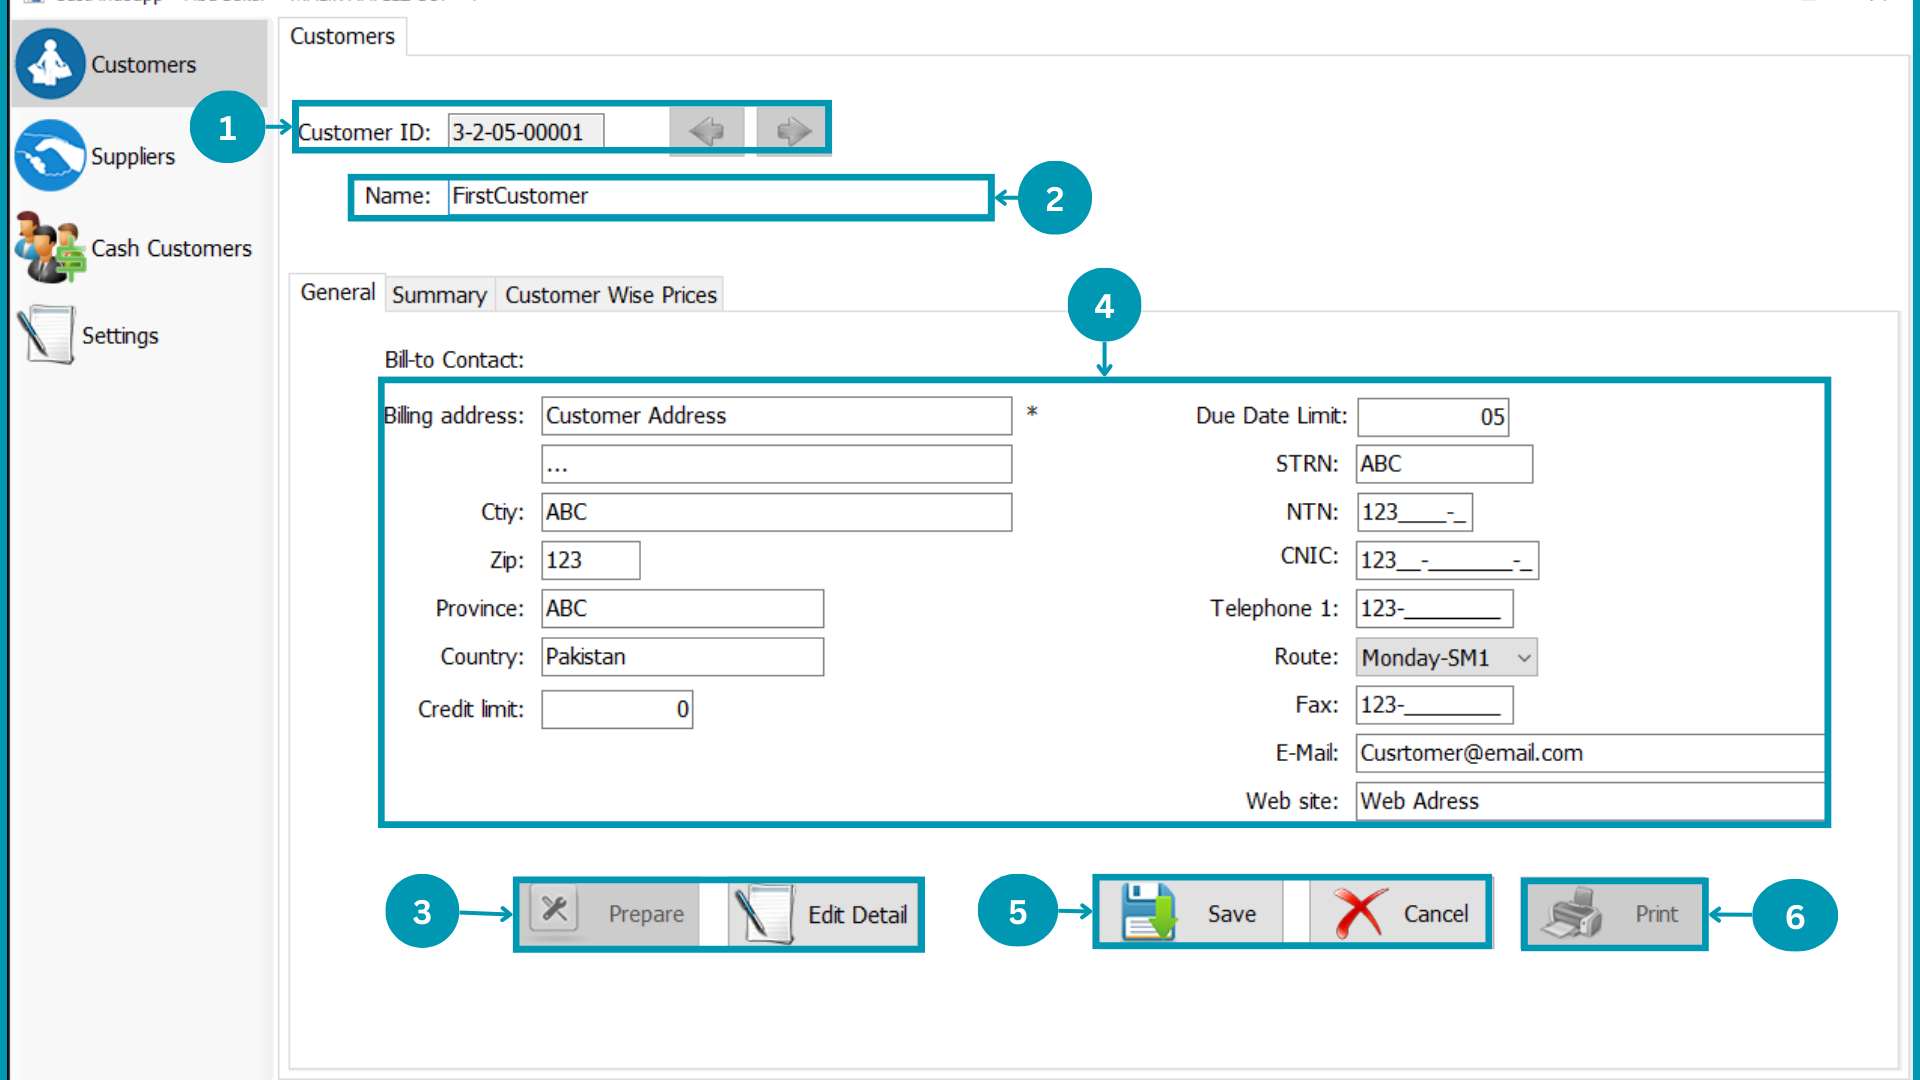
| 01 |  Forward and Backward Customers list, Initially it will be on One. Forward and Backward Customers list, Initially it will be on One.
|
| 02 |  Search Customer by name, and loaded customer name will be displayed here. Search Customer by name, and loaded customer name will be displayed here.
|
| 03 |  Select "Prepare" to enter data and "Edit detail" to change customers data. Select "Prepare" to enter data and "Edit detail" to change customers data. |
| 04 |  Write Customer details in respective boxes. Write Customer details in respective boxes. |
| 05 | Click the "Save" or "Cancel". |
| 06 | Print the viewing Customers details by Clicking Print.
|
Customers Summary
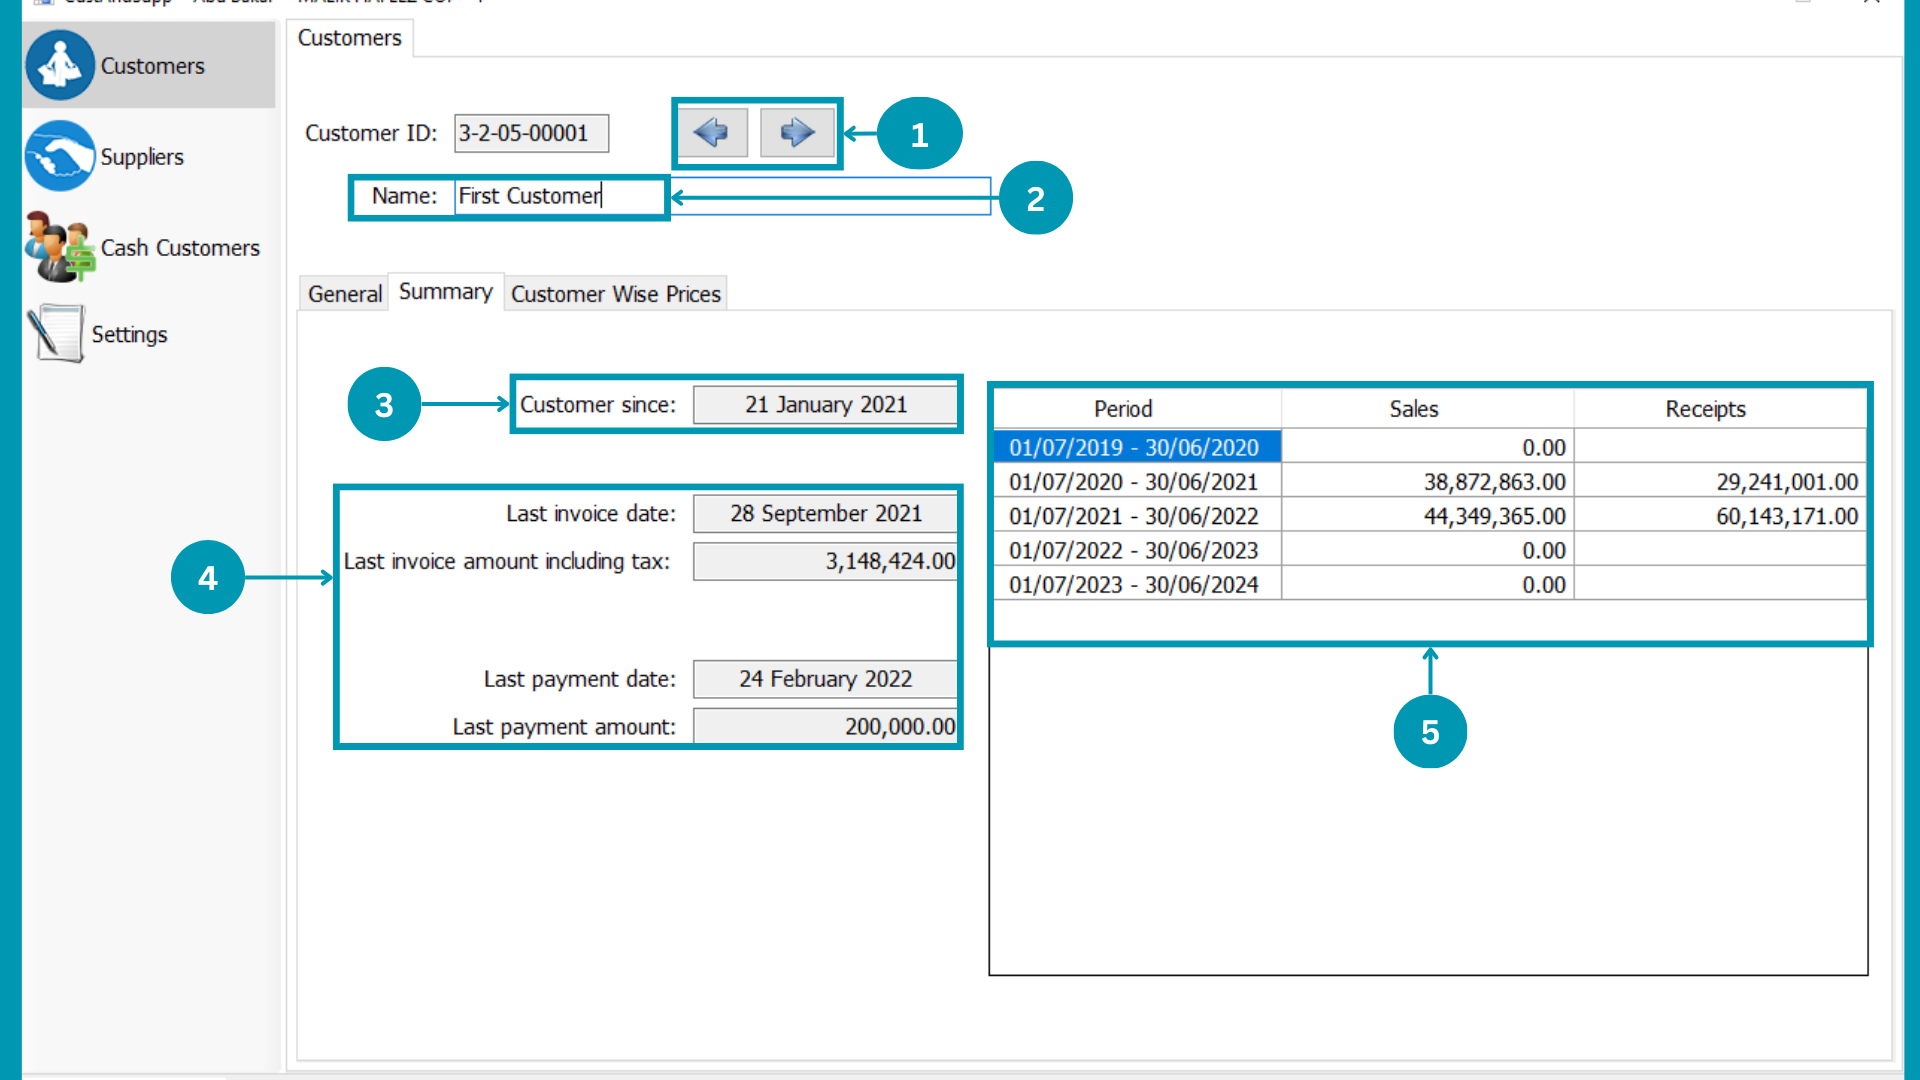
| 01 | Forward and Backward Customers list, Initially it will be on One.
|
| 02 | Search Customer by name, and loaded customer name will be displayed here.
|
| 03 |  Customer Since shows date of customer affiliation. Customer Since shows date of customer affiliation.
|
| 04 | |
| 05 |  Financial period wise Customers data will be shown there. Financial period wise Customers data will be shown there. |
Customers Wise Prices
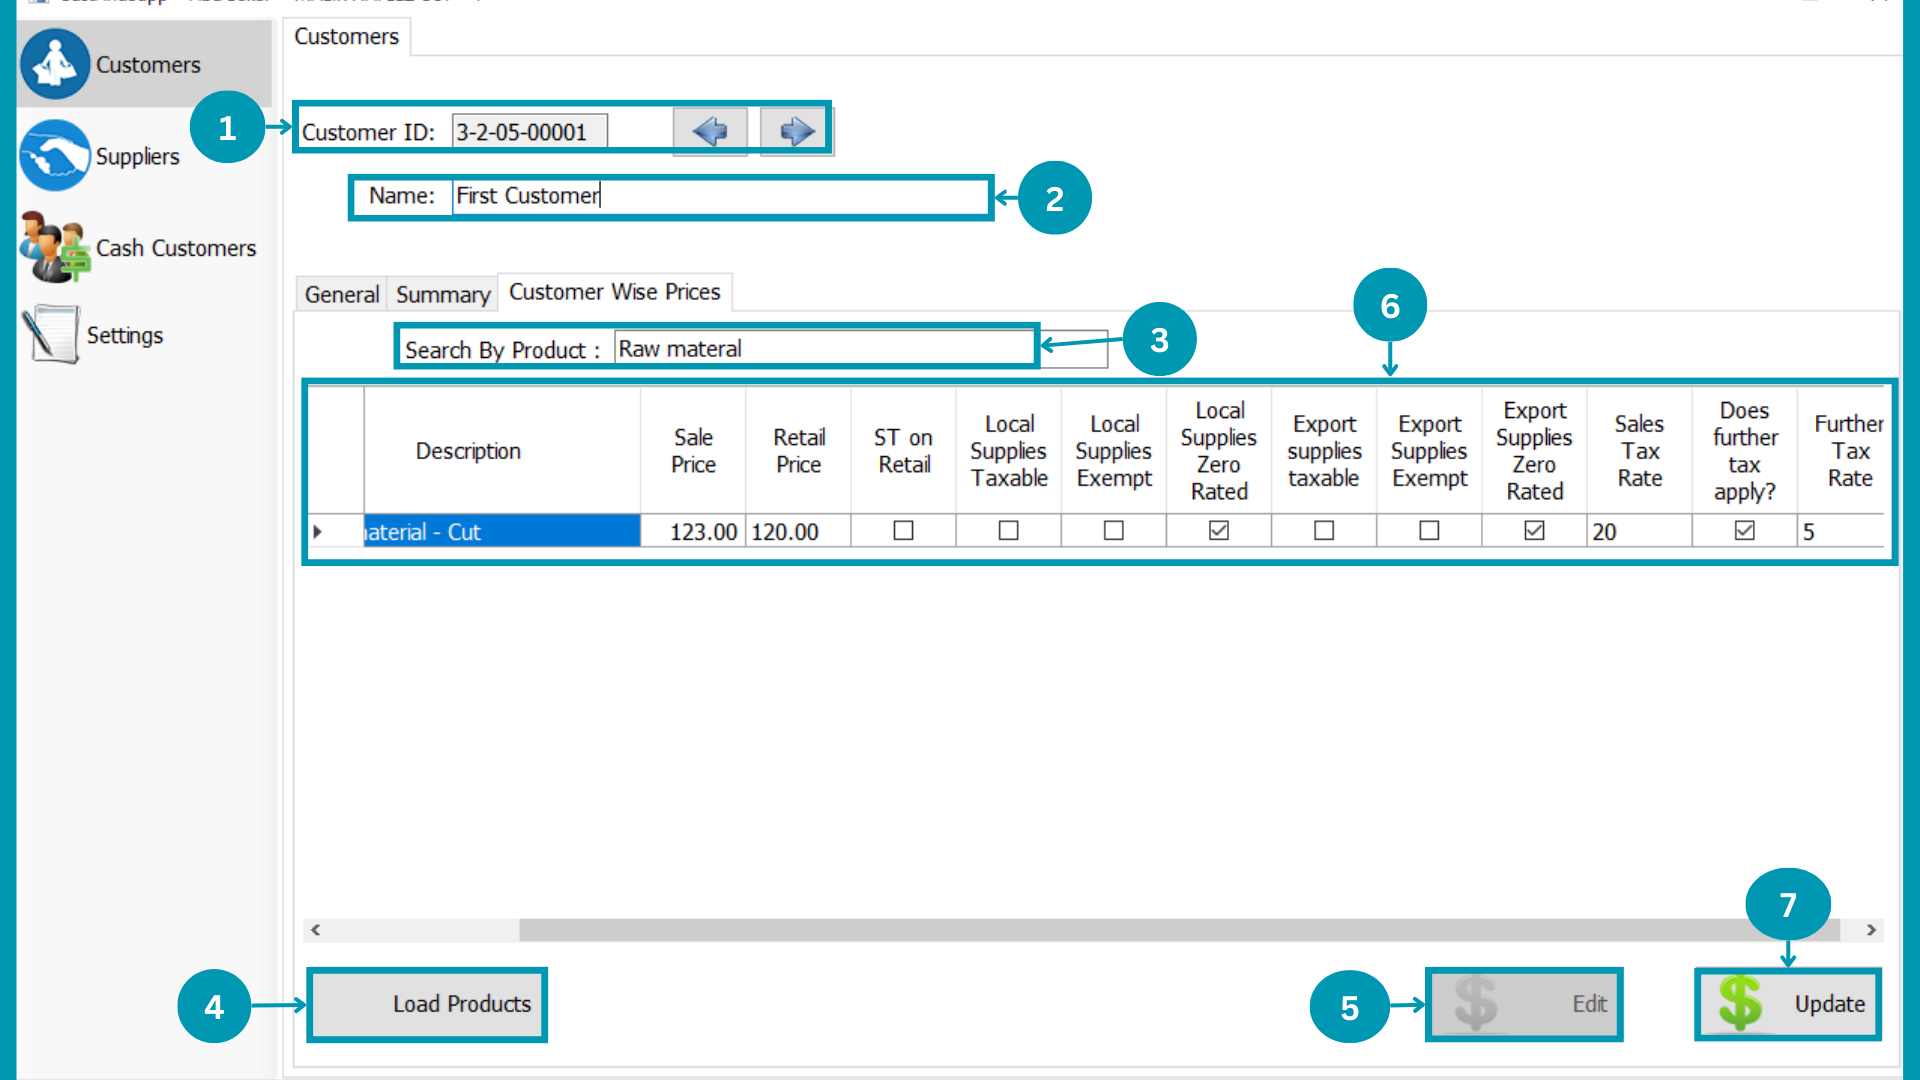
| 01 | Forward and Backward Customers list, Initially it will be on One.
|
| 02 | Search Customer by name, and loaded customer name will be displayed here.
|
| 03 |  To Customer wise prices of products search product. To Customer wise prices of products search product.
|
| 04 |  Click "Load Products" to load All. Click "Load Products" to load All.
|
| 05 |  Hit
the Edit Button. Hit
the Edit Button. |
| 06 |  Fill columns of products according to pricing. Fill columns of products according to pricing. |
| 07 |  Click on update to save pricing. Click on update to save pricing. |
Suppliers
| 01 |  Forward and Backward Suppliers list, Initially it will be on One. Forward and Backward Suppliers list, Initially it will be on One.
|
| 02 |  Search Supplier by name, and loaded customer name will be displayed here. Search Supplier by name, and loaded customer name will be displayed here.
|
| 03 | Select "Prepare" to enter data and "Edit detail" to change Supplier data. |
| 04 | 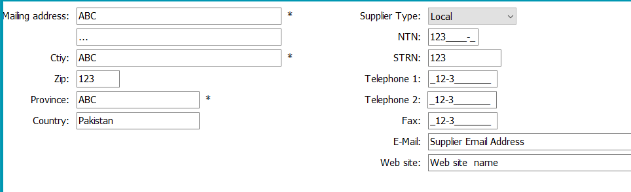 Write Supplier details in respective boxes. Write Supplier details in respective boxes. |
| 05 | Click the "Save" or "Cancel". |
| 06 | Print the viewing Customers details by Clicking Print.
|
Cash Customer
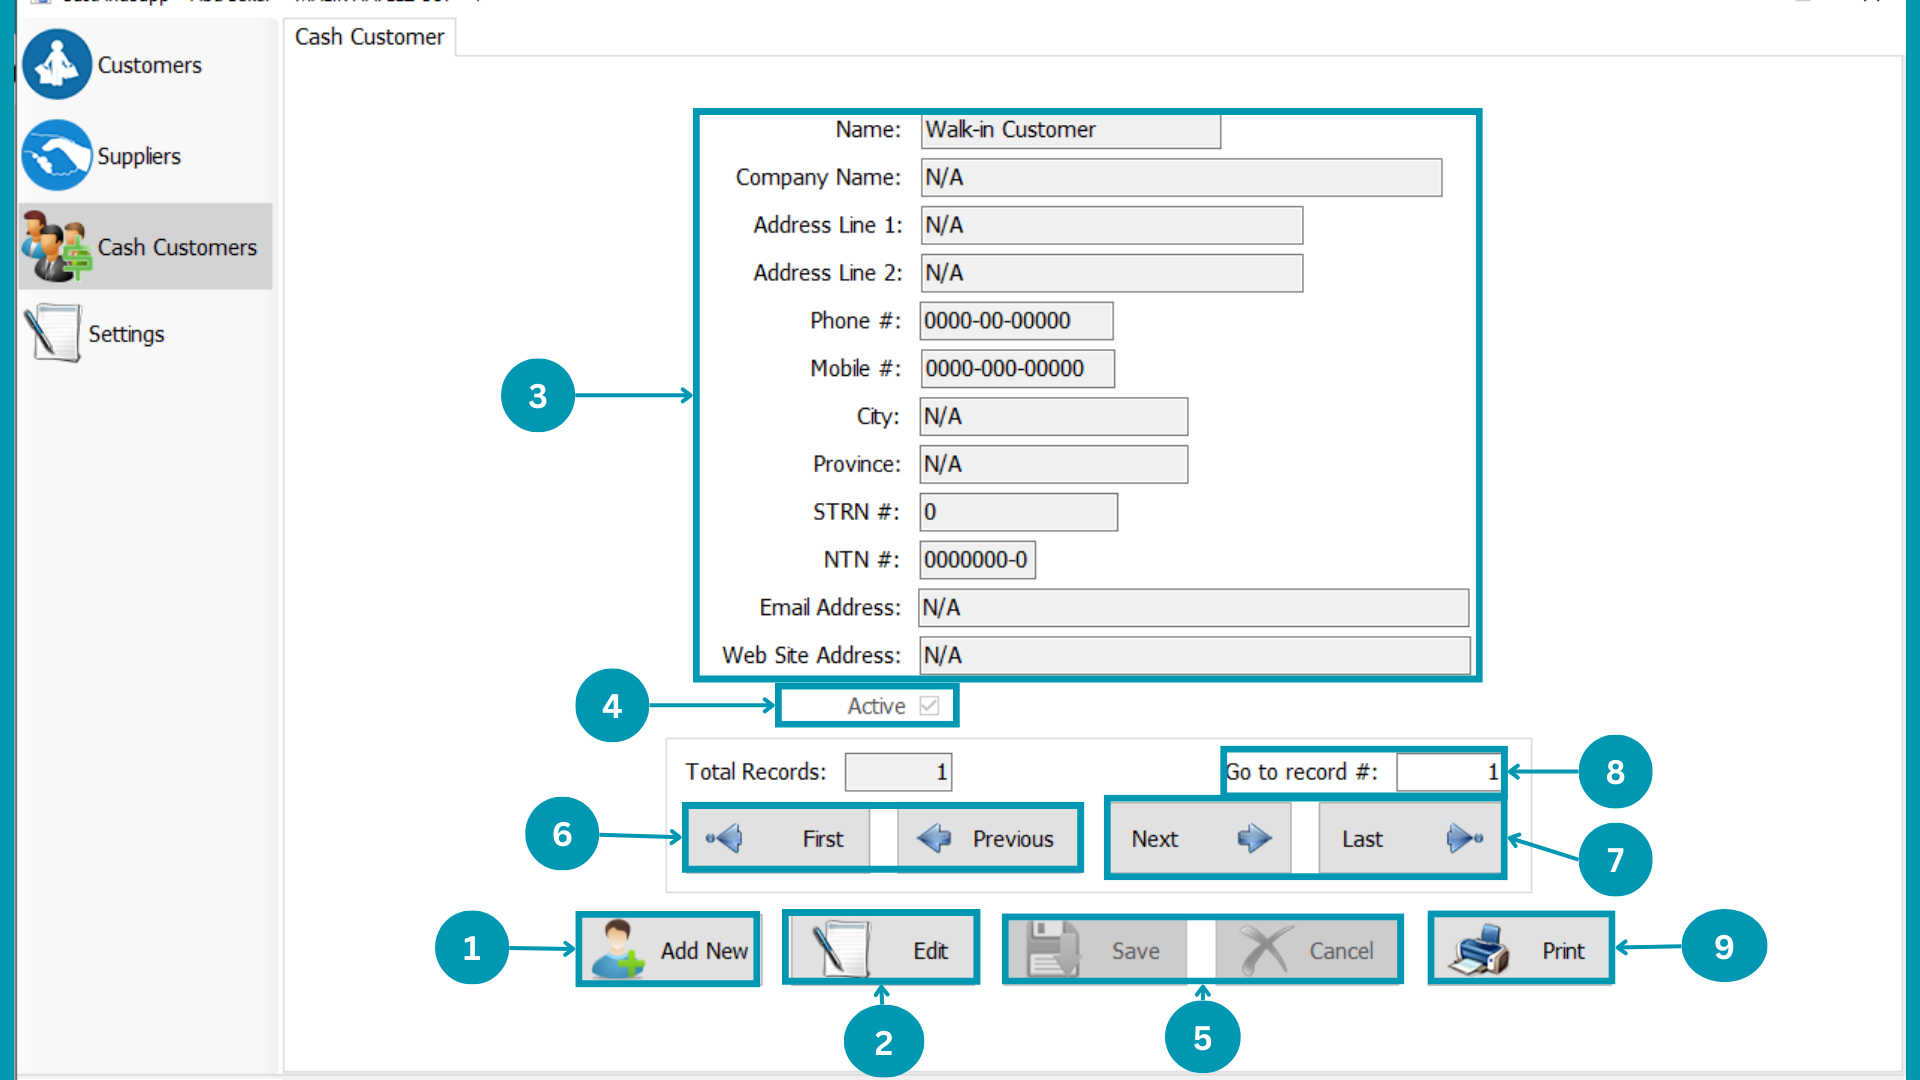
| 01 |  Click Add New to add cash customer. Click Add New to add cash customer.
|
| 02 | Click Edit to Edit displayed cash customer.
|
| 03 | 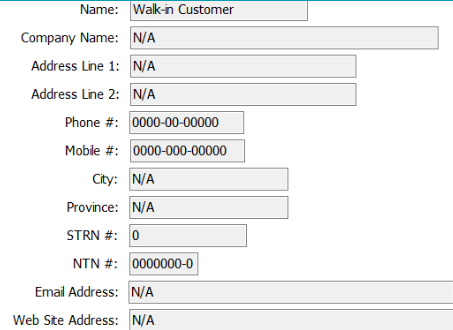 Write cash customers details in respective boxes. Write cash customers details in respective boxes.
|
| 04 |  Check Active Check Active
|
| 05 | Click the "Save" or "Cancel".
|
| 06 |  Backward the cash customer list through this. Backward the cash customer list through this.
|
| 07 |  forward the cash customer list through this. forward the cash customer list through this.
|
| 08 |  Write the number to go on that number record. Write the number to go on that number record.
|
| 09 | Print the viewing Customers details by Clicking Print.
|
Settings
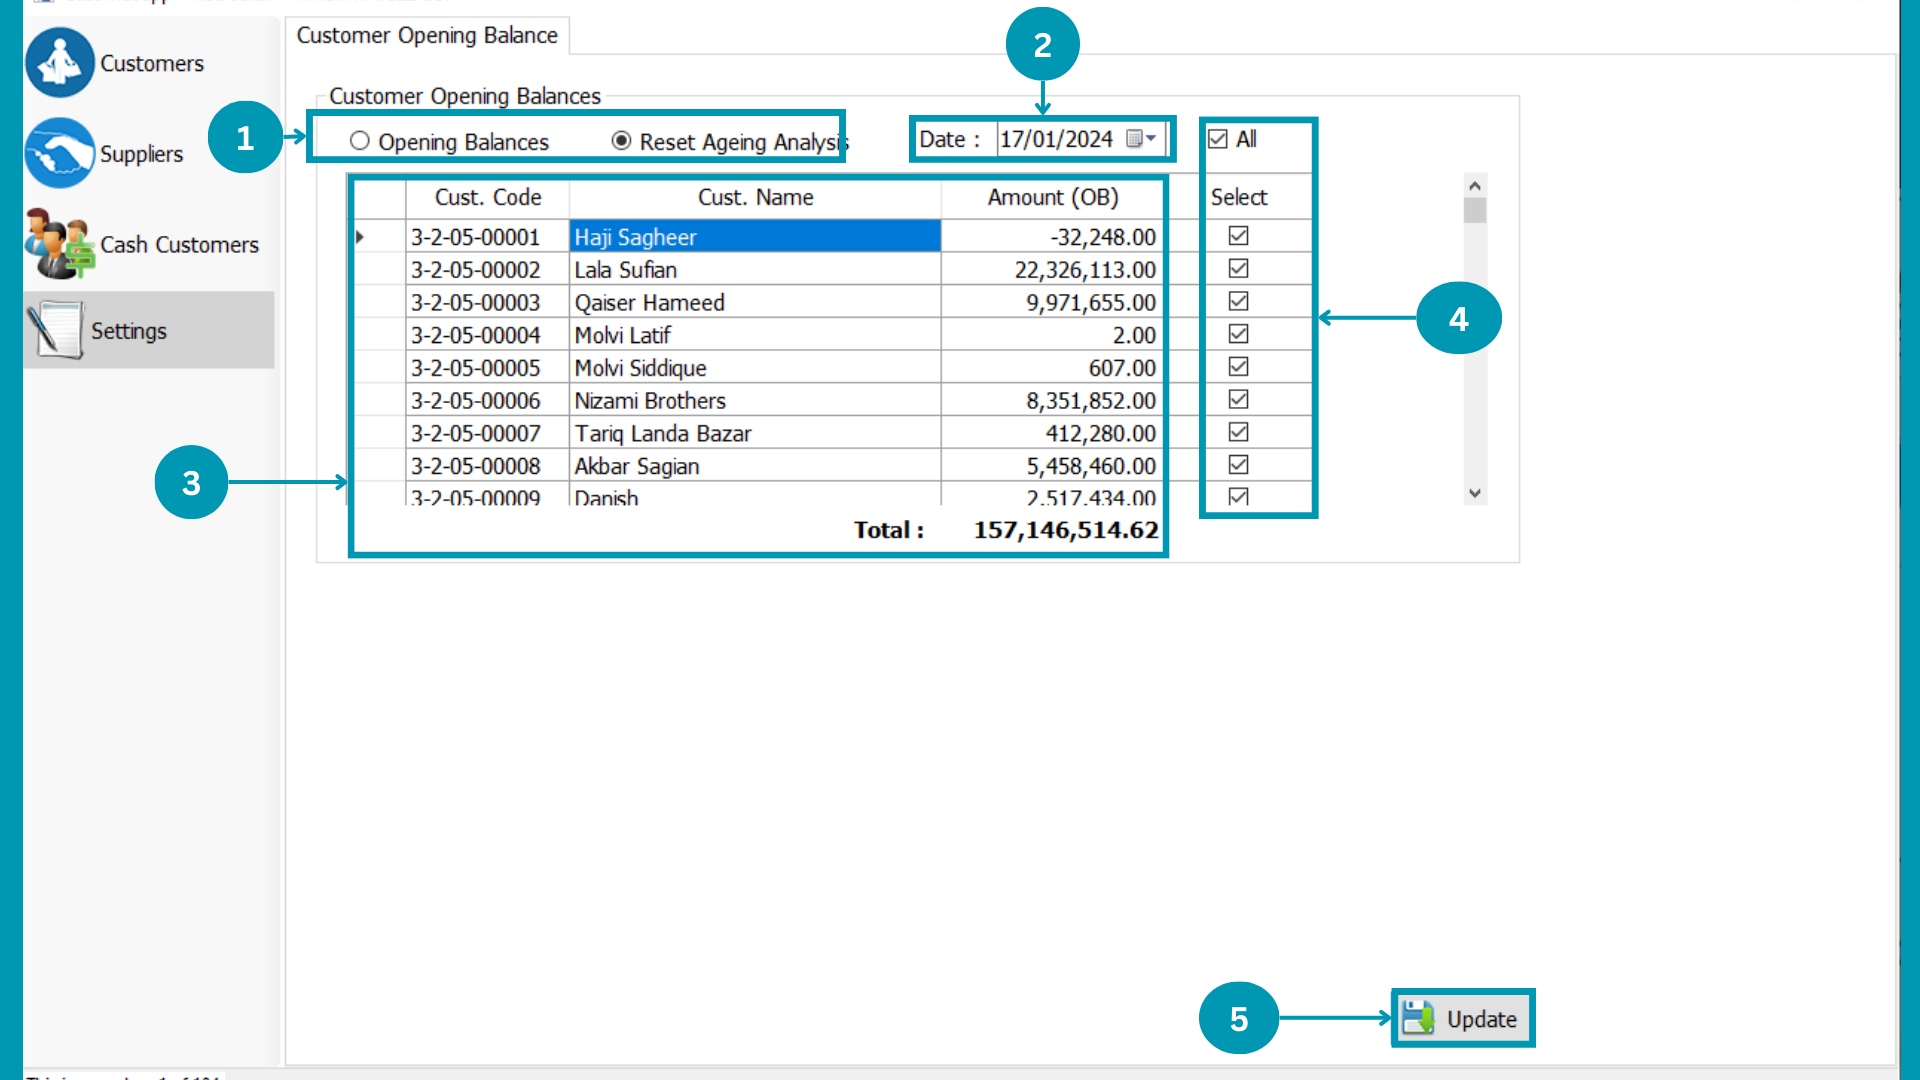
| 01 |  Select Opening Balance/ Reset Ageing Analysis to view customers wise till date. Select Opening Balance/ Reset Ageing Analysis to view customers wise till date.
|
| 02 | Select Transaction date.
|
| 03 |  Customers Name and Amount list will be shown in there. Customers Name and Amount list will be shown in there.
|
| 04 |  Select All by click on "All" check box or Select Selective customers by click on respective select box. Select All by click on "All" check box or Select Selective customers by click on respective select box.
|
| 05 |  Hit
the Update Button. Hit
the Update Button. |
MAB BIZ SOLUTIONS
Reports
Reports
Categorical reports, sequence of generate and displayed information refrence will be instructed below.
Following pages usage is explained in this segment
- Accounts
- Sale
- Inventory
- Production
- Non Stock
Accounts Report
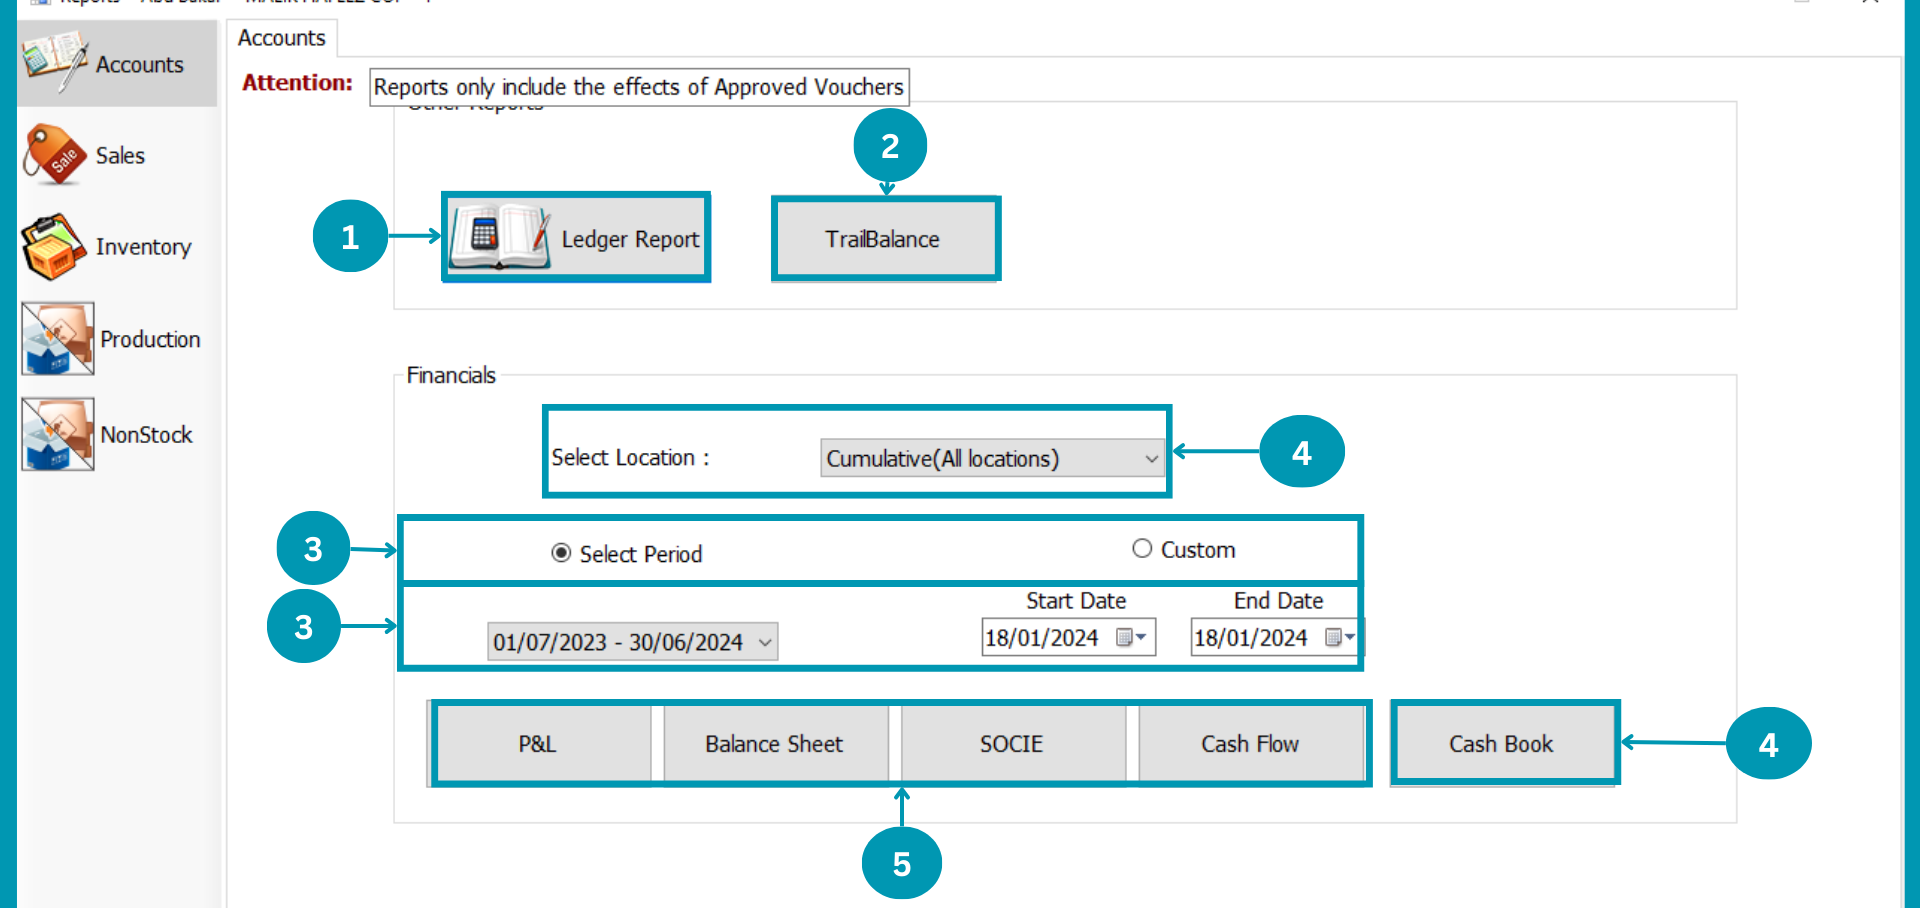
| 01 |  Click On Ledger Report. Click On Ledger Report.
|
| 02 |  Click on TrailBalance. Click on TrailBalance.
|
| 03 |  Select Location or All location will be default. Select Location or All location will be default.
|
| 04 |  Select Period of reports and Custom for a particular tenure. Select Period of reports and Custom for a particular tenure.
|
| 05 |  Select Financial period for Select period and Start to end date for Custom. Select Financial period for Select period and Start to end date for Custom.
|
| 06 |  Select any from P&L, Balance Sheet, SOICE and Cash Flow for reporting. Select any from P&L, Balance Sheet, SOICE and Cash Flow for reporting.
|
| 06 |  Click on Cash Book. Click on Cash Book.
|
Ledger Report
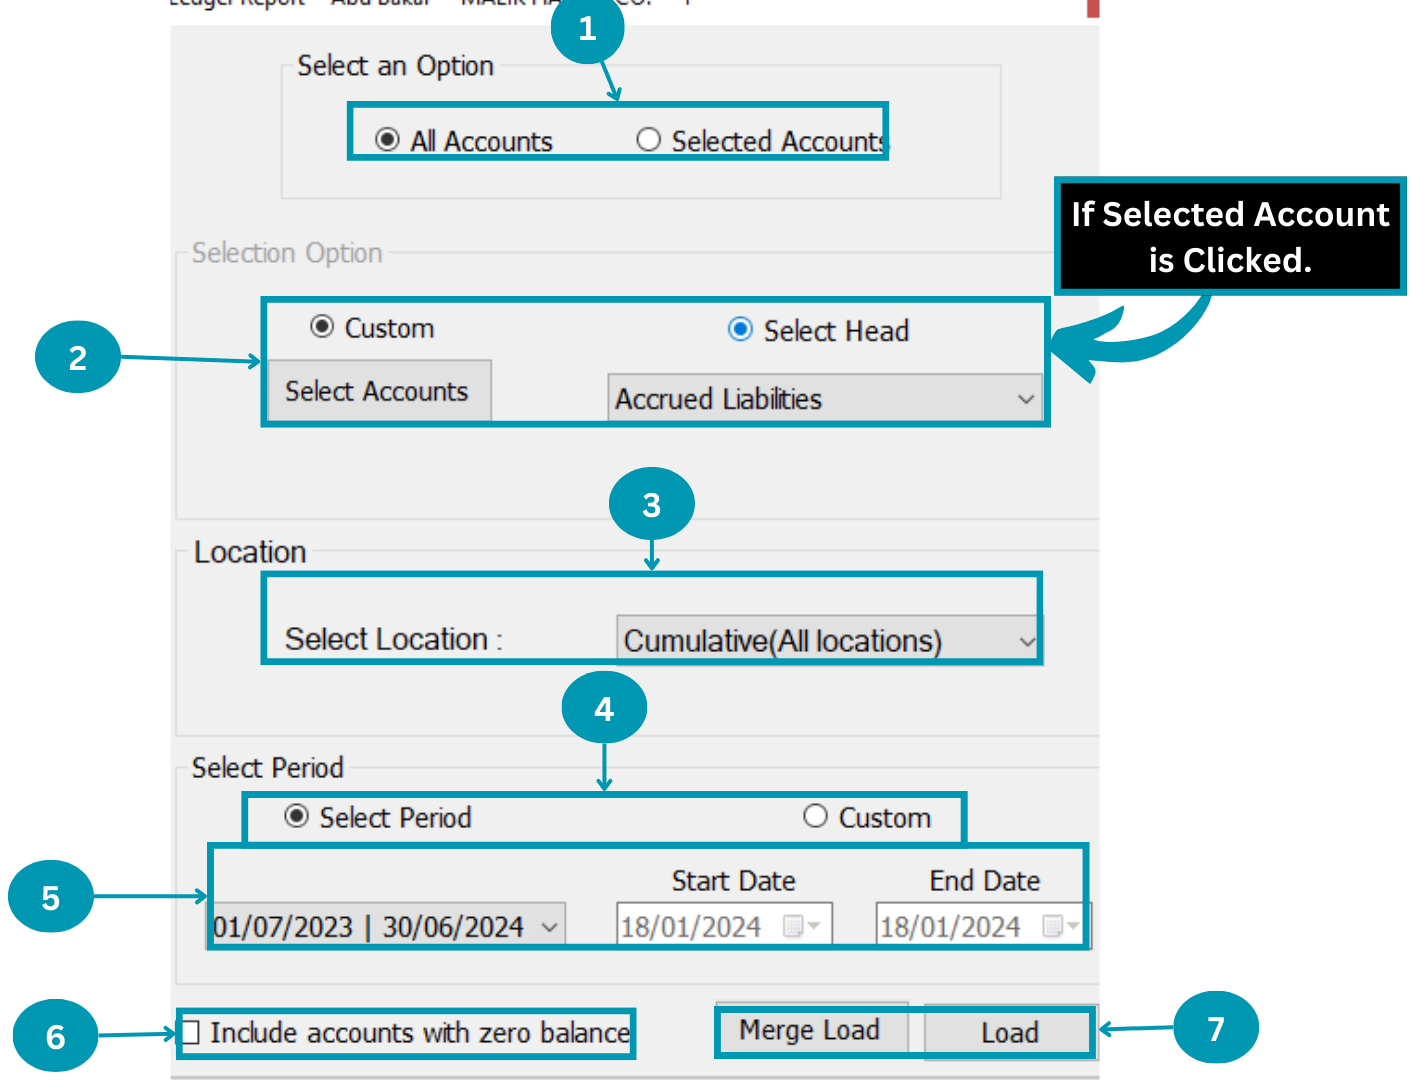
| 01 |  Select Accounts Type for ledger report. Select Accounts Type for ledger report.
|
| 02 |  Select Custom for particular accounts and Select head to all Accounts of that head. Select Custom for particular accounts and Select head to all Accounts of that head.
|
| 03 | Select Location or All location will be default.
|
| 04 | Select Period of reports and Custom for particular tenure.
|
| 05 | Select Financial period for Select period and Start to end date for Custom.
|
| 06 |  Click Include Accounts With zero balance if you want add it in reports. Click Include Accounts With zero balance if you want add it in reports.
|
| 07 |  Click on Merge Load if you selected two or more accounts in custom or Click on LOAD. Click on Merge Load if you selected two or more accounts in custom or Click on LOAD.
|
Trial Balance
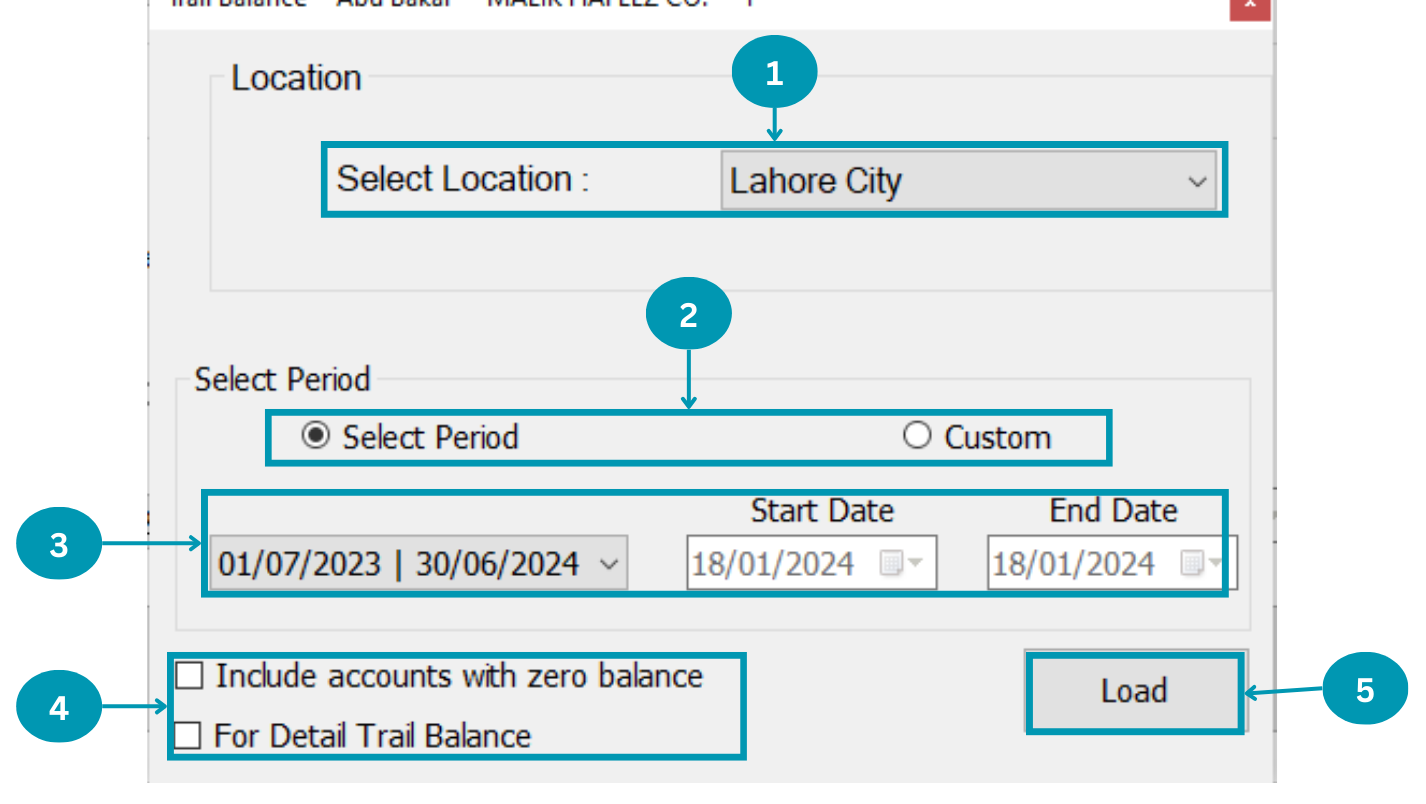
| 01 | Select Location or All location will be default.
|
| 02 | Select Period of reports and Custom for particular tenure.
|
| 03 | Select Financial period for Select period and Start to end date for Custom.
|
| 04 |  Click on Include Accounts with zero balance and Foe Detail TrailBalance if you want. Click on Include Accounts with zero balance and Foe Detail TrailBalance if you want.
|
| 05 | Hit
the Load Button. |
CashBook

| 01 | Select Period of reports and Custom for particular tenure.
|
| 02 | Select Financial period for Select period and Start to end date for Custom.
|
| 03 | Select Location or All location will be default.
|
| 04 |  Select Cash Account for Cash Book report. Select Cash Account for Cash Book report. |
| 05 | Click the "Load". |
Sales Report
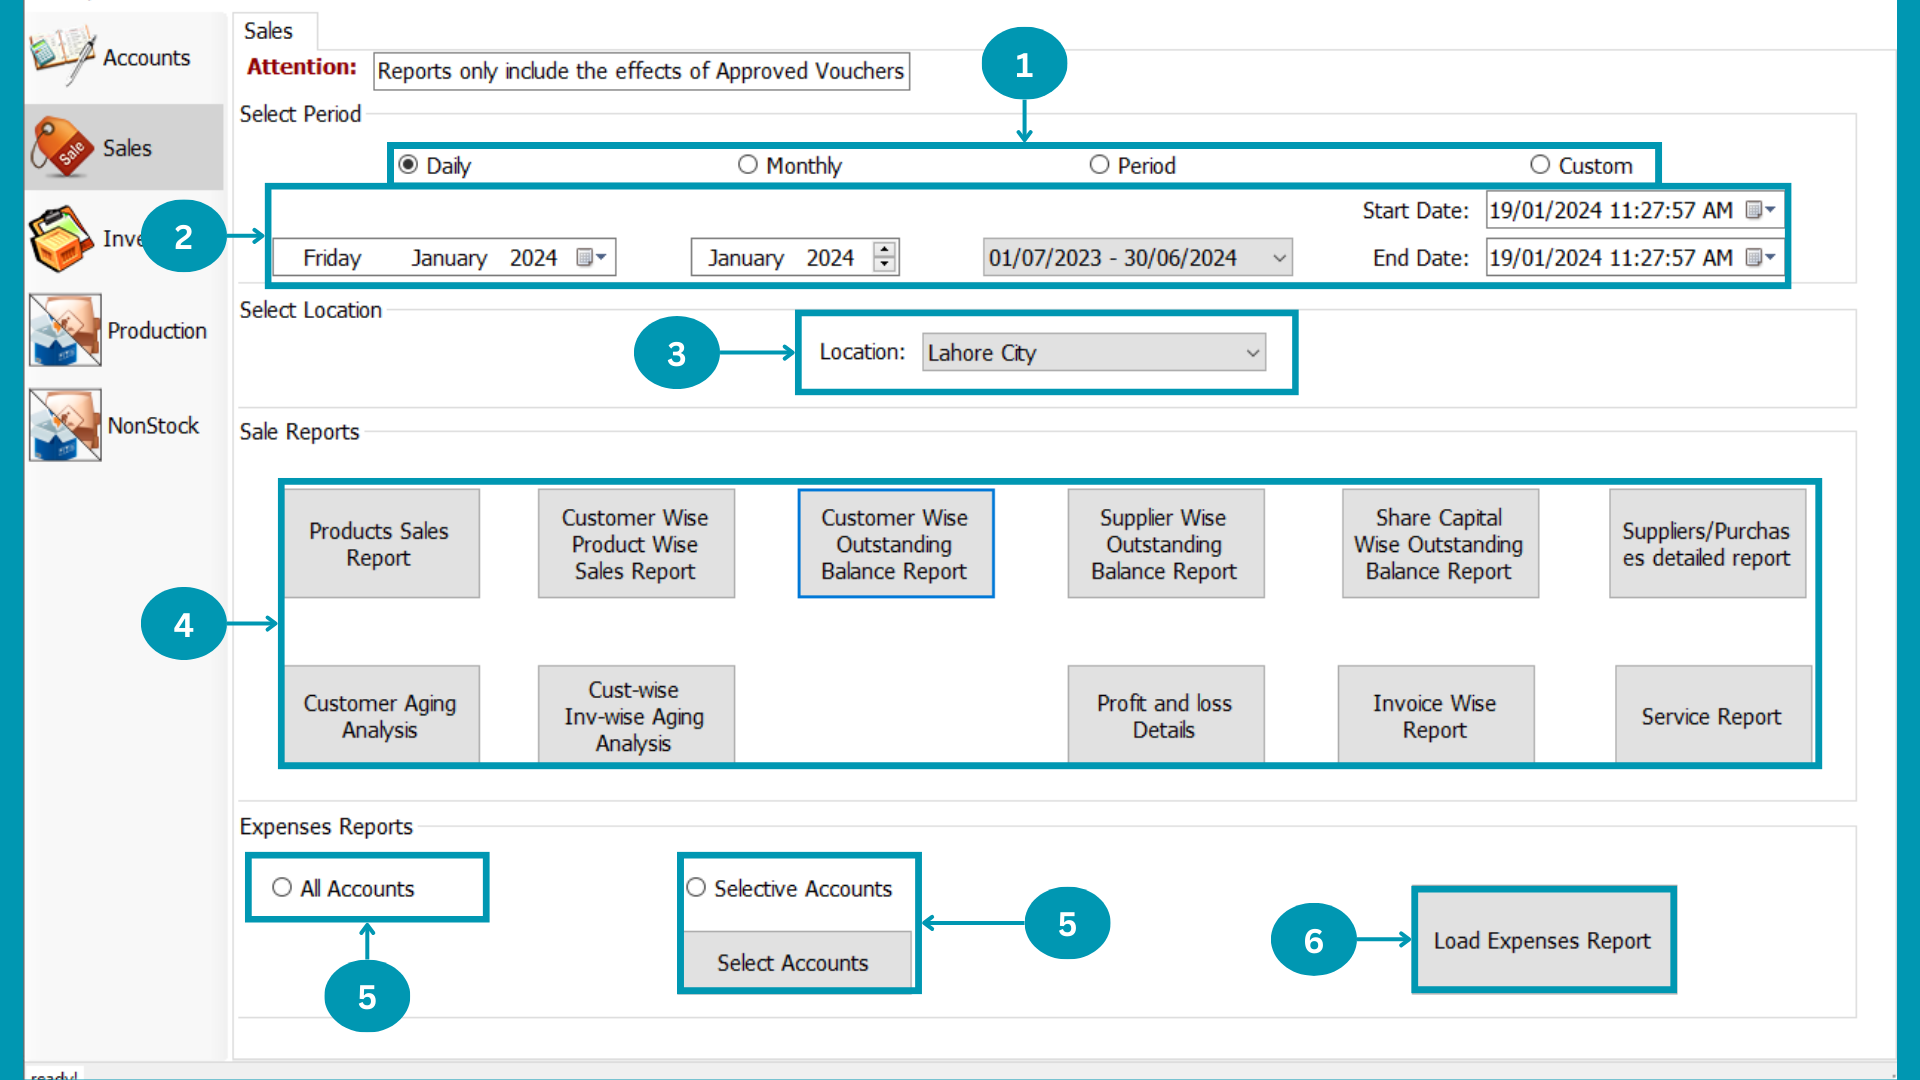
| 01 | Select reporting tenure period.
|
| 02 | Select time frame according to selected period type.
|
| 03 | Select Location or All location will be default.
|
| 04 | 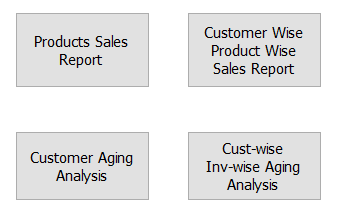 Choose the sales report's kind which you want to view. Choose the sales report's kind which you want to view.
|
| 05 |  Check the "All Accounts" to view Expenses report of all accounts. Check the "All Accounts" to view Expenses report of all accounts.
|
| 06 | 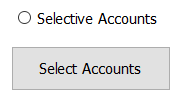 Check the "Selective Accounts"and select accounts to view the expense report of that accounts. Check the "Selective Accounts"and select accounts to view the expense report of that accounts.
|
| 07 |  Click The "Load Expenses Report " button. Click The "Load Expenses Report " button.
|
Inventory Report
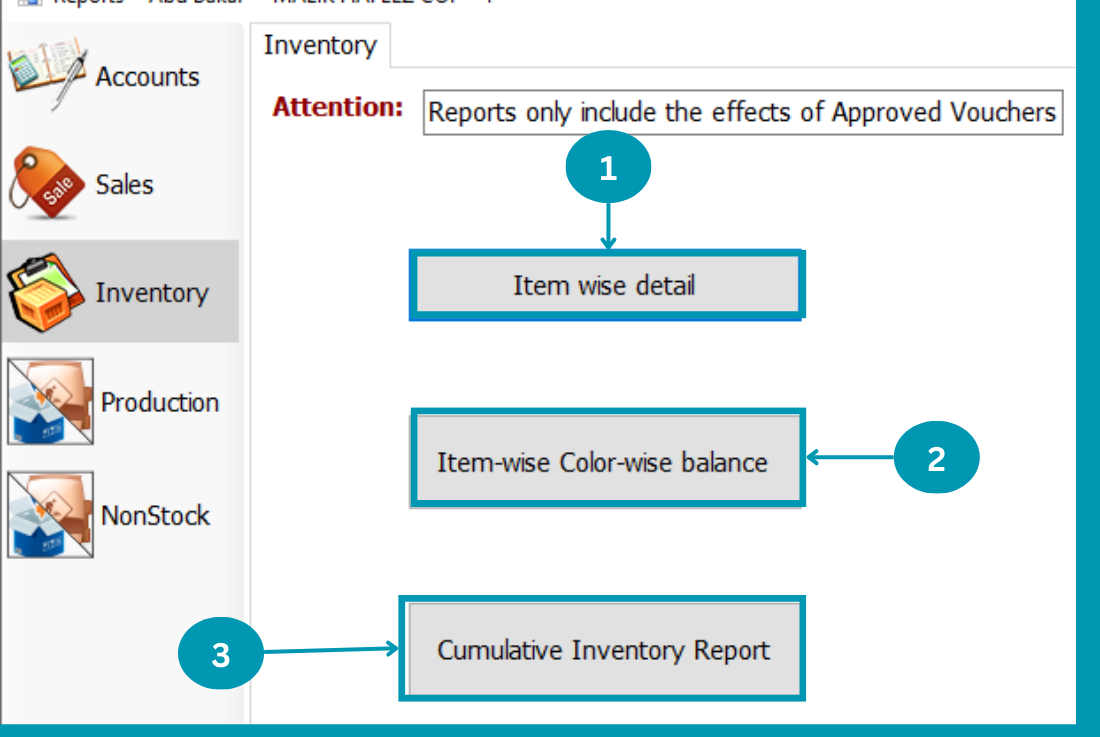
| 01 |  Click on "Item Wise Detail" to view its report. Click on "Item Wise Detail" to view its report.
|
| 02 | 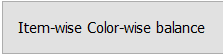 Click on "Item Wise Color-wise balance" to view its report. Click on "Item Wise Color-wise balance" to view its report.
|
| 03 |  Click on "Cumulative Inventory Report" to view its report. Click on "Cumulative Inventory Report" to view its report.
|
Item Wise detail
| 01 | Select Period of reports and Custom for particular tenure.
|
| 02 | Select Financial period for Select period and Start to end date for Custom.
|
| 03 | Select Location or All location will be default.
|
| 04 |  Select Inventory Item to view report. Select Inventory Item to view report. |
| 05 |  Click on "View Detail". Click on "View Detail".
|
| 06 |  Click on "To Excel" to get .xlsx format or Click on "Print" for print. Click on "To Excel" to get .xlsx format or Click on "Print" for print.
|
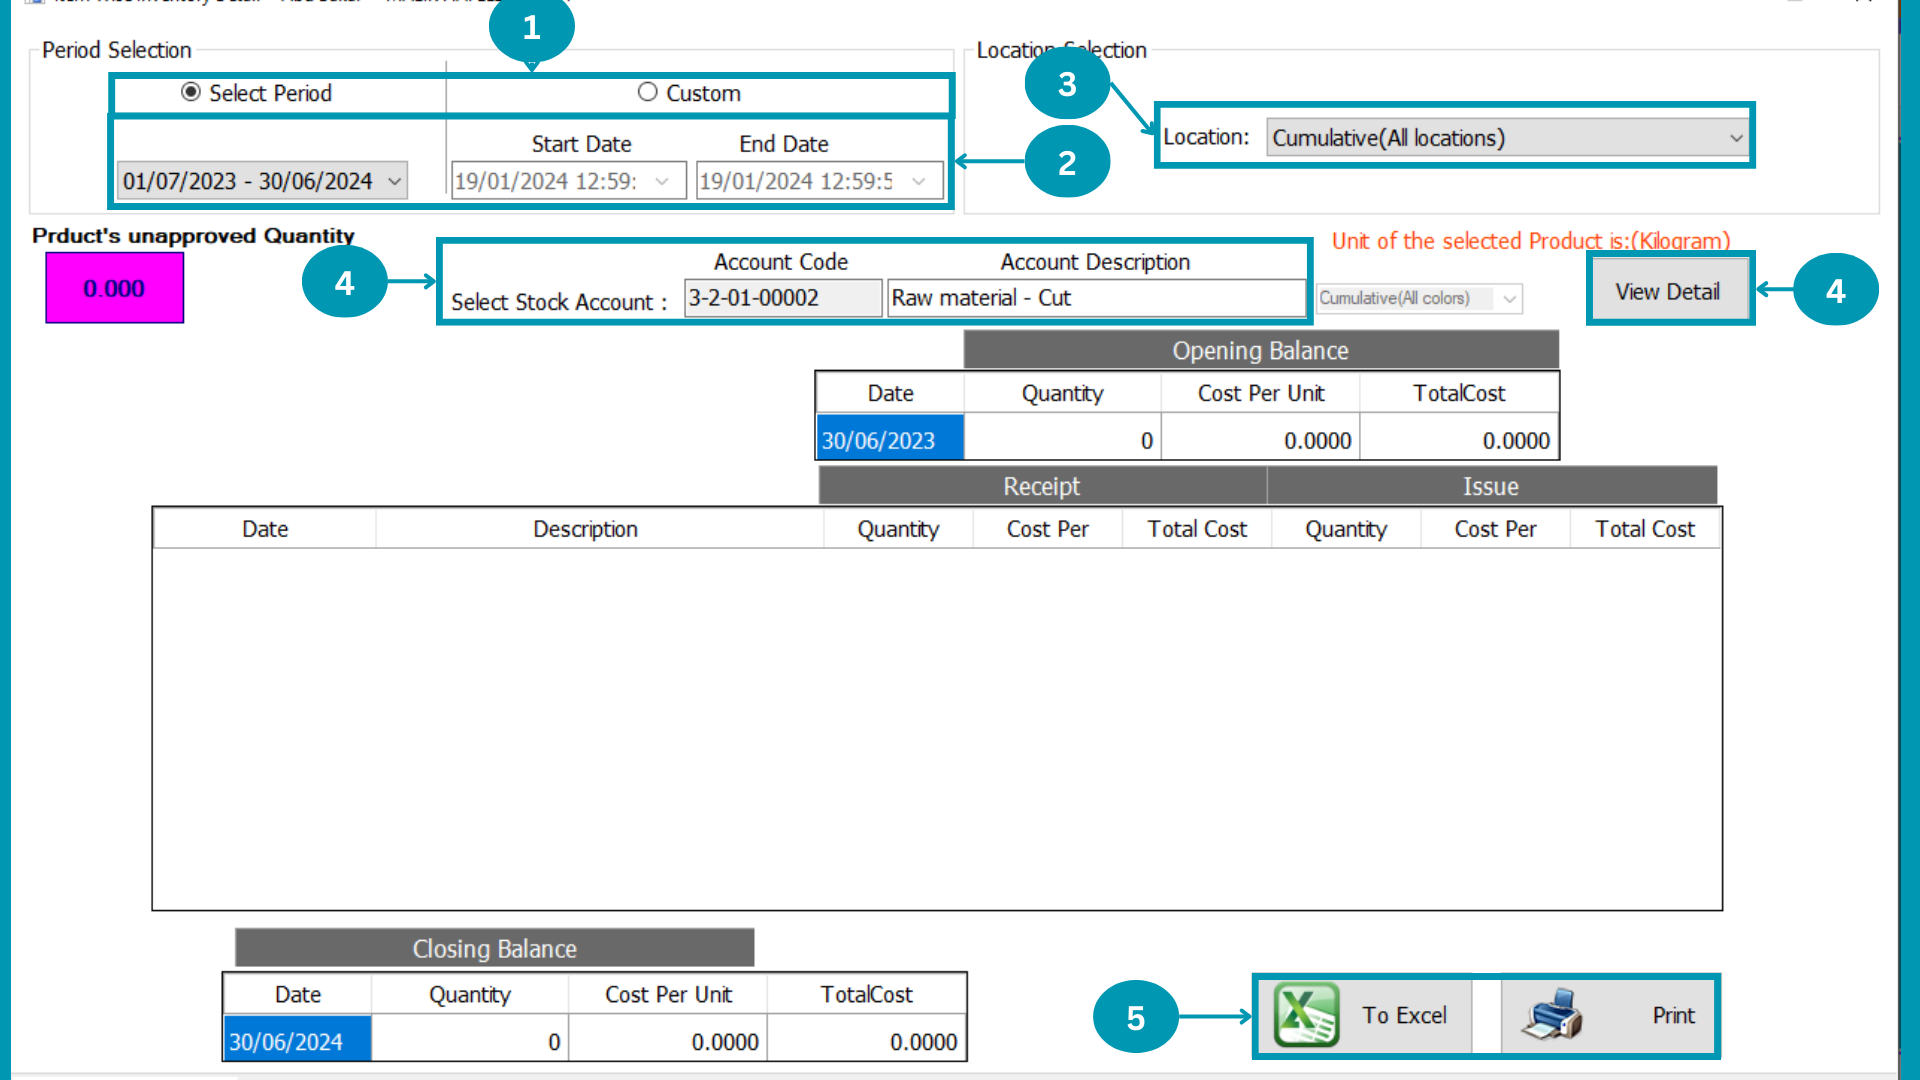
Item Wise Color-wise Balance
| 01 |  Select Product and search product for balance sheet. Select Product and search product for balance sheet.
|
| 02 | Select Location or All location will be default.
|
| 03 | Click on "Load" Button.
|
| 04 |  Select your desire Viewing, printing and Export option. Select your desire Viewing, printing and Export option.
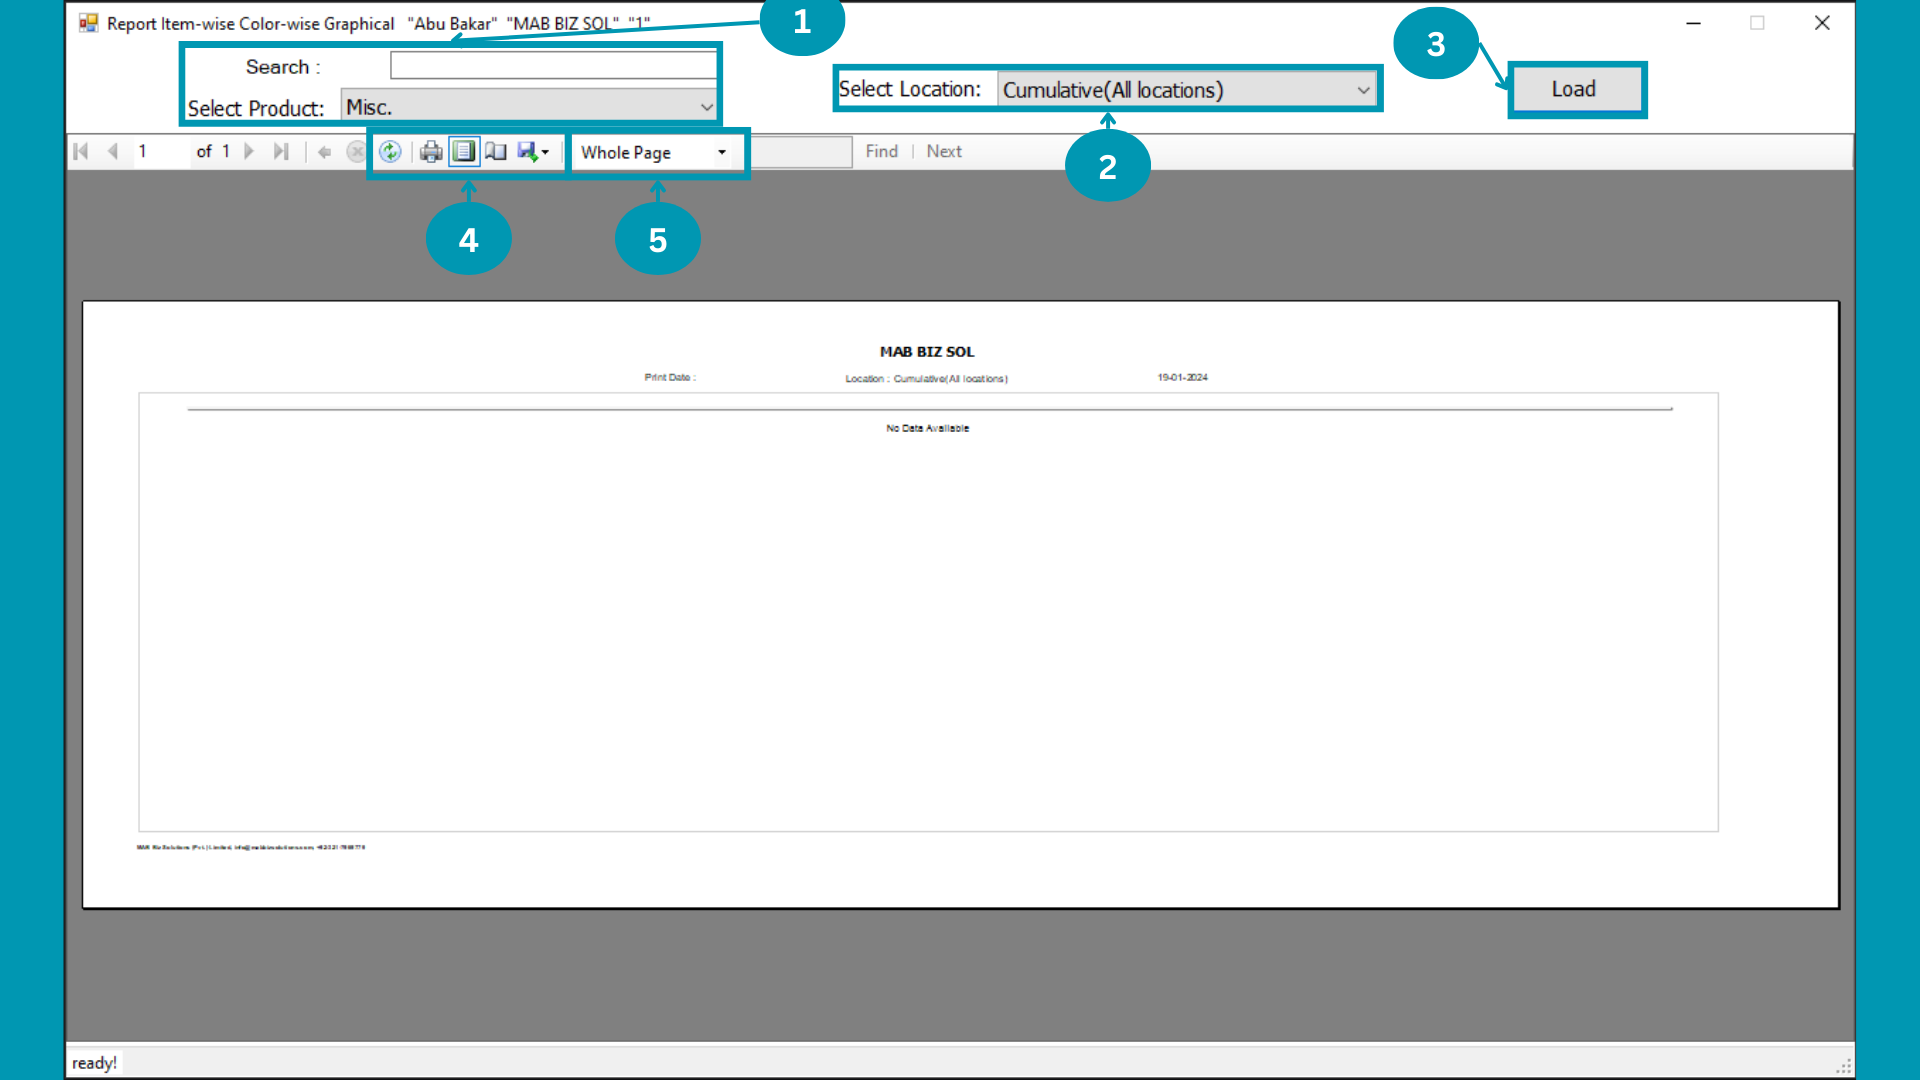
|
| 05 |  Zoom in or fit sheet content by this drop list. Zoom in or fit sheet content by this drop list.
|
Cumulative Inventory Report
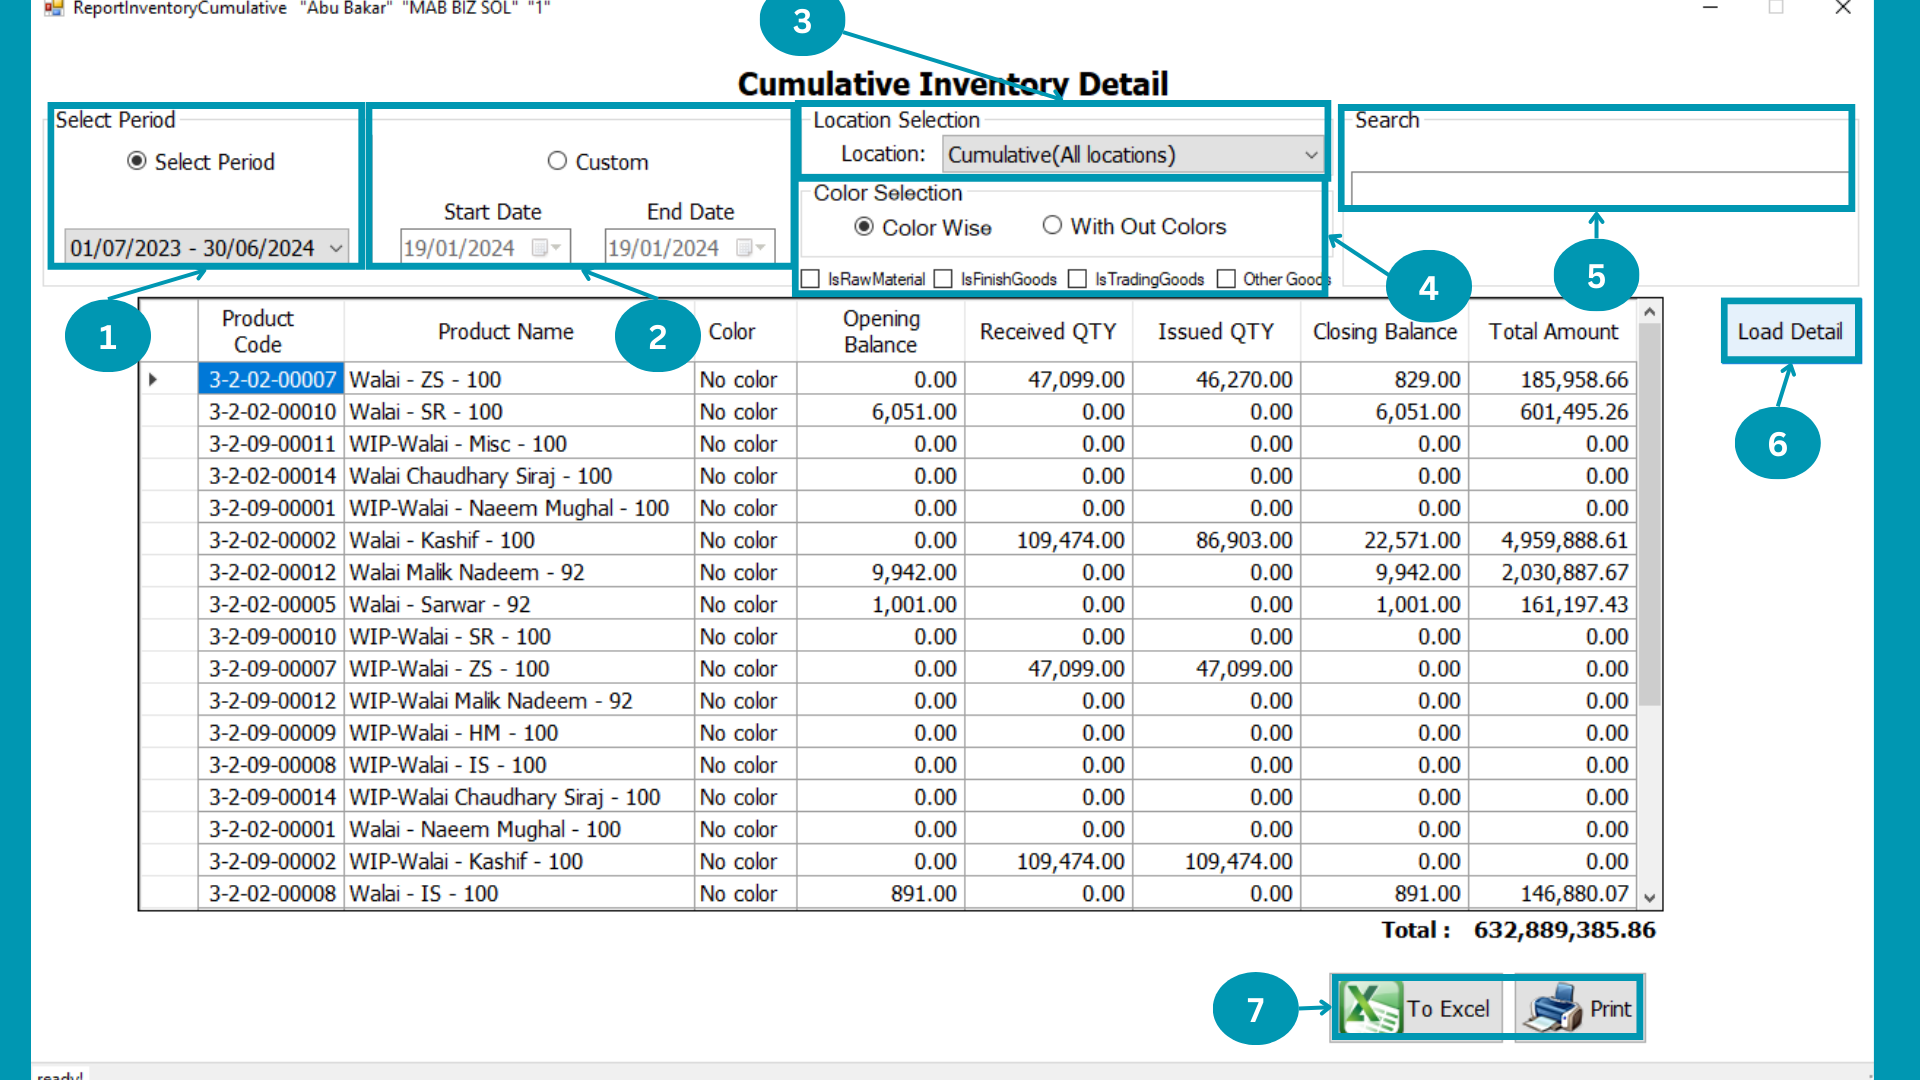
| 01 | Select Period of reports and Select Financial period for this.
|
| 02 | Select Custom for particular tenure and Start to end date for Custom.
|
| 03 | Select Location or All location will be default.
|
| 04 |  Click on "Color Wise" or "With Out Colors" and inventory type. Click on "Color Wise" or "With Out Colors" and inventory type.
|
| 05 |  Write Product name in search to selective product inventory balance. Write Product name in search to selective product inventory balance.
|
| 06 |  Hit
the Load Detail. Hit
the Load Detail. |
| 07 | Click on "To Excel" to get .xlsx format or Click on "Print" for print.
|
Production
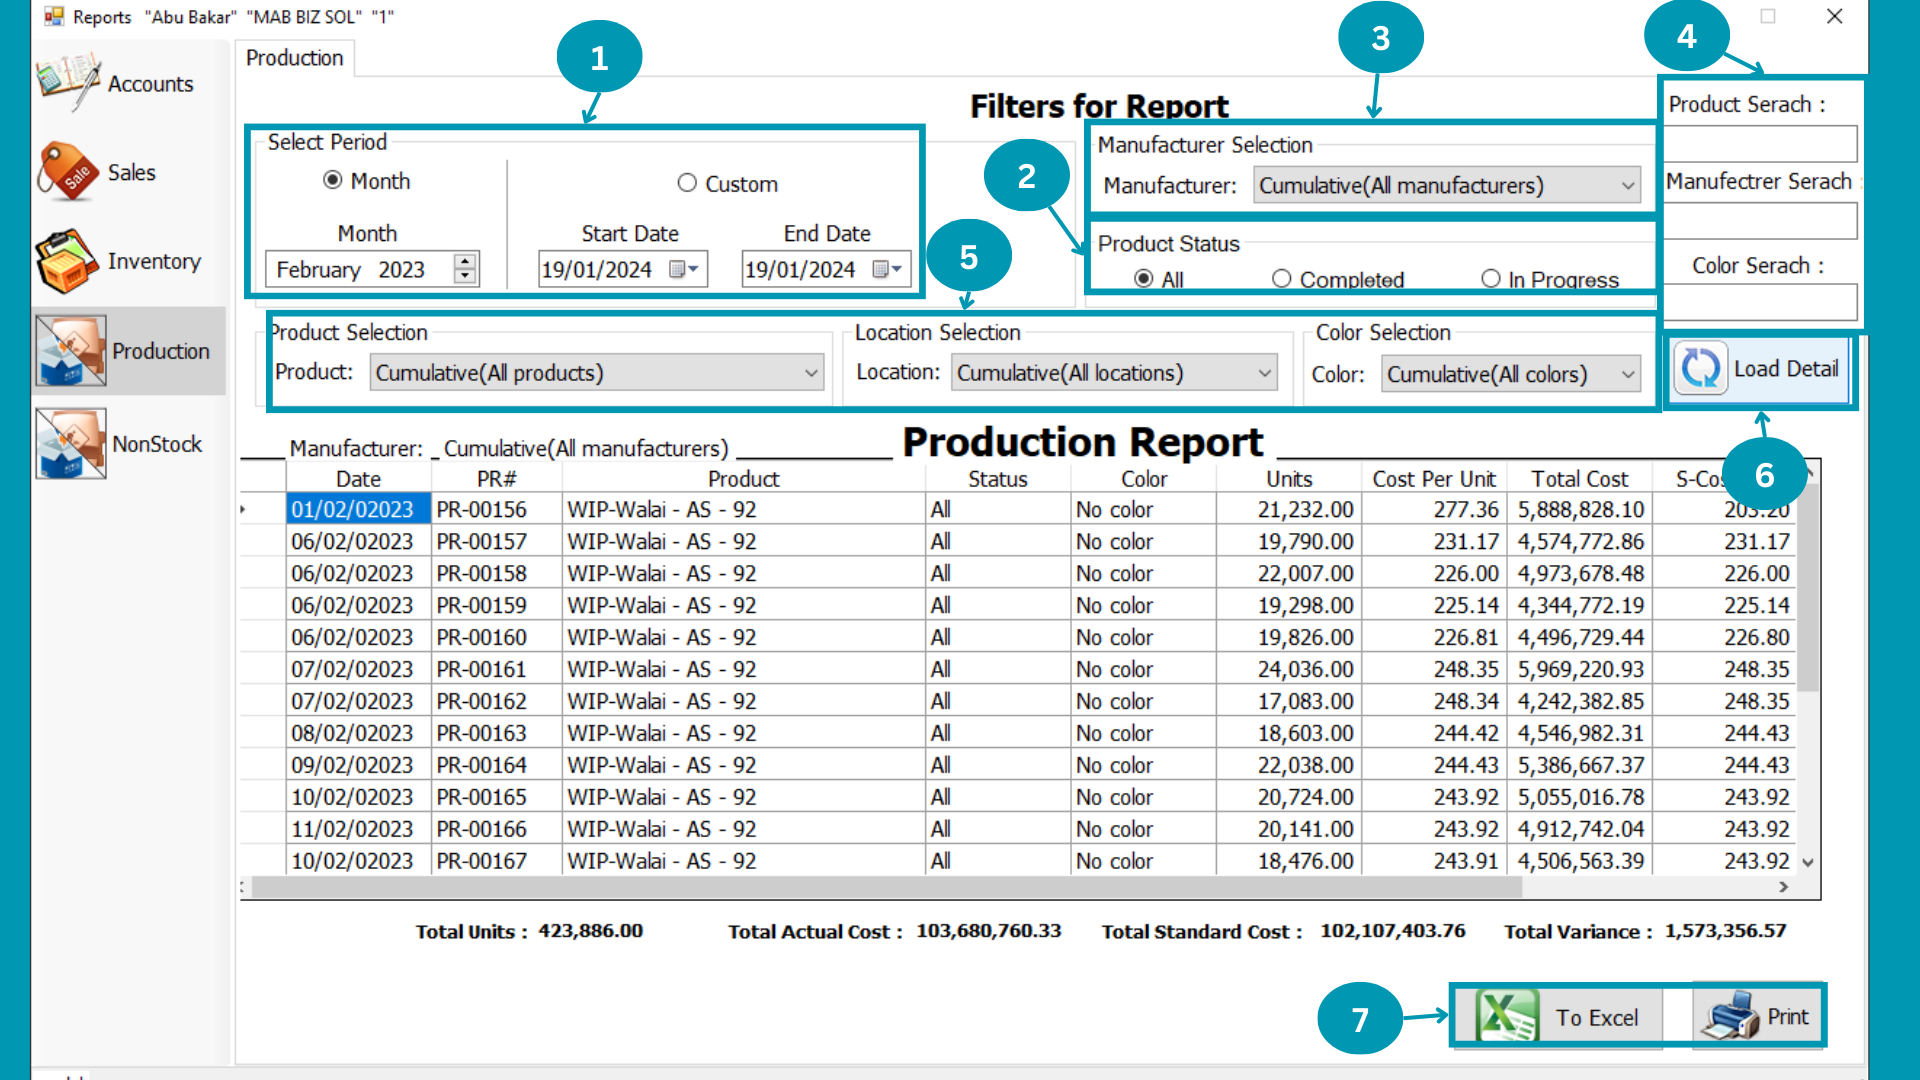
| 01 | Select Period of reports and Custom for particular tenure.
|
| 02 |  Select Products status for selective report. Select Products status for selective report.
|
| 03 |  Select Manufacturer or All Manufacturer will be default. Select Manufacturer or All Manufacturer will be default.
|
| 04 |  Search to Filter the product, Manufacturer and Color to generate report. Search to Filter the product, Manufacturer and Color to generate report.
|
| 05 |  Select Product, Location and Color from all lists. Select Product, Location and Color from all lists.
|
| 06 | Hit
the Load Detail. |
| 07 | Click on "To Excel" to get .xlsx format or Click on "Print" for print.
|
NonStock
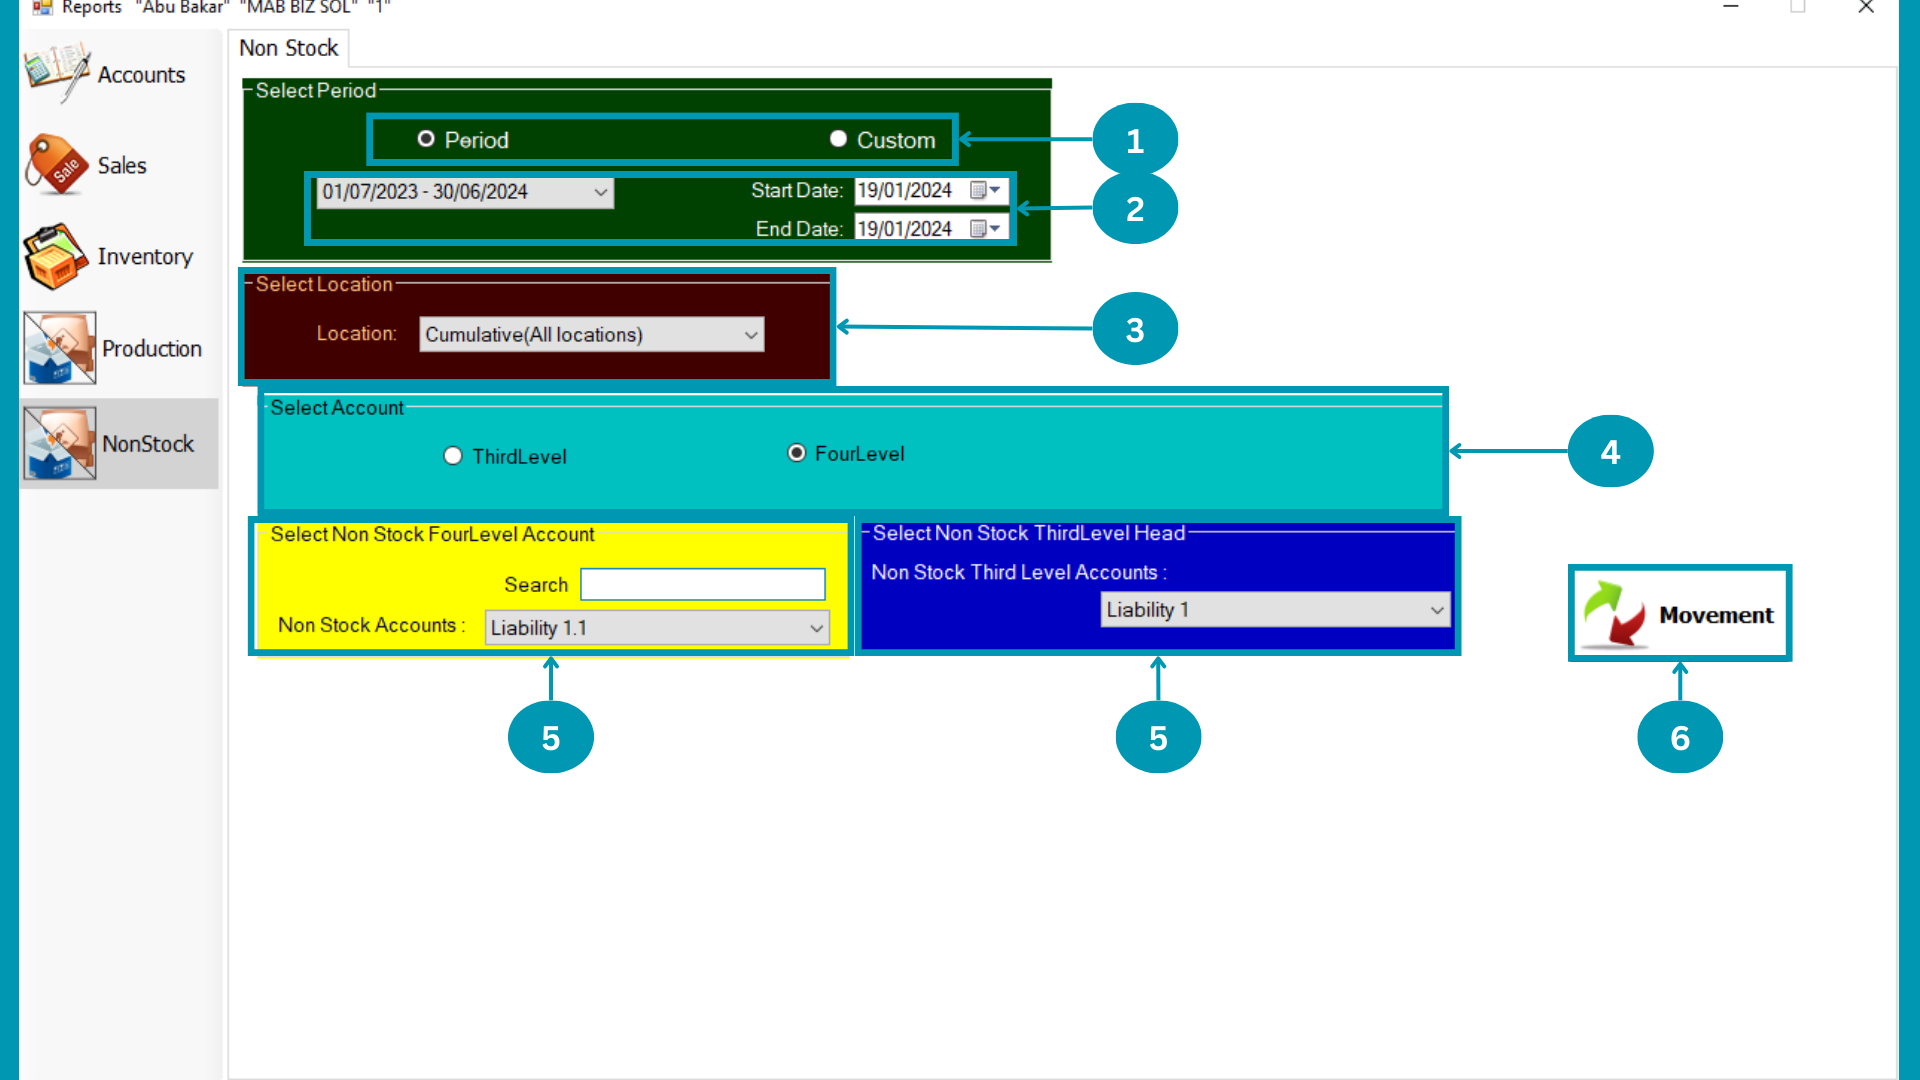
| 01 |  Select Period of reports and Select Financial period for this. Select Period of reports and Select Financial period for this.
|
| 02 |  Select Custom for particular tenure and Start to end date for Custom. Select Custom for particular tenure and Start to end date for Custom.
|
| 03 |  Select Location or All location will be default. Select Location or All location will be default.
|
| 04 |  Click on "Third Level" or "Fourth Level" Accounts type. Click on "Third Level" or "Fourth Level" Accounts type.
|
| 04 |  Select "Fourth Level" Accounts . Select "Fourth Level" Accounts .
|
| 05 | 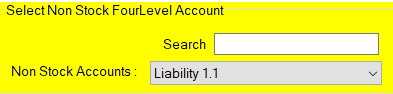 Select "Fourth Level" Accounts . Select "Fourth Level" Accounts .
|
| 06 |  Hit
the "Movement". Hit
the "Movement". |
MAB BIZ SOLUTIONS
Users Controls
Users Controls
The Admin controls management listed in this page.
Following pages usage is explained in this segment
- Change Rights
- Reset Password
- Disable User
Change Rights
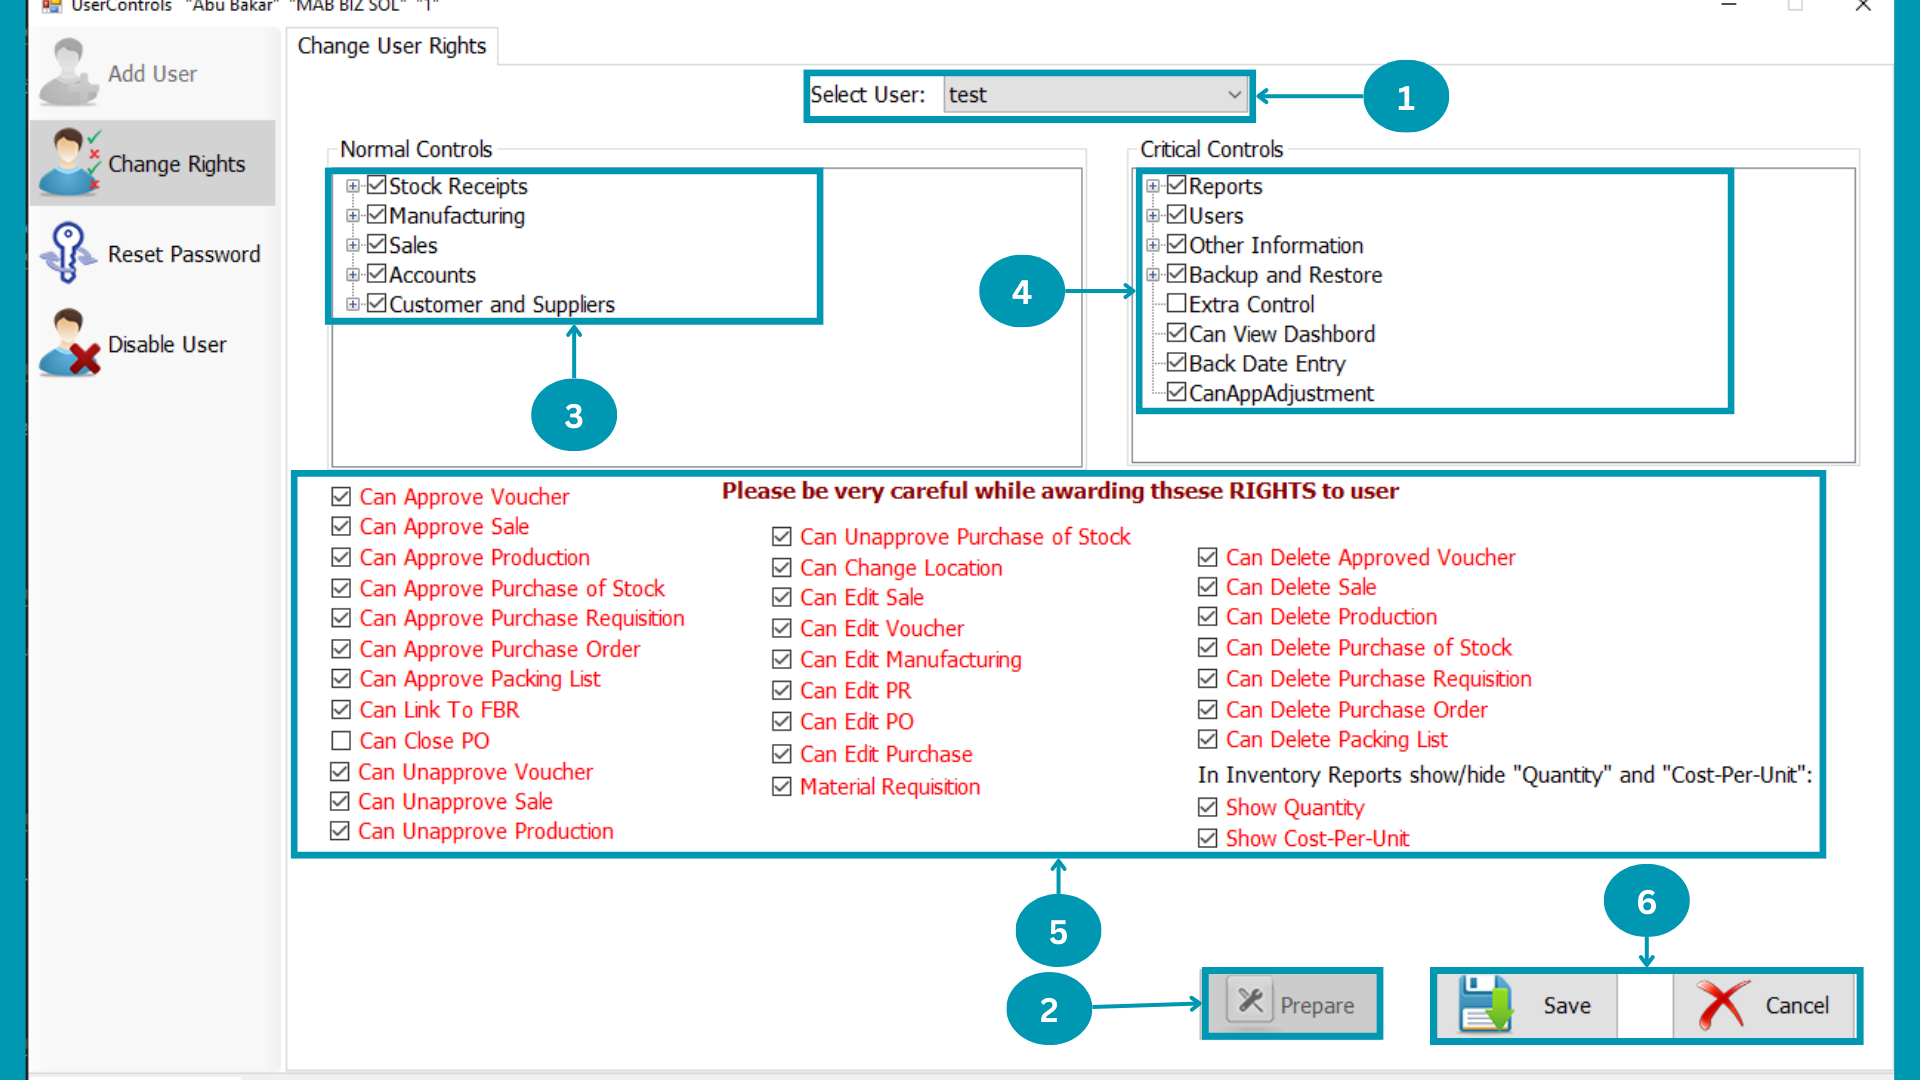
| 01 |  Select User from users list. Select User from users list.
|
| 02 | Hit the "Prepare" Button.
|
| 03 | 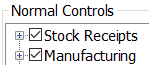 Check the Normal Control you want to allow to selected user. Check the Normal Control you want to allow to selected user.
|
| 04 |  Check the Critical Control you want to allow to selected user. Check the Critical Control you want to allow to selected user.
|
| 05 |  Check the Rights you want to allot to selected user. Check the Rights you want to allot to selected user.
|
| 06 | Click on "Save" or "Cancel".
|
Reset Password
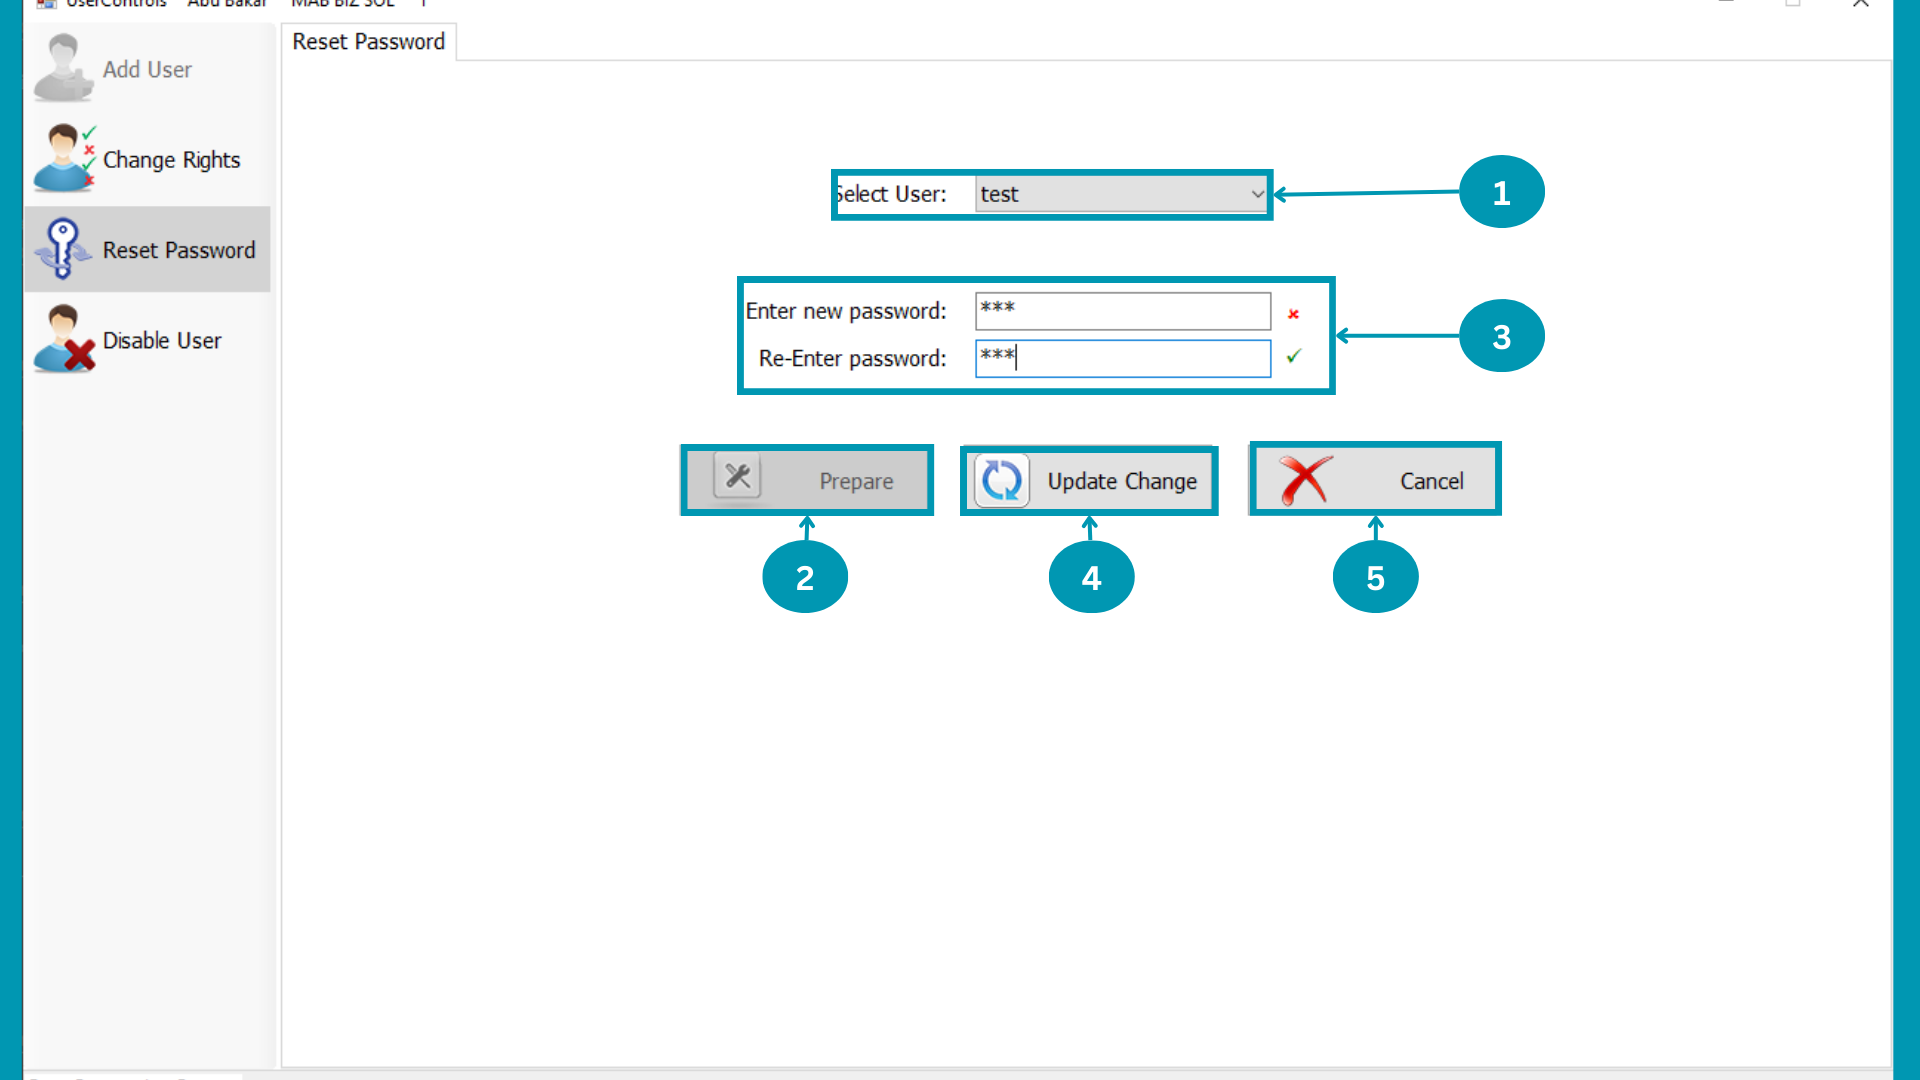
| 01 | Select User from users list.
|
| 02 | Hit the "Prepare" Button.
|
| 03 |  Write New Password on Enter New Password and Re-Enter Password to change password. Write New Password on Enter New Password and Re-Enter Password to change password.
|
| 04 |  Click on Update Change to save the change in password of selected user. Click on Update Change to save the change in password of selected user.
|
| 05 | To cancel changes click on cancel.
|
Disable User
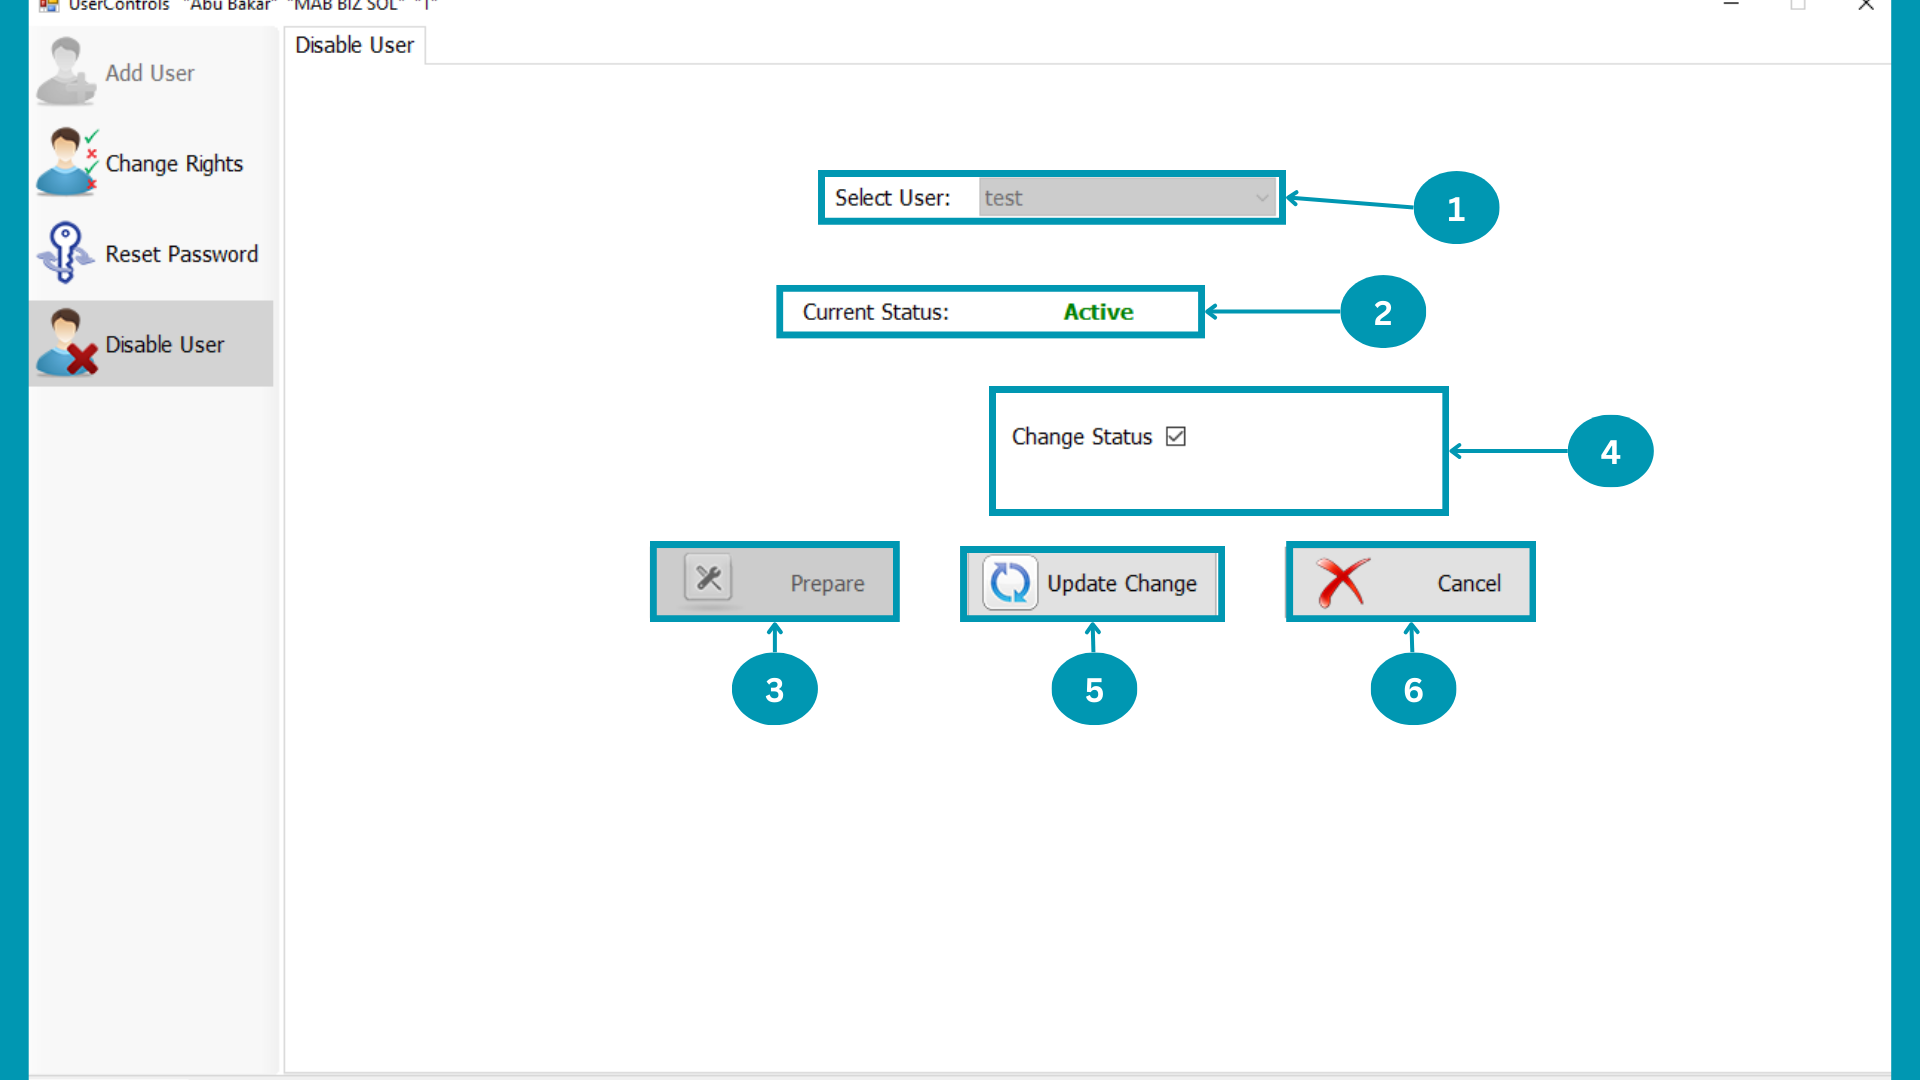
| 01 | Select User from users list.
|
| 02 |  Current status of Selected user will displayed here. Current status of Selected user will displayed here.
|
| 03 | Hit
the prepare Button. |
| 04 |  Check the change Status box to Active or disable the user. Check the change Status box to Active or disable the user.
|
| 05 | Click on Update Change to save the change in status of selected user.
|
| 05 | Hit
the Cancel Button.
|
MAB BIZ SOLUTIONS
Extra Control
Extra Control
The Company related controls and displaying informations settings exists here.
Following pages usage is explained in this segment
- Location
- Company Info
- Financial Period
- Aging Analysis Criteria
- Attach Setup
- Sale Print
- Payment Settings
Location

| 01 | Click On Prepare.
|
| 02 |  Select the location. Select the location.
|
| 03 |  Hit the Update or cancel button. Hit the Update or cancel button.
|
| 04 | Select Add to enter new location or Edit to rename the existing location.
|
| 05 |  If you clicked ADD write new location name in new row and select and rename the existing location for edit. If you clicked ADD write new location name in new row and select and rename the existing location for edit.
|
| 06 | Click on "Save" or "Cancel".
|
Company Info
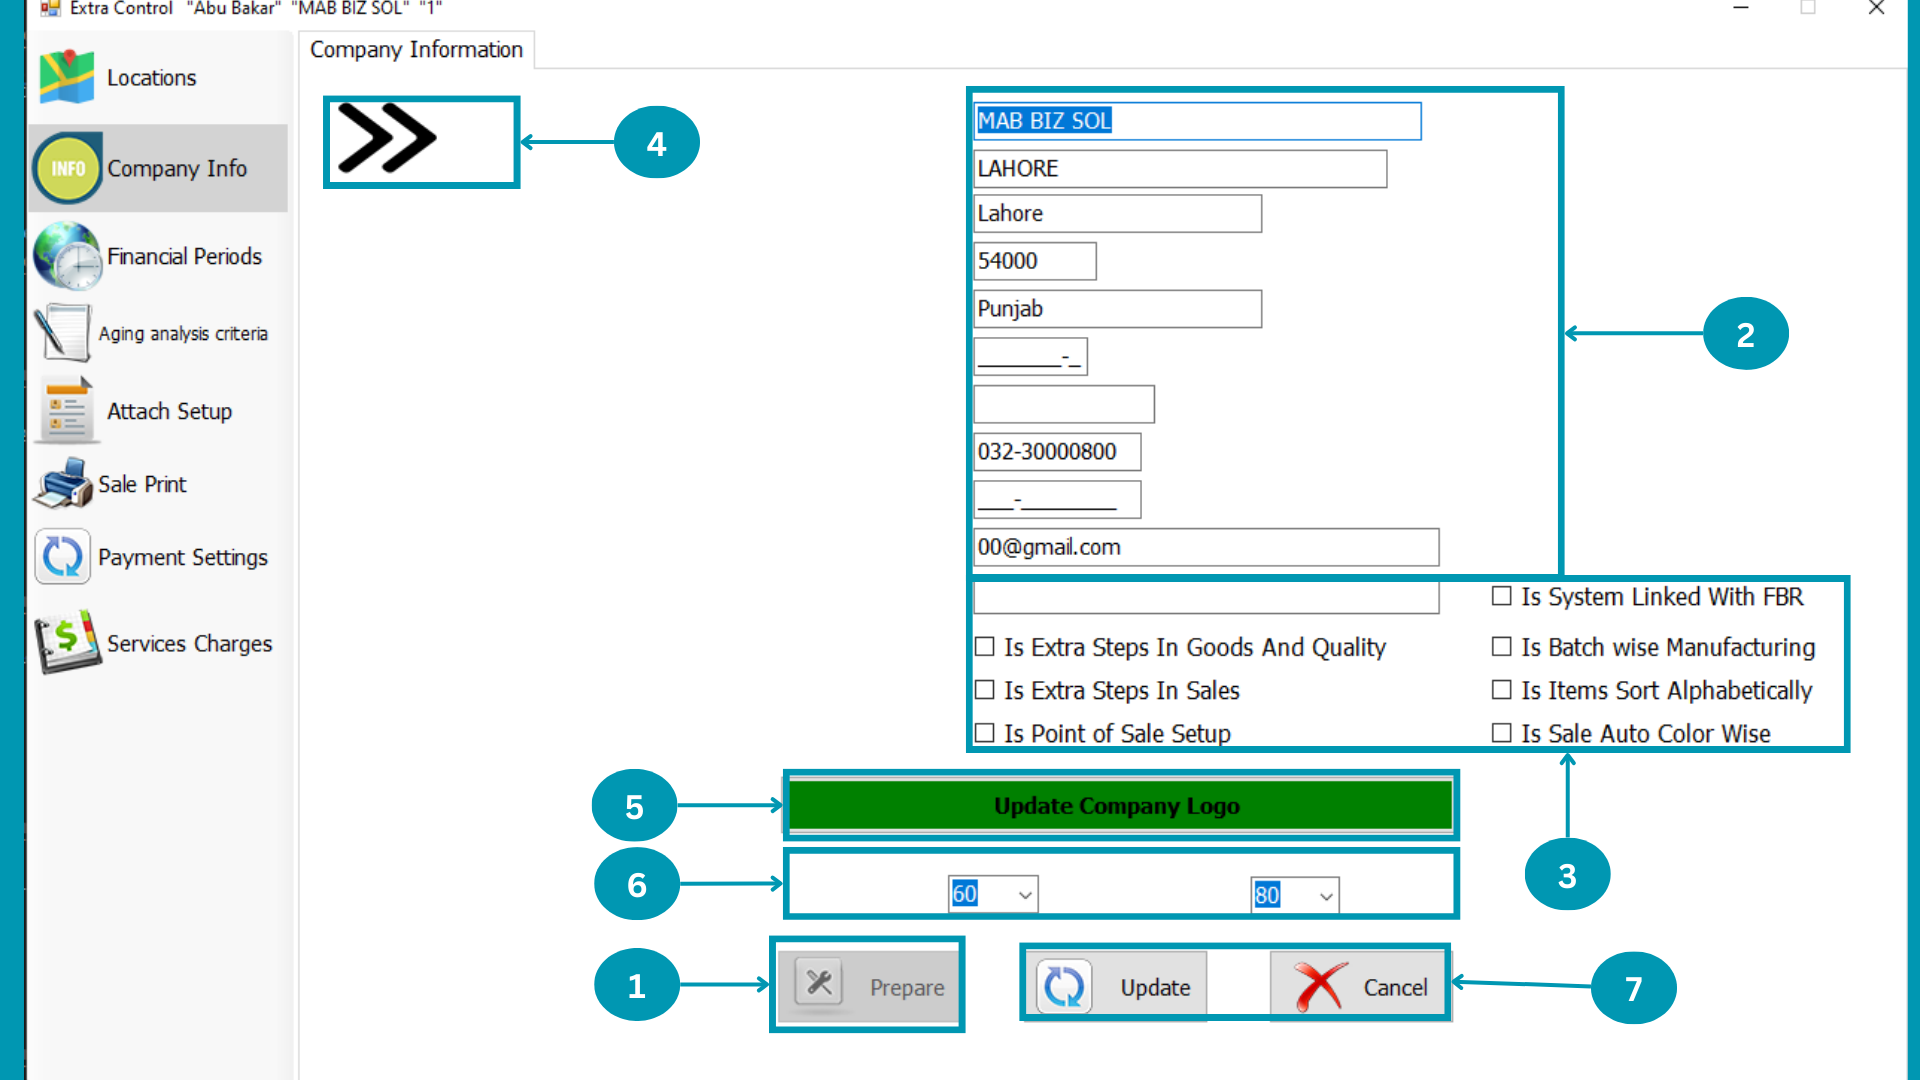
| 01 | Click On Prepare. |
| 02 |  Update the company info which you want. Update the company info which you want.
|
| 03 |  Check the Box in this section relates to your company requirements. Check the Box in this section relates to your company requirements.
|
| 04 | |
| 05 |  Click the update Company logo to select logo from PC , it has to be in ".PNG" format. Click the update Company logo to select logo from PC , it has to be in ".PNG" format.
|
| 06 |  Select the Height or width of the logo to be used in this software. Select the Height or width of the logo to be used in this software.
|
| 07 | Click on Update to save or Click on Cancel.
|
Financial Period
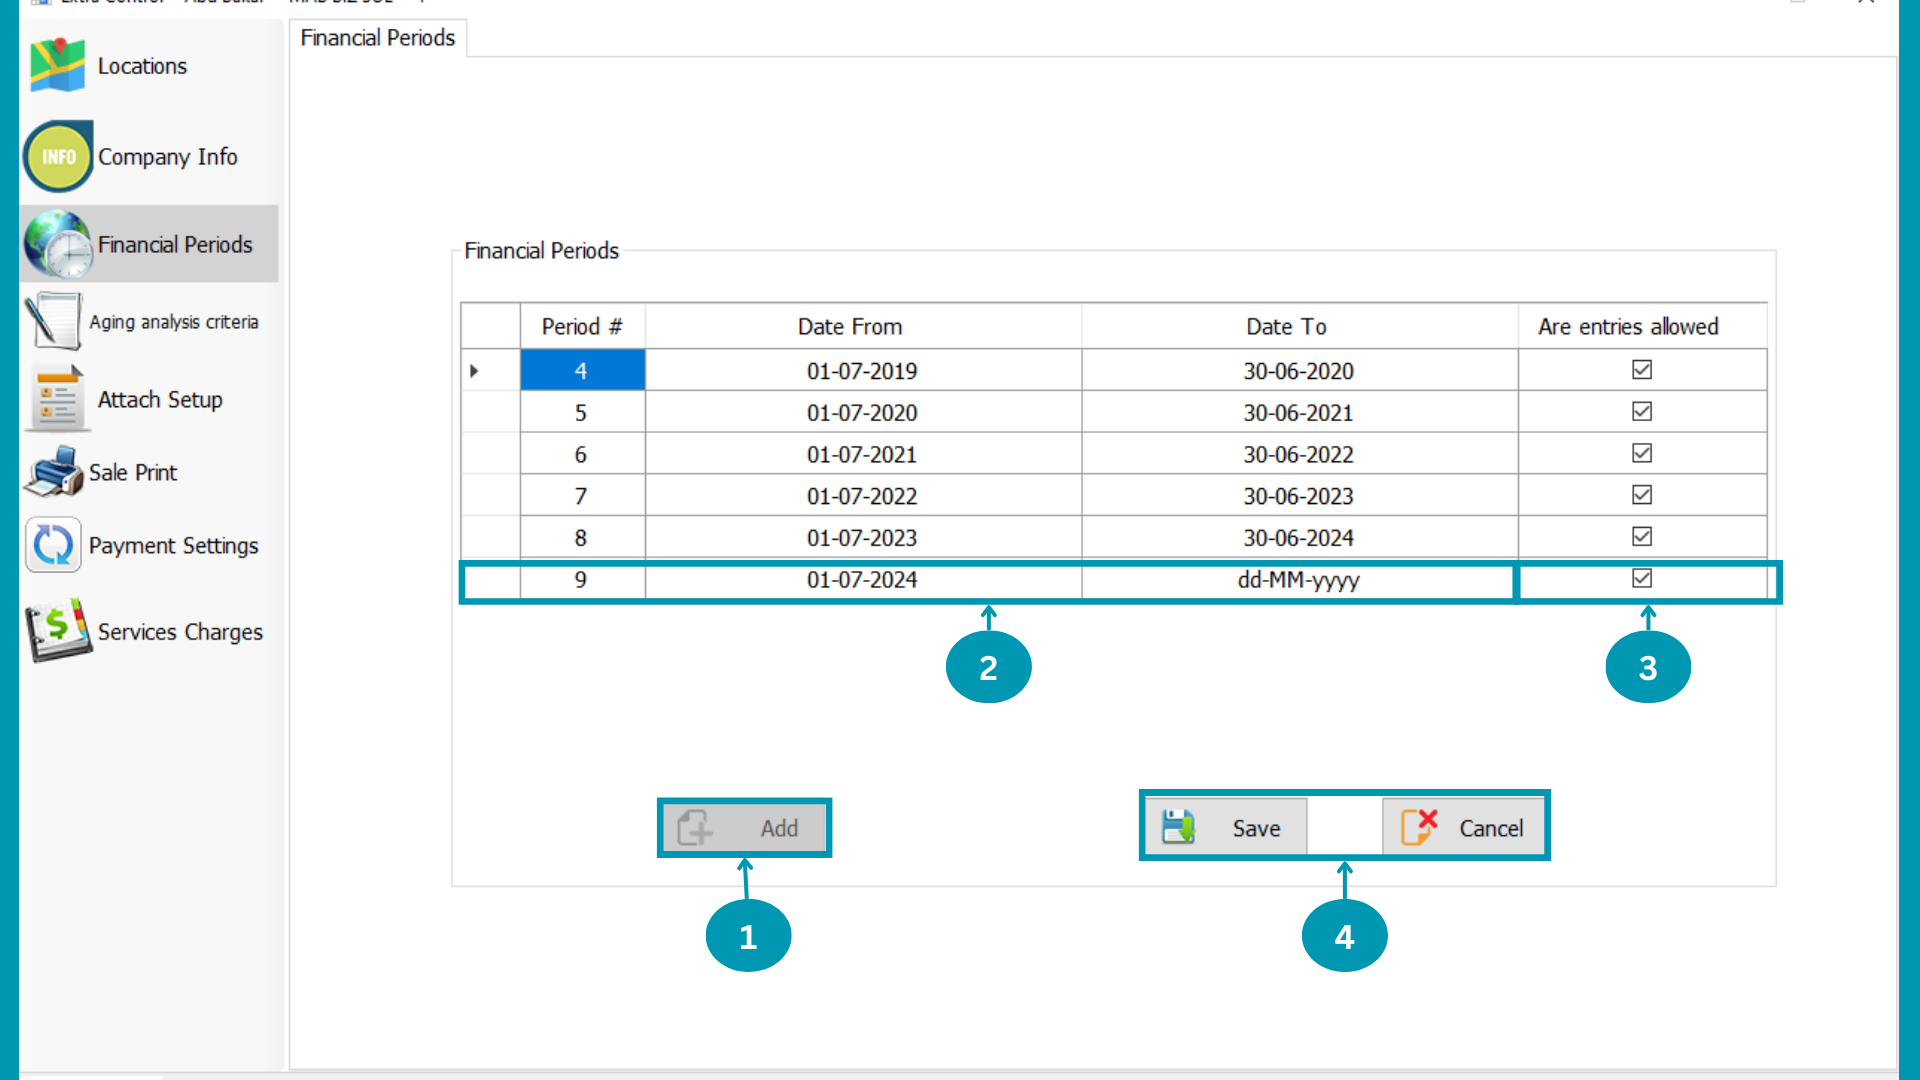
| 01 |  Select Add to enter new financial period. Select Add to enter new financial period.
|
| 02 |  Write Financial period Start date and end Date or default start will be next to last period end date. Write Financial period Start date and end Date or default start will be next to last period end date.
|
| 03 |  Click on Are Entries Allowed to enable to entries. Click on Are Entries Allowed to enable to entries.
|
| 04 | Hit the "Save or Cancel". |
Aging Analysis Criteria
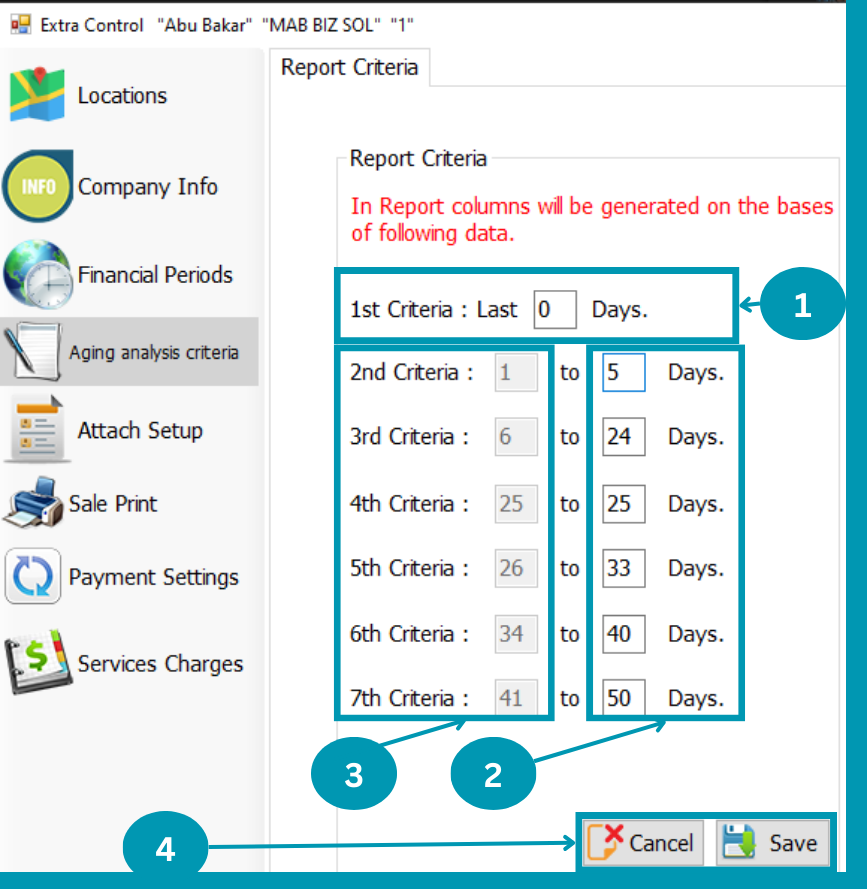
| 01 |  Enter 1st Criteria days for Aging Analysis reporting. Enter 1st Criteria days for Aging Analysis reporting.
|
| 02 |  Enter Next Reporting criteria end day in 2ns box of that row. Enter Next Reporting criteria end day in 2ns box of that row.
|
| 03 |  The Start Day of next aging analysis reporting will be next day of last rows end day. The Start Day of next aging analysis reporting will be next day of last rows end day.
|
| 04 | Hit the "Save or Cancel". |
Attach Setup
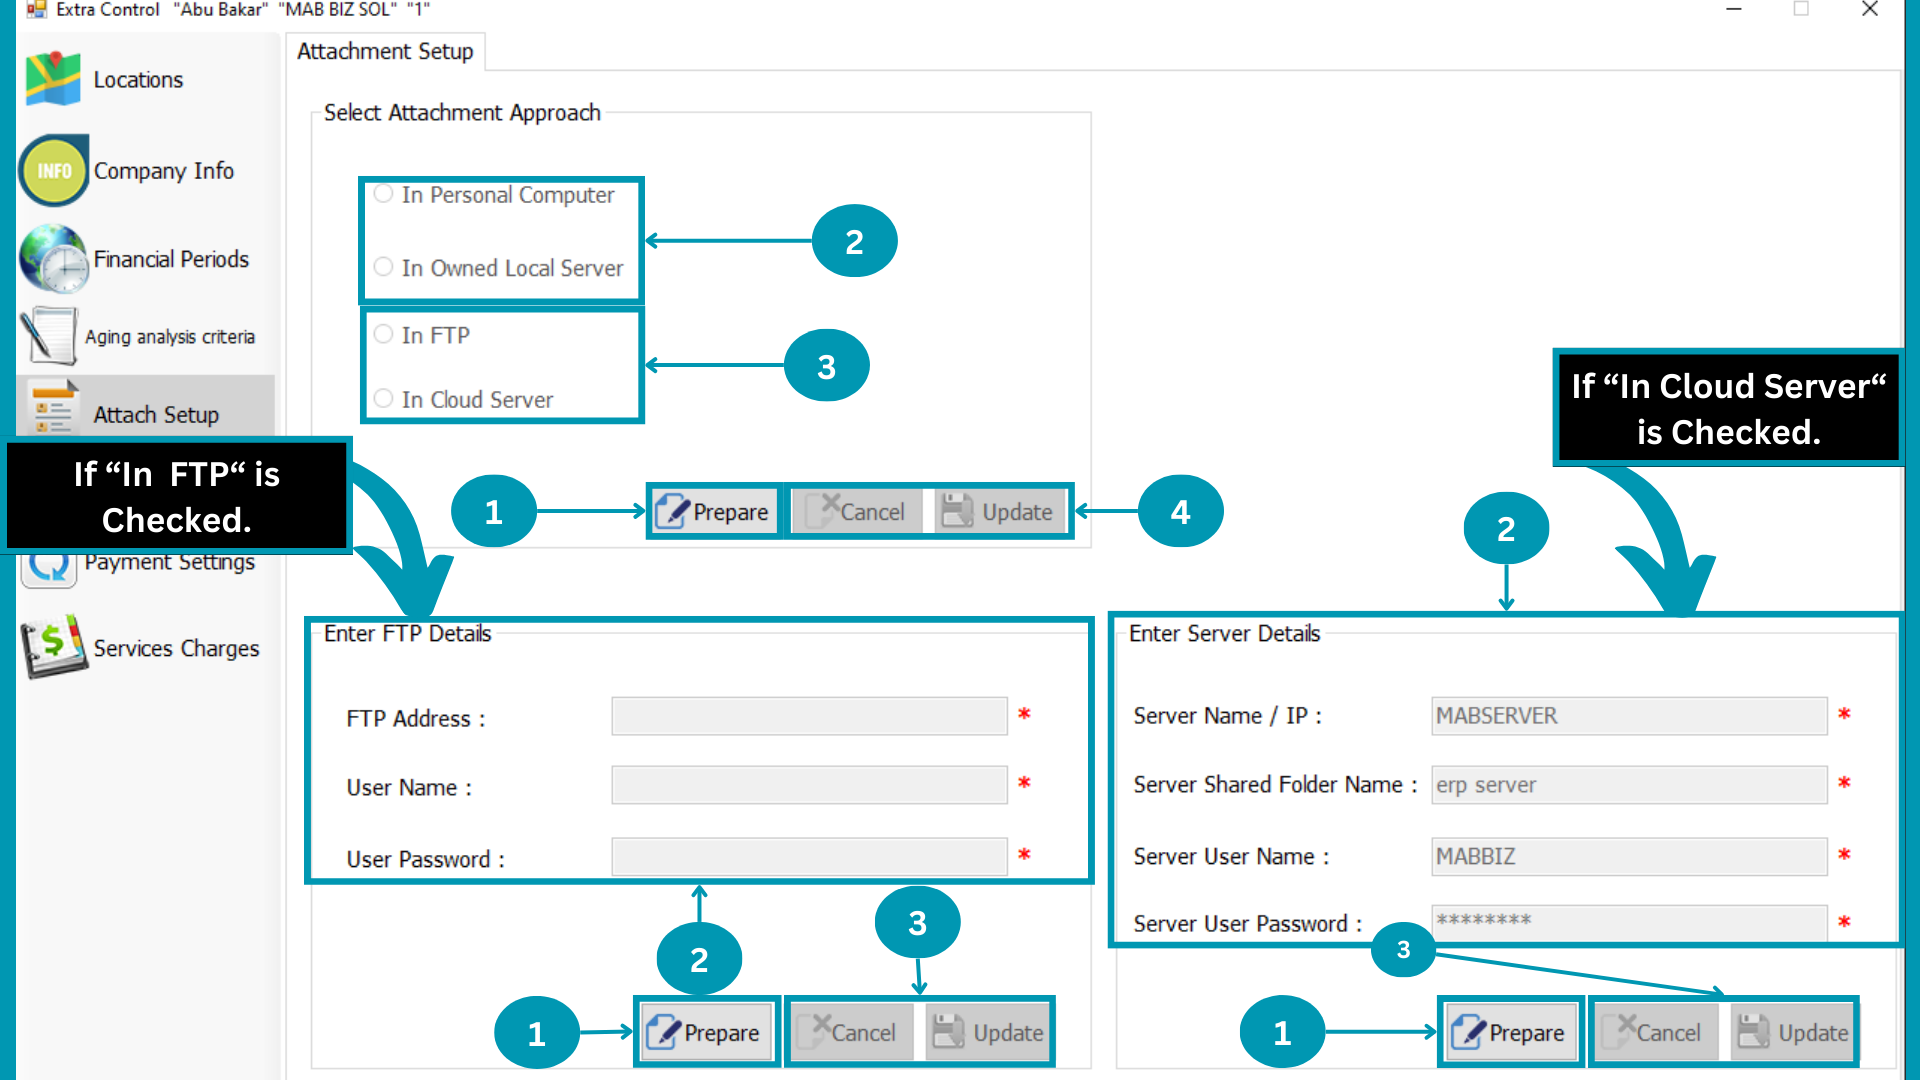
| 01 | Hit the "Prepare" Button. |
| 02 |  Check first or Second rows to store Documents in your storage. Check first or Second rows to store Documents in your storage.
|
| 03 | 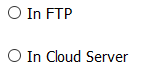 Check FTP or In Cloud Server rows to store Documents in Online storage. Check FTP or In Cloud Server rows to store Documents in Online storage.
|
| 04 | Choose Cancel or Update Button.
|
|
To store docs in google folder fill this section.
|
|
| 01 | Click on "prepare" button.
|
| 02 | 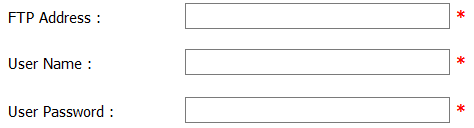 Enter FTP details here. Enter FTP details here.
|
| 03 | Choose Cancel or Update Button.
|
|
To store docs in Cloud Server fill this section.
|
|
| 01 | Click on "prepare" button.
|
| 02 | 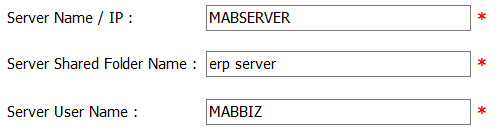 Enter Server details here. Enter Server details here.
|
| 03 | Choose Cancel or Update Button.
|
Sale Print
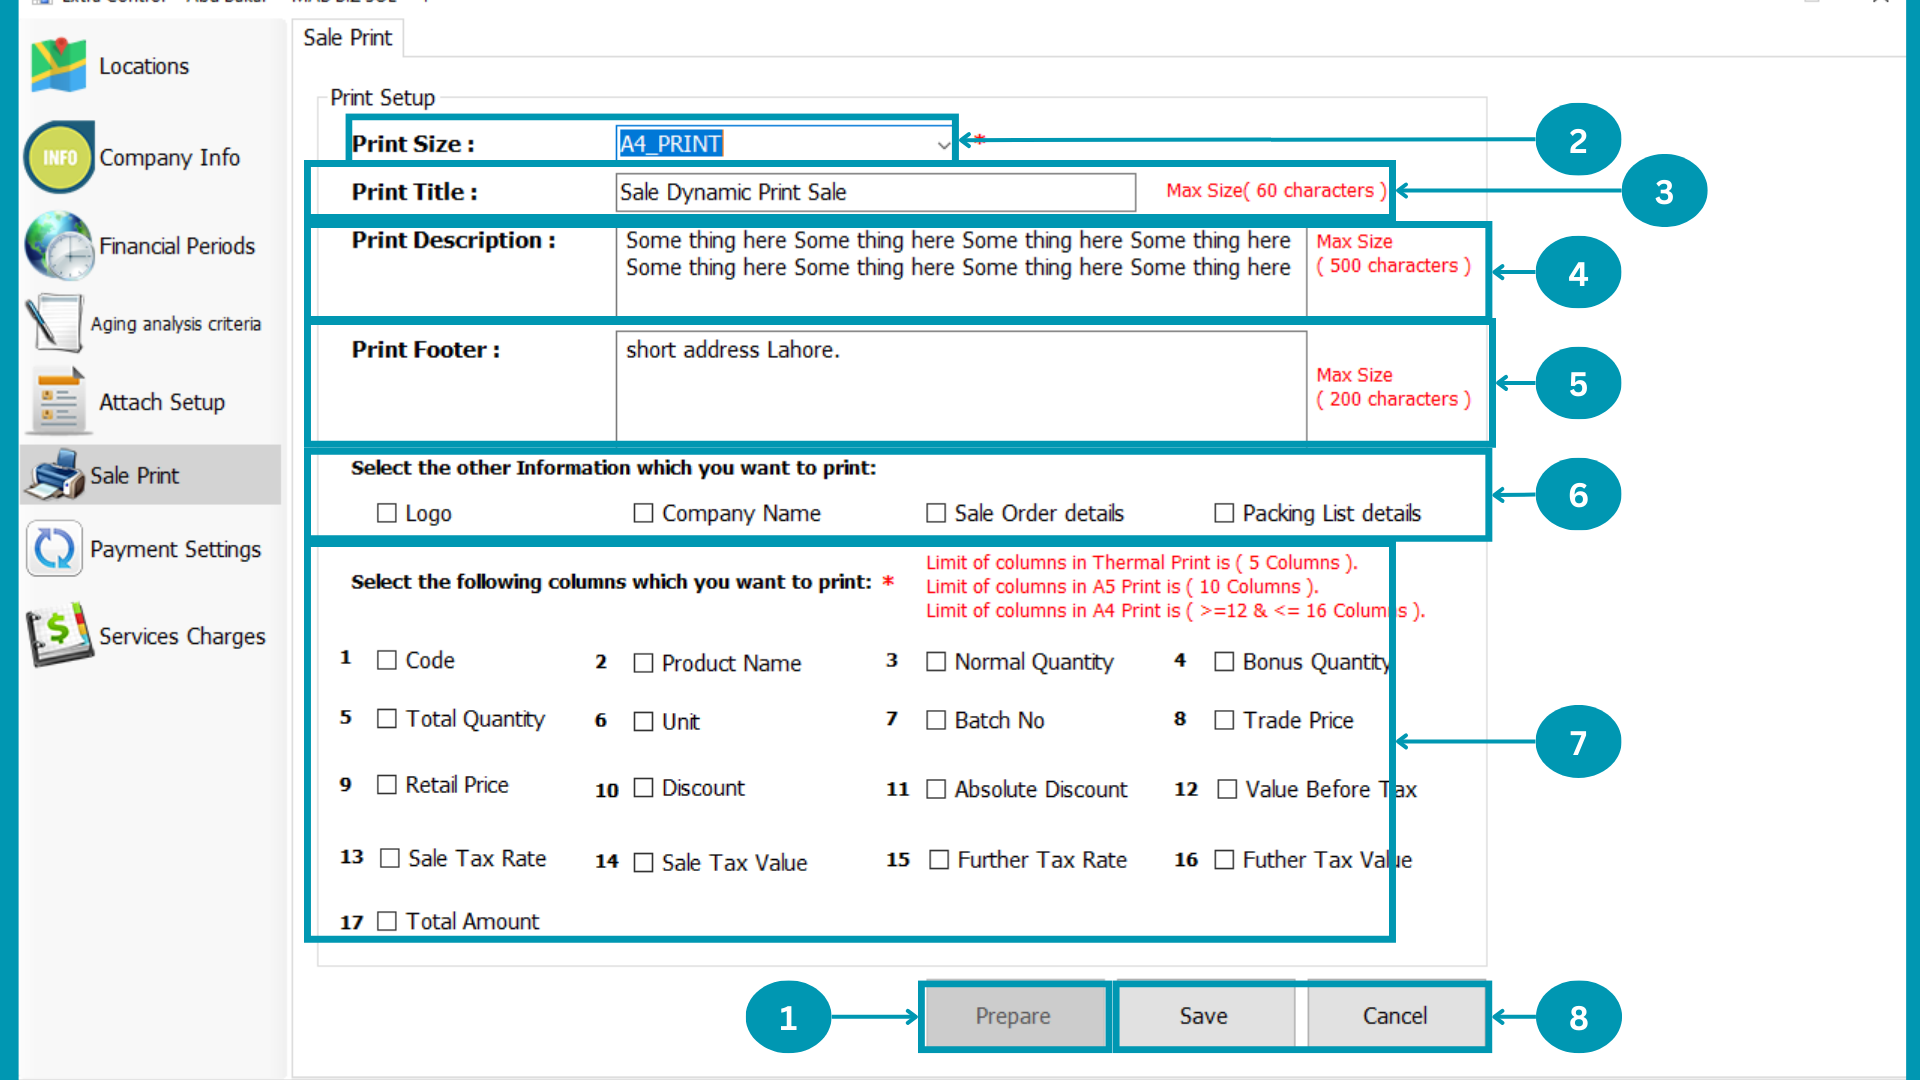
| 01 | Click on "prepare" button.
|
| 02 | 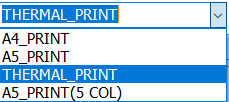 Select the print size. Select the print size.
|
| 03 |  Write Title of sale print. Write Title of sale print.
|
| 04 |  Write Description of sale print. Write Description of sale print.
|
| 05 |  Write Footer of sale print. Write Footer of sale print.
|
| 06 |  Select the information to show on print. Select the information to show on print.
|
| 07 |  Select columns to print according to print size. Select columns to print according to print size.
|
| 08 |  Choose Save or cancel Button. Choose Save or cancel Button.
|
Payment Settings
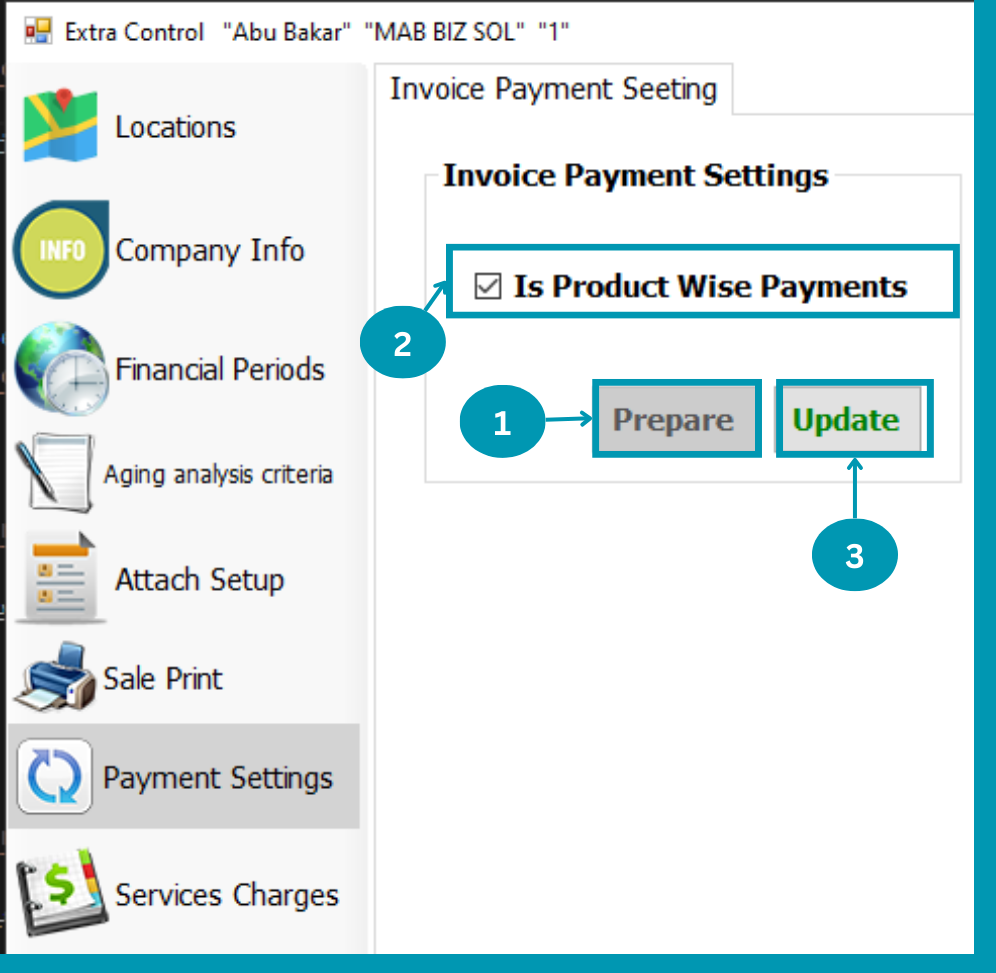
| 04 |  Click on "Prepare" button. Click on "Prepare" button. |
| 05 | 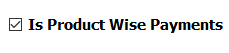 Click on "Is Product Wise Payments box". Click on "Is Product Wise Payments box".
|
| 06 |  Click on "Update". Click on "Update".
|
MAB BIZ SOLUTIONS
Other Info & Controls
Other Info & Controls
The Settings relates to productions of raw material and sales of production are avalible in Other Info & Controls
Following pages usage is explained in this segment
- Recorder and Alias
- Sale Prices
- Add units
- Others
- Ship to Info
- Manufacturers
Recorder and Alias
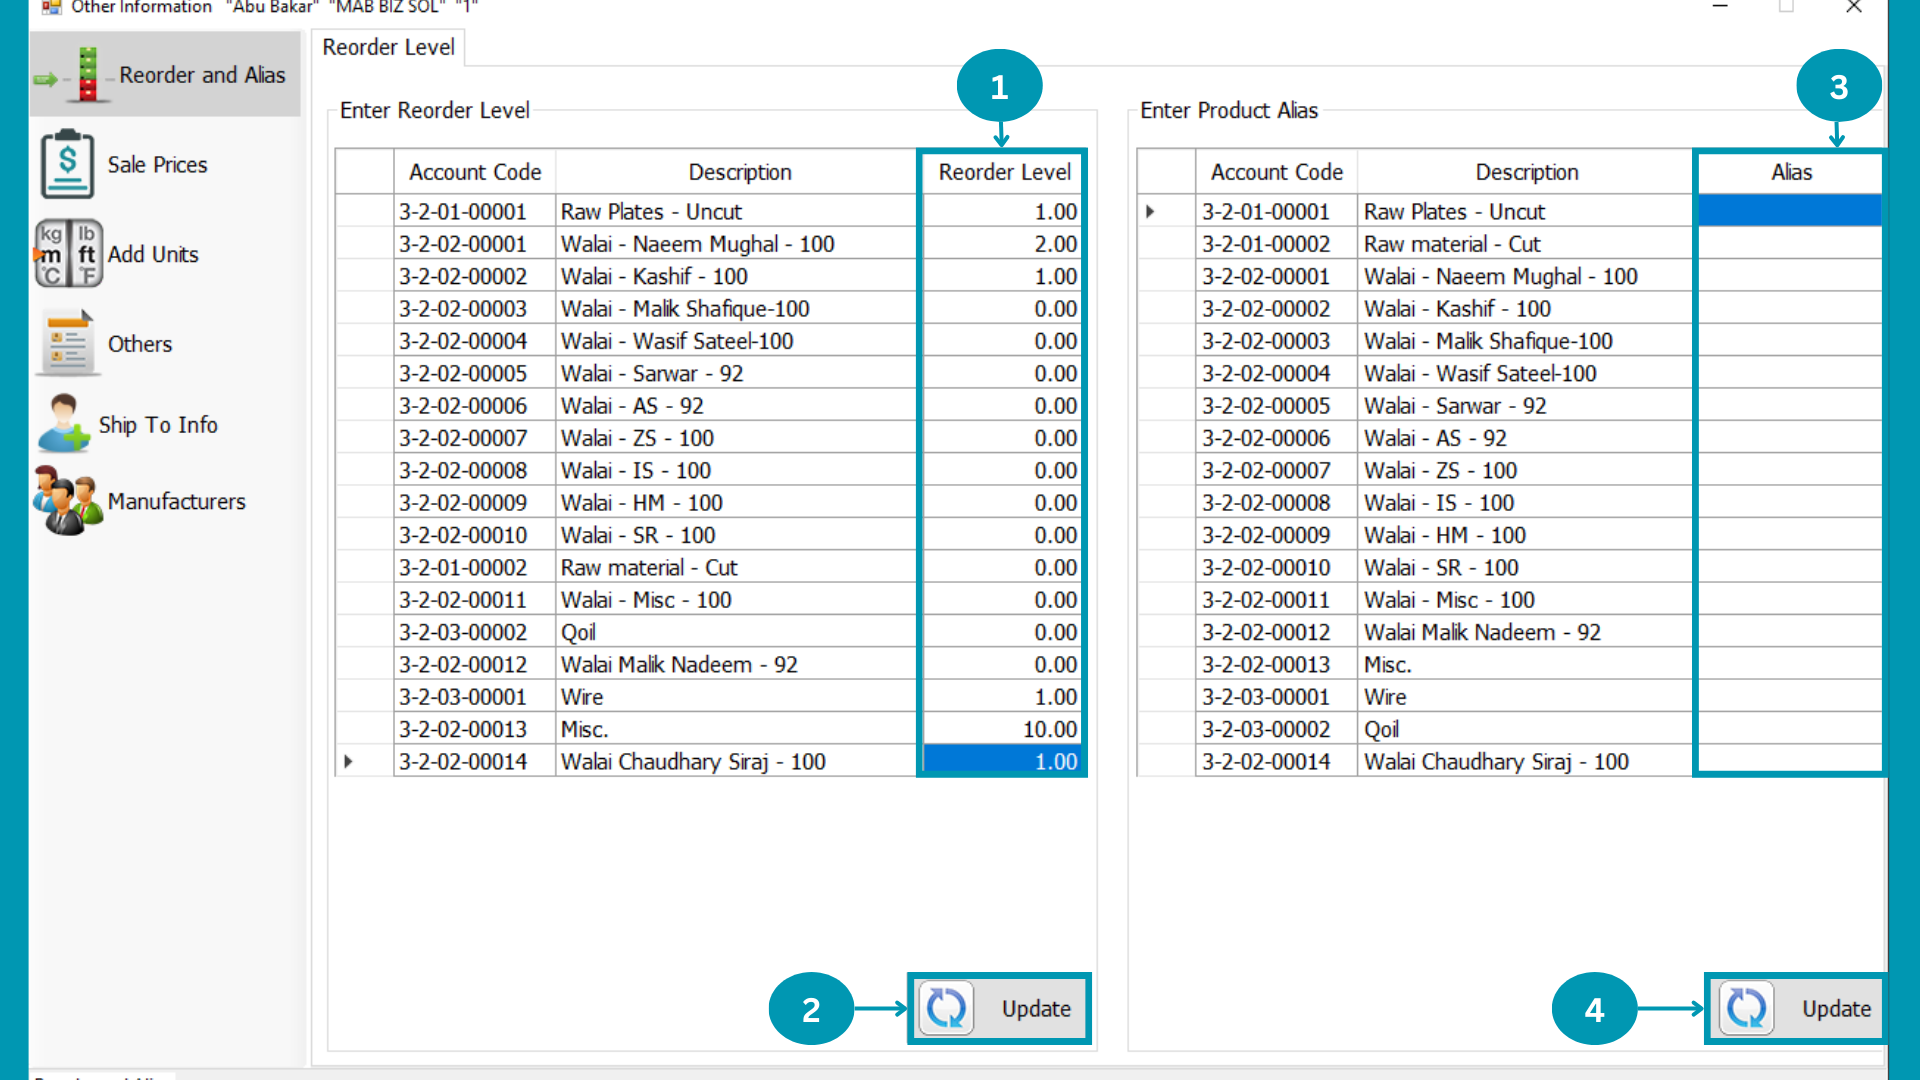
| 01 |  Write the reorder level for the Raw-materials and finished goods along with the corresponding quantity Write the reorder level for the Raw-materials and finished goods along with the corresponding quantity
|
| 02 |  Click on update. Click on update.
|
| 03 |  Write the Alias level for the Raw-materials and finish goods along with the corresponding quantity. Write the Alias level for the Raw-materials and finish goods along with the corresponding quantity.
|
| 04 | Click on update.
|
Sale Prices
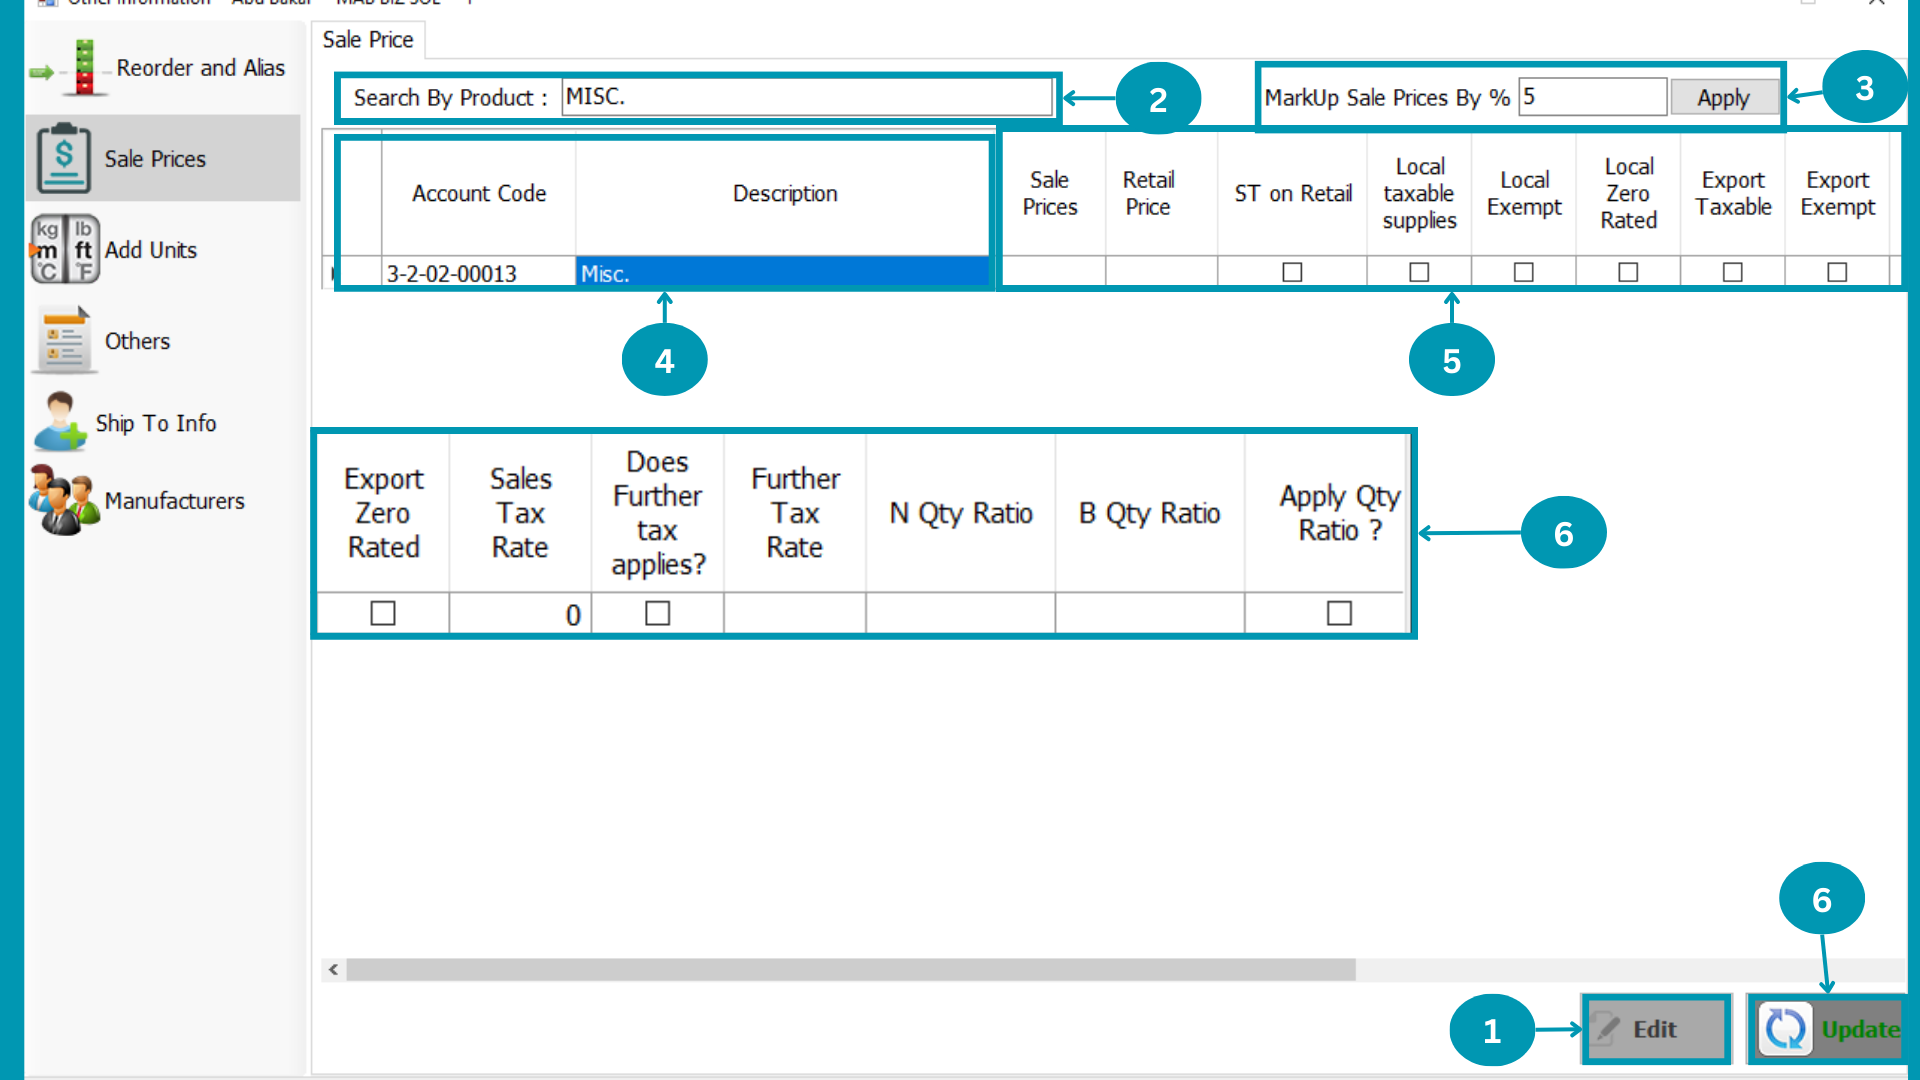
| 01 | Click on edit button.
|
| 02 | Search product to set price.
|
| 03 |  Write MarkUp Sale Prices by percentage %. Write MarkUp Sale Prices by percentage %.
|
| 04 |  Select product for pricing. Select product for pricing.
|
| 05 | 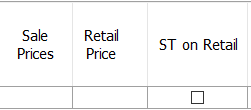 Fill product row according to sale pricing of that product. Fill product row according to sale pricing of that product.
|
| 06 | 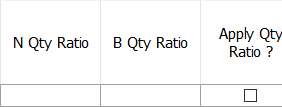 Scroll the table and fill next cells. Scroll the table and fill next cells.
|
| 07 | Click on "Update"
|
Add Units

| 01 | 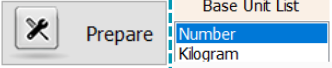 Click Prepare for new base unit and select existing to edit. Click Prepare for new base unit and select existing to edit.
|
| 02 |  Write new unit name or select edit or delete for existing. Write new unit name or select edit or delete for existing.
|
| 03 | 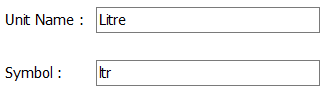 Fill Unit name and symbol in unit cells. Fill Unit name and symbol in unit cells.
|
| 04 |  Click Save or Cancel for new unit and Cancel or Update for existing unit. Click Save or Cancel for new unit and Cancel or Update for existing unit.
|
| 05 |  Select Base Unit to view related units. Select Base Unit to view related units.
|
| 06 |  Click Prepare for new related unit and select existing to edit. Click Prepare for new related unit and select existing to edit.
|
| 07 |  Write new unit name or select edit or delete for existing. Write new unit name or select edit or delete for existing.
|
| 08 | 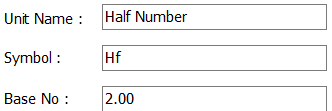 Fill Unit name and symbol of unit in cells. Fill Unit name and symbol of unit in cells.
|
| 09 | Click Save or Cancel for new unit and Cancel or Update for existing unit.
|
| 10 | Click Prepare for adding units against Raw Material and Finished Goods.
|
| 11 |  Select Raw Material and Finished Goods from list. Select Raw Material and Finished Goods from list.
|
| 12 |  Select Unit from units list. Select Unit from units list.
|
| 13 | Click the Update Button.
|
| 14 | Click on prepare for apply related units.
|
| 15 |  Click the Is link to sale. Click the Is link to sale.
|
| 16 |  Click "Cancel or Update" Click "Cancel or Update"
|
Others
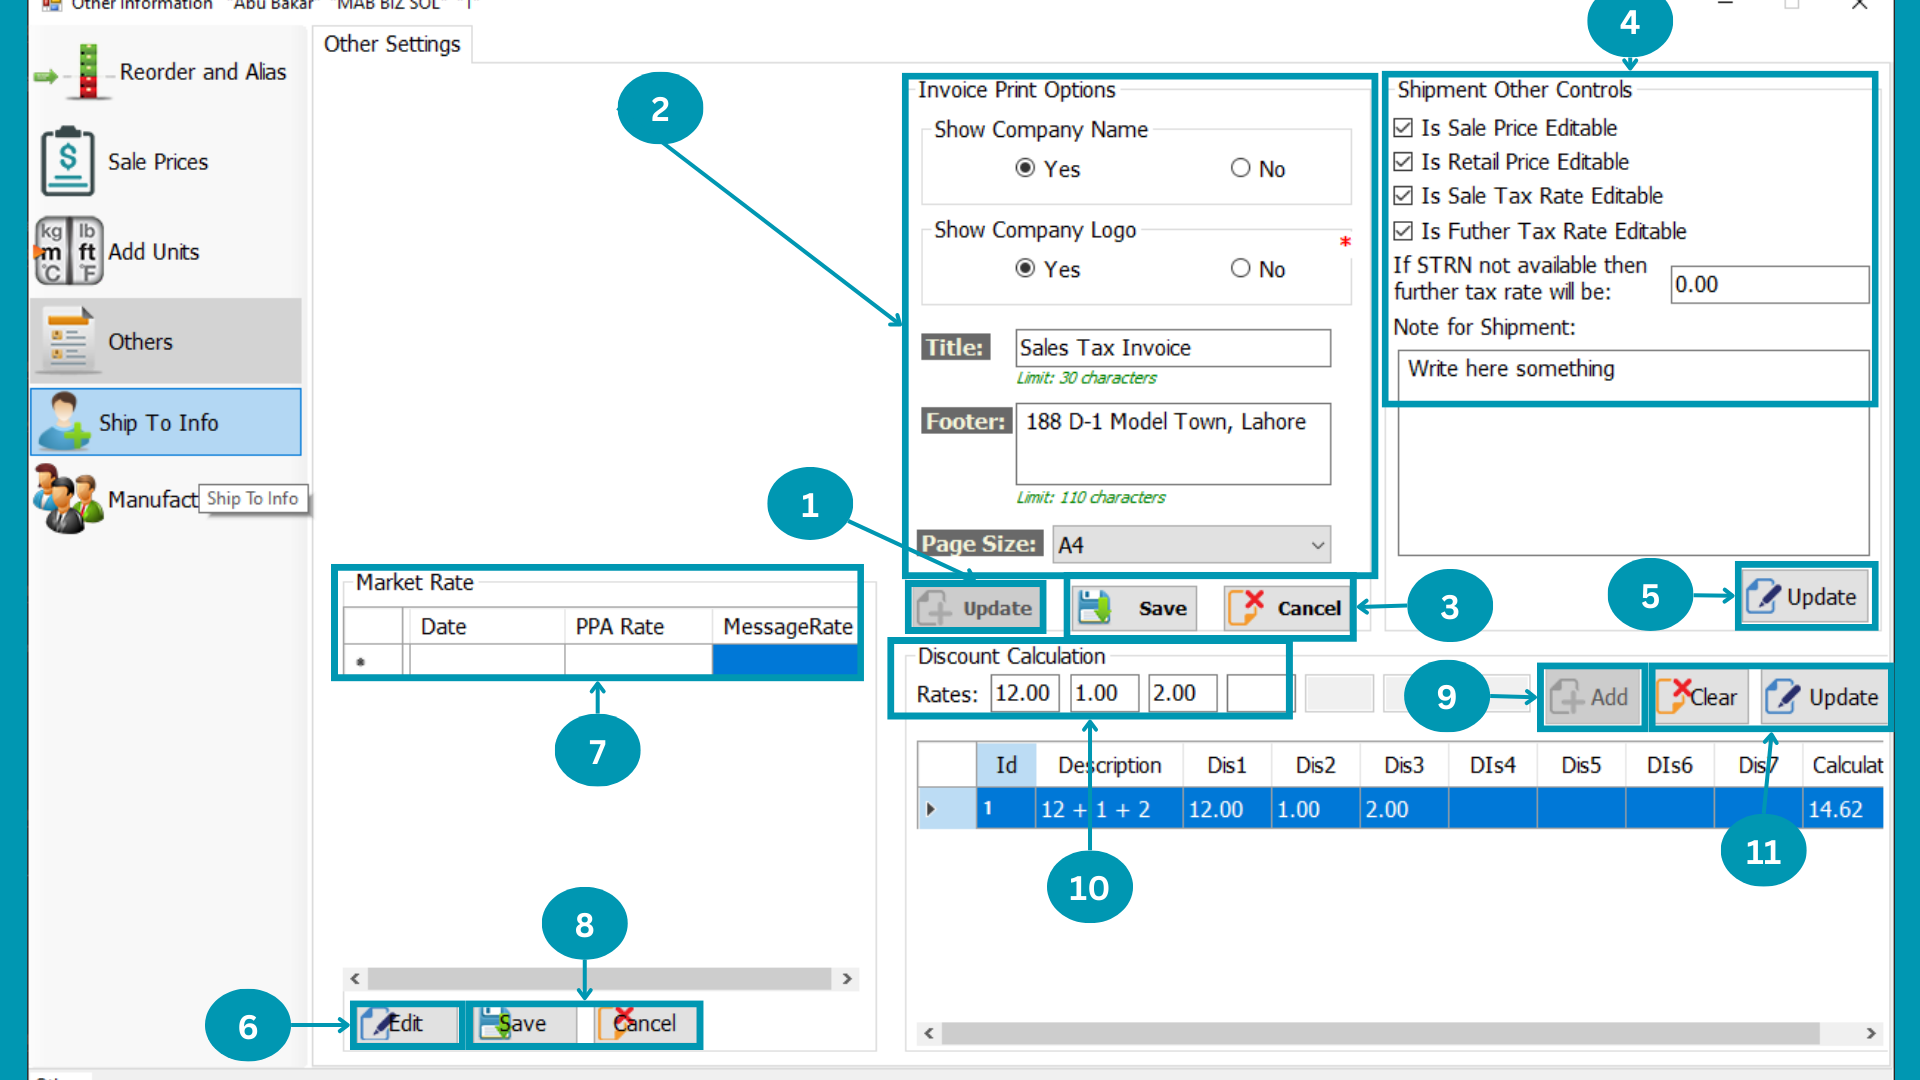
| 01 |  Click on Update for invoice print options. Click on Update for invoice print options.
|
| 02 |  Customize Invoice Print option. Customize Invoice Print option.
|
| 03 | Click on save or cancel.
|
| 04 | 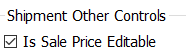 Enable other shipment controls through this or write shipment note. Enable other shipment controls through this or write shipment note.
|
| 05 | Click the Update Button.
|
| 06 | Click on Edit to write and change market rate.
|
| 07 | 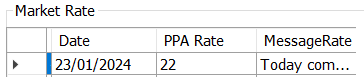 Fill Market Rate Table. Fill Market Rate Table.
|
| 08 | Click on save or cancel.
|
| 09 | Enable other shipment controls through this or write shipment note.
|
| 10 | Click the Update Button.
|
Ship to Info
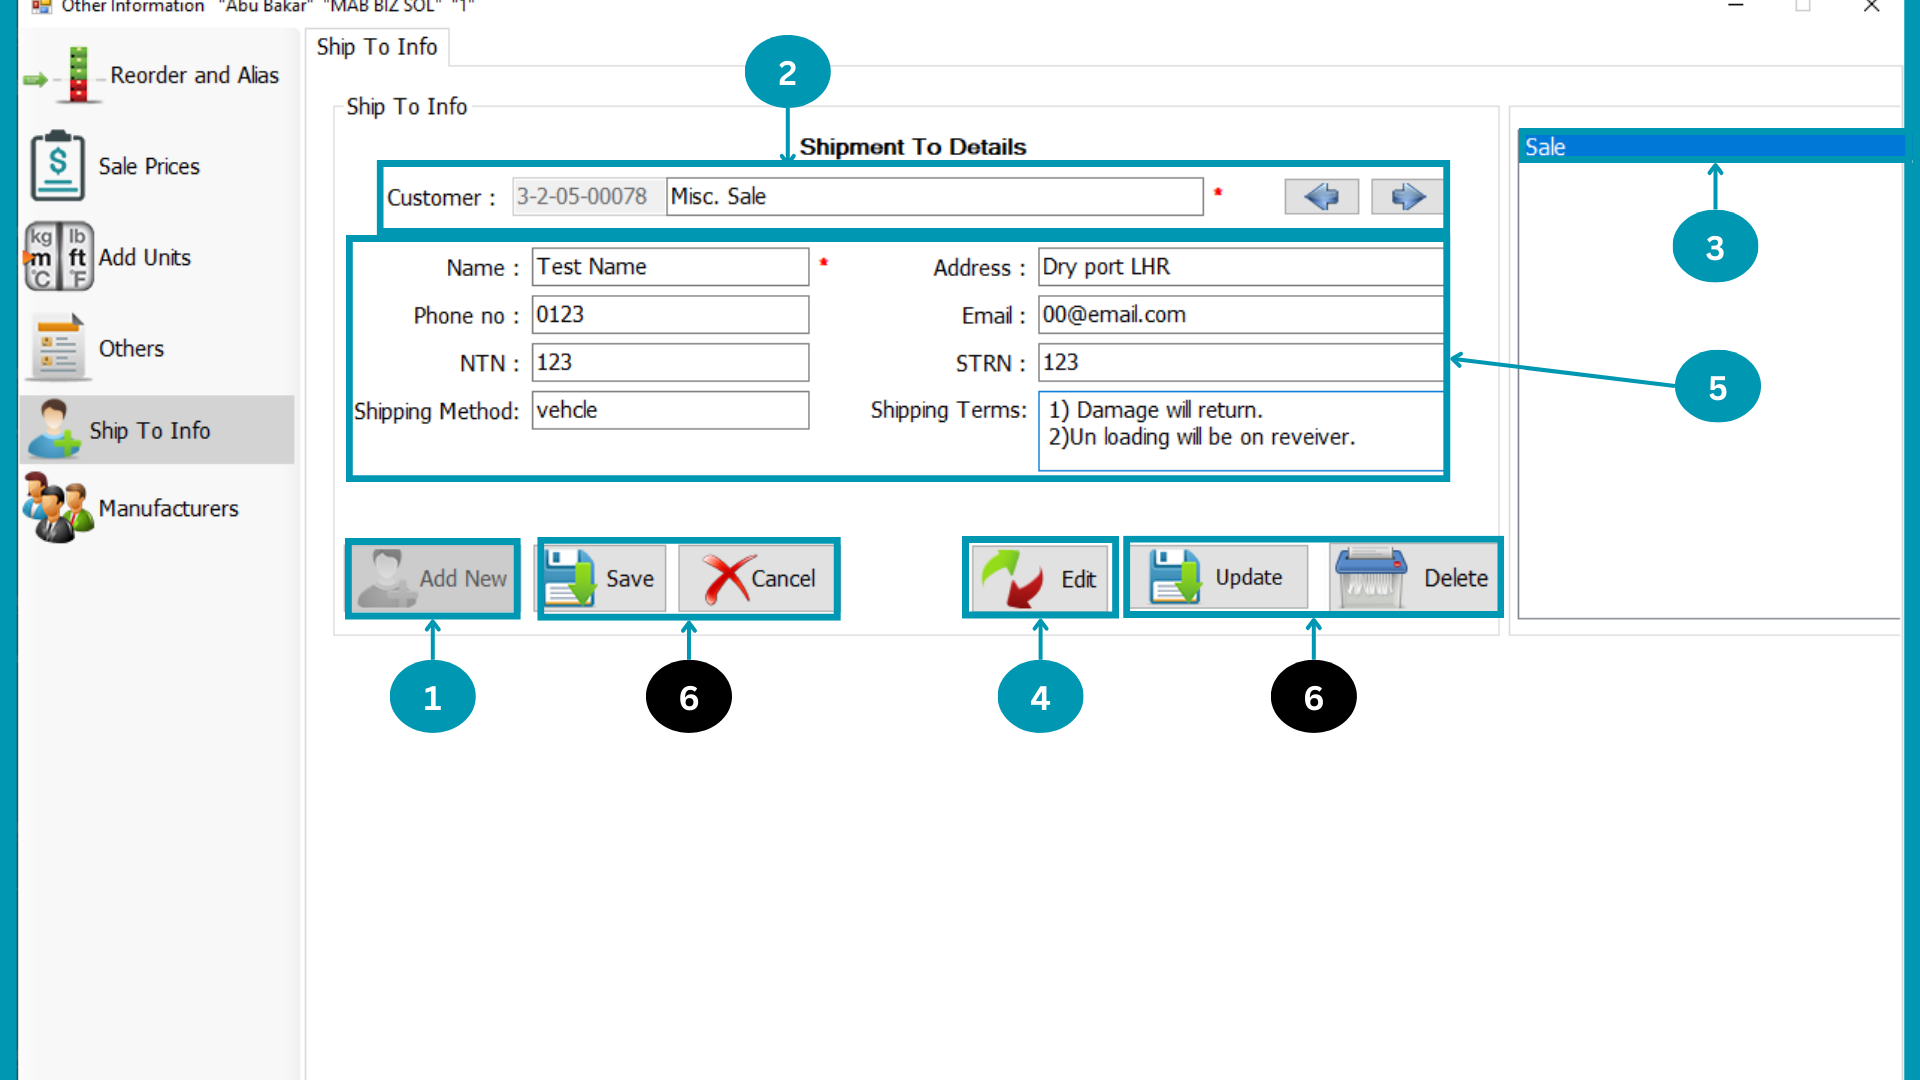
| 01 | Click the "Add New" button.
|
| 02 |  Select Customer name. Select Customer name.
|
| 03 |  Select already entered shipment details to edit. Select already entered shipment details to edit.
|
| 04 |  Click on edit button Click on edit button
|
| 05 | 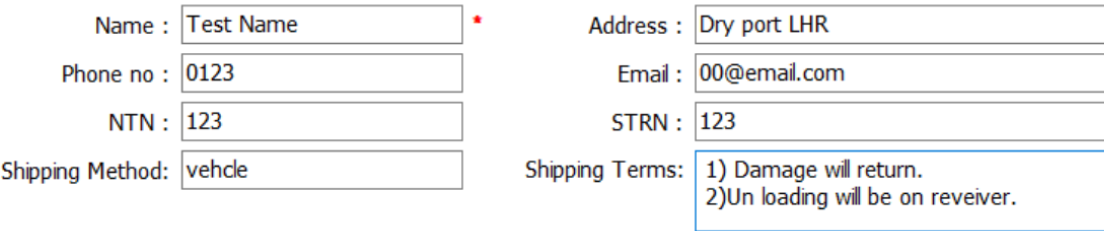 Fill Shipment details in respective rows. Fill Shipment details in respective rows.
|
| 06 |  If you edited click on "Update" or "delete" else click on "Save" or "Cancel " If you edited click on "Update" or "delete" else click on "Save" or "Cancel "
|
Manufacturers
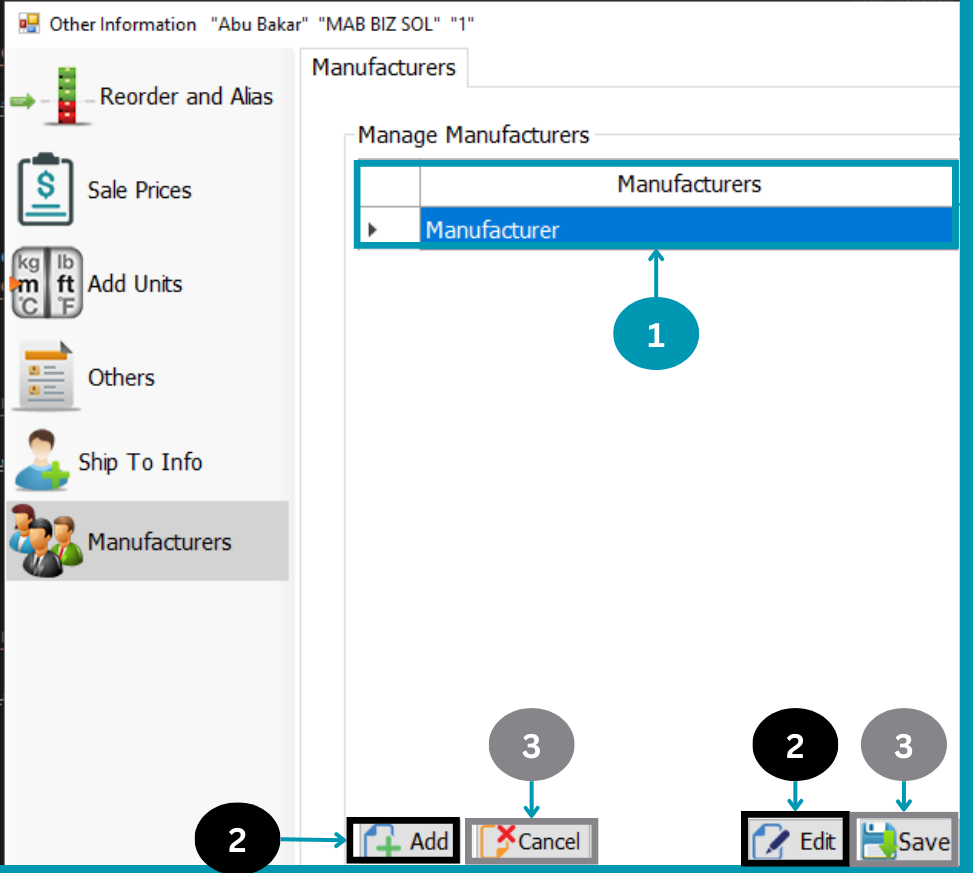
| 01 |  Click on Manufacturer-name to edit name. Click on Manufacturer-name to edit name.
|
| 02 |  Click on Add for new and Edit for edit selected name. Click on Add for new and Edit for edit selected name.
|
| 03 | Click on "Cancel" or "Save".
|
MAB BIZ SOLUTIONS
Admin Panel
Admin Panel
Admin Panel have fields of Add user allow rights enter company informations and add location for attached documents location.
This is specifically for Admin.
MAB BIZ SOLUTIONS
Backup And Restore
Backup And Restore
Creating the attached Database Backup And retrieving the Database through restore explained below.
Following pages usage is explained in this segment
- Backup
- Restore
- Location
Backup
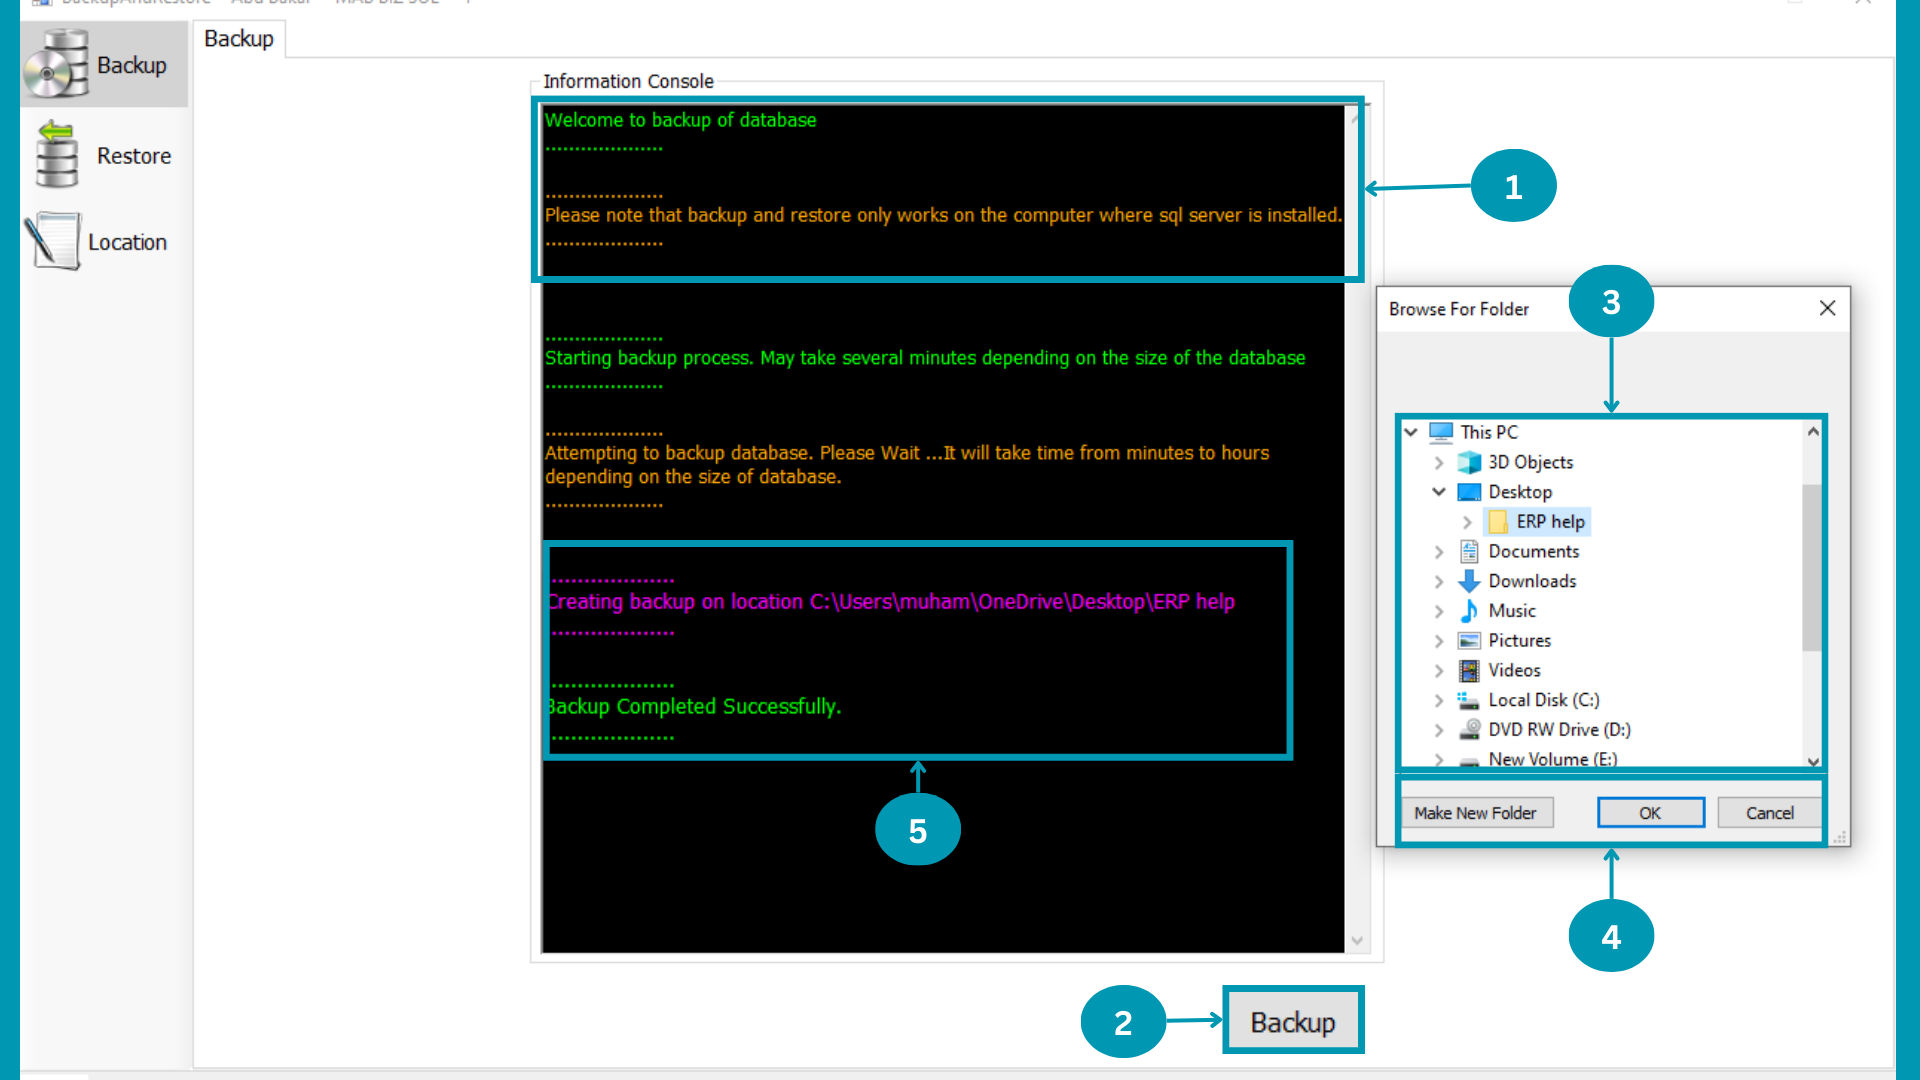
| 01 |  This backup option is only for local SQL Server users. This backup option is only for local SQL Server users.
|
| 02 |  Click on "Backup" button. Click on "Backup" button. |
| 03 |  Select the folder in which you want t store the backup file. Select the folder in which you want t store the backup file.
|
| 04 |  Click ok to start backup or cancel to skip. Click ok to start backup or cancel to skip. |
| 05 | 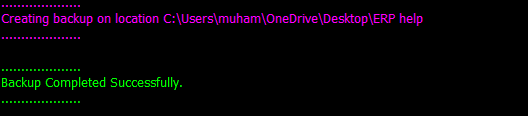 On Sucess The Success message of backup will display on screen. On Sucess The Success message of backup will display on screen.
|
Restore
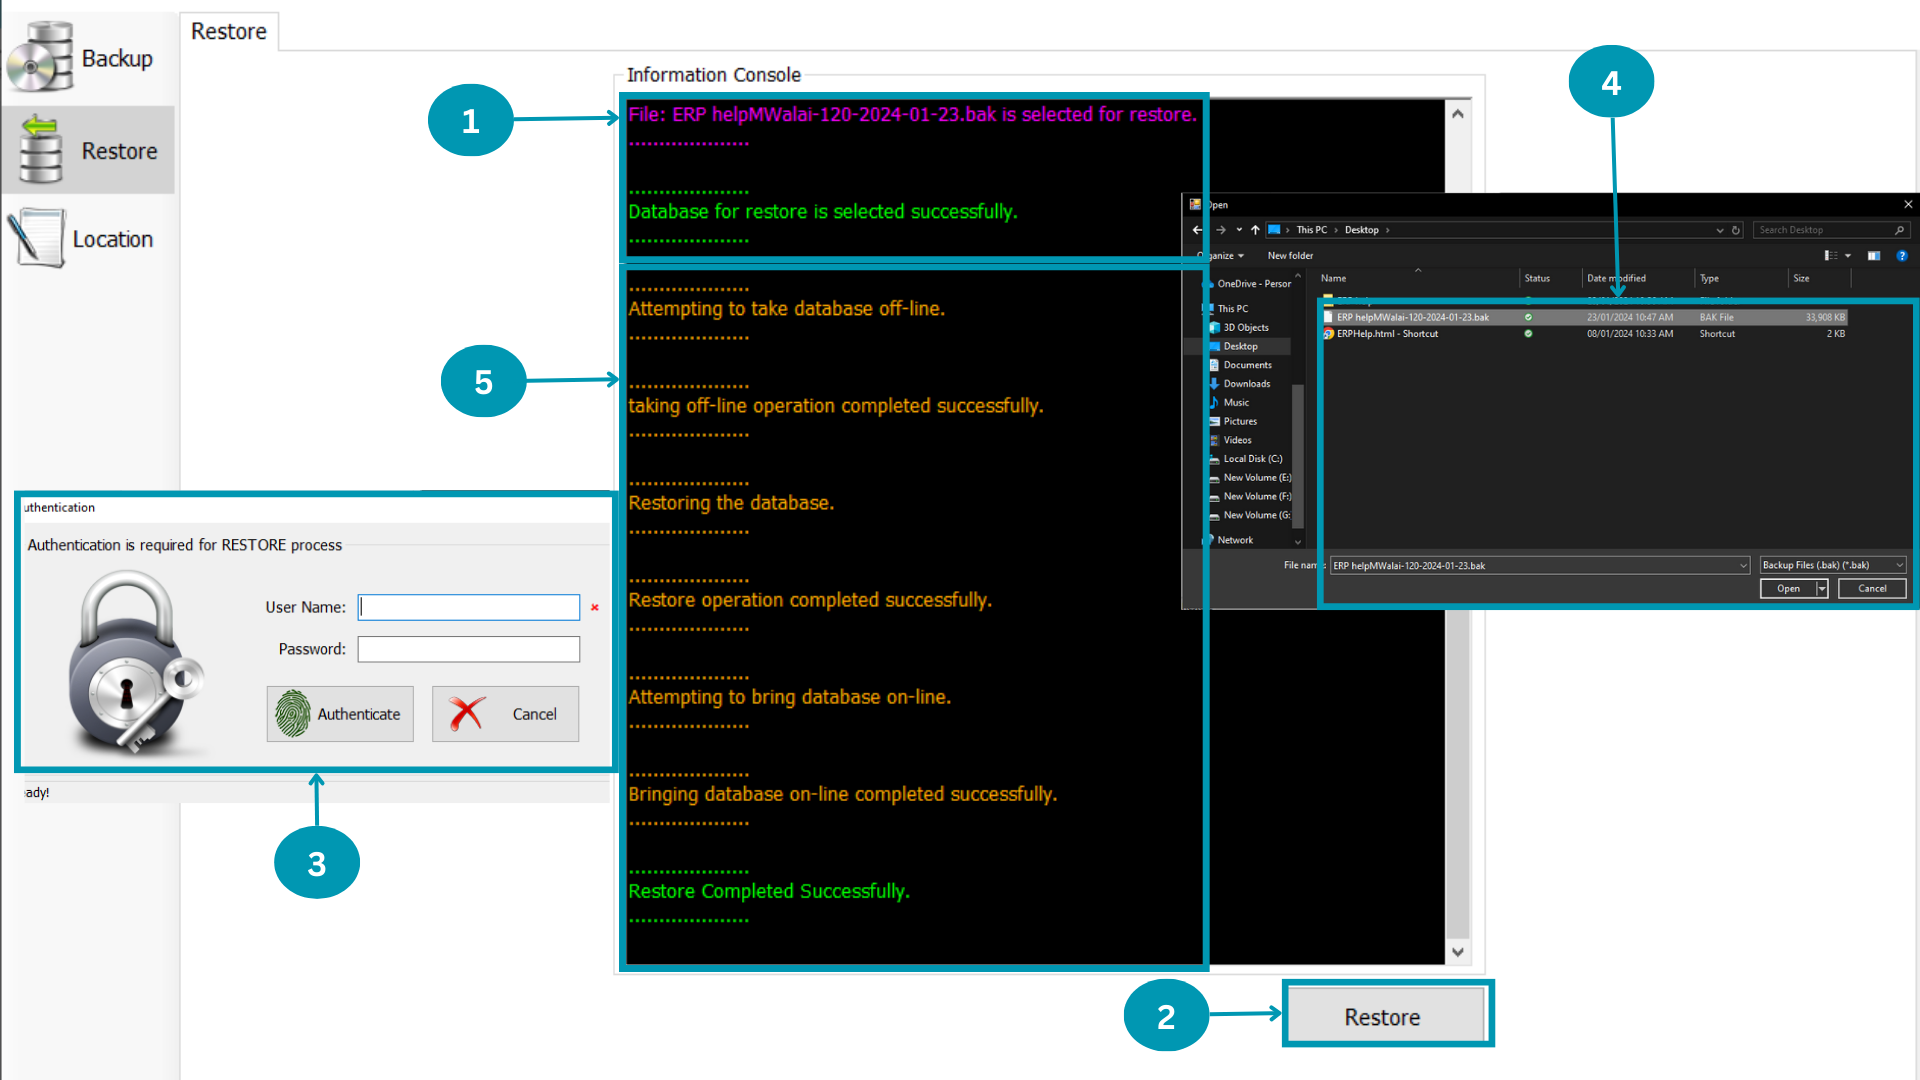
| 01 |  This restore option is only for local SQL Server users. This restore option is only for local SQL Server users.
|
| 02 |  Click on "Restore" button. Click on "Restore" button. |
| 03 | 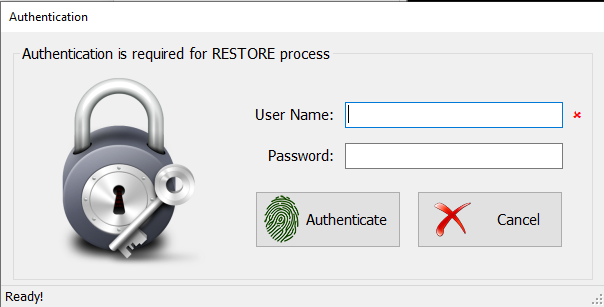 Complete the Authentication process. Complete the Authentication process. |
| 04 |  Select the Backup file from your PC then Click 'ok' to start restore or cancel to skip. Select the Backup file from your PC then Click 'ok' to start restore or cancel to skip. |
| 05 | On Sucess The Success message of restore will display on screen.
|
Location
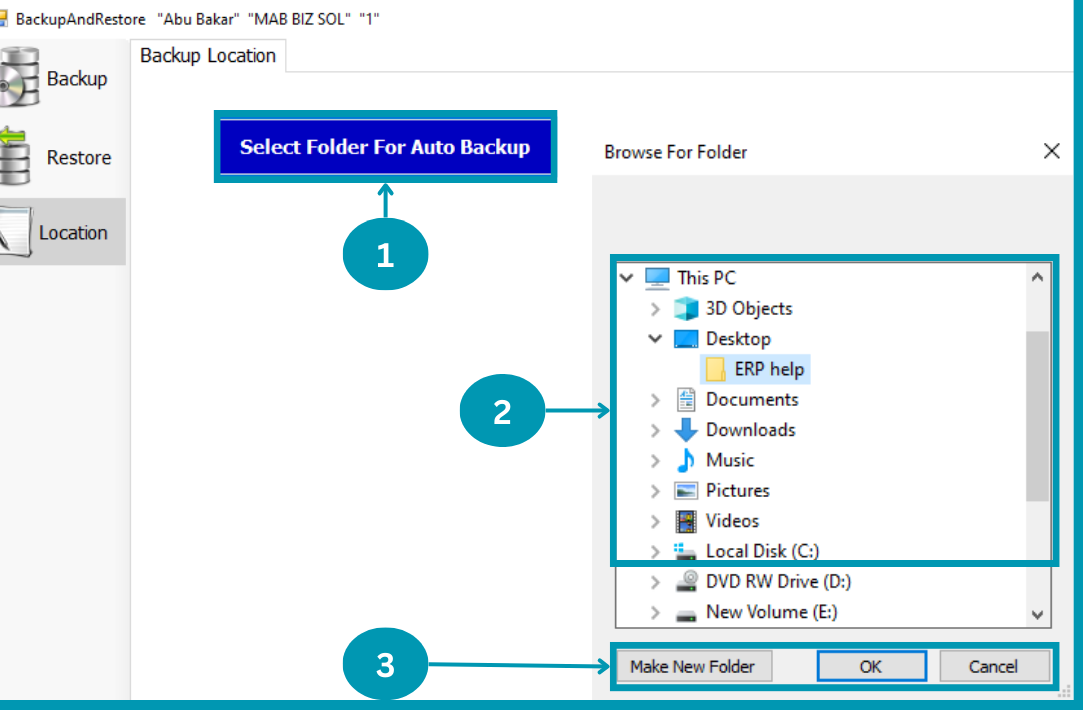
| 01 |  Click "Select Folder for Auto Backup" to save backup automatically on selected location. Click "Select Folder for Auto Backup" to save backup automatically on selected location.
|
| 02 | Select the folder in which you want to store the backup file.
|
| 03 | Click ok to Save backup location or cancel to skip. |
MAB BIZ SOLUTIONS
Logout
Logout
Click on Logout to exit or remove log-out account from the ERP.
MAB BIZ SOLUTIONS
Dashboard
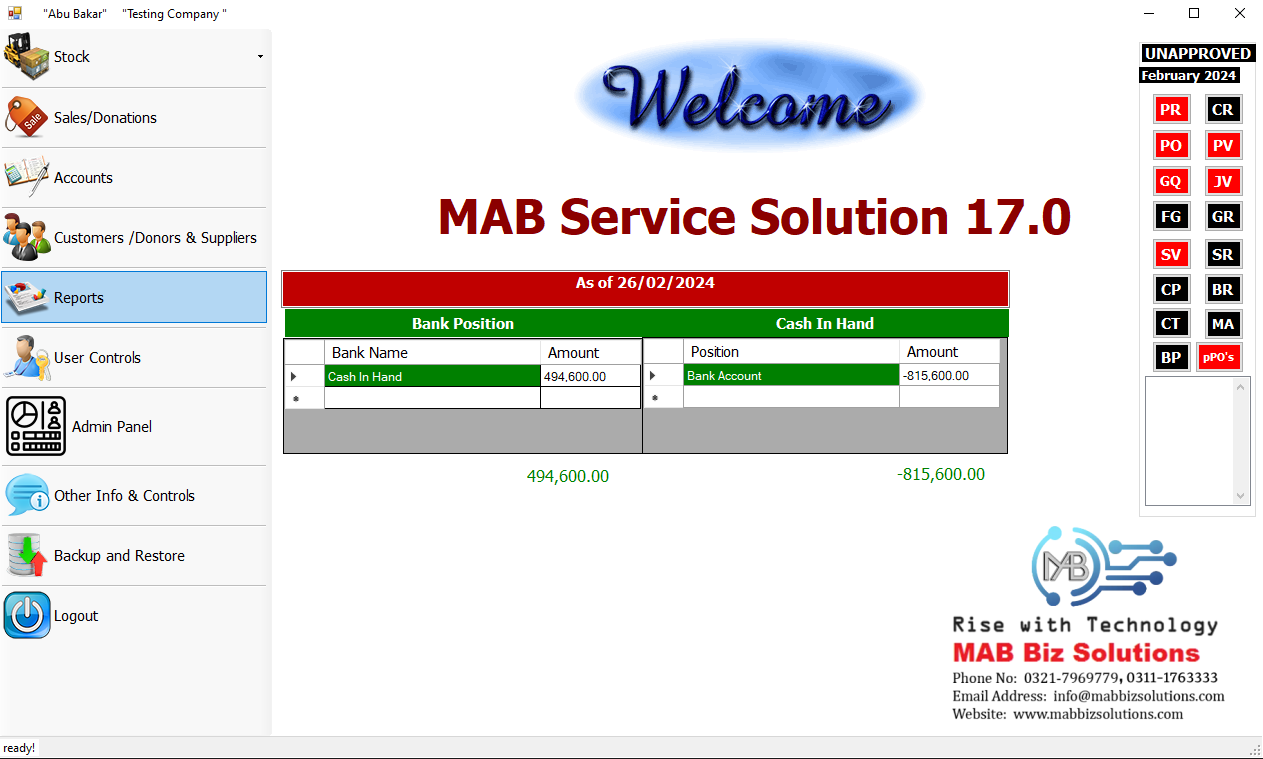
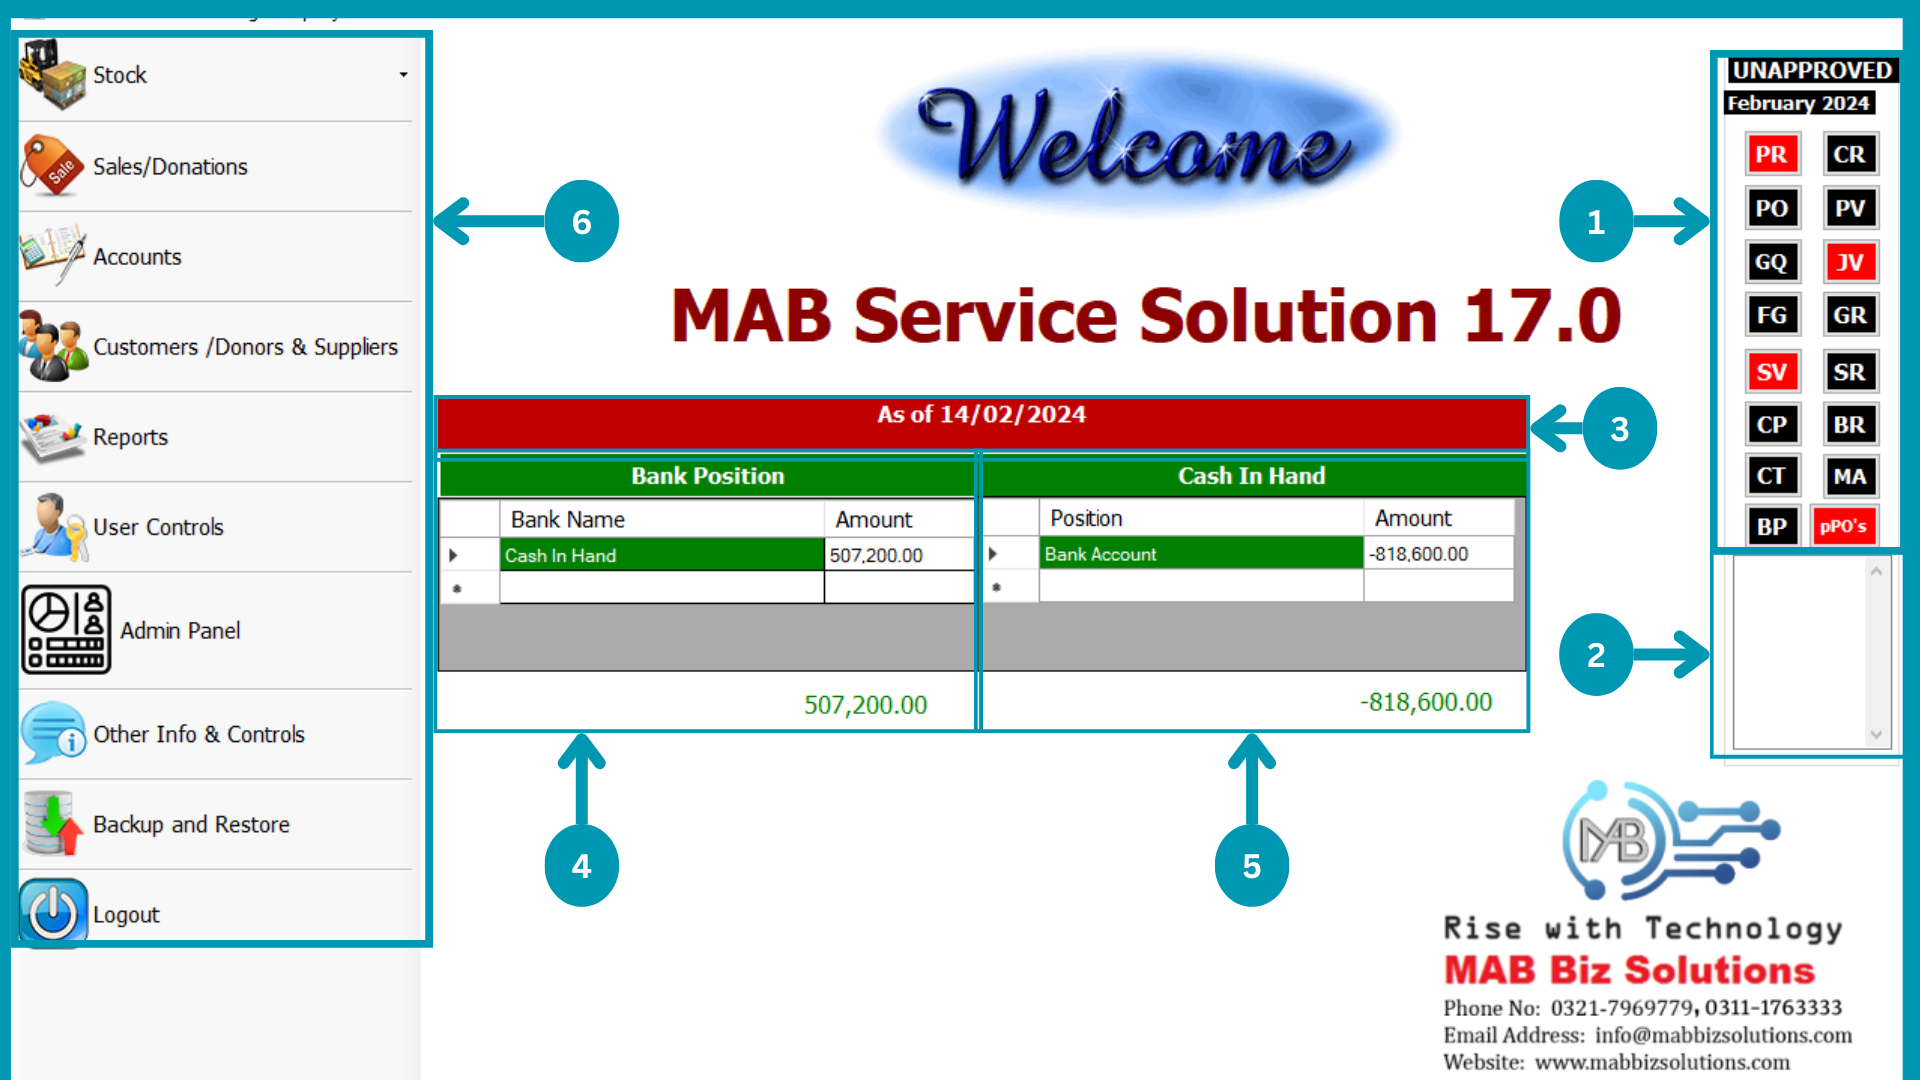
Service Solution Dashboard
There on Dashboard of Service Solution user can get information of Bank Positions and Cash in hand with respect to current date. As of Date and below Bank names and respective amount in them will be mentioned as well beside this cash.
Service Solution Dashboard
| 01 | 
|
|---|---|
| 02 | 
|
| 03 | 
|
| 04 | 
|
| 05 | 
|
| 06 | 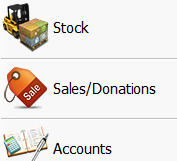
|
MAB BIZ SOLUTIONS


Stocks
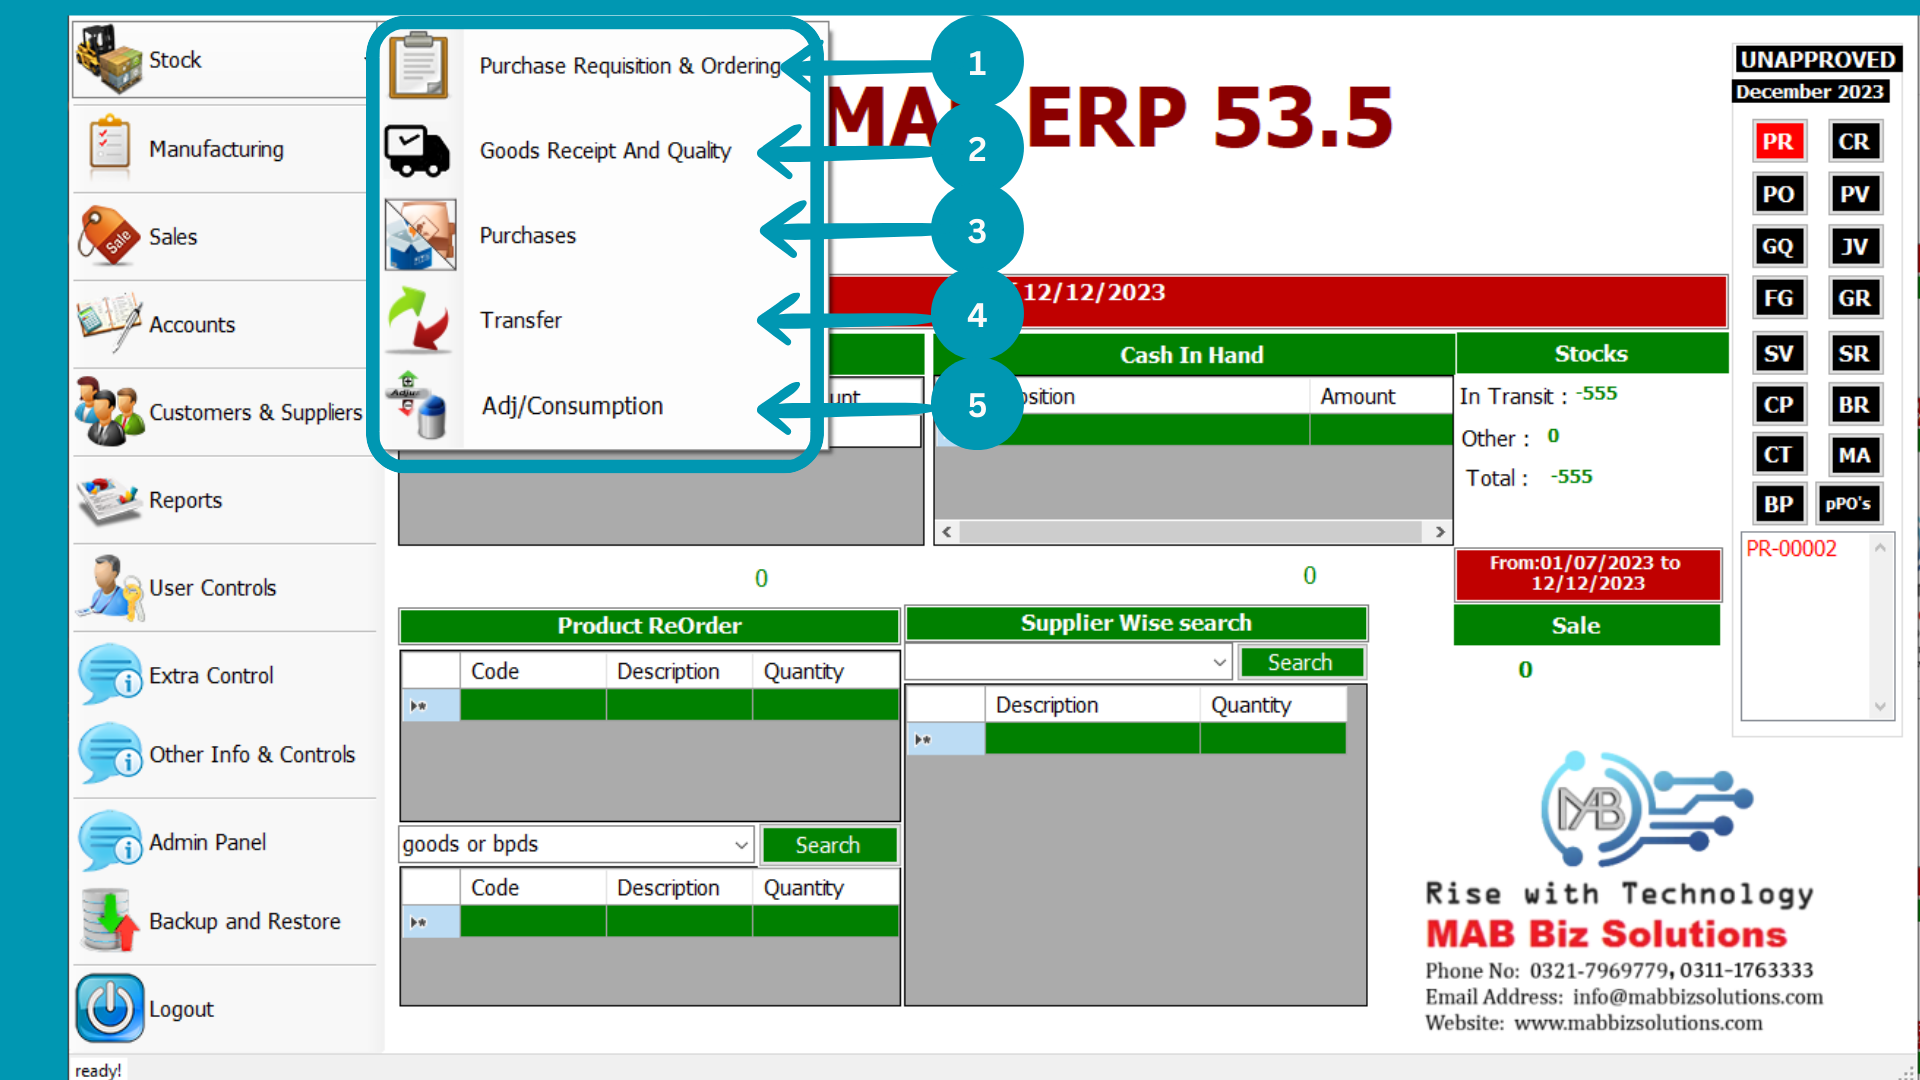
Stock
After Clicking on Stock drop list will fall here further sections of Stock, There you will
Create, Read, Update or Delete entire inventory entries. Now select the respective section among
stock drop list.
Stock Department's cunsorner or allowed person only be allowed to access, edit so be authorized
first then enter into this section.Below picture of drop provided which would link you to
require block.
- Purchases Requisition & Ordering
- Goods Receipt & Quality
- Purchases
- Transfer
- Consumption
Before selecting the Stock check below requirements to completed
- Enter Company Information into Extra control\ Company Info And save.
- Then select location in Other info & Control.
- Add Stock and units in Chart of Account.
- Add Customers in ERP.
- Add Suppliers also.
- Add Bank instances in it.
MAB BIZ SOLUTIONS
Purchases Requisition & Ordering
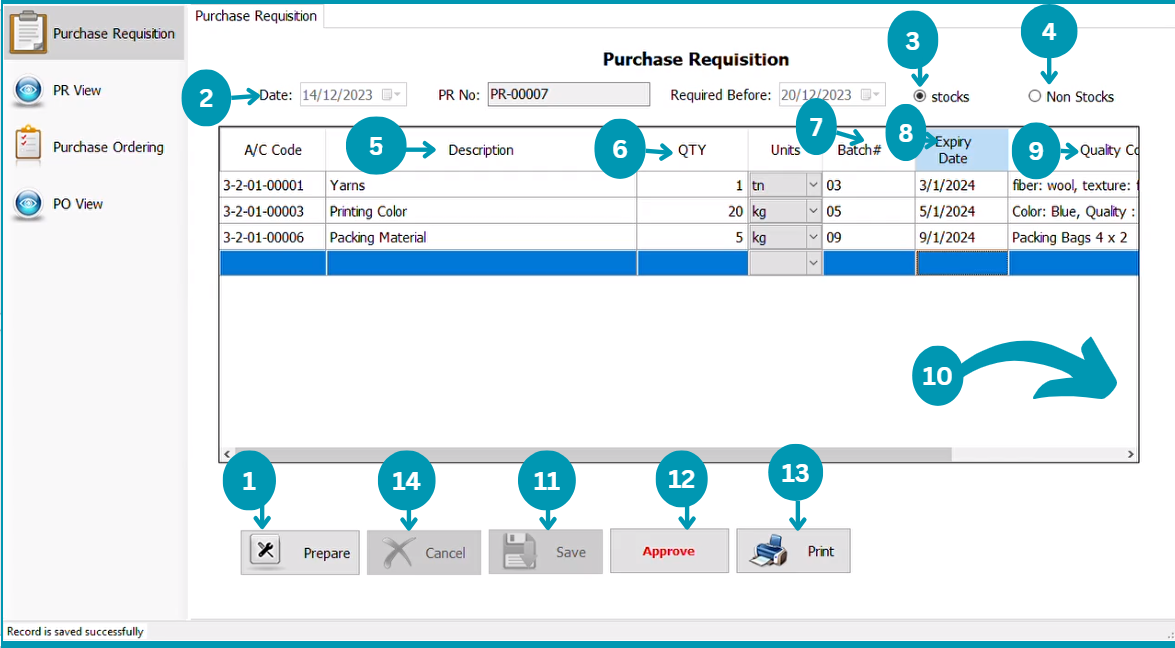
Purchases Requisition & Ordering
This Department is design to meet future requirements to run the organization smoothly. Purchase Requisition address the requirements and time period within which the required inventory have to be available for use.
Explanation of Purchase Requisition Design
- Purchase Requisition
- PR View
- Purchase Ordering
- PO View
Purchases Requisition
| 01 | 
|
|---|---|
| 02 | 
|
| 03 | 
|
| 04 | 
|
| 05 | 
|
| 06 |
|
| 07 | 
|
| 08 | 
|
| 09 | 
|
| 10 | 
|
| 11 |
|
| 12 | 
|
| 13 | 
|
Purchases Requisition View

| 01 | 
|
| 02 | 
|
| 03 | 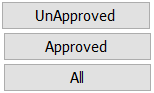
|
| 04 | 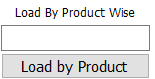
|
| 05 | 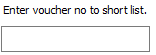
|
| 06 | 
|
| 07 | 
|
| 08 | 
|
| 09 | 
|
| 10 | 
|
Purchases Ordering
| 01 |
|
| 02 | 
|
| 03 | 
|
| 04 |
|
| 05 |
|
| 06 | 
|
| 07 |
|
| 08 |
|
| 09 | 
|
| 10 | 
|
| 11 | 
|
| 12 |
|
| 13 | 
|
Purchases Ordering View
| 01 |
|
| 02 |
|
| 03 |
|
| 04 |
|
| 05 |
|
| 06 | 
|
| 07 |
|
| 08 |
|
MAB BIZ SOLUTIONS
Goods Receipt and Quality
Goods Receipt And Quality
Goods Receipt and Quality indicates the receipt process after Purchase Ordering. In this module you will pass through receiving goods from gate to generate receipt to accepted Purchase.
Following pages usage is explained in this segment
- Gate Pass
- View Gate Pass
- Store
- View Store
- Receipt and Quality
- View Receipts
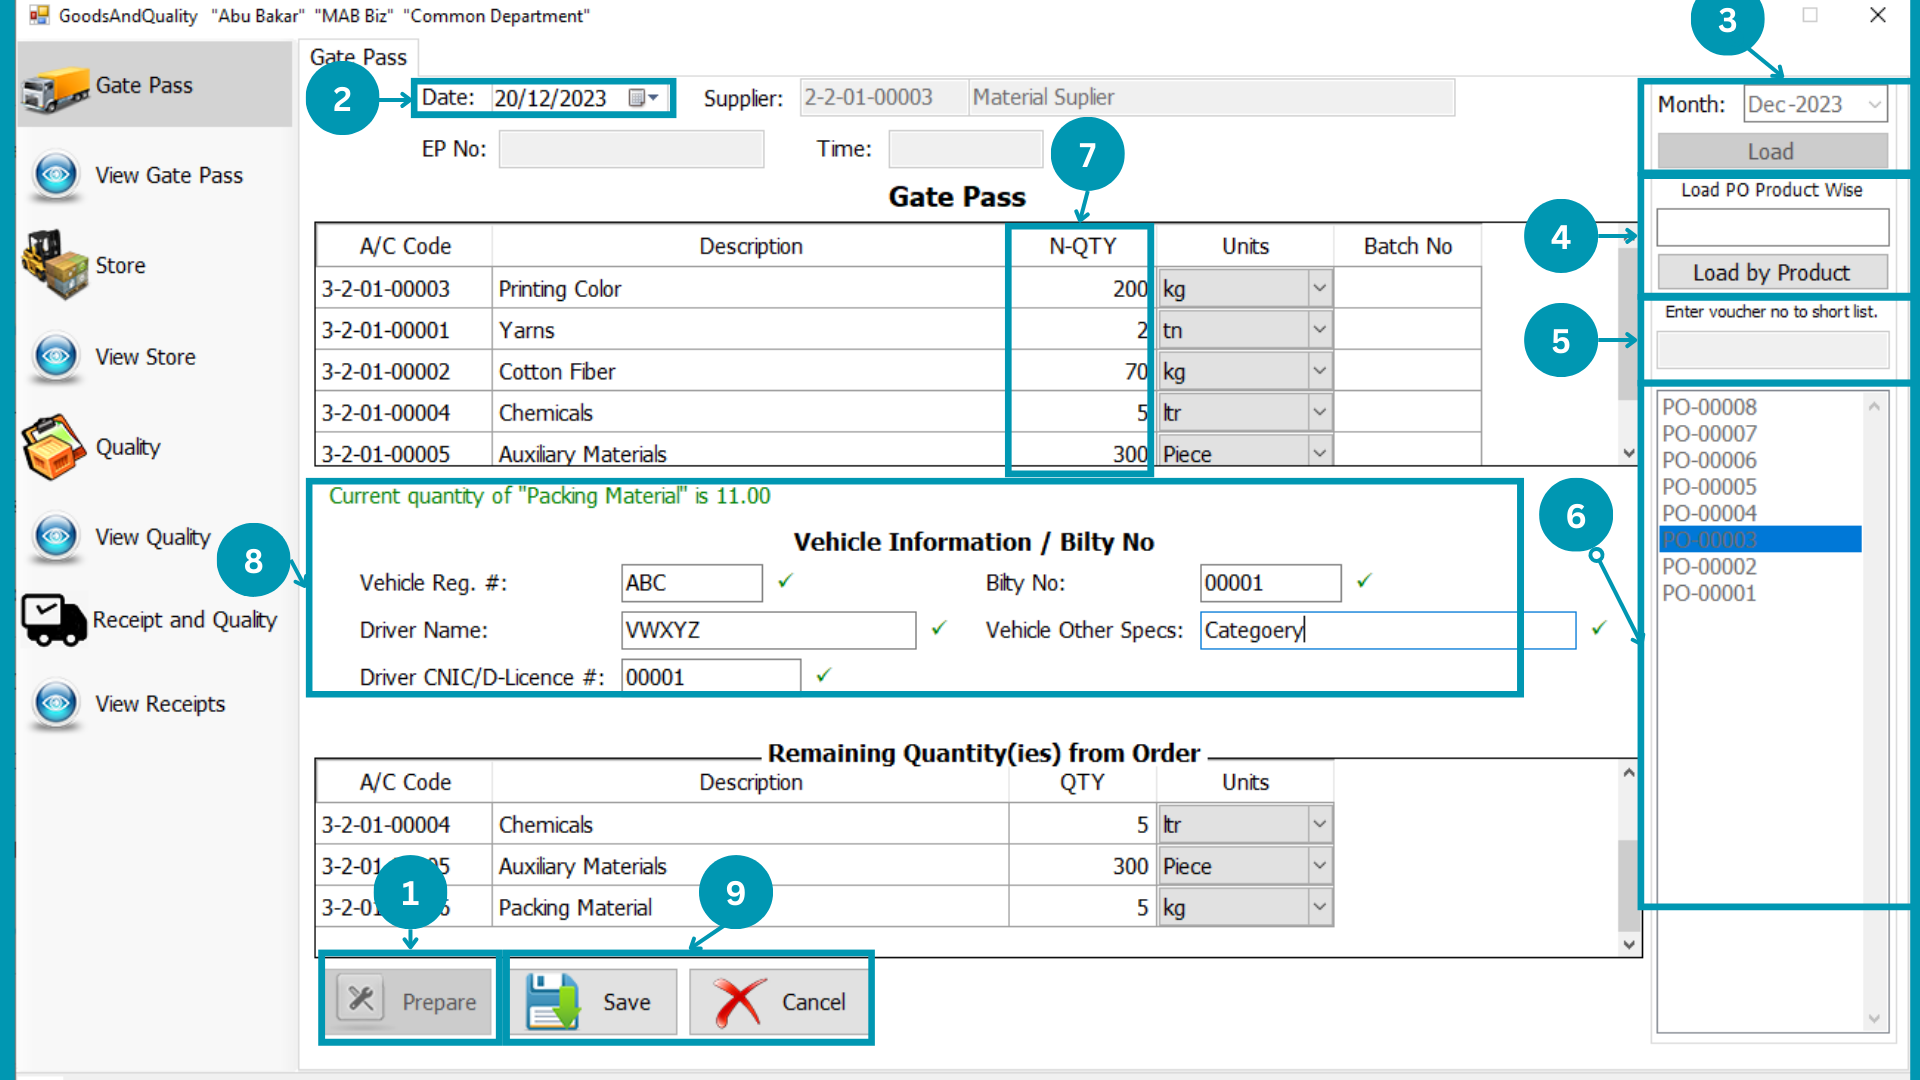
Gate Pass
| 01 |  Select
Month and click load PO to view avalible Purchasing Ordering Vouchers of that months. Select
Month and click load PO to view avalible Purchasing Ordering Vouchers of that months. |
| 02 |  Write
“Product Name” to filter Purchase Requisition of specific product. Write
“Product Name” to filter Purchase Requisition of specific product.
|
| 03 |  Enter the
Specific Voucher Number to view a specific Product Order. Enter the
Specific Voucher Number to view a specific Product Order.
|
| 04 | 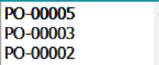 Click on
voucher number to check entry made against that specific voucher. Click on
voucher number to check entry made against that specific voucher. |
| 05 | Click
on “Prepare” to start data entry. |
| 06 |
|
| 07 |
|
| 08 | |
| 09 |  Fill
details of receiving vehicle in this section for record. Fill
details of receiving vehicle in this section for record. |
| 10 | Hit
the Save Or Cancel Button. |
Gate Pass View
| 01 | 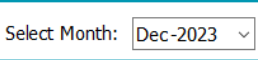
|
| 02 | Click Load
to load all Gate Passes. |
| 03 | Select
Type (Approved, Unapproved or both) of Gate Passes to view. |
| 04 |  Select
All GP's of Gate Passes to view. Select
All GP's of Gate Passes to view. |
| 05 | Write
“Product Name” to filter Gate Passes of specific product.
|
| 06 | Enter the
Specific Voucher Number to view a specific Gate Pass.
|
| 07 |  Click
on voucher number to check entry made against that specific voucher. Click
on voucher number to check entry made against that specific voucher. |
| 08 |  Click your desire Button Approve, Edit and Delete.
|
| 09 | Print the
viewing Gate pass by Clicking Print.
|
Store
| 01 |  Select Specific month to view all Approved GPs of that month and hit load.
 |
| 02 | Write
“Product Name” to filter Gate Passes of specific product.
|
| 03 | Enter the
Specific Voucher Number to view a specific Gate Pass.
|
| 04 | Click
on voucher number to check entry made against that specific voucher. |
| 05 | Click
on “Prepare” to start data entry. |
| 06 | Select
Transaction date
|
| 07 |
|
| 08 | |
| 09 |  Write the
Quantity-Best Received of selected Product. Write the
Quantity-Best Received of selected Product. |
| 10 | Write
Batch Number in Batch# column.
|
| 11 | Hit
the Save Or Cancel Button. |
Store View

| 01 |
|
| 02 | Click Load
to load all Gate Passes. |
| 03 |  Select
Type (Approved or All) of Gate Passes to view. Select
Type (Approved or All) of Gate Passes to view. |
| 04 |  Select
All SP's of Gate Passes to view. Select
All SP's of Gate Passes to view. |
| 05 | 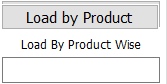 Write
“Product Name” to filter Gate Passes of specific product. Write
“Product Name” to filter Gate Passes of specific product.
|
| 06 | Enter the
Specific Voucher Number to view a specific Gate Pass.
|
| 07 | Click
on voucher number to check entry made against that specific voucher. |
| 08 |  Click
your desire Button Approve and Edit. Click
your desire Button Approve and Edit.
|
| 09 | Print the
viewing Store Statement by Clicking Print.
|
Quality
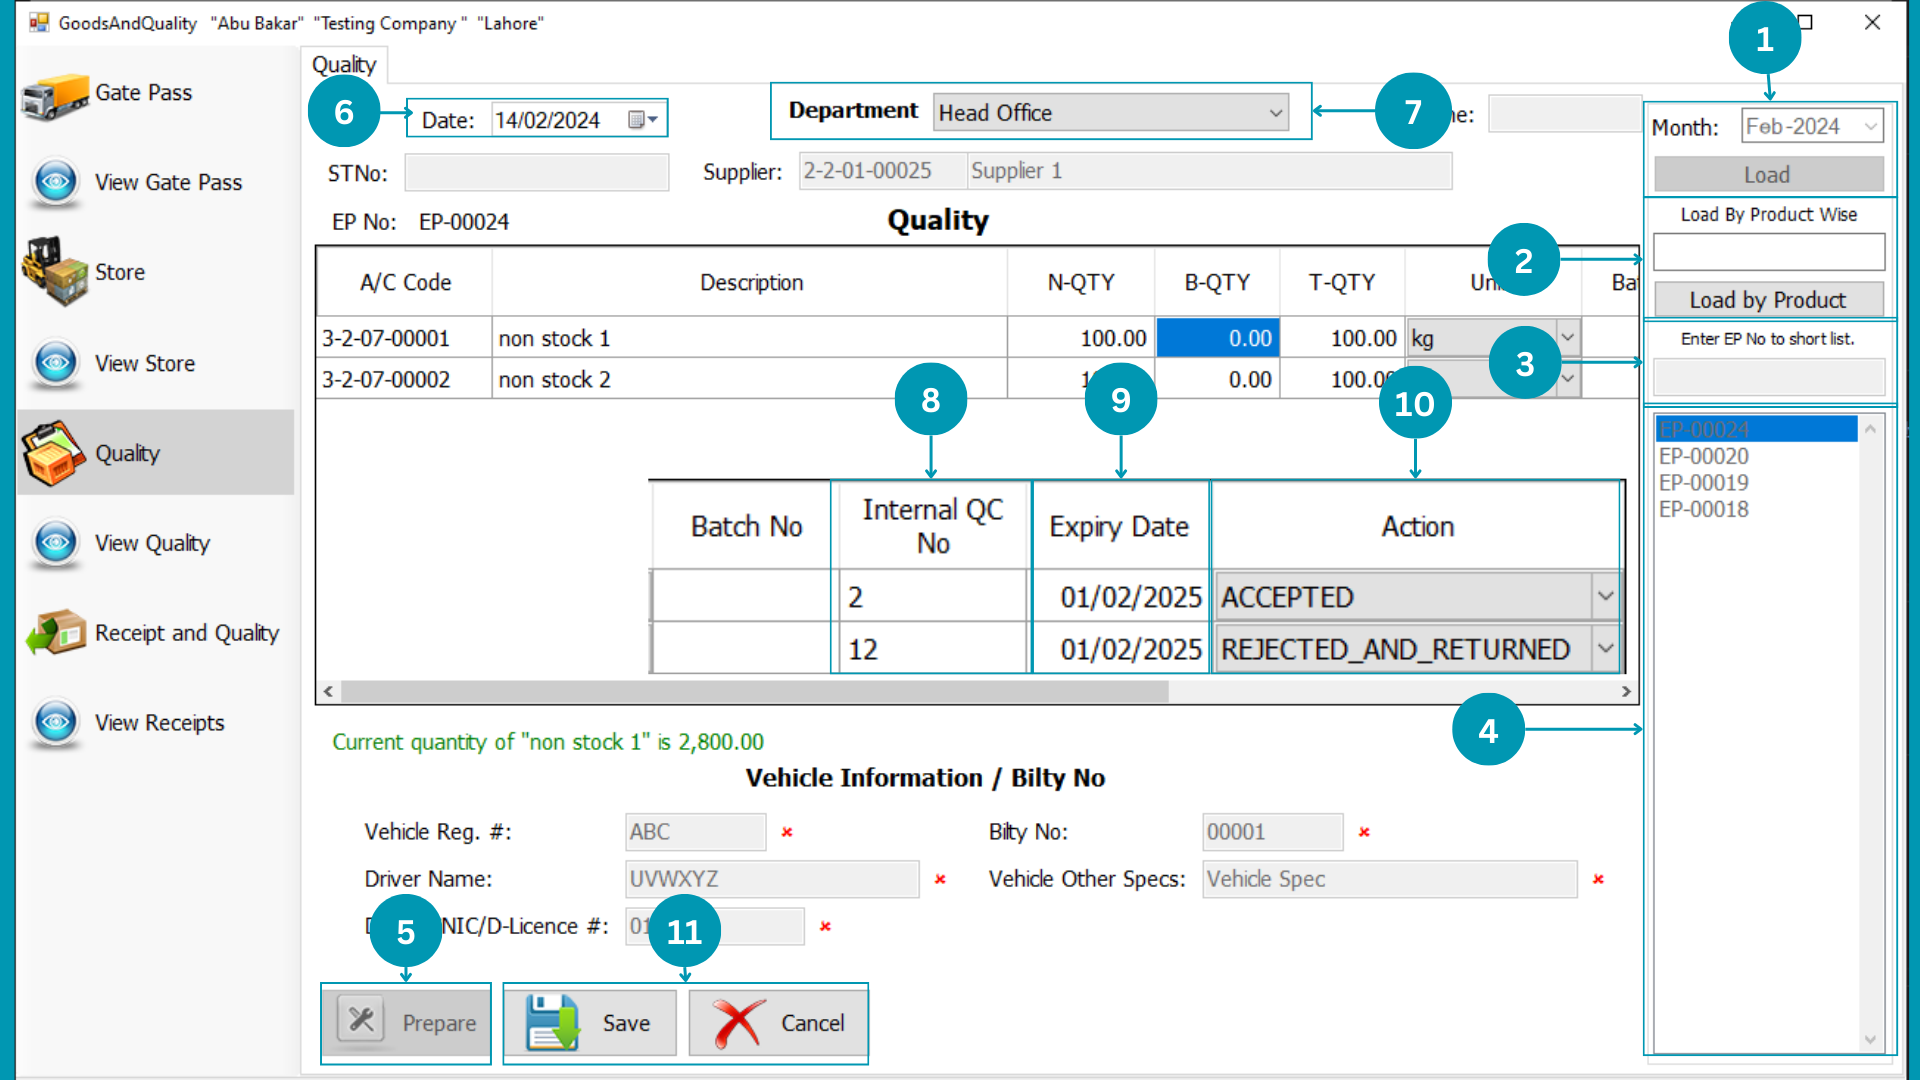
| 01 |
Select Specific month to view all Approved GPs of that month and hit load. |
| 02 | Write
“Product Name” to filter Gate Passes of specific product.
|
| 03 | Enter the
Specific Voucher Number to view a specific Gate Pass.
|
| 04 | Click
on voucher number to check entry made against that specific voucher. |
| 05 | Click
on “Prepare” to start data entry. |
| 06 | Select
Transaction date
|
| 07 |
|
| 08 |  Write
there internal QC number. Write
there internal QC number. |
| 09 | Write Expiry date of received material
in this column.
|
| 10 |  Select
Action of Acceptance against product. Select
Action of Acceptance against product. |
| 11 | Hit
the Save Or Cancel Button. |
Quality View
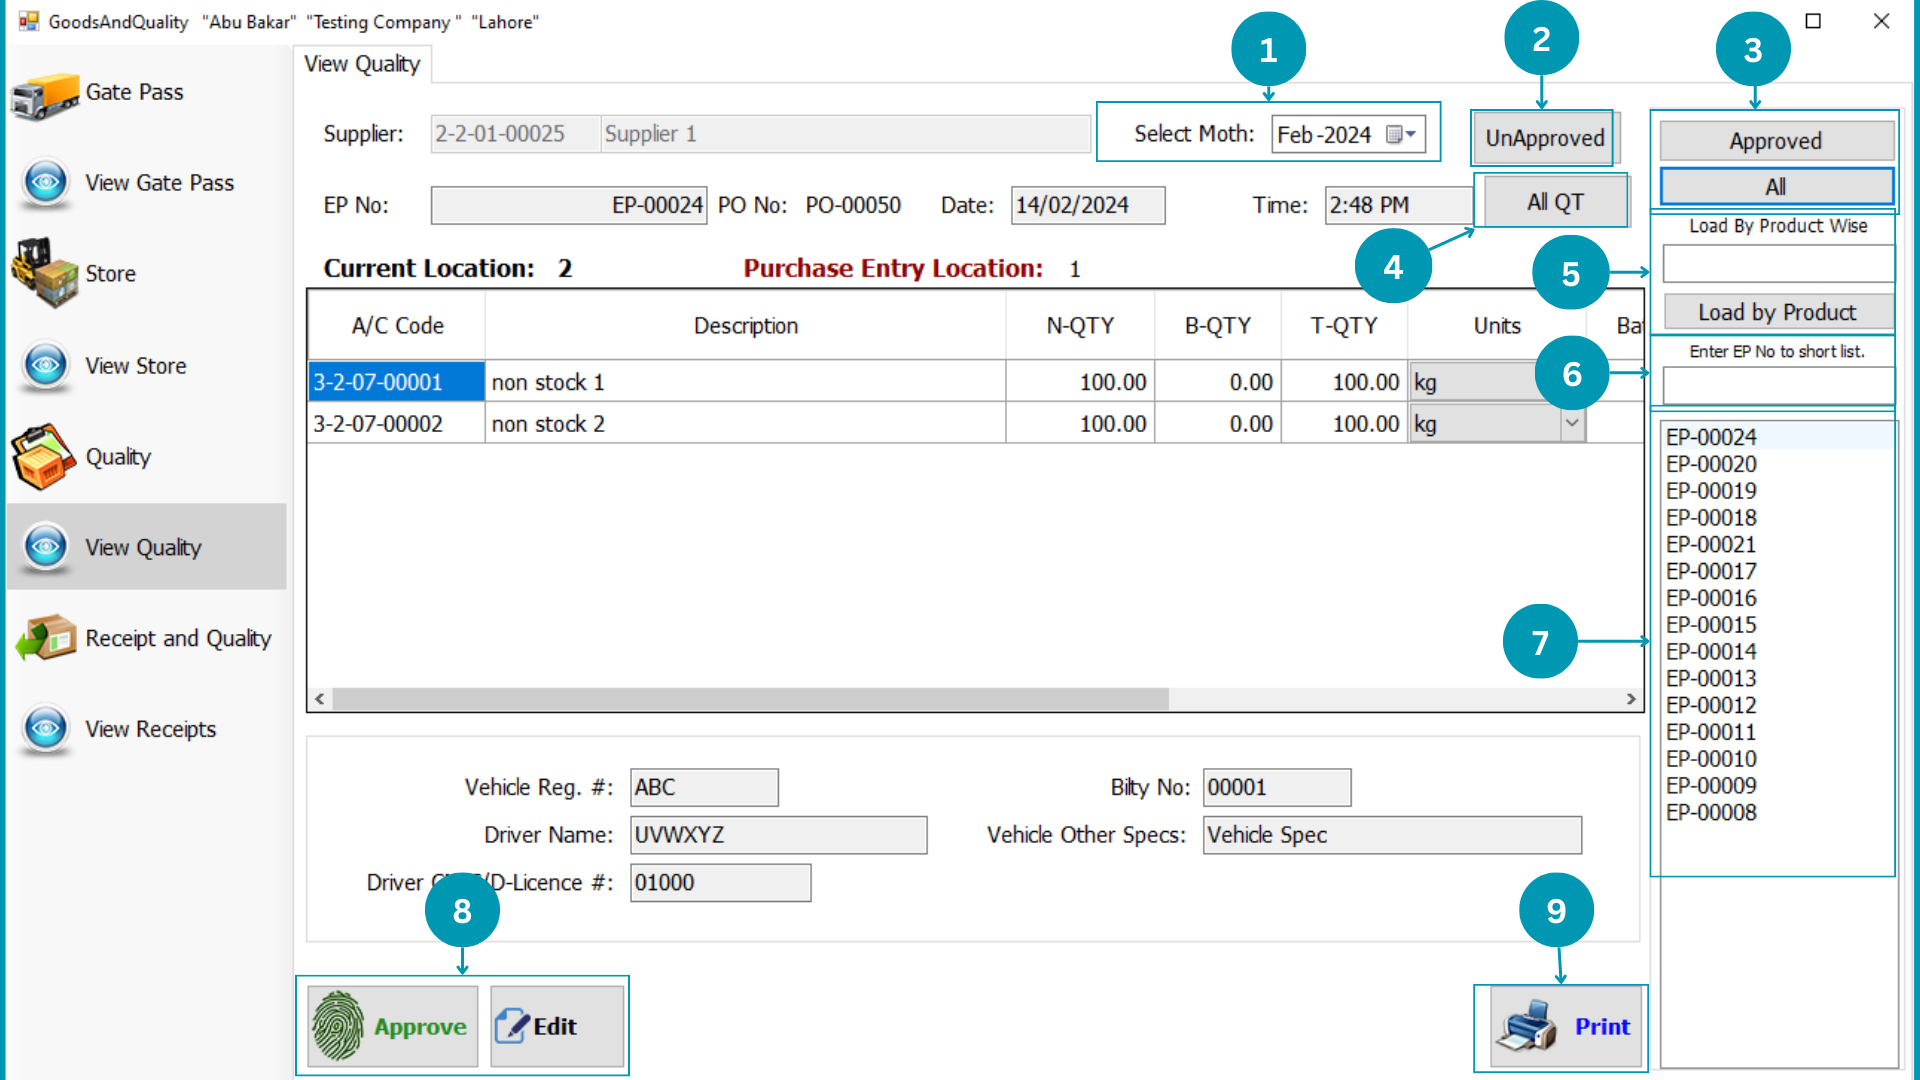
| 01 | Select
Specific month to view Quality Record of that month.
|
| 02 |  Click on Unapprove unapproved quality
vouchers list will load. Click on Unapprove unapproved quality
vouchers list will load. |
| 03 |  Select
Type (Approved or All) of Quality Product to view. Select
Type (Approved or All) of Quality Product to view.
|
| 04 | Select
All QT's of Gate Passes to view. |
| 05 | Write
“Product Name” to filter Quality Product of specific product.
|
| 06 | nter the
Specific Voucher Number to view a specific Quality Product.
|
| 07 | Click
on voucher number to check entry made against that specific voucher. |
| 08 |
Click your desire Button Approve and Edit. |
| 09 | Print the
viewing Quality Statement by Clicking Print.
|
Receipt And Quality
| 01 | Select
Specific month to view all Approved POs of that month and hit load. |
| 02 |  Select
Supplier to view all vouchers received from that specific Supplier. Select
Supplier to view all vouchers received from that specific Supplier.
|
| 03 | Write
“Product Name” to filter Purchase Requisition of specific product.
|
| 04 |  Enter the
Specific Voucher Number to view a specific Product Requisition. Enter the
Specific Voucher Number to view a specific Product Requisition.
|
| 05 |  Click
on voucher number to check entry made against that specific voucher. Click
on voucher number to check entry made against that specific voucher. |
| 06 | Click
on “Prepare” to start data entry. |
| 07 | Select
Transaction date
|
| 08 |
|
| 09 | 
|
| 10 | Hit the
Save or Cancel Button. |
| 11 |
Approve the requisition to initiate the purchase order.
|
View Receipts
| 01 |  Select “Monthly” to view month wise Purchase Requisition; or select “Custom” to view
Financial Period wise Purchase Requisition.
Select “Monthly” to view month wise Purchase Requisition; or select “Custom” to view
Financial Period wise Purchase Requisition.
|
| 02 | Select
relevant “Month or Financial Period”.
|
| 03 | Select
Type (Approved, Unapproved or both) of Purchase Requisition to view. |
| 04 | 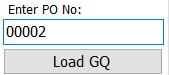 Enter the
Specific Voucher Number to view a specific Product Requisition. Enter the
Specific Voucher Number to view a specific Product Requisition.
|
| 05 |  Write
“Product Name” to filter Purchase Requisition of specific product. Write
“Product Name” to filter Purchase Requisition of specific product.
|
| 06 |  Select
Supplier filter by particular supplier data. Select
Supplier filter by particular supplier data.
|
| 07 |  Click
on voucher number to check entry made against that specific voucher. Click
on voucher number to check entry made against that specific voucher. |
| 08 |
Approve the requisition to initiate the purchase order.
|
| 09 | Press
Print to get print of it.
|
MAB BIZ SOLUTIONS
Purchases
Purchases
Purchase is simply the process of paying an item to take possession after quality check.So the purchase could be done by cash which will paid on time by cash page and credit purchase would be written over credit page as well the return will be treated against approved Voucher/GRN No.
Following pages usage is explained in this segment
- Credit
- Cash
- Credit Note
- View Invoices
Credit Purchases
| 01 | Click
on “Prepare” to start data entry |
| 02 | Select
Transaction date.
|
| 03 |
|
| 04 |  Select
Specific month to view all Approved GQs of that month and hit load. Select
Specific month to view all Approved GQs of that month and hit load. |
| 05 | Click on
voucher number to check entry made against that specific voucher.
|
| 06 |  Click Color Info for details,You can
Merge Add QRWind here if you selected ALL GQs from 7 Number block. Click Color Info for details,You can
Merge Add QRWind here if you selected ALL GQs from 7 Number block.
|
| 07 |  Select
GQ and All GQ's. Select
GQ and All GQ's.
|
| 08 |  Select
GQ number to purchase you chossed selected GQ's. Select
GQ number to purchase you chossed selected GQ's.
|
| 09 |  Write
Discount Per Unit against product. Write
Discount Per Unit against product.
|
| 10 |  Write
Price/Unit or default will be PO's price. Write
Price/Unit or default will be PO's price.
|
| 11 |  Write
Applied Sale Tax. Write
Applied Sale Tax.
|
| 12 |  Hit the
Save Cancel Or Print Button. Hit the
Save Cancel Or Print Button. |
| 13 | Hit the
Approve Button. |
| 14 |  Write
the extra expenses. Write
the extra expenses.
|
Cash Purchases
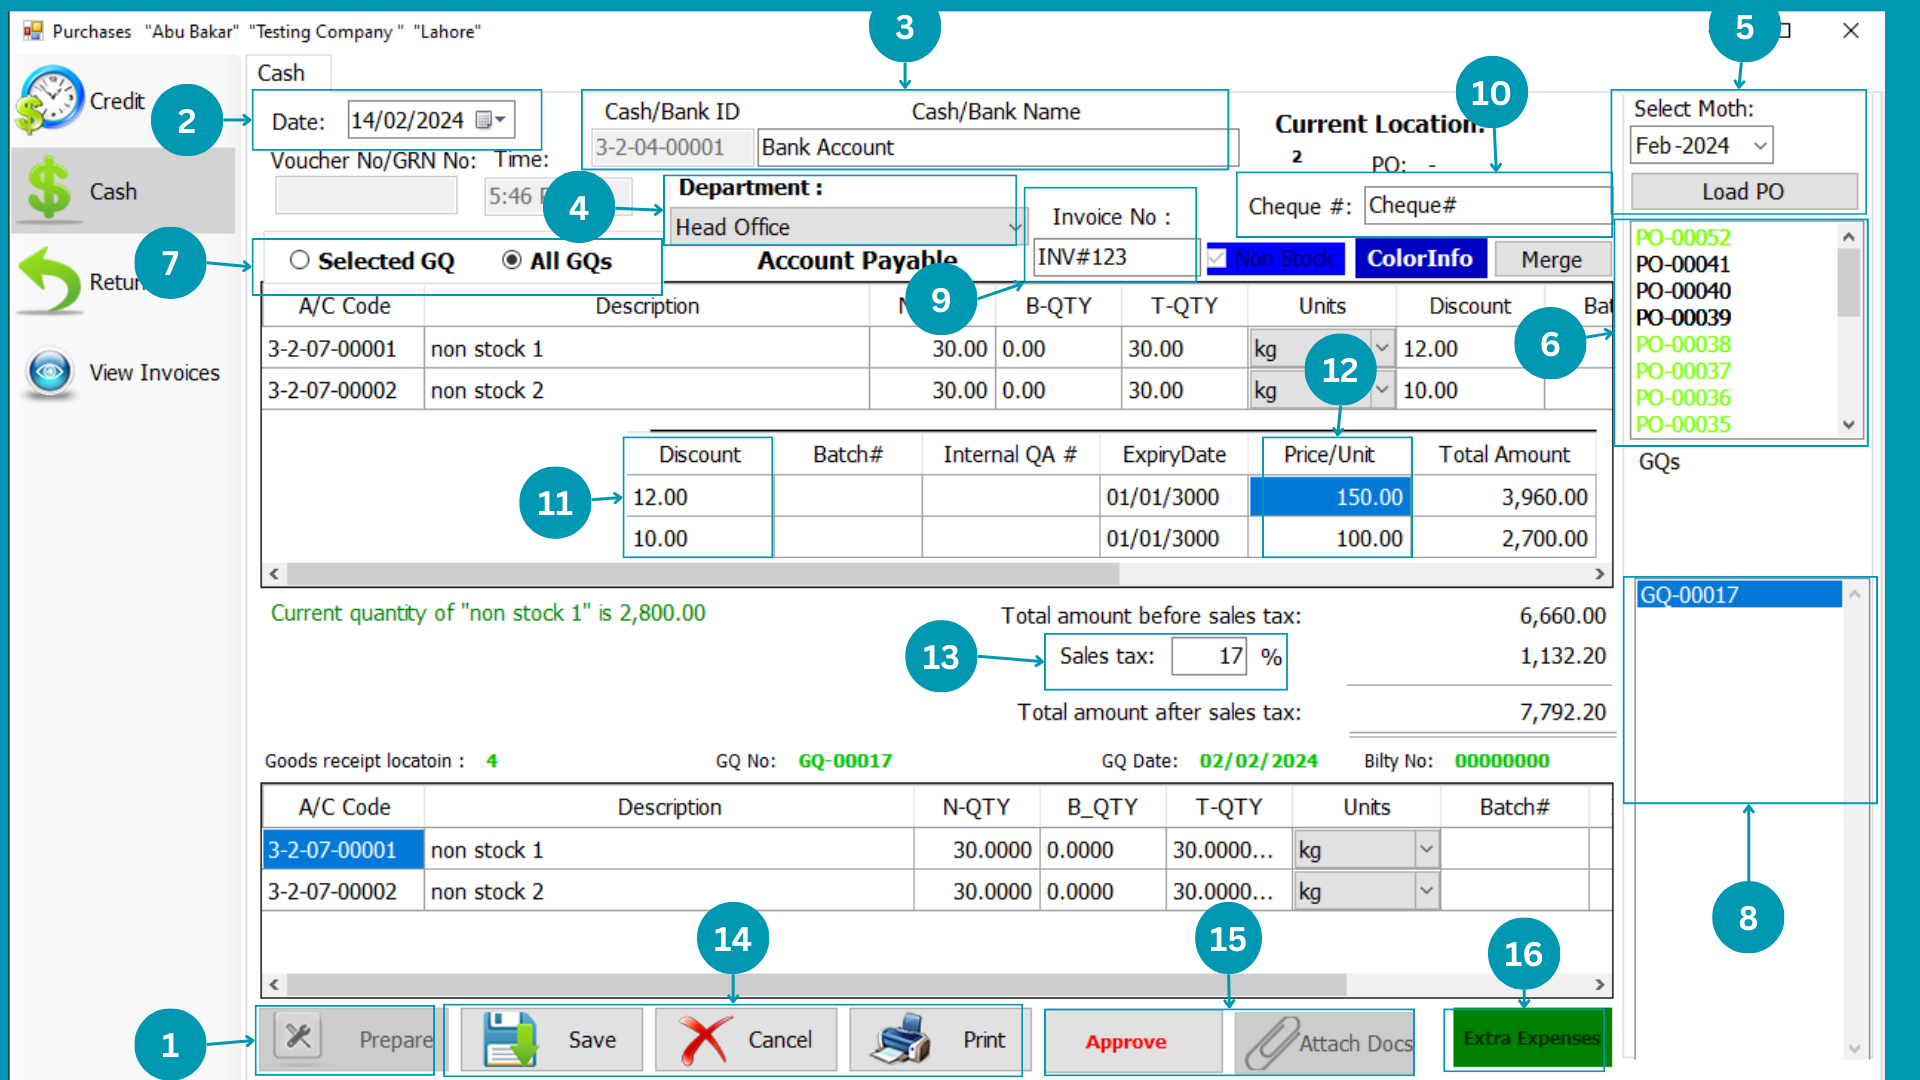
| 01 | Click
on “Prepare” to start data entry |
| 02 | Select
Transaction date.
|
| 03 |  Select Bank/Cask Head of account while paying cash on stock receipt.
 |
| 04 |
|
| 05 | Select
Specific month to view all Approved GQs of that month and hit load.
|
| 06 | Select
PO Number from list to make payment.
|
| 07 | Select
GQ and All GQ's.
|
| 08 | Select GQ number to purchase you chossed selected GQ's.
|
| 09 |  Write
Manual Voucher Number. Write
Manual Voucher Number.
|
| 10 |  Write
Check Number #. Write
Check Number #.
|
| 11 | Write Discount Per Unit against product.
|
| 12 | Write Price/Unit or default will be PO's price.
|
| 13 | Write Applied Sale Tax.
|
| 14 | Hit the
Save Cancel Or Print Button. |
| 15 | Approve |
| 16 | Write
the extra expenses.
|
Returns

| 01 | Click
on “Prepare” to start data entry. |
| 02 |  Enter
Voucher Number of returned purchase. Enter
Voucher Number of returned purchase. |
| 03 | Select
month of purchase to load that voucher .
|
| 04 | Click Load
to load Purchase Voucher. |
| 05 |  Write the
returned quantity in respective columns with sign "-". Write the
returned quantity in respective columns with sign "-". |
| 06 | Hit the
Save Cancel Or Print Button. |
View Invoices
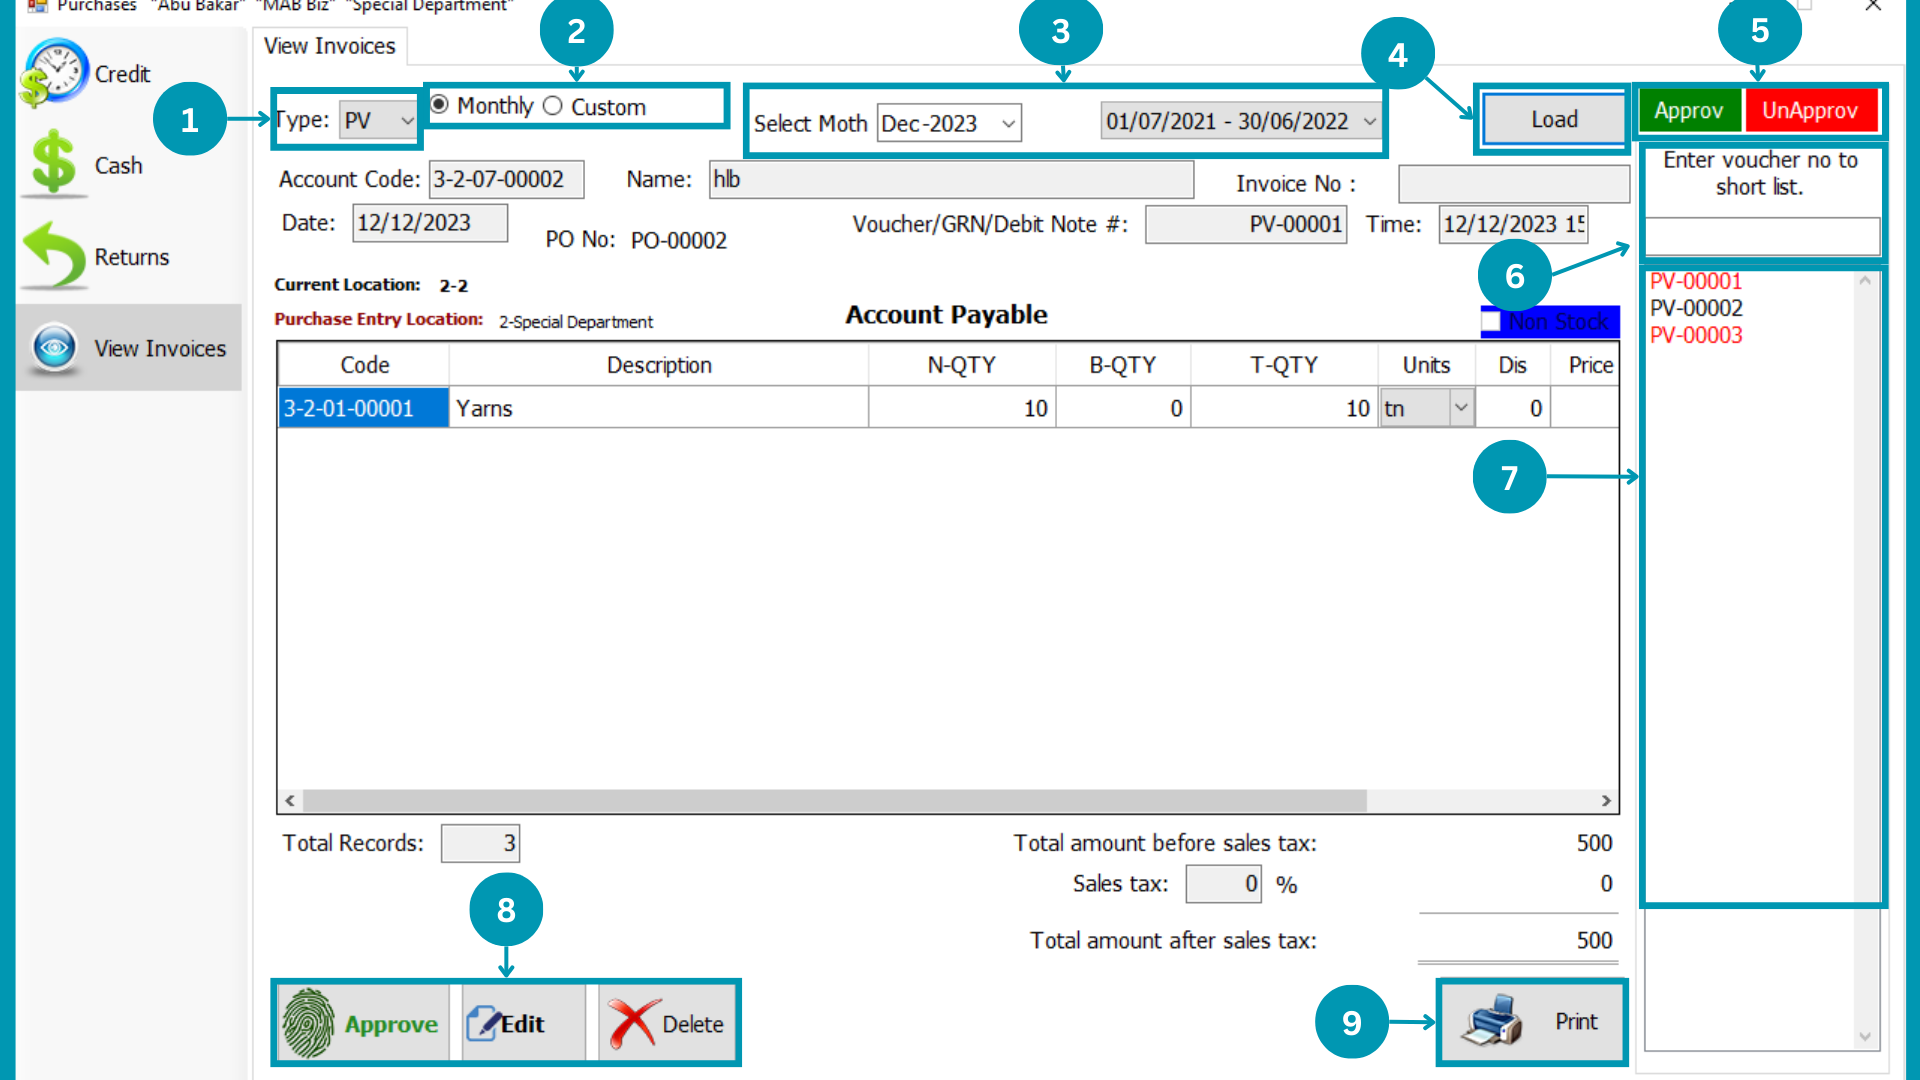
| 01 |  Select
Type of the Invoice from PV, GR. Select
Type of the Invoice from PV, GR.
|
| 02 | Select “Monthly” to view month wise
Purchase Requisition; or select “Custom” to view Financial Period wise Purchase Requisition.
|
| 03 | Select
relevant “Month or Financial Period”.
|
| 04 | Click Load
to load all Purchase Invoices. |
| 05 |  Select Type (Approved or Unapproved ) of Purchase Invoices to view.
|
| 06 | Enter the
Specific Voucher Number to view a specific Product Invoices.
|
| 07 |  Click
on voucher number to check entry made against that specific voucher. Click
on voucher number to check entry made against that specific voucher. |
| 08 | Click
your desire Button Approve, Edit, Delete and Unapprove.
|
| 09 | Print the
viewing Quality Statement by Clicking Print.
|
MAB BIZ SOLUTIONS
Material Requisition
Material Requisition
In Material requisition, Material is required from one department/location to other Department/Location with-in company.
Following pages usage is explained in this segment
- Request
- View Request
Request

| 01 | Click
on “Prepare” to start data entry. |
| 02 | Select
Transaction date.
|
| 03 |  Select
Department to send request of stock. Select
Department to send request of stock. |
| 04 |  Select
“Stock or Non-Stock” Select
“Stock or Non-Stock”
|
| 05 |  Press
Space and select required product. Press
Space and select required product. |
| 06 |  Enter the
required quantity for each unit. Enter the
required quantity for each unit. |
| 07 |  Write there
the comment you want to pass with request. Write there
the comment you want to pass with request.
|
| 08 | Hit
the Save Or Cancel Button. |
| 09 | Print the
viewing Required Statement by Clicking Print.
|
View Request

| 01 | Select “Monthly” to view month wise
Material Requisition; or select “Custom” to view Financial Period wise Material Requisition.
|
| 02 | Select
relevant “Month or Financial Period”.
|
| 03 | Click
Load to load all Required Statements. |
| 04 | Enter the
Specific Voucher Number to view a specific Material Requisition.
|
| 05 |  Click on
voucher number to check entry made against that specific voucher. Click on
voucher number to check entry made against that specific voucher. |
| 06 |  Hit the
Edit Or Delete button. Hit the
Edit Or Delete button.
|
| 07 | Print
the viewing Request Statement by Clicking Print.
|
MAB BIZ SOLUTIONS
Transfer
Transfer
Transferring the Raw material from one location to other will treated here. With-in a company buying material from one place through nearest location.
Following pages usage is explained in this segment
- Sender
- Recipient
- View Transfers
Sender
| 01 | Click
on “Prepare” to start data entry. |
| 02 | Select
Transaction date.
|
| 03 | Select
Department to whom send stock.
|
| 04 | Select
“Stock or Non-Stock”.
|
| 05 | Click Load
to load all Required Statements. |
| 06 | Click
on voucher number to check entry made against that specific voucher. |
| 07 | Press
Space and select product. |
| 08 |  Enter
the required quantity for each unit. Enter
the required quantity for each unit.
|
| 09 | Fill
details of Sending vehicle in this section for record.
|
| 10 | Hit the
Save Cancel Or Print Button. |
| 11 |  Hit the
Accounting Effect. Hit the
Accounting Effect.
|
Recipient
| 01 |  Select
Department from whom receives stock. Select
Department from whom receives stock.
|
| 02 | Select
month of which you want to view Send Goods.
|
| 03 | Click
Load to load all Send Statements. |
| 04 | Enter the
Specific Voucher Number to view a specific Send Statement.
|
| 05 | Click on
voucher number to check entry made against that specific voucher. |
| 06 | Hit the
Save and Print Button. |
| 07 | Hit the
Accounting Effect.
|
View Transfer
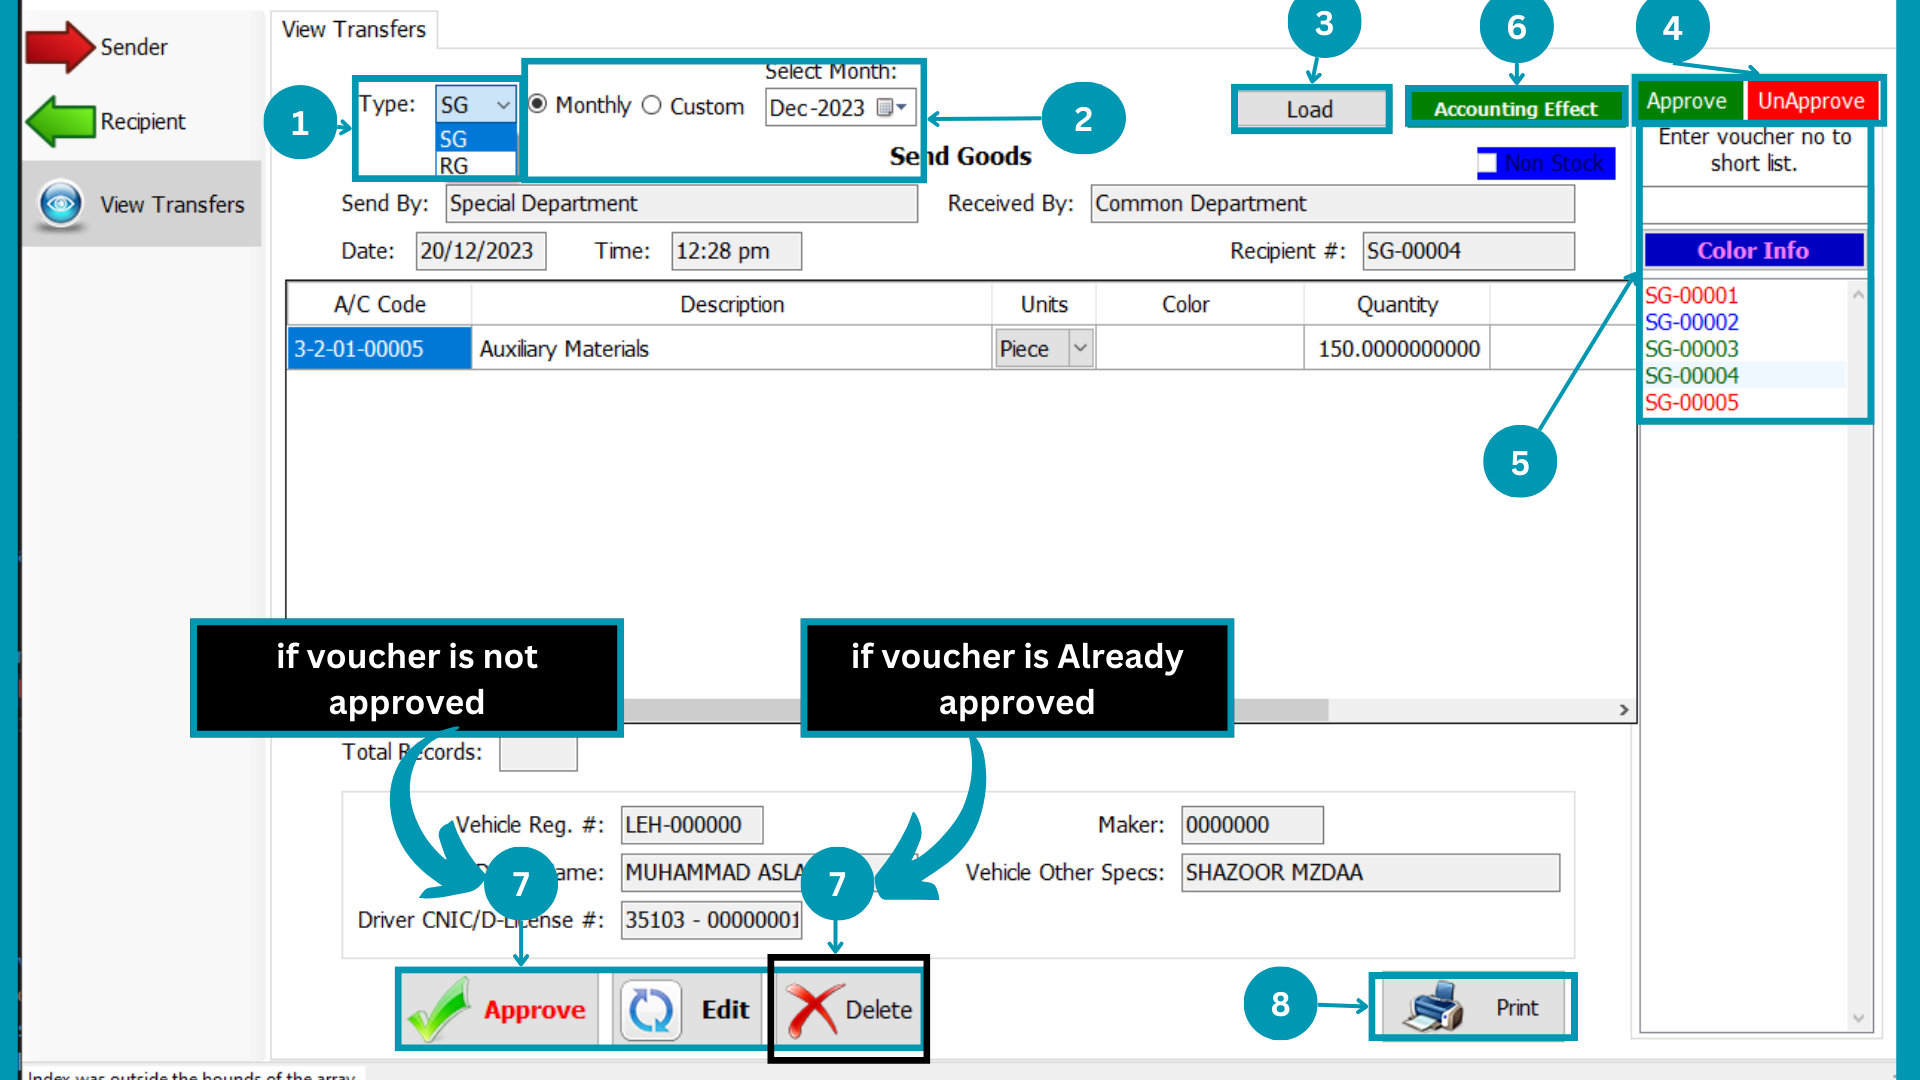
| 01 | 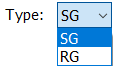 Select Type of the Invoice from SG,
RG. Select Type of the Invoice from SG,
RG.
|
| 02 | Select
relevant “Month or Financial Period”.
|
| 03 | Click
Load to load all Transfer Statements. |
| 04 |
Select Type (Approved, Unapproved ) of Transfer Statement to view.
|
| 05 | 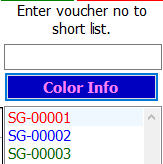 Enter the
Specific Voucher Number to view a specific Transfer Statement or Select any Voucher Number
from list. Enter the
Specific Voucher Number to view a specific Transfer Statement or Select any Voucher Number
from list. |
| 06 | Hit the
Accounting Effect.
|
| 07 | Approve, Edit and Delete if Transfer is Unapproved OR Delete if Transfer is already Approved through this.
|
| 08 | Print
the viewing Required Statement by Clicking Print.
|
MAB BIZ SOLUTIONS
Consumption
Adjust/Consumption
Raw material consumption refers to the raw material that is used or consumed during a production cycle or any defined period of time. It's an important metric for manufacturers to track, especially when it comes to material management and waste management.
Following pages usage is explained in this segment
- Adjust/Consumption
- View Records
Adjust Consumption

| 01 | Click
on “Prepare” to start data entry. |
| 02 | Select
Transaction date.
|
| 03 |  Select
Department of consumed stock. Select
Department of consumed stock. |
| 04 | Select
“Stock or Non-Stock”
|
| 05 | Press Space and select required
product. |
| 06 |  Enter
quantity of product Consumed with "-" sign. Enter
quantity of product Consumed with "-" sign. |
| 07 | Hit the
Accounting Effect.
|
| 08 | Hit the
Save Cancel Or Print Button. |
View Records
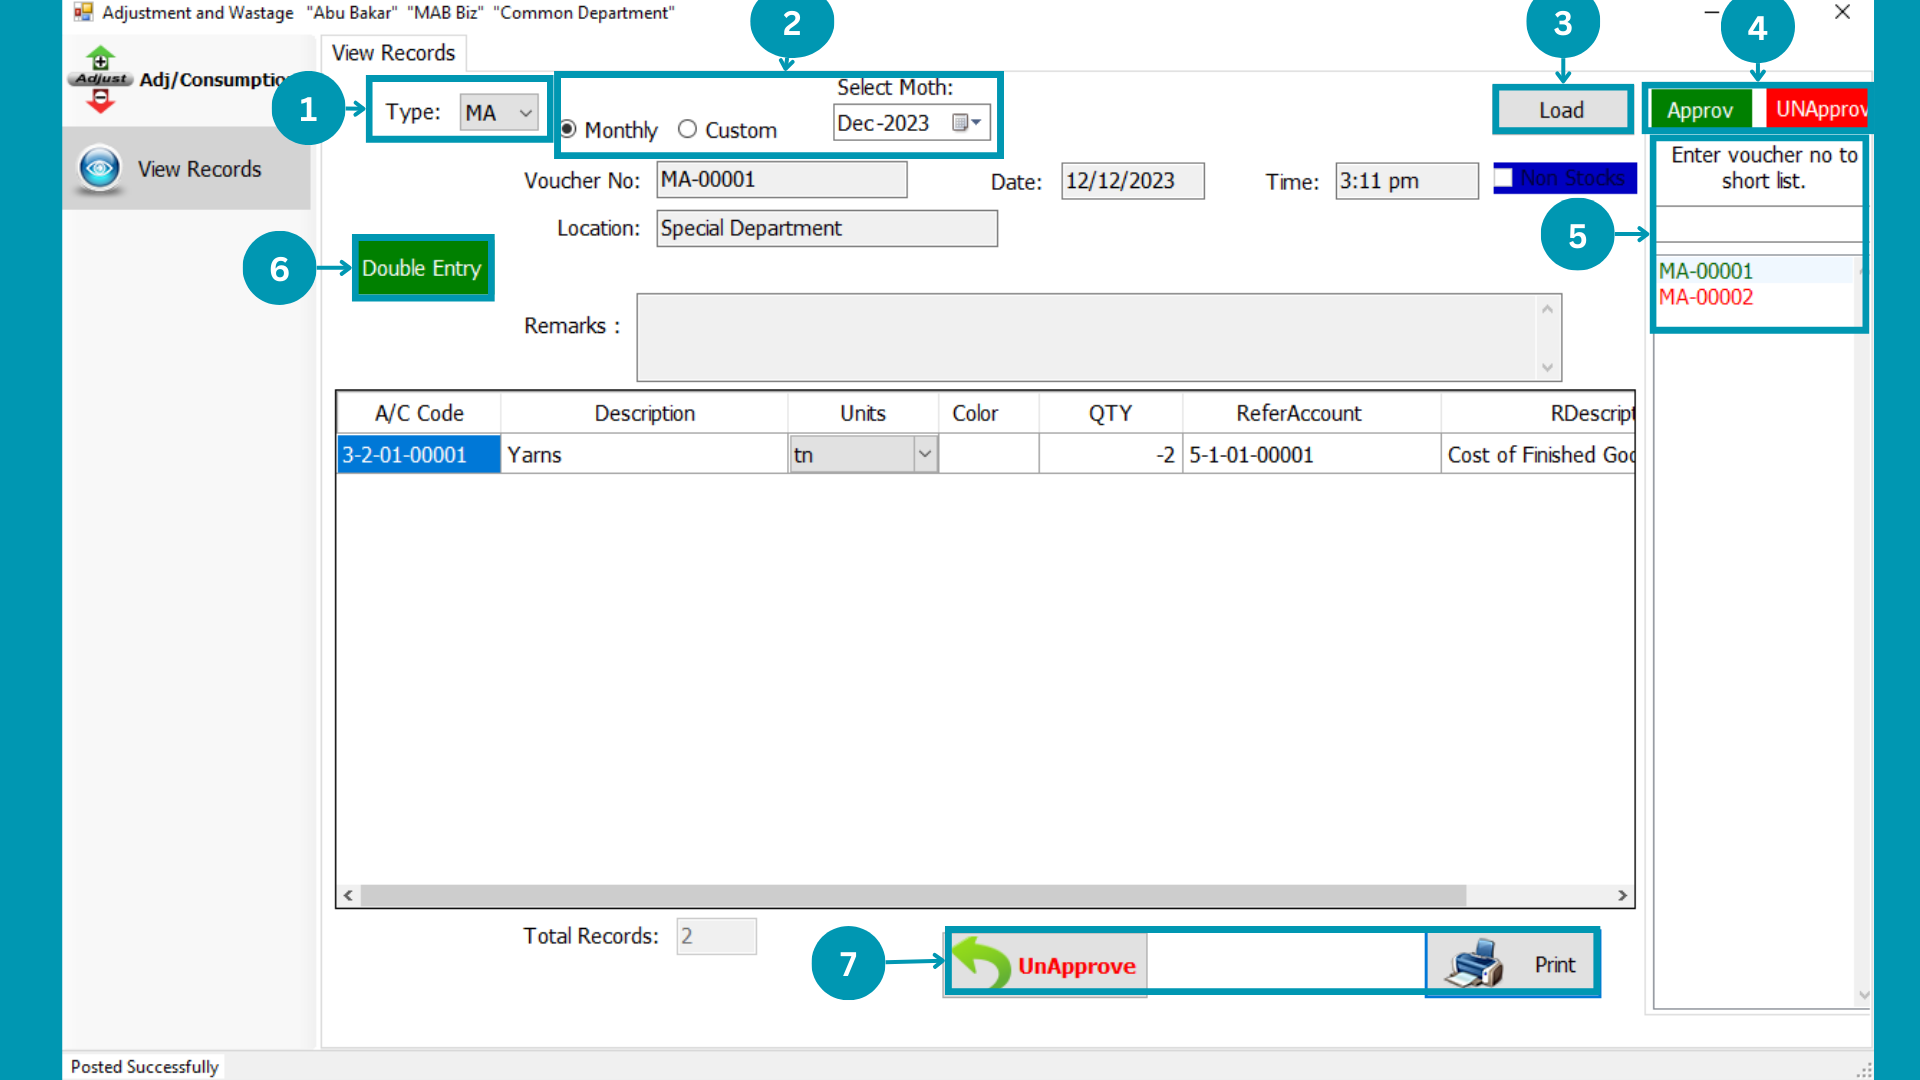
| 01 |  Select
Type of the Invoice from "MA". Select
Type of the Invoice from "MA".
|
| 02 | Select “Monthly” to view month wise
Material consumed; or select “Custom” to view Financial Period wise Material Consumed.
|
| 03 | Click
Load to load all Consumed Statements. |
| 04 |
Select Type (Approved or Unapproved ) of Consumed Invoices to view.
|
| 05 | 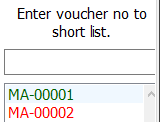 Enter
the Specific Voucher Number to view a specific Consumed Statement or Select any Voucher
Number from list. Enter
the Specific Voucher Number to view a specific Consumed Statement or Select any Voucher
Number from list. |
| 06 |  You can
view Double entries by selecting this . You can
view Double entries by selecting this .
|
| 07 |  Hit
the Save and Print Button. Hit
the Save and Print Button.
|
MAB BIZ SOLUTIONS
Sales
Sales
All sales against customers will be treated here.
Following pages usage is explained in this segment
- Credit
- Cash
- Credit Note
- View Invoices
Credit
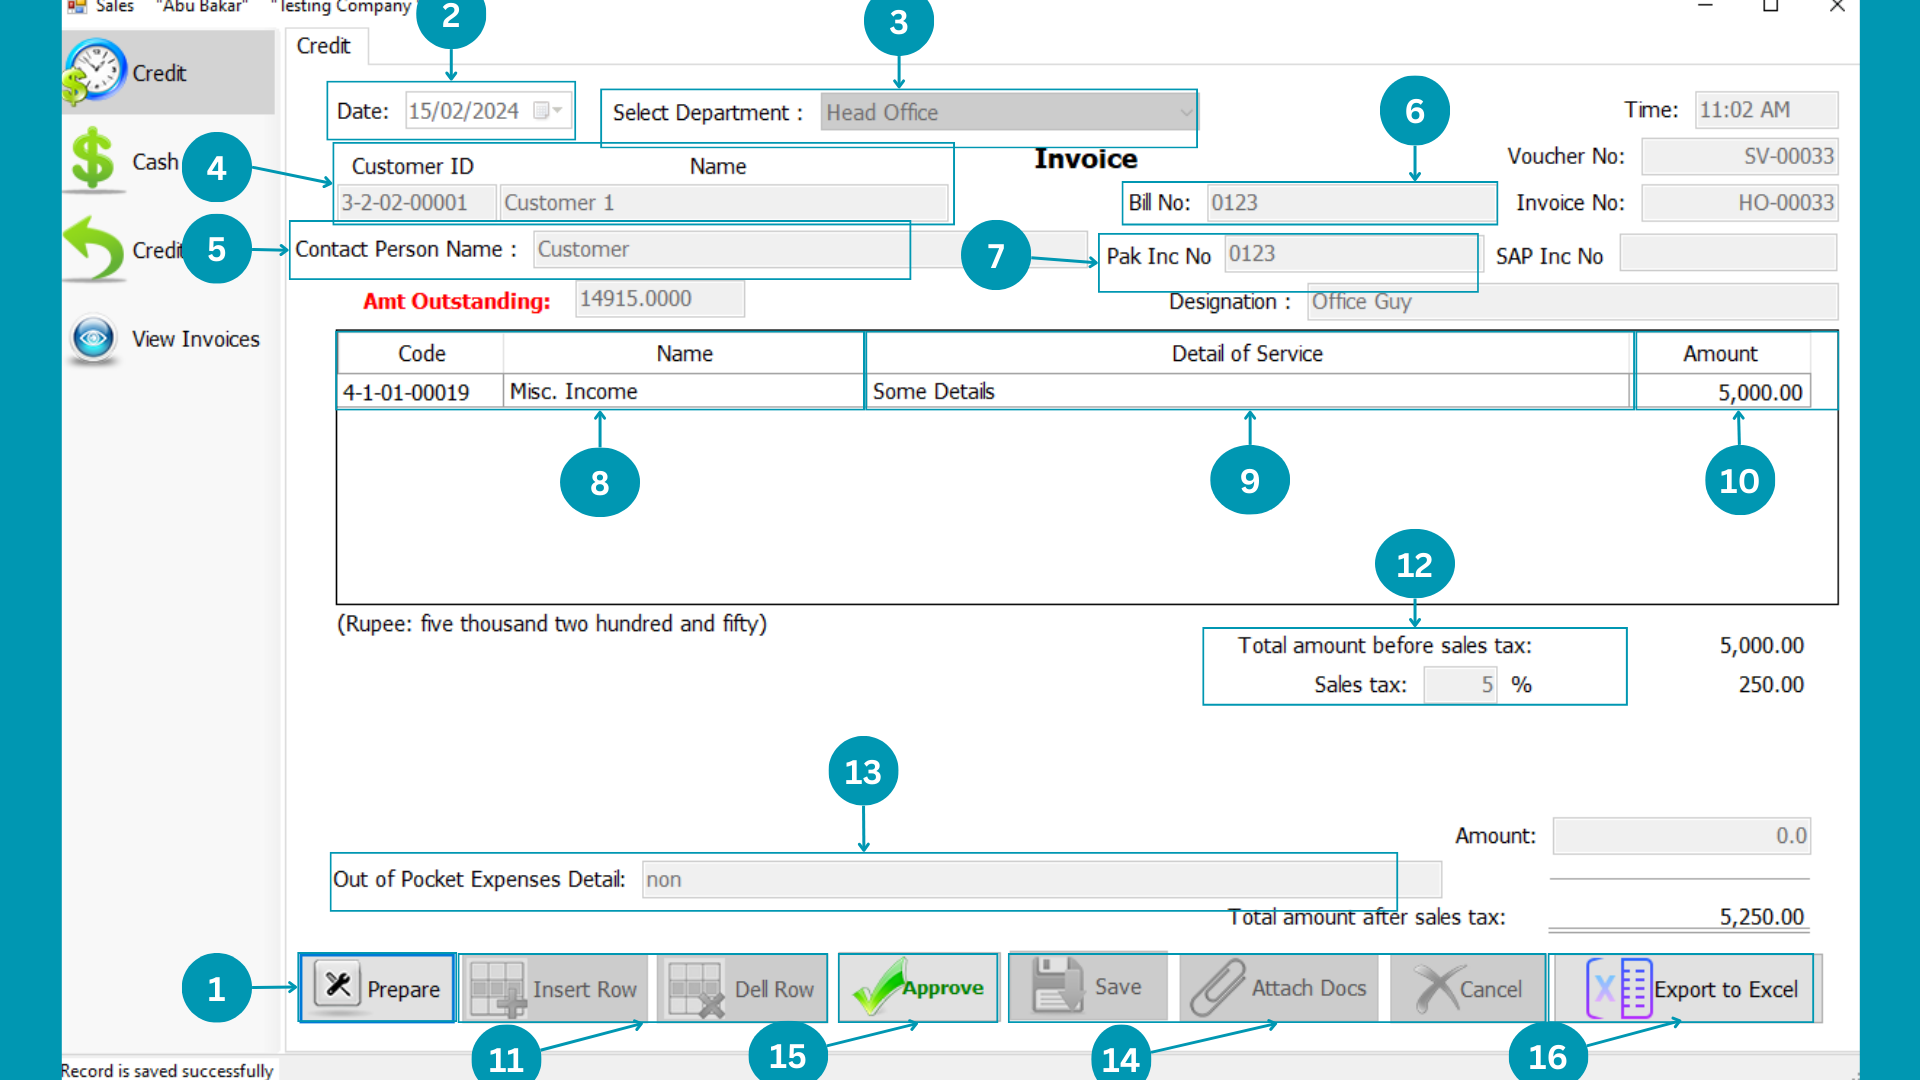
| 01 | Click
on “Prepare” to start data entry |
| 02 | Select
Transaction date.
|
| 03 | Select
|
| 04 |  Select customer name to make sale on his name. Select customer name to make sale on his name.
|
| 05 |  Write contact person name related to sale. Write contact person name related to sale.
|
| 06 |  Write Manual Bill number in sale invoice. Write Manual Bill number in sale invoice.
|
| 07 |  Write pak inc number in this field. Write pak inc number in this field.
|
| 08 |  Choose Service to sale it. Choose Service to sale it.
|
| 09 |  Write description of provided service. Write description of provided service.
|
| 10 |  Write amount of the service to be sell. Write amount of the service to be sell.
|
| 11 |  Click insert row to add another row and delete to delete selected row. Click insert row to add another row and delete to delete selected row.
|
| 12 | write sales tax percentage of sales invoice services.
|
| 13 |  Write out of peckek (Extra expences) against this invoice. Write out of peckek (Extra expences) against this invoice.
|
| 14 |  Hit the Save or cancel button to proceed and Attach Docs. Hit the Save or cancel button to proceed and Attach Docs.
|
| 15 |  Hit the
"Approve" Button. Hit the
"Approve" Button. |
| 16 |  Hit the
"Export To Excel" Button. Hit the
"Export To Excel" Button. |
Cash
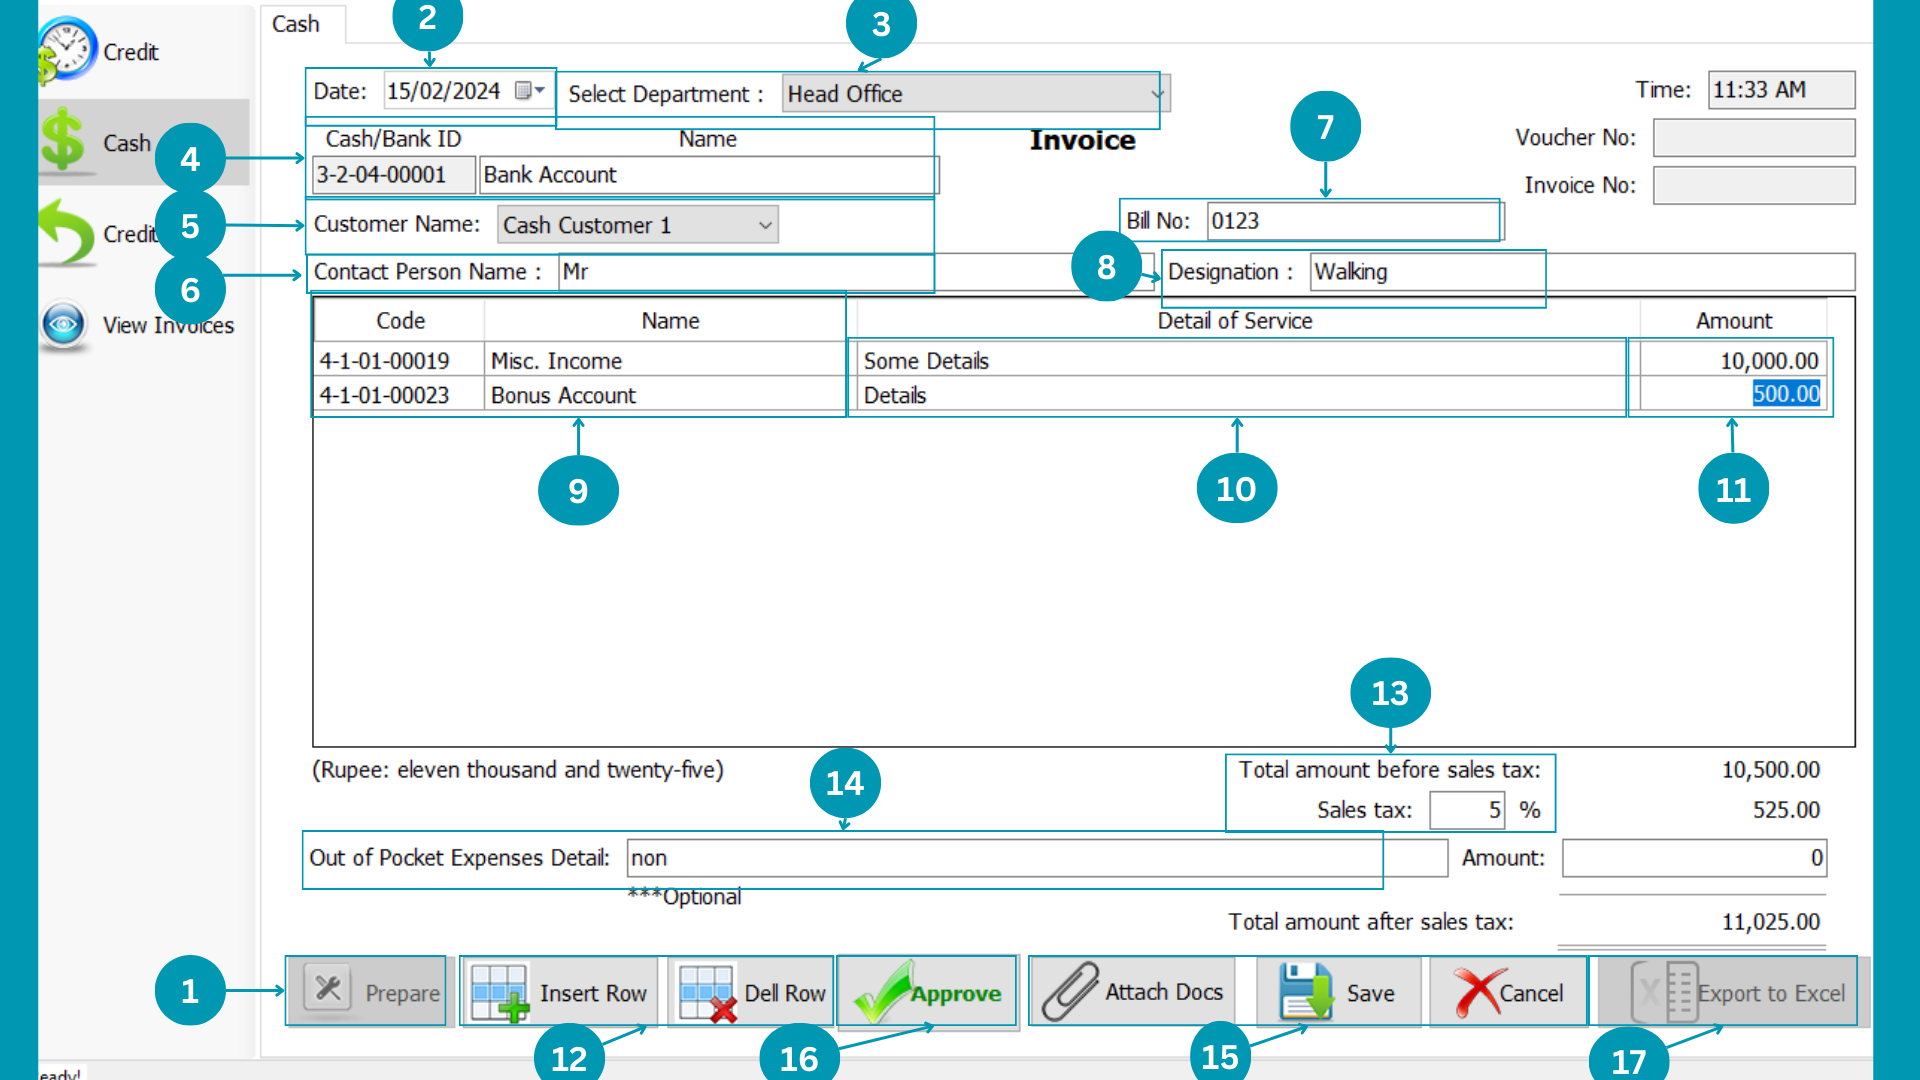
| 01 | Click
on “Prepare” to start data entry |
| 02 | Select
Transaction date.
|
| 03 |
|
| 04 | Select the cash or bank account to be receive cash. |
| 05 |  Select the buyer cash Customer name Select the buyer cash Customer name |
| 06 | Write contact person name related to sale.
|
| 07 | Write Manual Bill number in sale invoice.
|
| 08 |  Write the designation of contact person. Write the designation of contact person.
|
| 09 |  Choose Service to sale it. Choose Service to sale it.
|
| 10 | Write description of provided service.
|
| 11 | Write amount of the service to be sell.
|
| 12 | Click insert row to add another row and delete to delete selected row.
|
| 13 | write sales tax percentage of sales invoice services.
|
| 14 | Write out of peckek (Extra expences) against this invoice.
|
| 15 | Hit the Save or cancel button to proceed and Attach Docs.
|
| 16 | Hit the
"Approve" Button. |
| 17 |  Hit the
"Export To Excel" Button. Hit the
"Export To Excel" Button. |
Credit Note
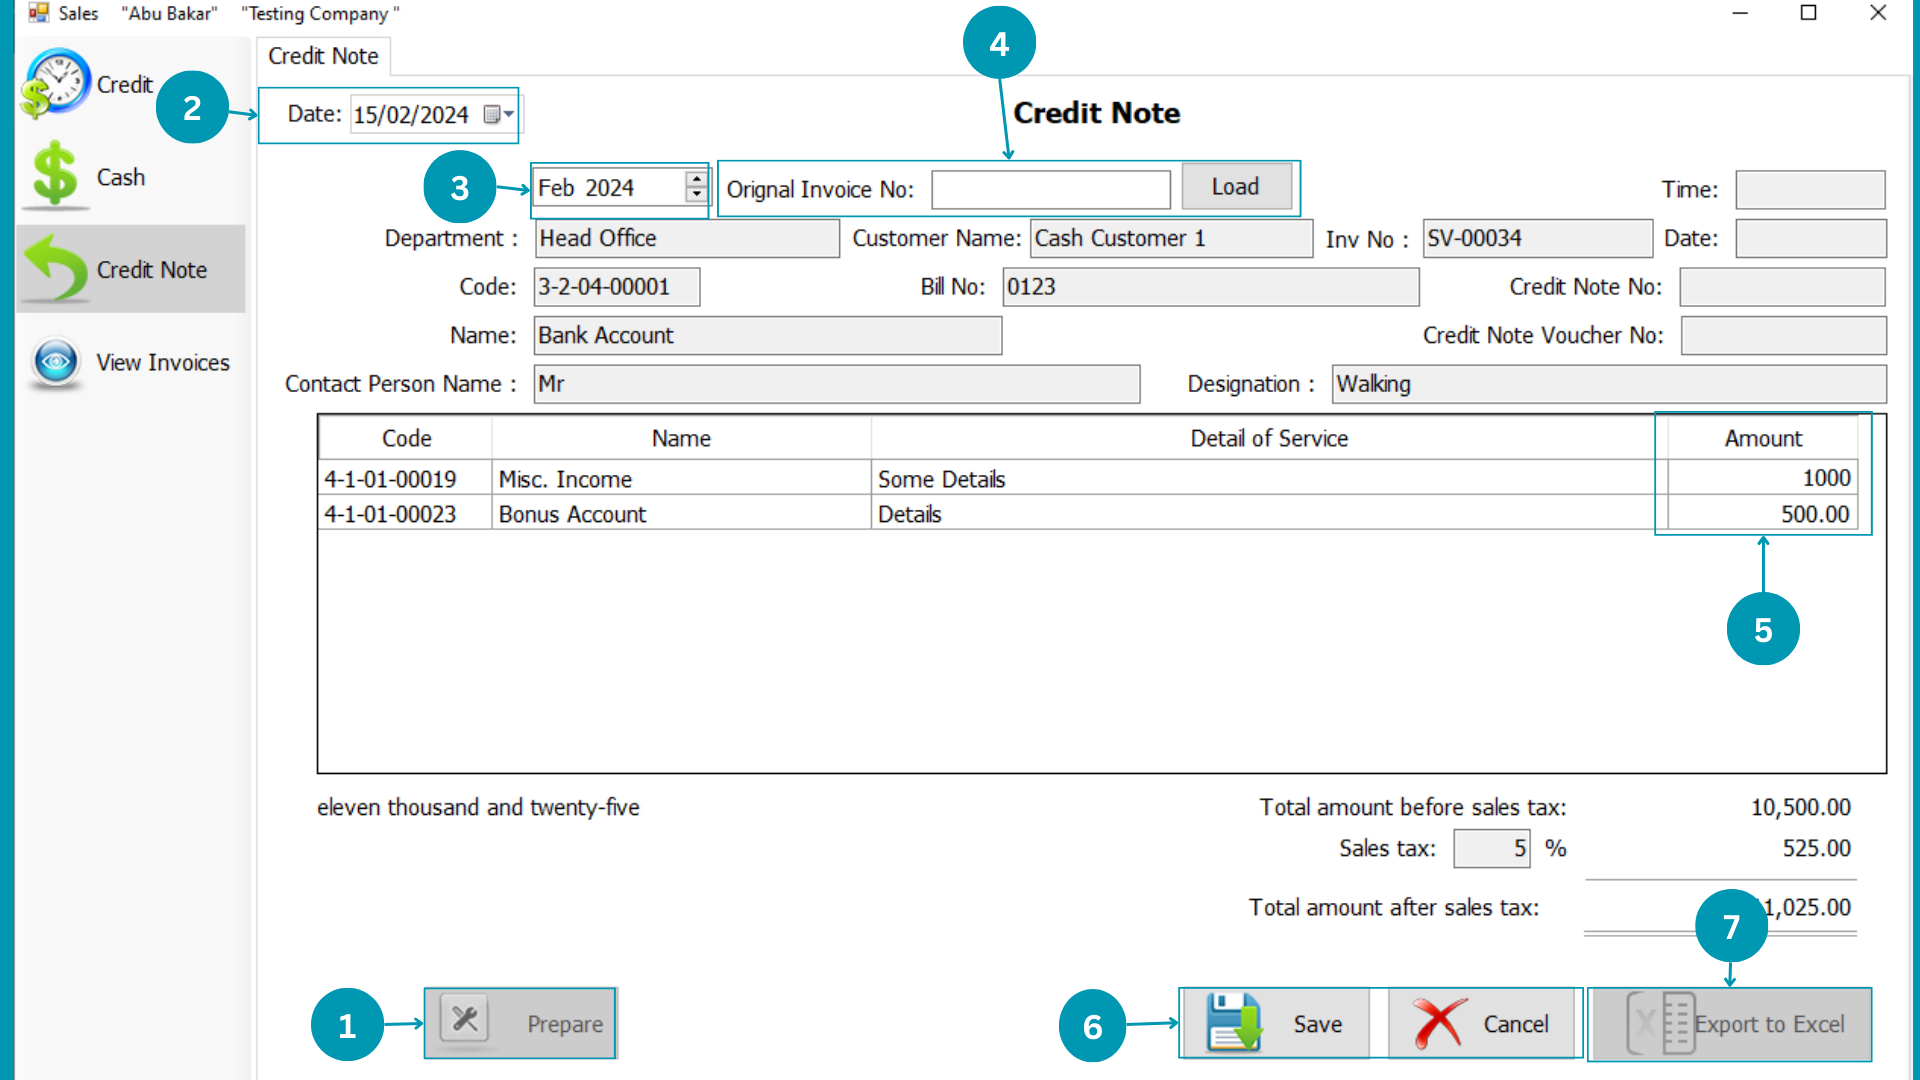
| 01 | Click
on “Prepare” to start data entry. |
| 02 | Select
Transaction date.
|
| 03 |  Select month of sale for credit note. Select month of sale for credit note.
|
| 04 |  Write
Sales Orignal Invoice Number and click Load. Write
Sales Orignal Invoice Number and click Load.
|
| 05 | Enter the
Credit Note Amount in respective column or default will be saled amount. |
| 06 | Hit the
Save Or Cancel Button. |
| 07 | Hit the "Export To Excel" Button.
|
View Invoices
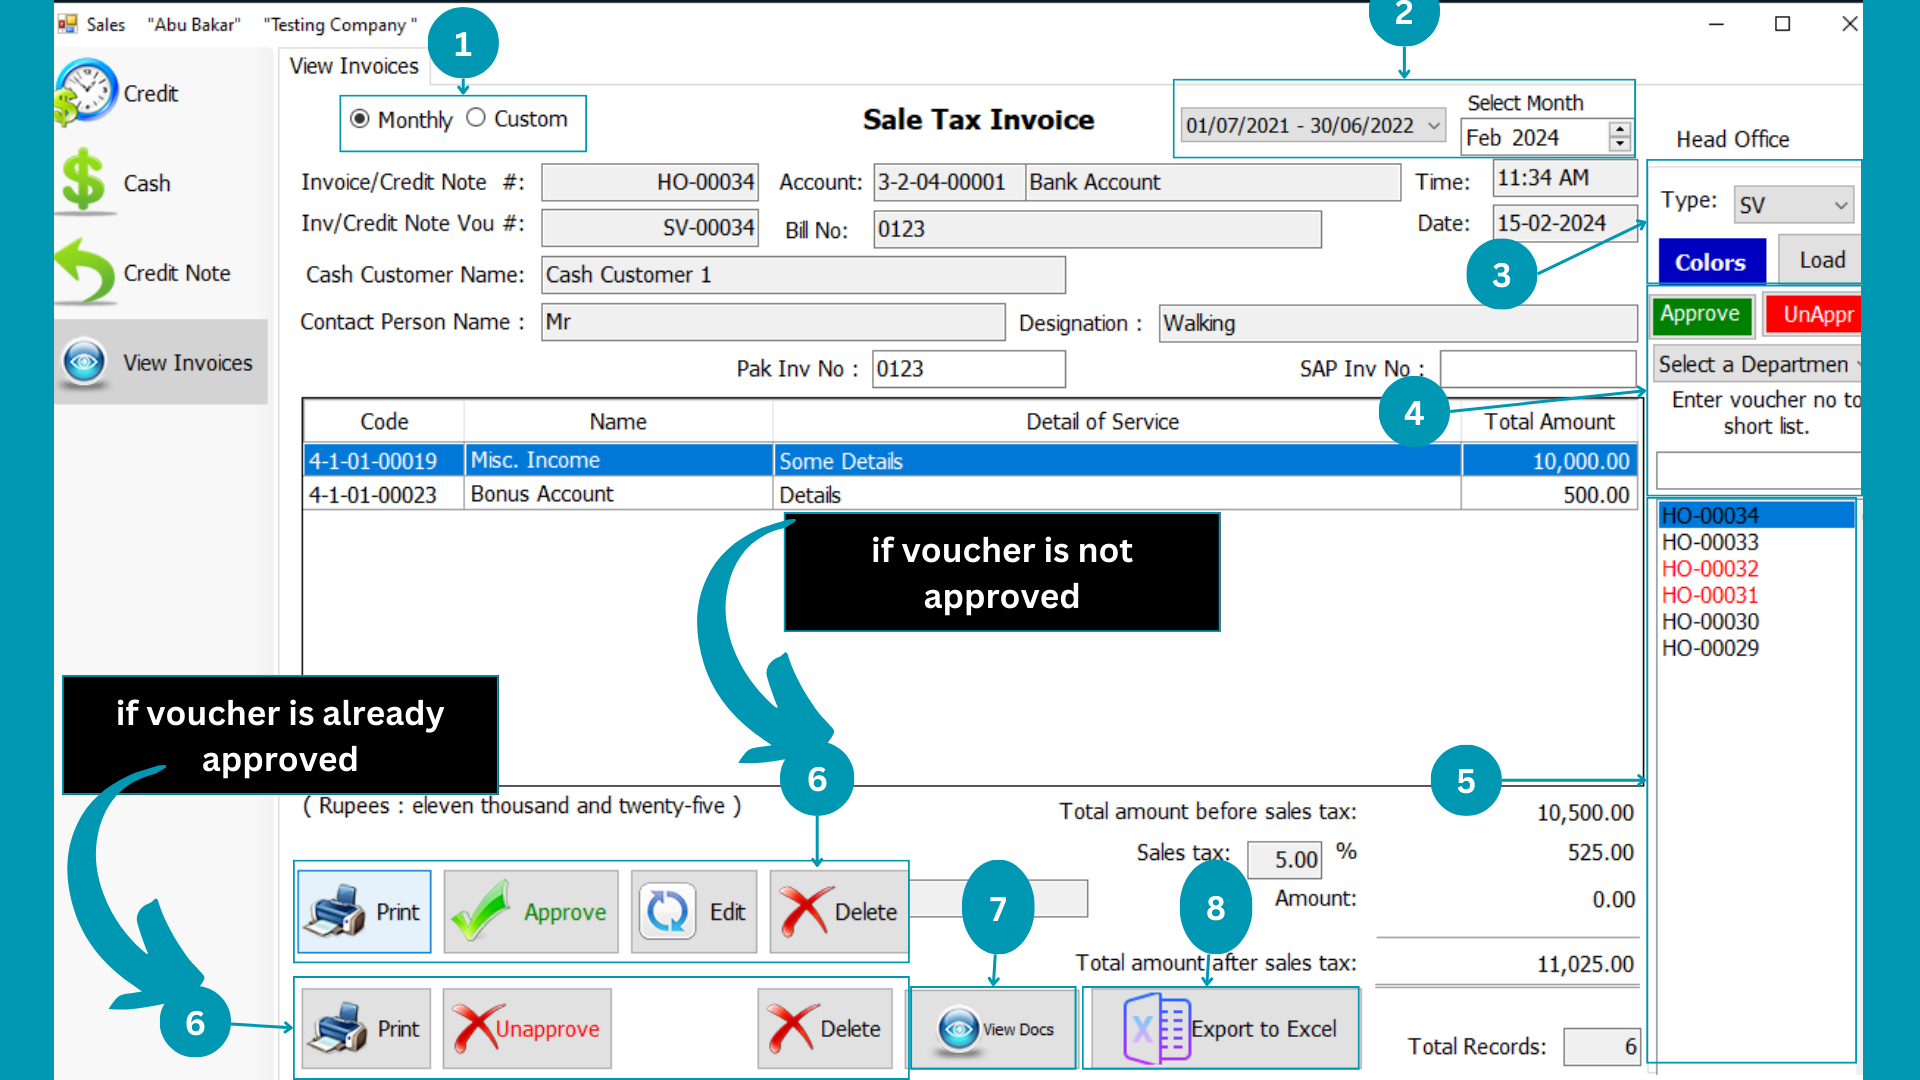
| 01 | Select
“Monthly” to view month wise Purchase Requisition; or select “Custom” to view Financial
Period wise Purchase Requisition.
|
| 02 | Select relevant “Month or Financial
Period”.
|
| 03 | 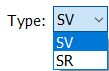 Select Type of the Invoice from SV, SR and click load.
 |
| 04 |
|
| 05 | 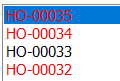 Select
HO number for sale Invoice view. Select
HO number for sale Invoice view.
|
| 06 |  Hit
the Approve Or Edit Button if Voucher is Unapproved, and Unapprove or Delete if Approved. Hit
the Approve Or Edit Button if Voucher is Unapproved, and Unapprove or Delete if Approved.
|
| 07 |  Hit the "View Docs" Button to sight attached documents. Hit the "View Docs" Button to sight attached documents.
|
| 08 | Hit the "Export To Excel" Button.
|
MAB BIZ SOLUTIONS
Accounts
Accounts
All the debit credit accounts entries and chart of Accounts instructions listed here.
Following pages usage is explained in this segment
- Add Voucher
- View Voucher
- Chart of Accounts
Journal Vouchers
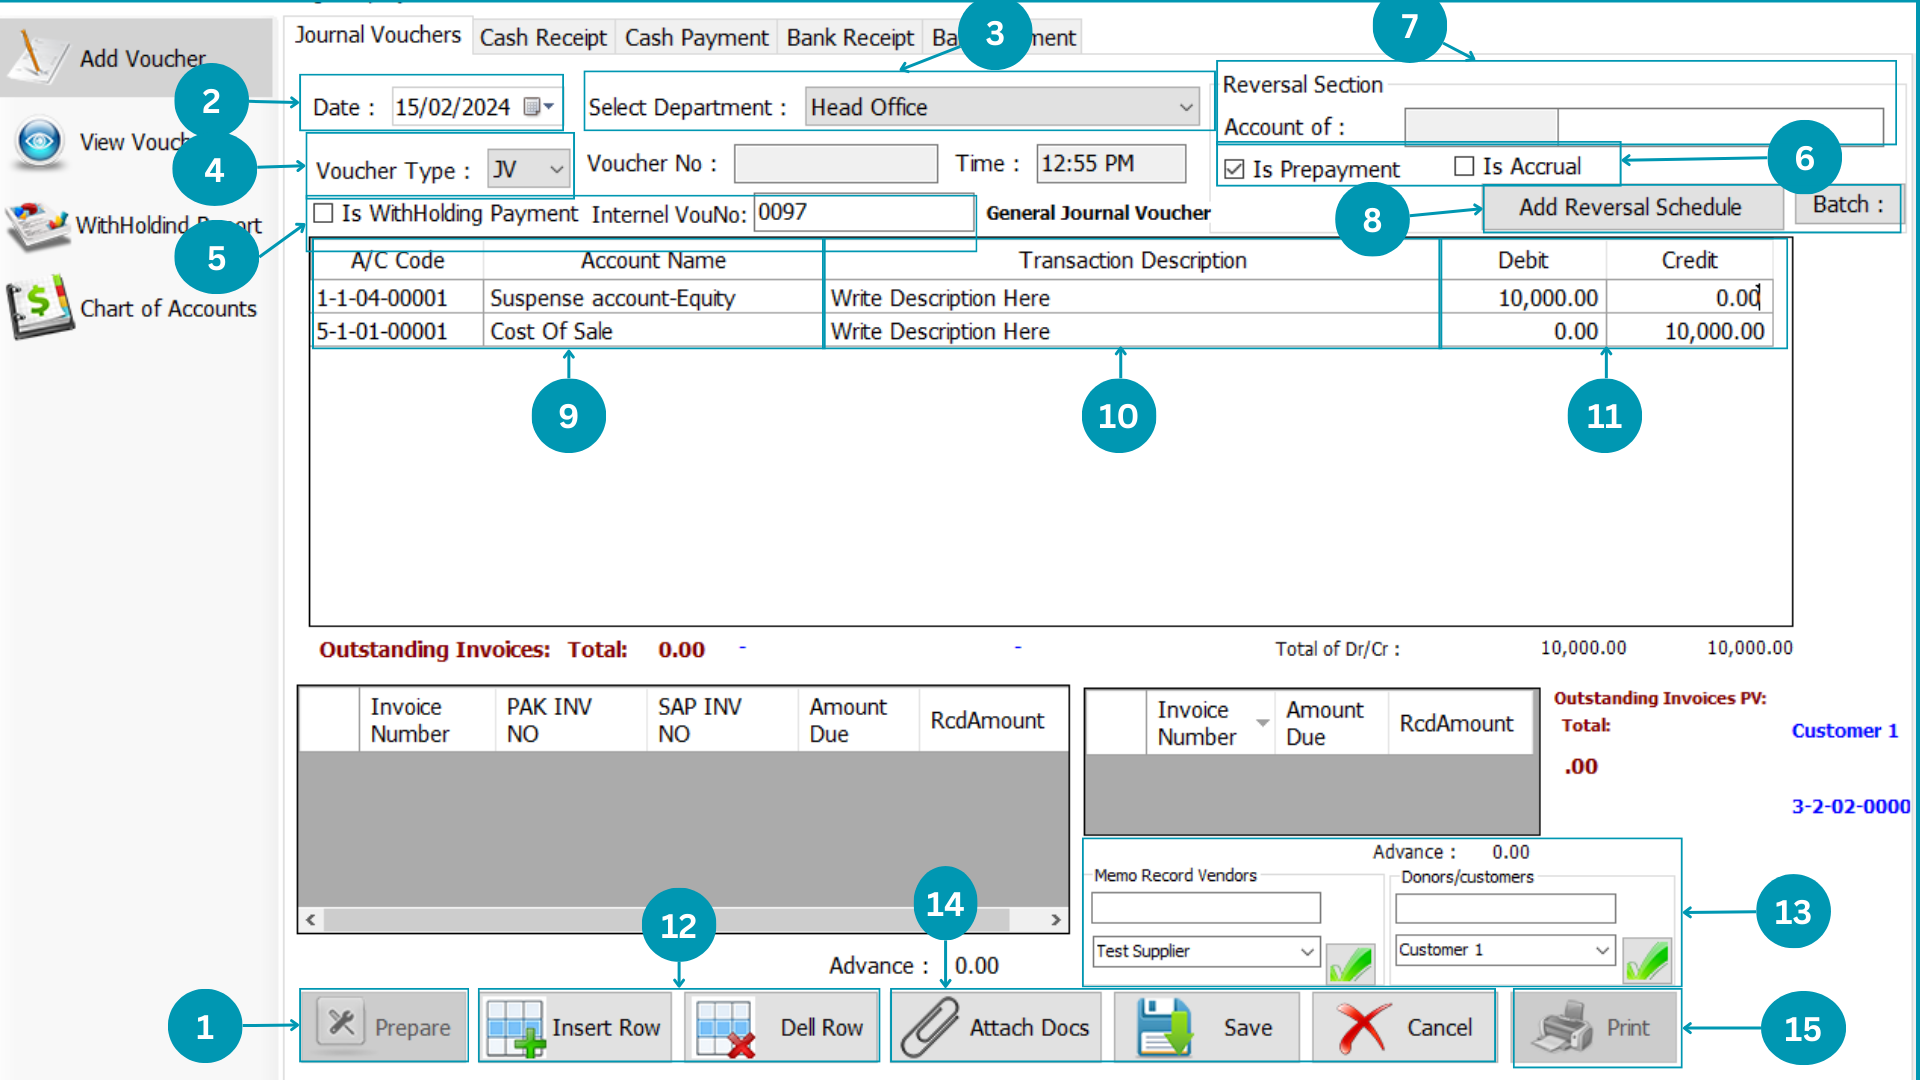
| 01 | Click on Prepare to start writing in the table. |
| 02 | Select Transaction date.
|
| 03 |
|
| 04 |  Select Type of the Invoice from JV, PC, RC, PB, RB. Select Type of the Invoice from JV, PC, RC, PB, RB. |
| 05 |  Check the Is WitghHolding Payment for withholding Tax payment and write payment tax from payable tax, and write Internal voucher number. Check the Is WitghHolding Payment for withholding Tax payment and write payment tax from payable tax, and write Internal voucher number.
|
| 06 |  Click 'Is Prepayment' for advance and 'Is Accural' for else. Click 'Is Prepayment' for advance and 'Is Accural' for else.
|
| 07 |  If you selected Is Prepayment then select the account of reversal section.
 |
| 08 |  For use of Prepayment and Accrual have to ADD reversal schedule, for batchWise entry click batch For use of Prepayment and Accrual have to ADD reversal schedule, for batchWise entry click batch
|
| 09 |  Select at least Two head of account by pressing "Space".
 |
| 10 |  Write Transaction Description beside every entry.
 |
| 11 |  Enter the amount numbers in credit or debit fileds respectively. Enter the amount numbers in credit or debit fileds respectively. |
| 12 | You can insert or delete rows through this but there should be at least two rows.
|
| 13 | |
| 14 |
Click the "Attach Docs" "Save" or "Cancel". |
| 15 |
Click the "Print";
|
Batch Wise
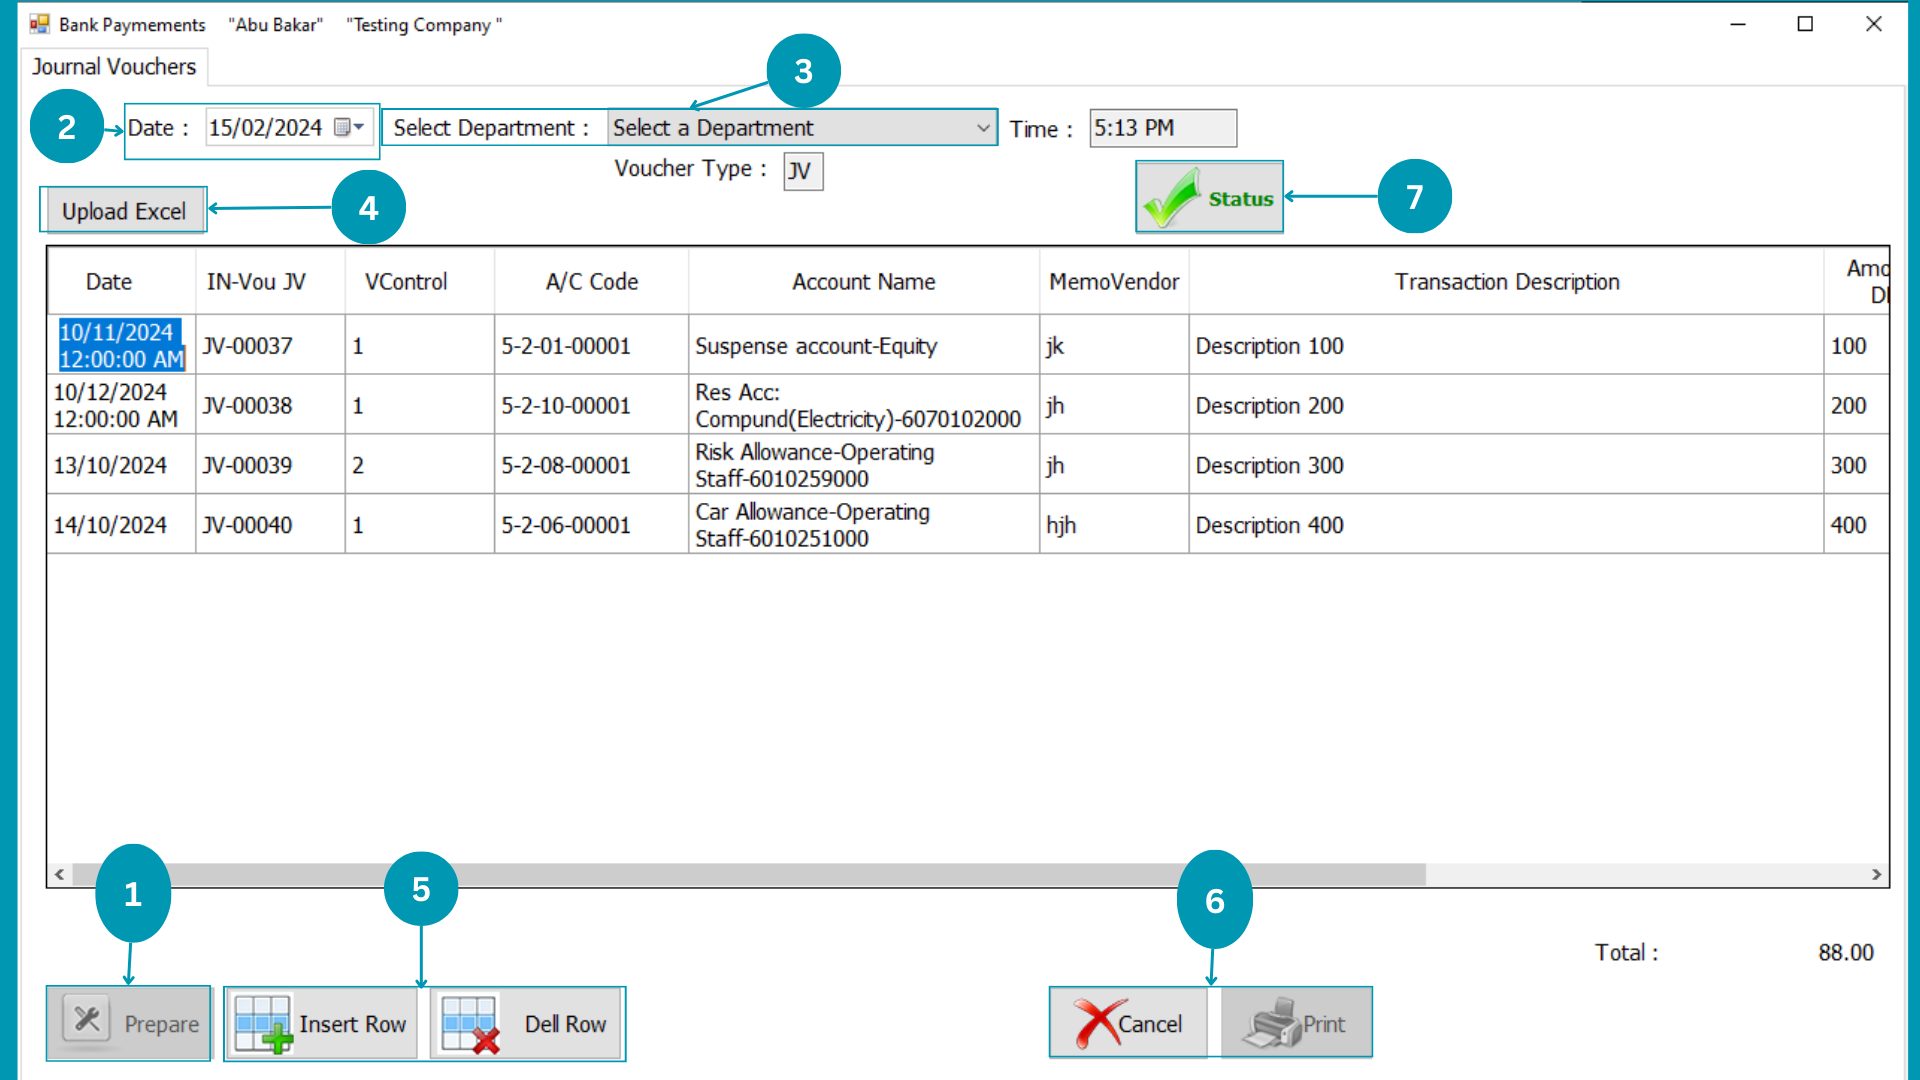
| 01 | Click on Prepare to start writing in the table. |
| 02 | Select Transaction date.
|
| 03 | Select the Department. |
| 04 |  Click on "upload excel" and selected formated file to enter the data batch wise. Click on "upload excel" and selected formated file to enter the data batch wise. |
| 05 |
You can insert or delete rows through this. |
| 06 |  Click the "Print" or "Cancel".
 |
| 07 |  Click the "Status" to save entry.
 |
Cash Receipt
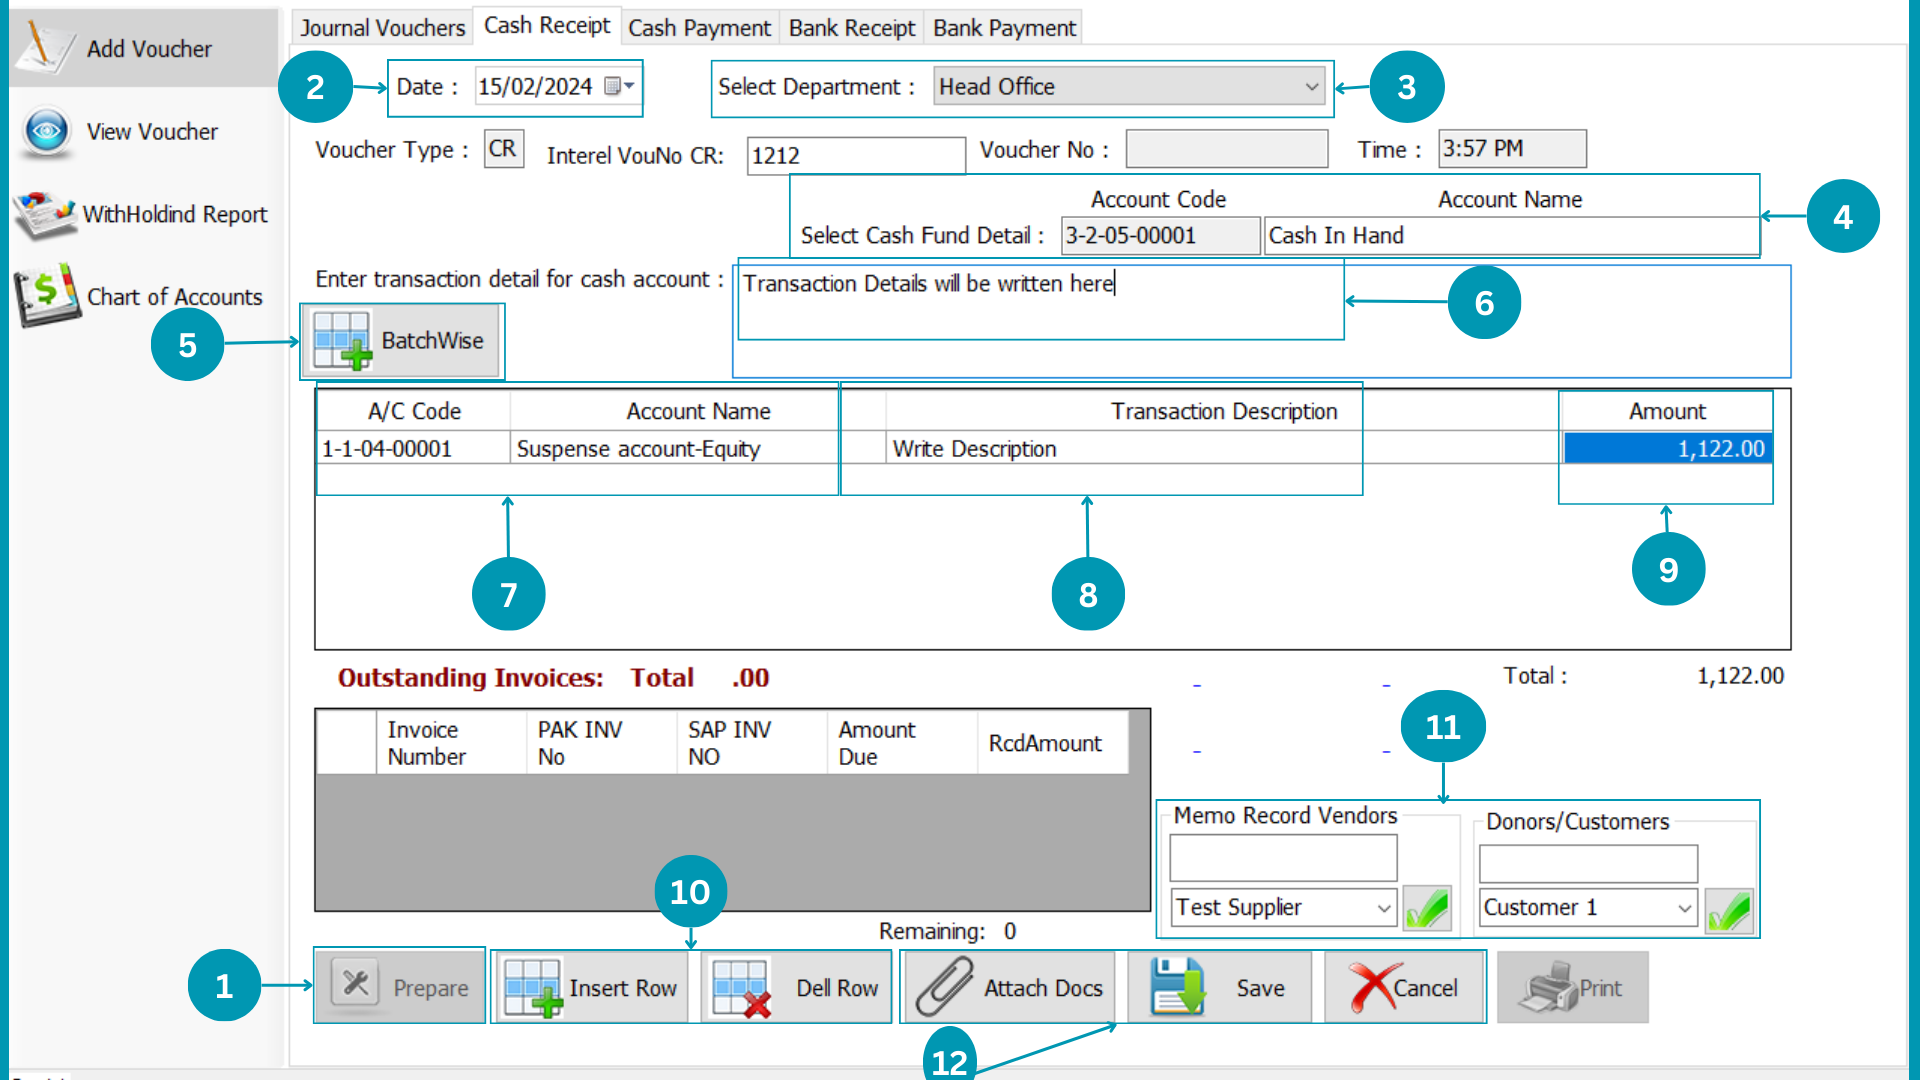
| 01 | Click on Prepare to start writing in the table. |
| 02 | Select Transaction date.
|
| 03 |
|
| 04 | 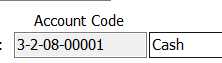 Select Cash Fund Head. Select Cash Fund Head. |
| 05 |  Click BatchWise to enter data from excel file.
 |
| 06 |  Write transaction comments here. Write transaction comments here.
|
| 07 | Select Cash recipient account by pressing "Space". |
| 08 |
Write Transaction Description beside every entry. |
| 09 | Write the amount of cash receipt. |
| 10 | Add or delete the row through there. |
| 11 | |
| 12 |
Click the "Attach Docs" "Save" or "Cancel". |
Cash Payment
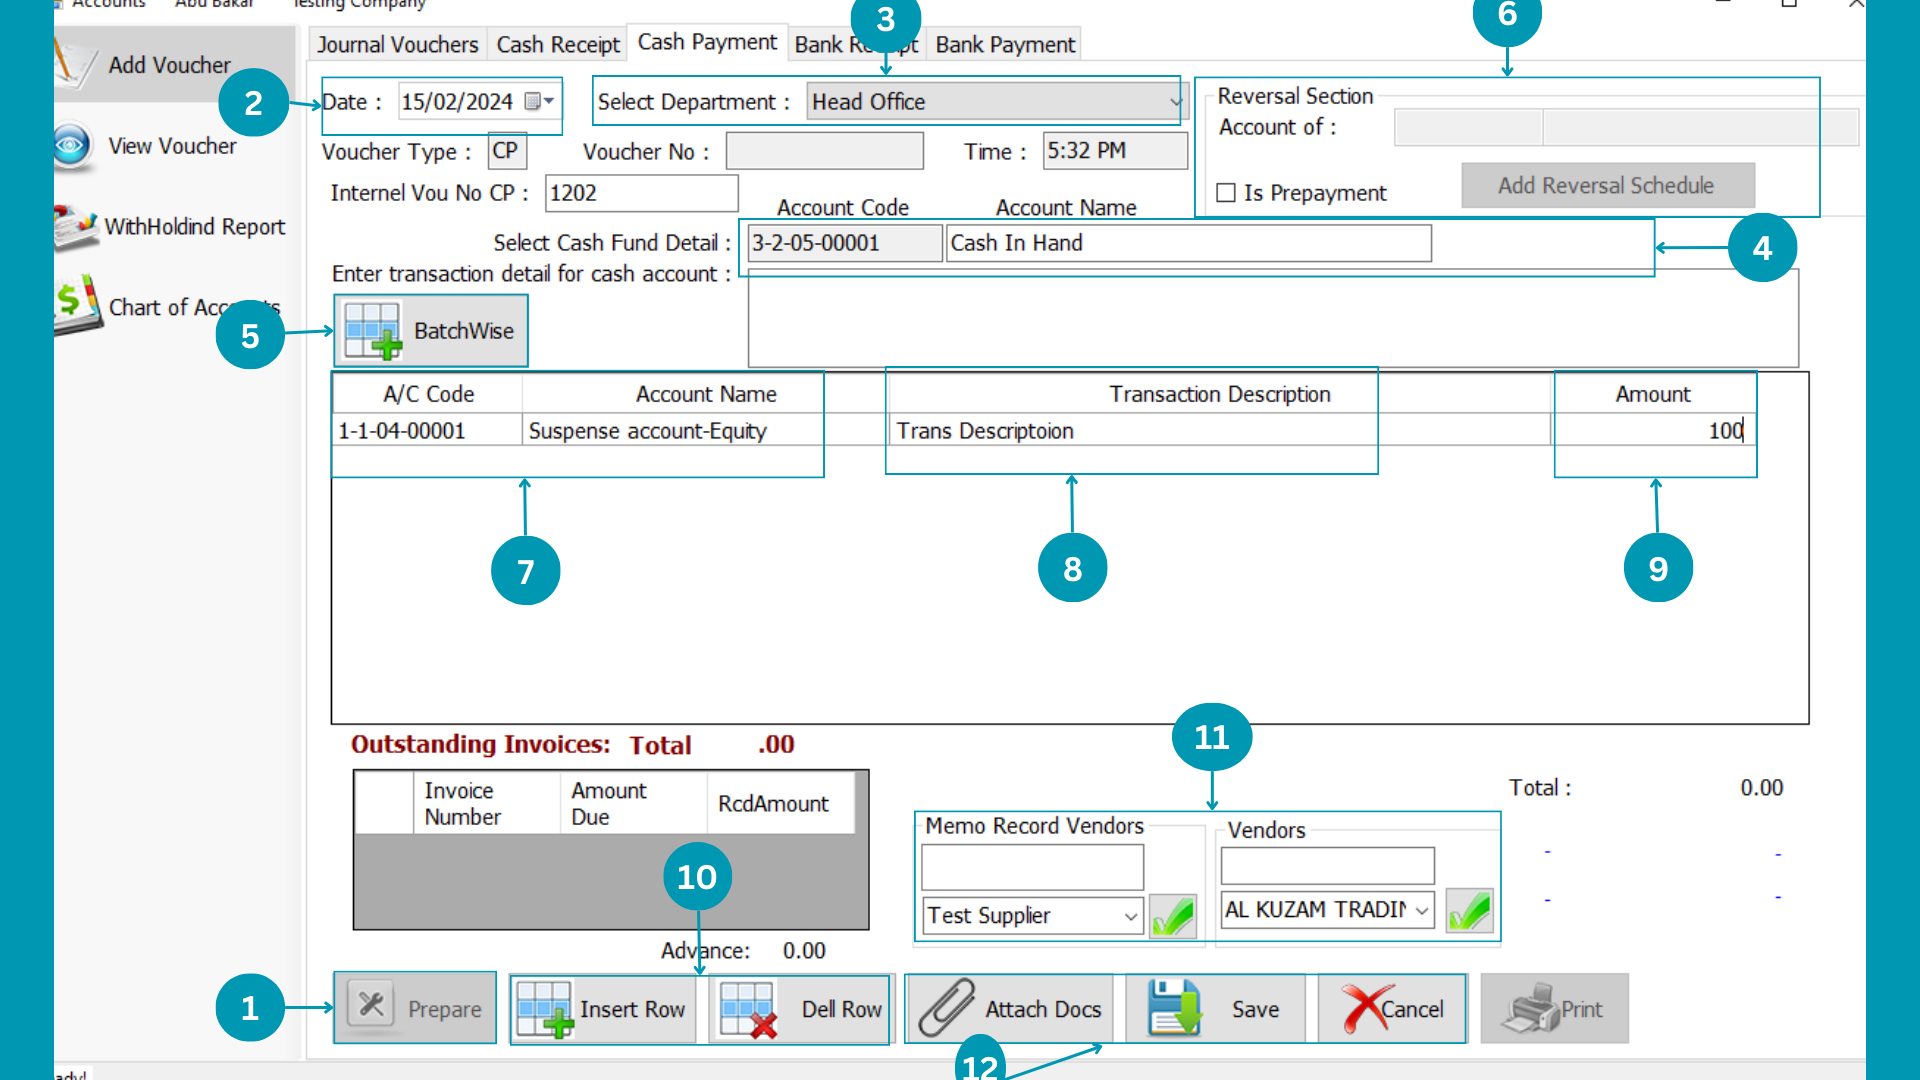
| 01 | Click on Prepare to start writing in the table. |
| 02 | Select Transaction date.
|
| 03 |
|
| 04 | Select Cash Fund Head. |
| 05 |
Click BatchWise to enter data from excel file. |
| 06 |
Click 'Is Prepayment' for advance payment, If you selected Is Prepayment then select the account of reversal section.
|
| 07 |
Select Cash recipient by pressing "Space". |
| 08 |
Write Transaction Description beside every entry. |
| 09 | Write the amount of cash payment. |
| 10 | Add or delete the row through there. |
| 11 | |
| 12 |
Click the "Attach Docs" "Save" or "Cancel". |
Bank Receipt
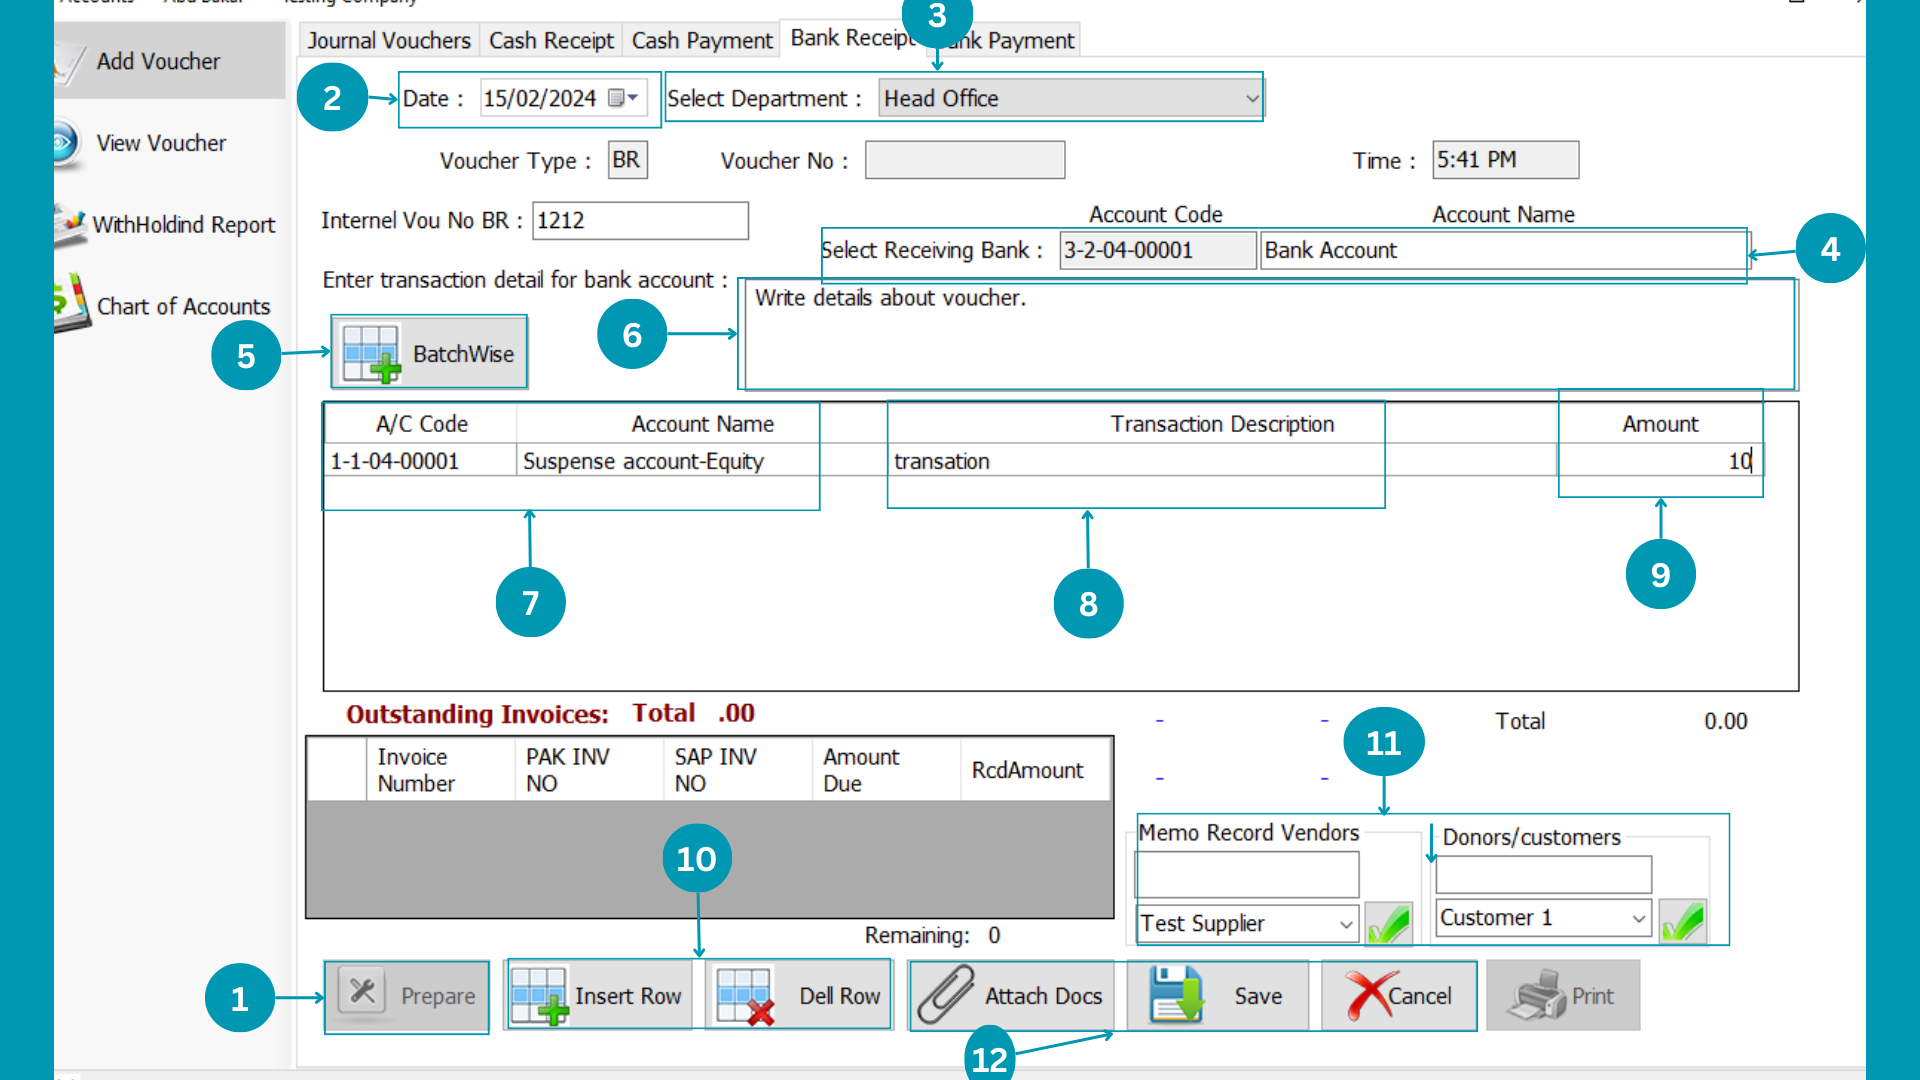
| 01 | Click on Prepare to start writing in the table. |
| 02 | Select Transaction date.
|
| 03 |
|
| 04 | Select receiving Bank. |
| 05 |
Click BatchWise to enter data from excel file. |
| 06 |
Write transaction comments here.
|
| 07 |
Select recipient by pressing "Space". |
| 08 |
Write Transaction Description beside every entry. |
| 09 | Write the amount of payment. |
| 10 | Add or delete the row through there. |
| 11 | |
| 12 |
Click the "Attach Docs" "Save" or "Cancel". |
Bank Payment
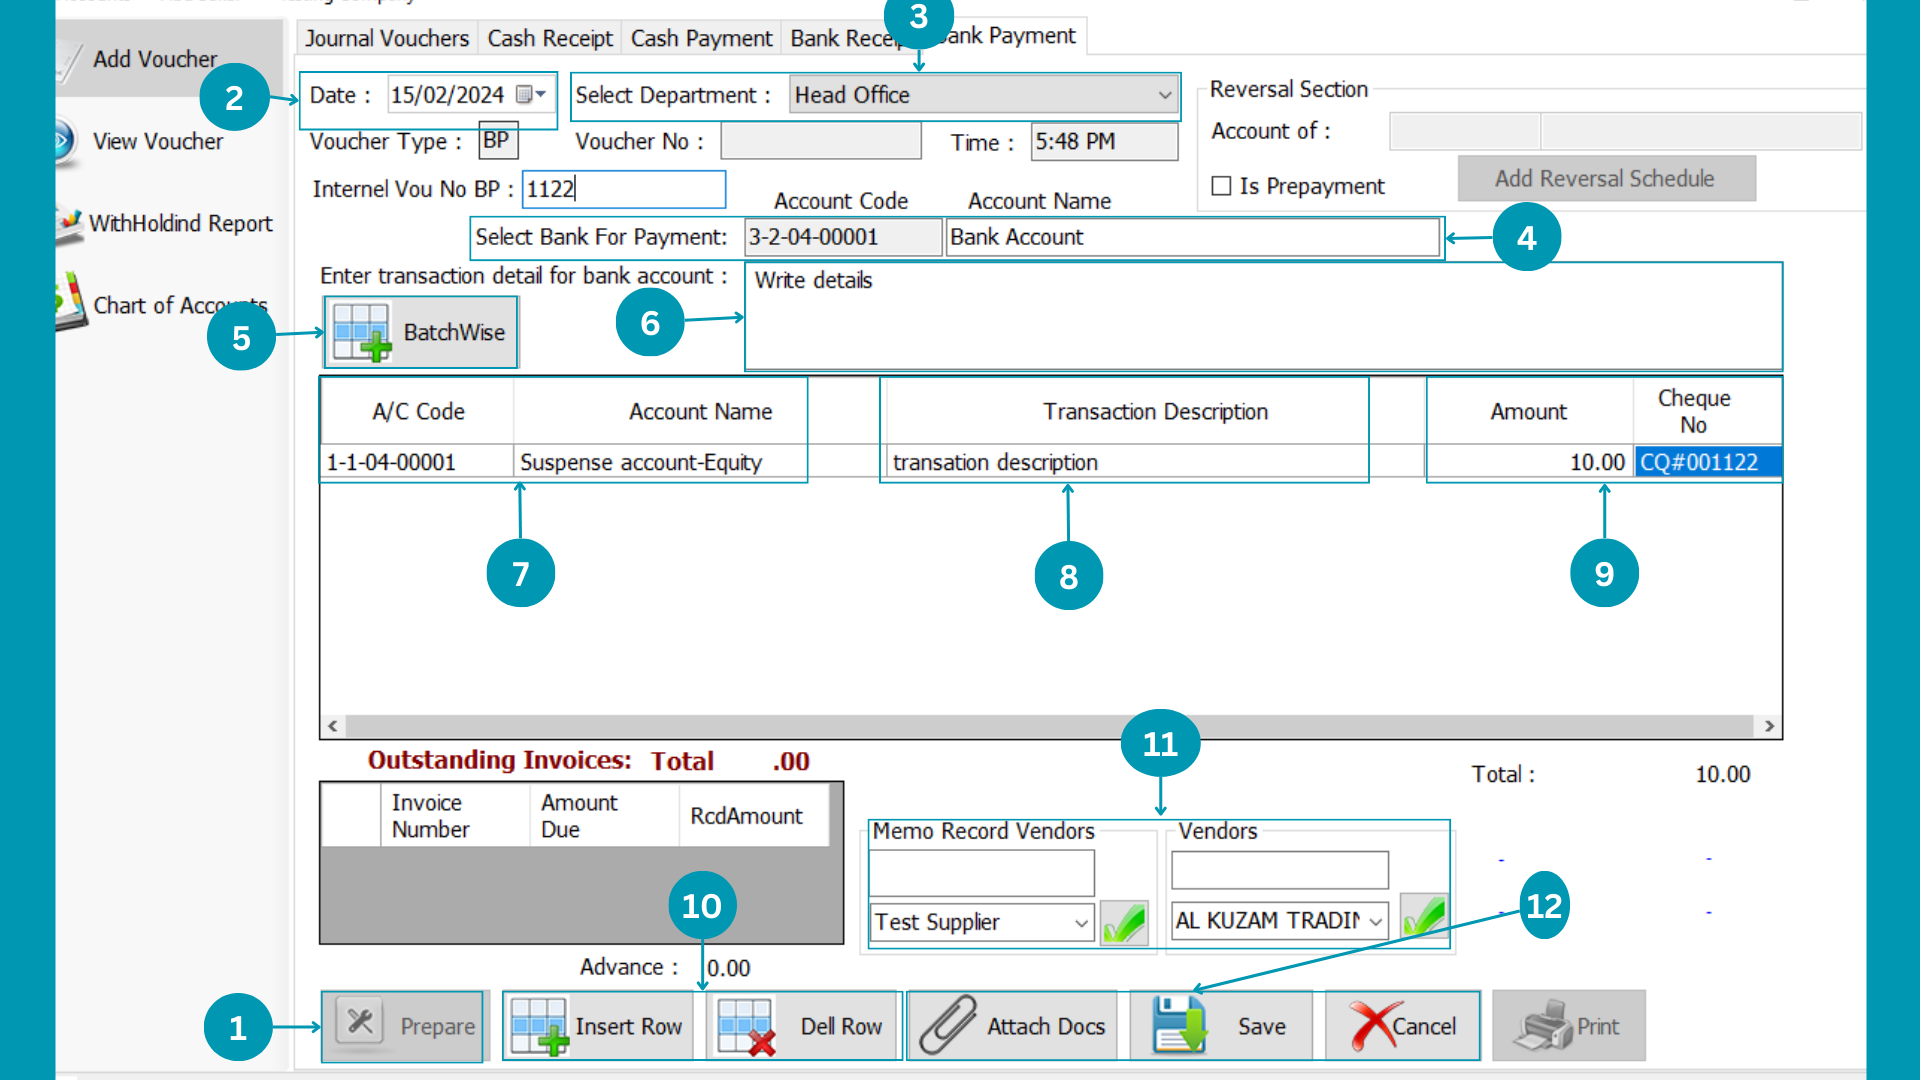
| 01 | Click on Prepare to start writing in the table. |
| 02 | Select Transaction date.
|
| 03 |
|
| 04 | Select sending Bank name. |
| 05 |
Click BatchWise to enter data from excel file. |
| 06 |
Write transaction comments here.
|
| 07 |
Select recipient by pressing "Space". |
| 08 |
Write Transaction Description beside every entry. |
| 09 | Write the amount of payment. |
| 10 | Add or delete the row through there. |
| 11 | |
| 12 |
Click the "Attach Docs" "Save" or "Cancel". |
View Voucher
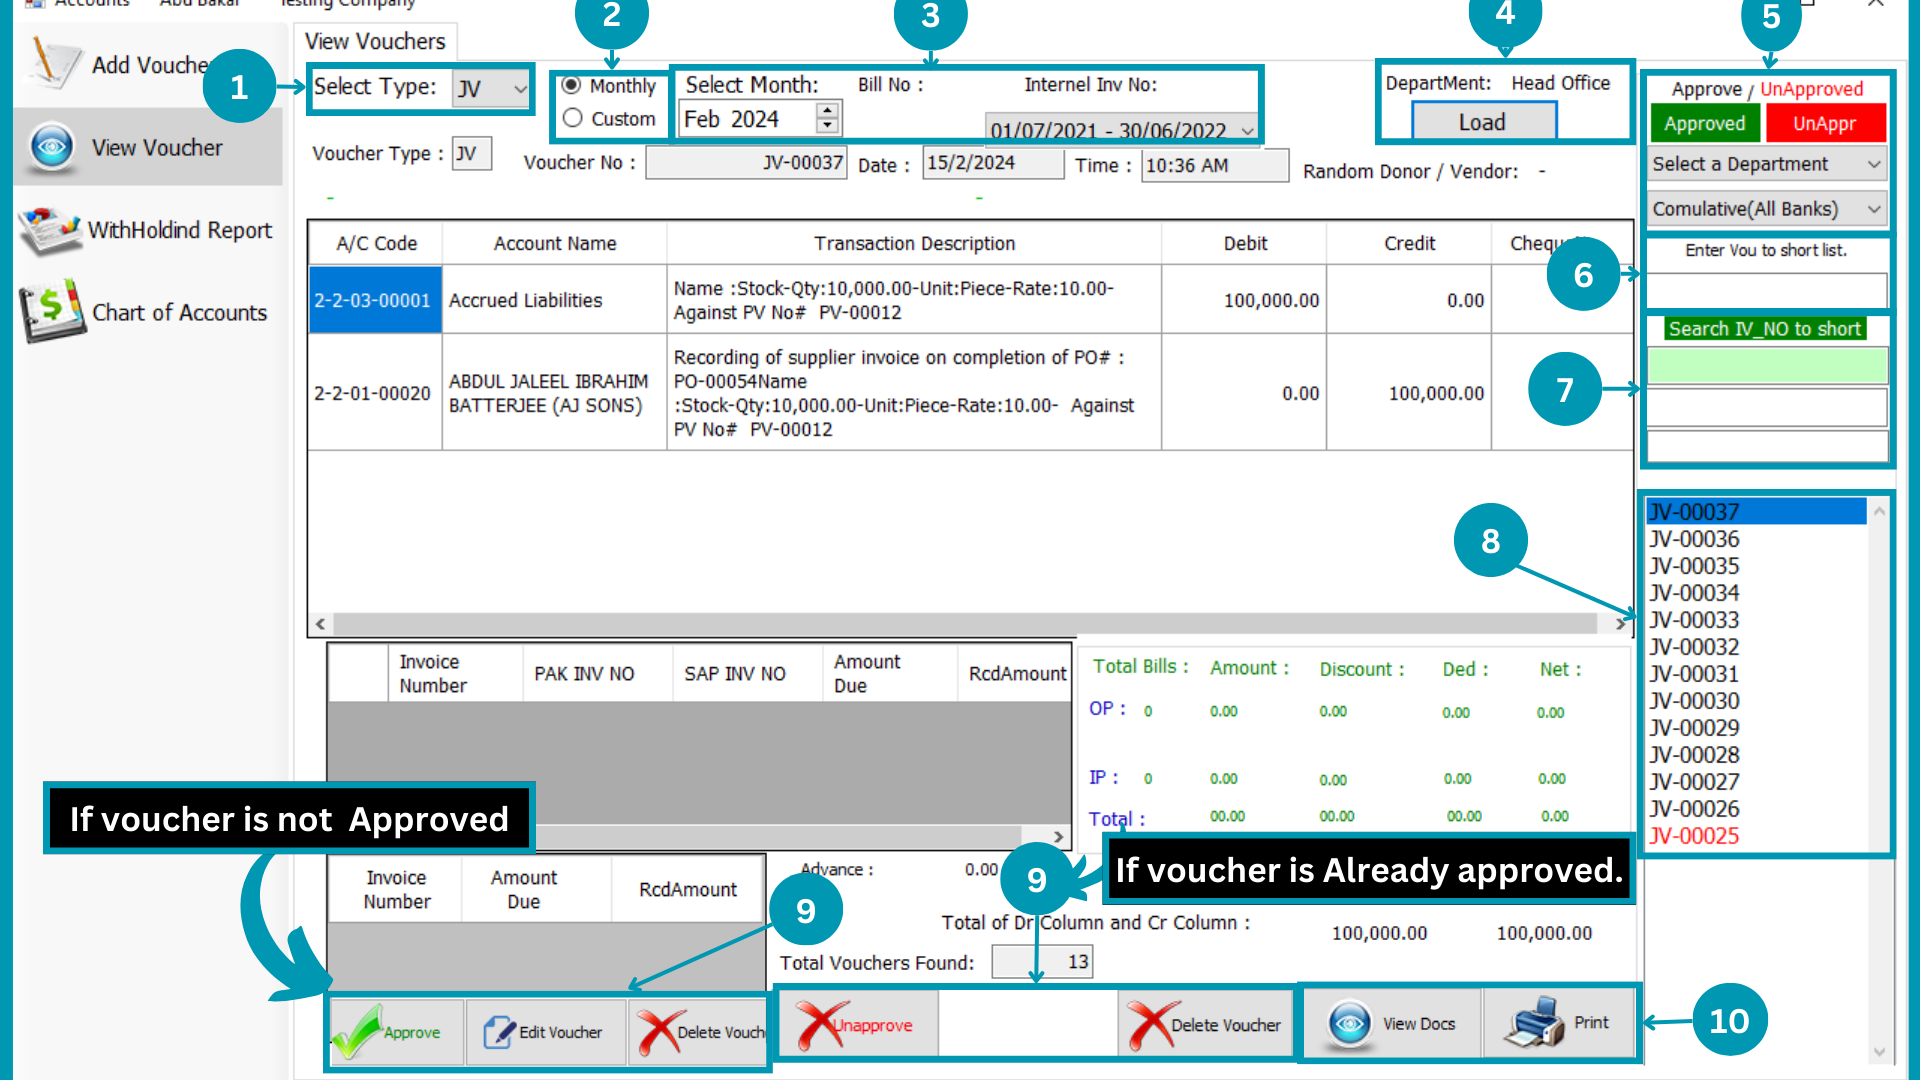
| 01 | Select Type of the Invoice from JV, PC, RC, PB, RB.
|
| 02 | Select relevant “Month or Financial Period”.
|
| 03 | Select “Monthly” to view month wise Purchase Requisition; or select “Custom” to view Financial Period wise Accounts voucher. |
| 04 | Hit the load Button. |
| 05 | Choose the filter from the Approved Or Unapproved Button, Department, and Bank.
|
| 06 |
Enter the Specific Voucher Number to view a specific Accounts Voucher. |
| 07 |  Click on Iv number to filter and short list the vouchers list. Click on Iv number to filter and short list the vouchers list.
|
| 08 |  Click on voucher number to check entry made against that specific voucher. Click on voucher number to check entry made against that specific voucher. |
| 09 |  If voucher if approved you can here unapprove and delete it in other case approve , edit and delete it. If voucher if approved you can here unapprove and delete it in other case approve , edit and delete it.
|
| 10 | 
|
Withholding Report
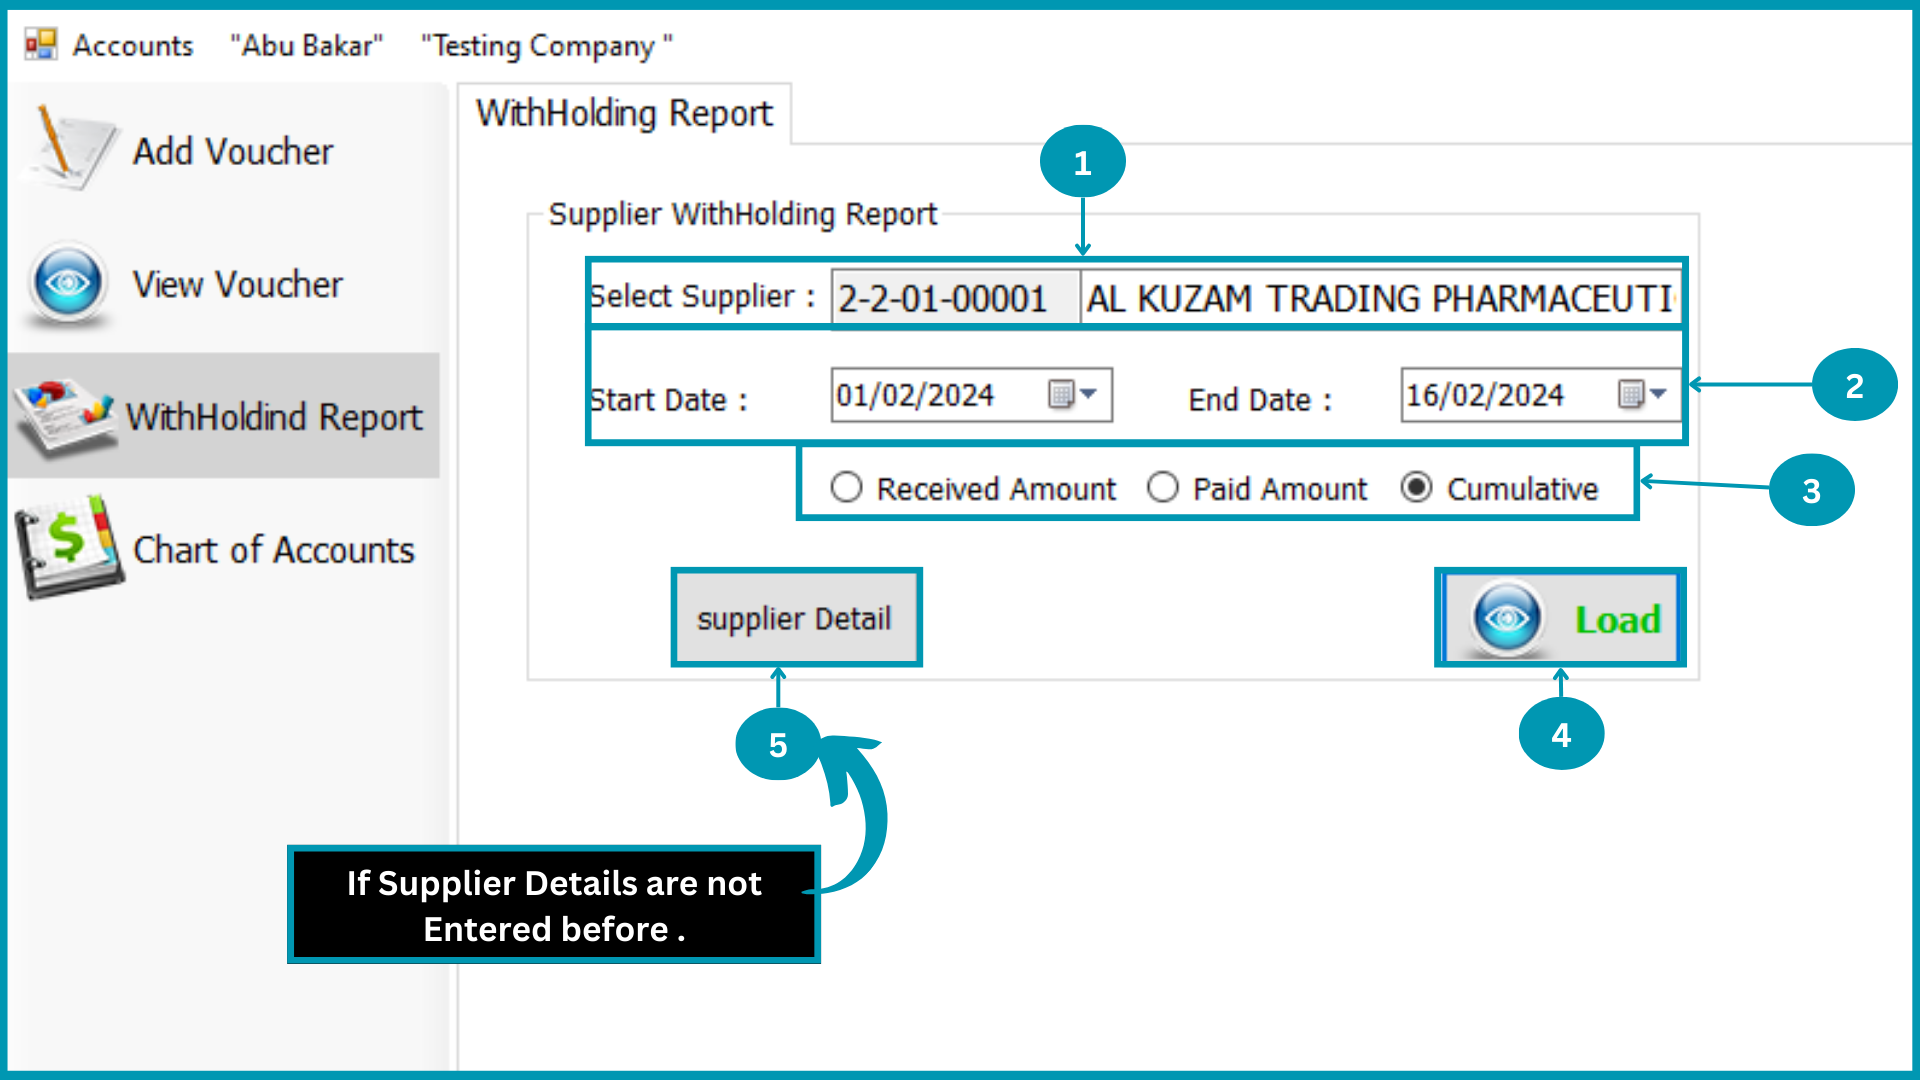
| 01 | Select Supplier from suppliers list.
|
| 02 |  Select relevant “Start to End Period date”. Select relevant “Start to End Period date”.
|
| 03 |  Select type of Withholding report. Select type of Withholding report.
|
| 04 |  Hit the load Button. Hit the load Button. |
| 05 |  Hit the Suppliers Detail Button and add supplier details if not entered before. Hit the Suppliers Detail Button and add supplier details if not entered before.
|
Chart of Account Equity Issued and Paid Up Capital
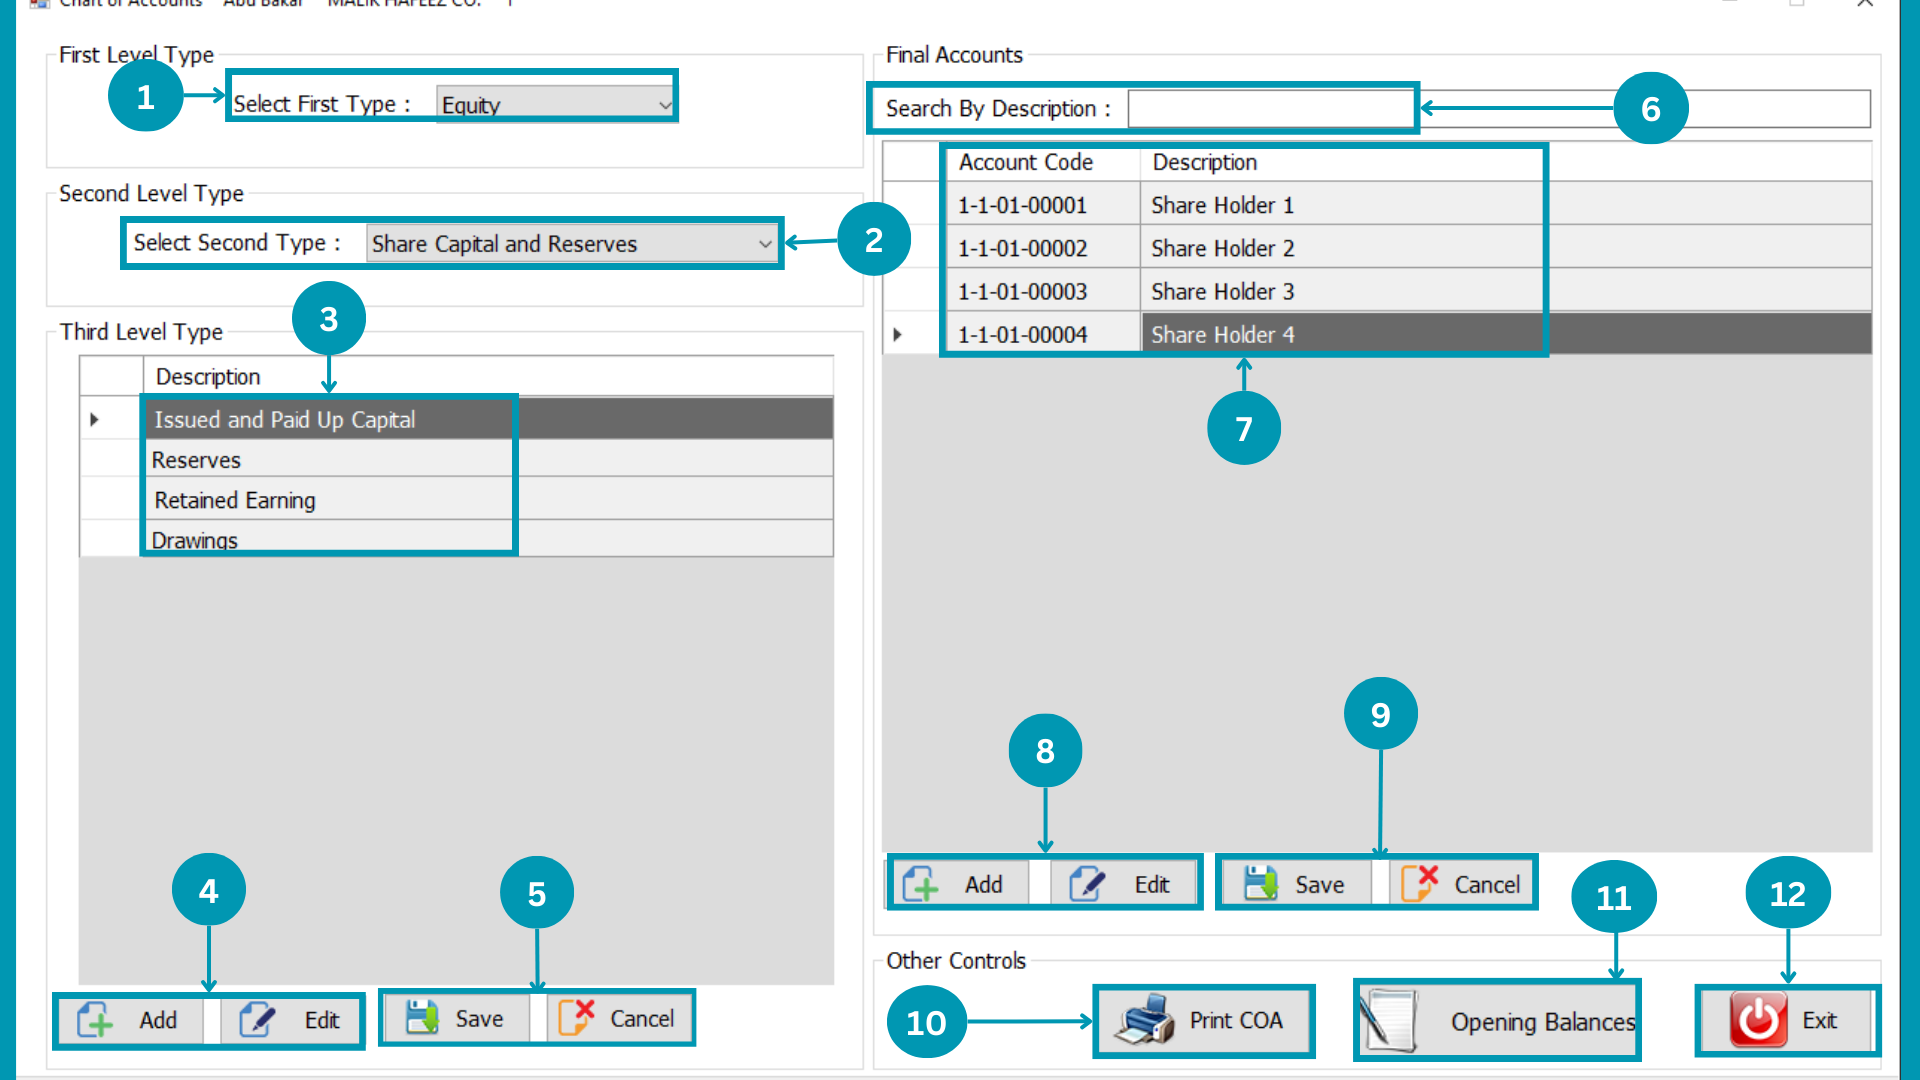
| 01 |  Select First level head of Account's type. Select First level head of Account's type.
|
| 02 |  Select Second level head of Account's type. Select Second level head of Account's type.
|
| 03 |  Select Third level head of Accounts "Issued and Paid Up Capital". Select Third level head of Accounts "Issued and Paid Up Capital".
|
| 04 |  Hit the Add Or Edit Button to change third-level heads. Hit the Add Or Edit Button to change third-level heads. |
| 05 |  After Clicking on Add or Edit Select "Save" or "Cancel" Button to close. After Clicking on Add or Edit Select "Save" or "Cancel" Button to close.
|
| 06 |  Search the Added heads by writing in the search bar
 |
| 07 |  Select Final Accounts in Issued and Paid up Capital want to Edit. Select Final Accounts in Issued and Paid up Capital want to Edit. |
| 08 |
Click Edit to rename existing head and Click Add to Enter new. |
| 09 | After Clicking on Add or Edit Select "Save" or "Cancel" Button to close.
|
| 10 | 
|
| 11 | 
|
Reserves
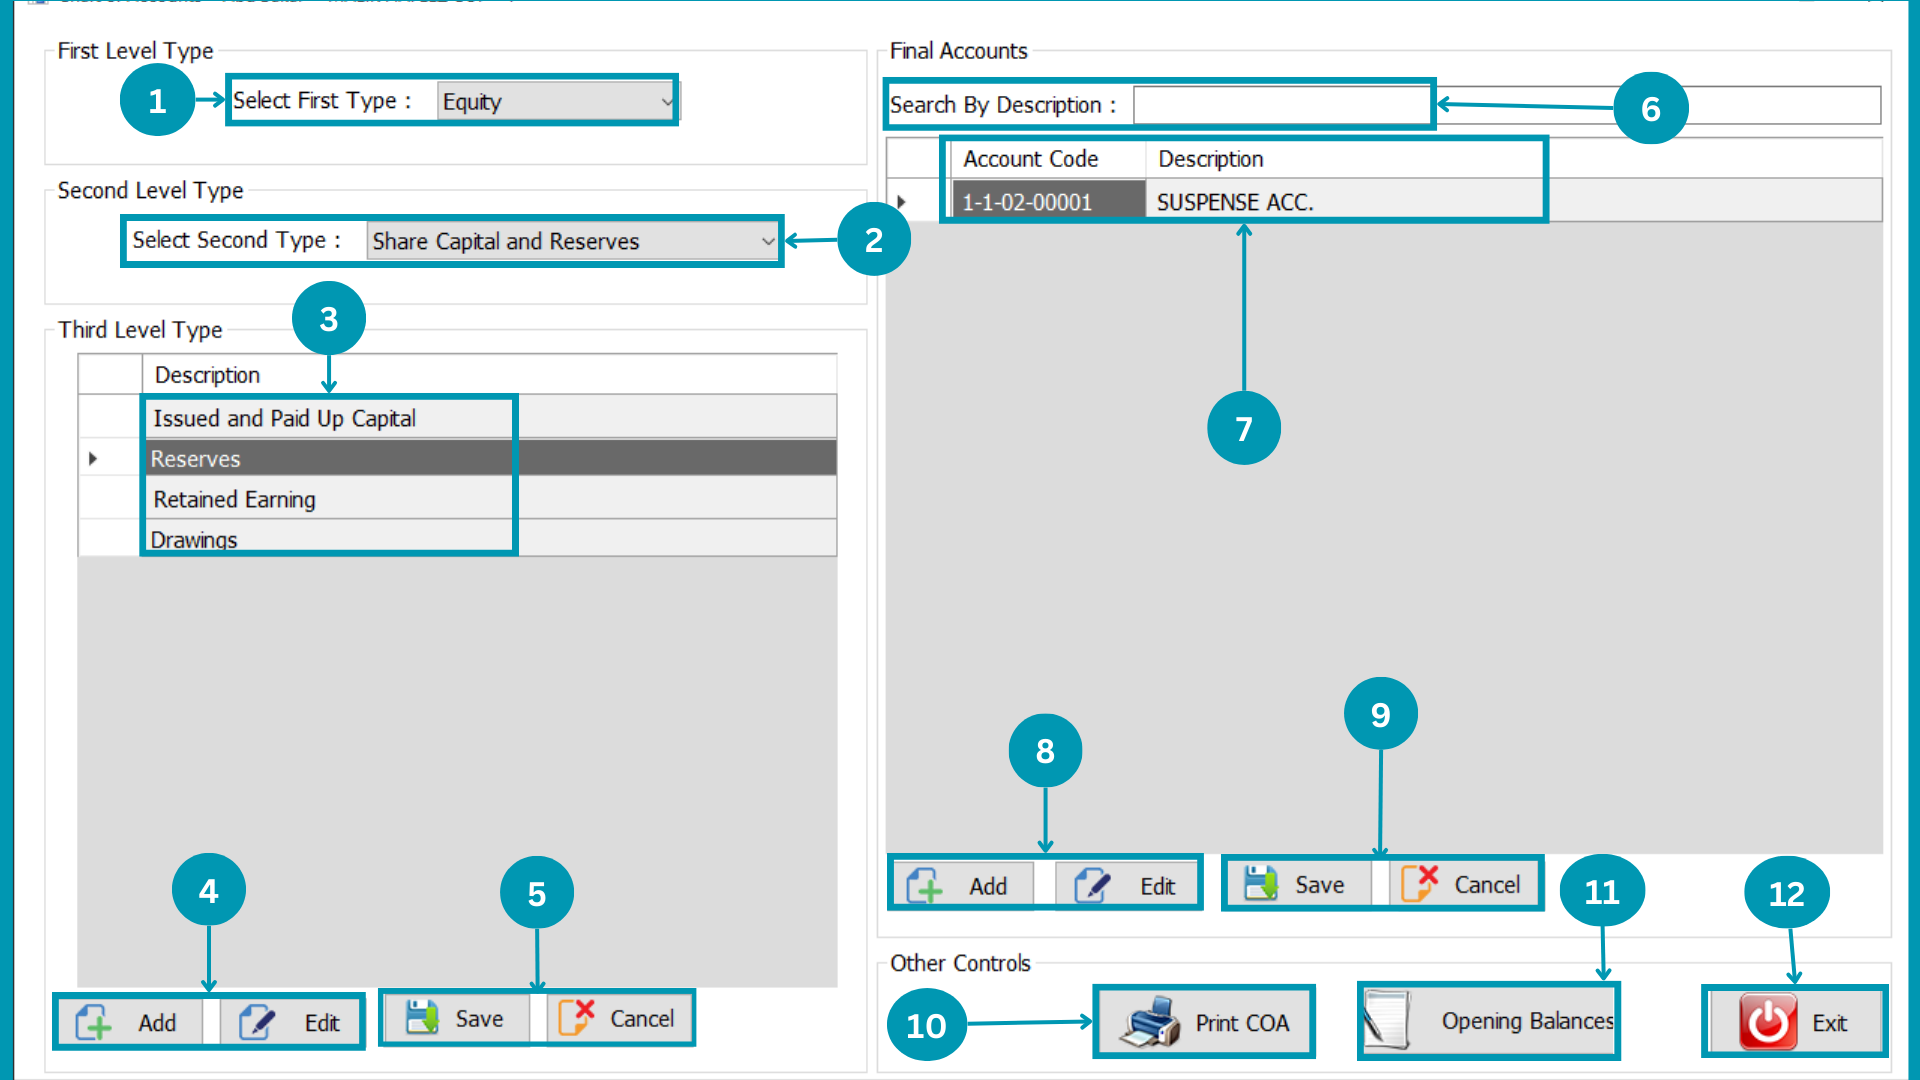
| 01 | Select First level head of Account's type.
|
| 02 | Select Second level head of Account's type.
|
| 03 |  Select Third level head of Accounts "Reserves". Select Third level head of Accounts "Reserves".
|
| 04 | Hit the Add Or Edit Button to change third-level heads. |
| 05 | After Clicking on Add or Edit Select "Save" or "Cancel" Button to close.
|
| 06 |
Search the Added heads by writing in the search bar |
| 07 |  Select Final Accounts in Reserves want to Edit. Select Final Accounts in Reserves want to Edit. |
| 08 |
Click Edit to rename existing head and Click Add to Enter new. |
| 09 | After Clicking on Add or Edit Select "Save" or "Cancel" Button to close.
|
| 10 |
|
| 11 |
|
Retained Earning
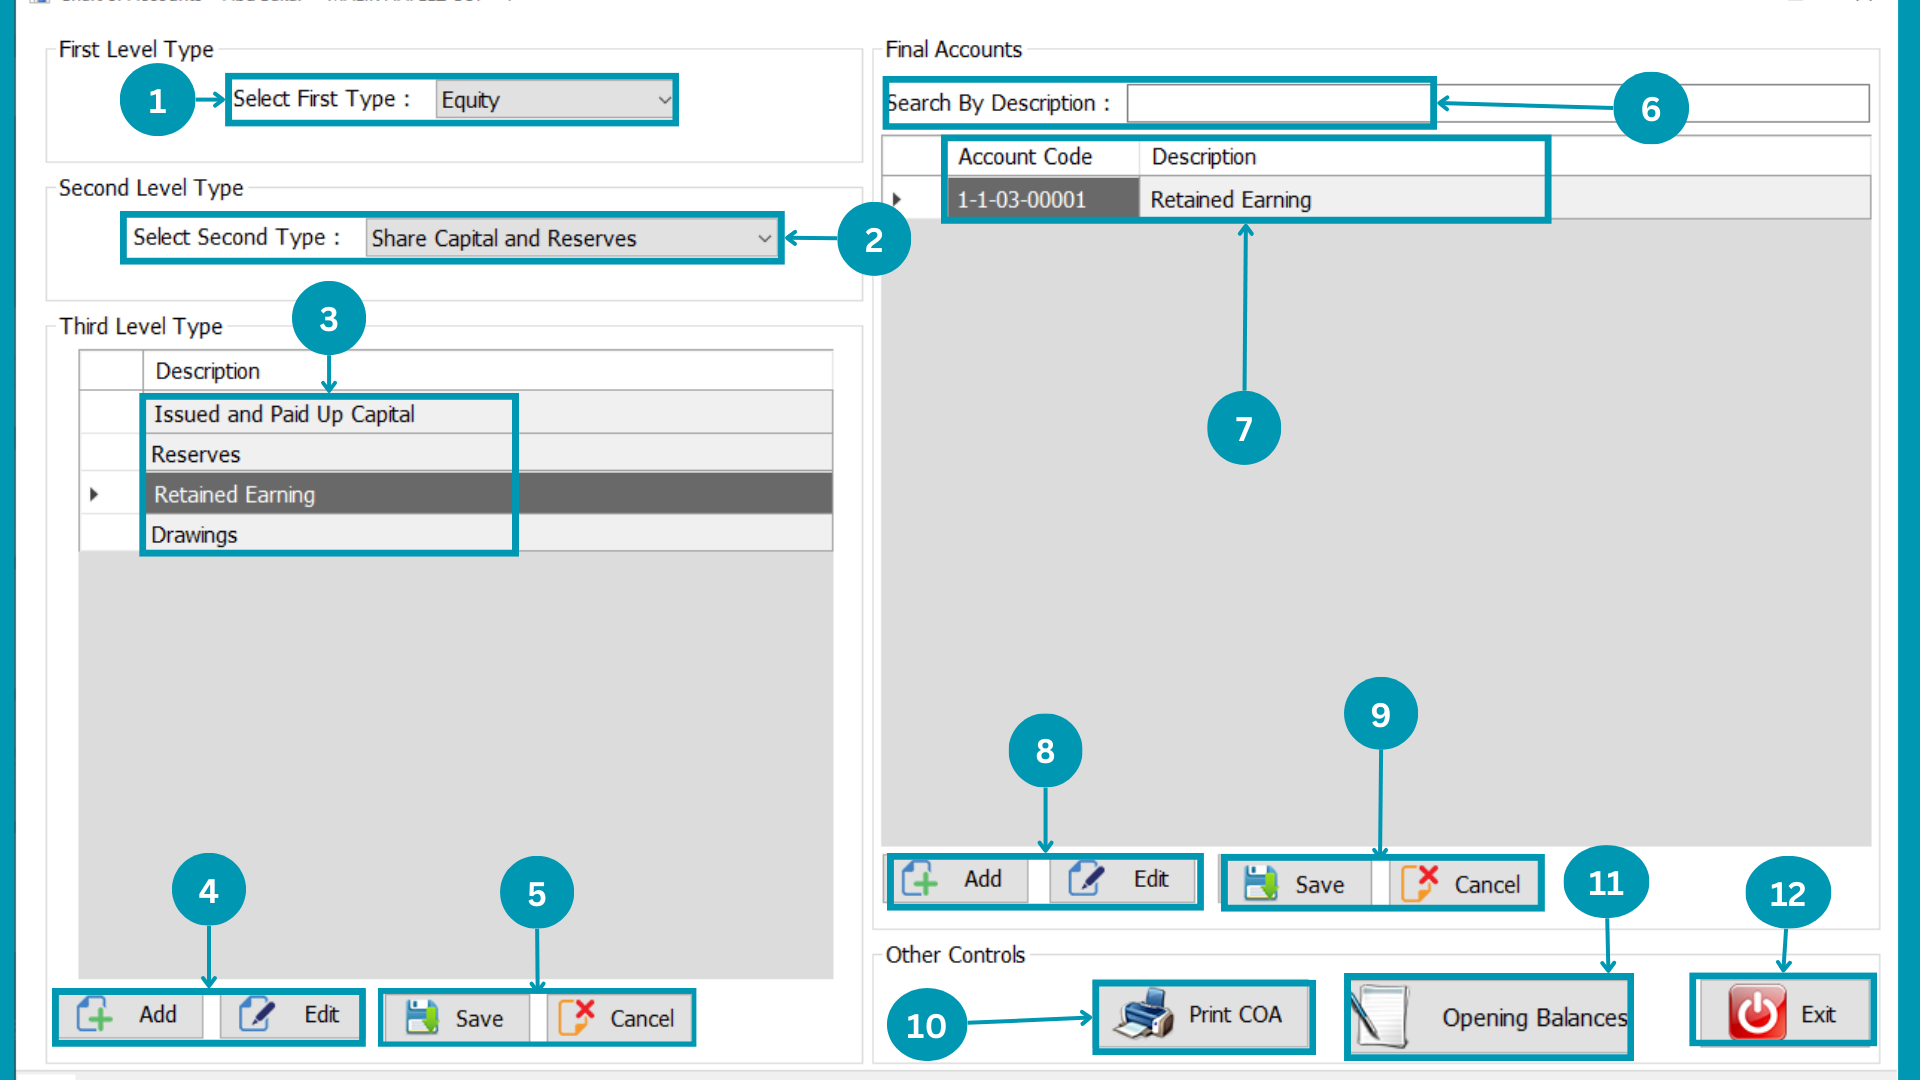
| 01 | Select First level head of Account's type.
|
| 02 | Select Second level head of Account's type.
|
| 03 |  Select Third level head of Accounts "Retained Earning". Select Third level head of Accounts "Retained Earning".
|
| 04 | Hit the Add Or Edit Button to change third-level heads. |
| 05 | After Clicking on Add or Edit Select "Save" or "Cancel" Button to close.
|
| 06 |
Search the Added heads by writing in the search bar |
| 07 |  Select Final Accounts in Retained Earning want to Edit. Select Final Accounts in Retained Earning want to Edit. |
| 08 |
Click Edit to rename existing head and Click Add to Enter new. |
| 09 | After Clicking on Add or Edit Select "Save" or "Cancel" Button to close.
|
| 10 |
|
| 11 |
|
Drawings
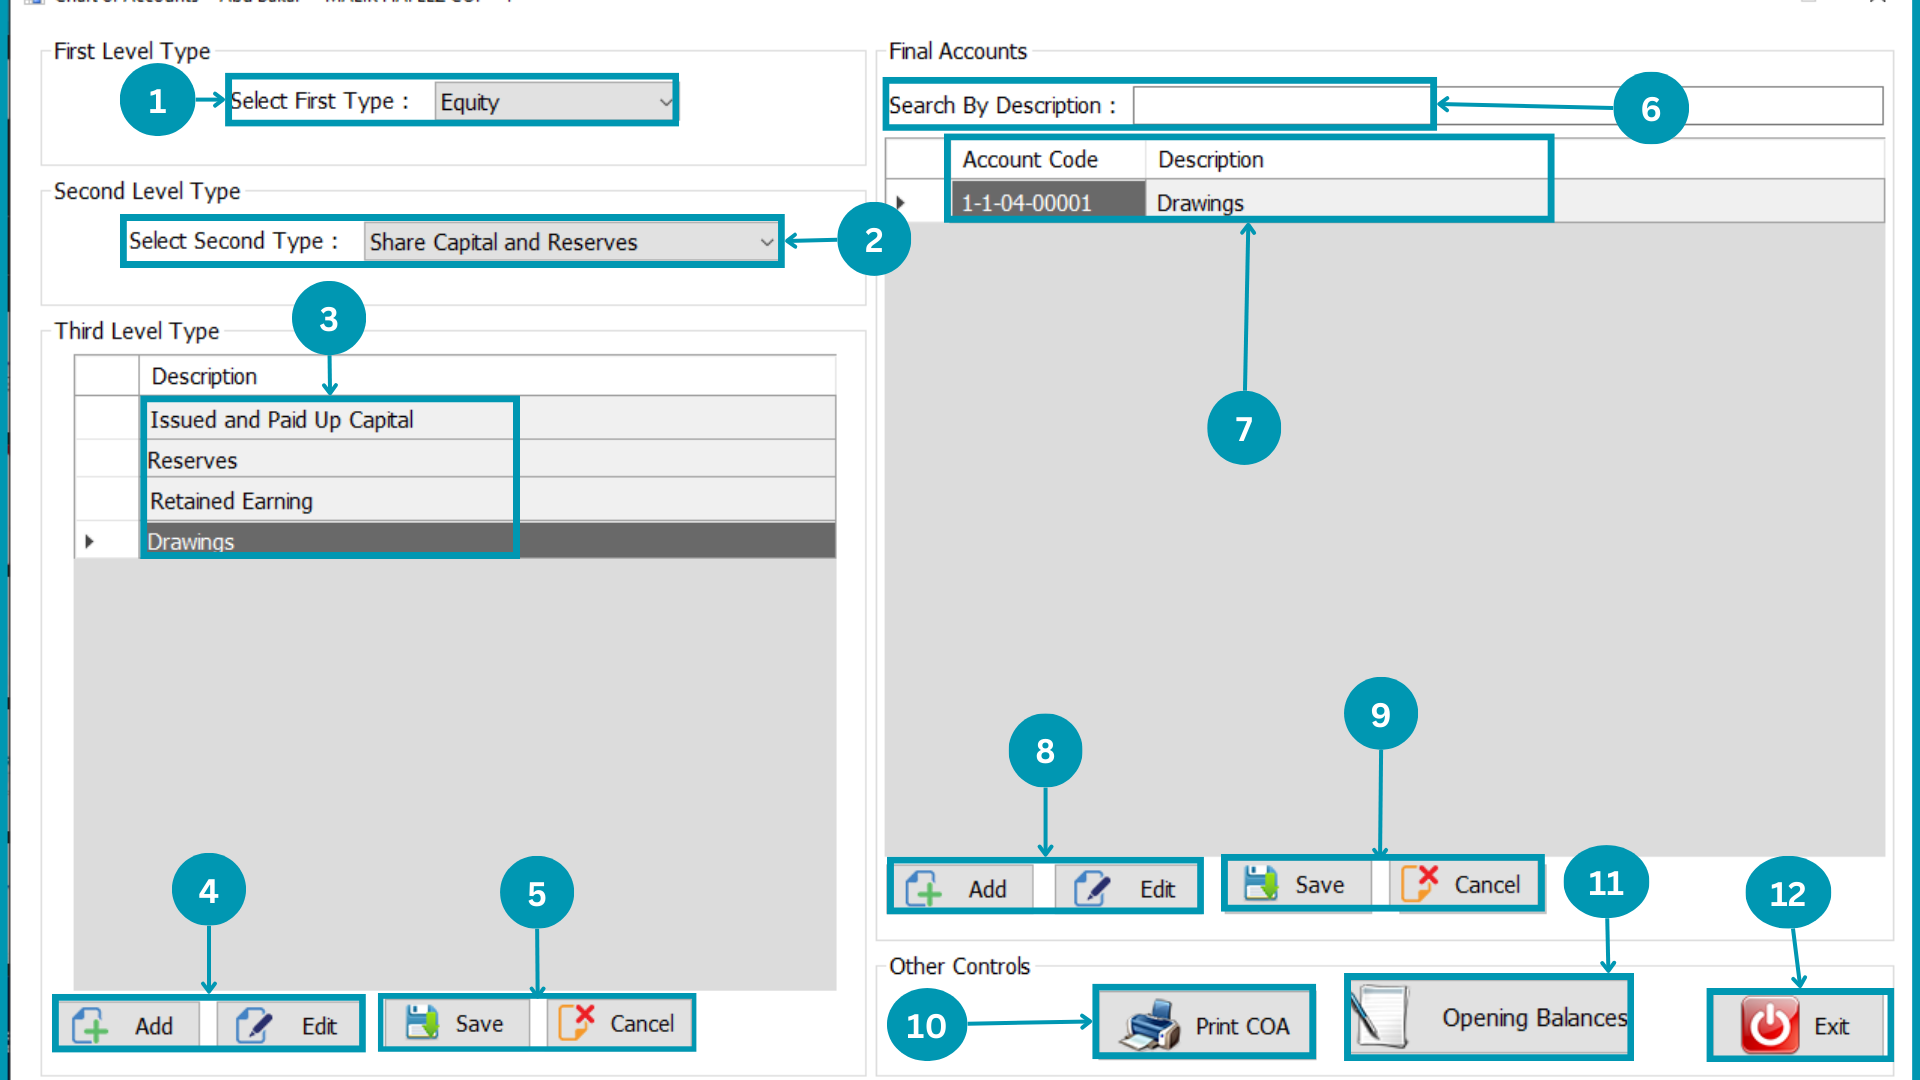
| 01 | Select First level head of Account's type.
|
| 02 | Select Second level head of Account's type.
|
| 03 |  Select Third level head of Accounts "Drawings". Select Third level head of Accounts "Drawings".
|
| 04 | Hit the Add Or Edit Button to change third-level heads. |
| 05 | After Clicking on Add or Edit Select "Save" or "Cancel" Button to close.
|
| 06 |
Search the Added heads by writing in the search bar |
| 07 |  Select Final Accounts in Drawings want to Edit. Select Final Accounts in Drawings want to Edit. |
| 08 |
Click Edit to rename existing head and Click Add to Enter new. |
| 09 | After Clicking on Add or Edit Select "Save" or "Cancel" Button to close.
|
| 10 |
|
| 11 |
|
As Same other heads of Accounts will be customize.
MAB BIZ SOLUTIONS
Customers & Suppliers
Customers & Suppliers
Customers wise mechanism of treatment and Customers & Suppliers details will be explained in this set.
Following pages usage is explained in this segment
- Customers
- Suppliers
- Cash Customers
- Cusstomer Settings
- Supplier Setting
- Upload Memo vendor Donors
- Upload Memo Donors
Customers-Generals
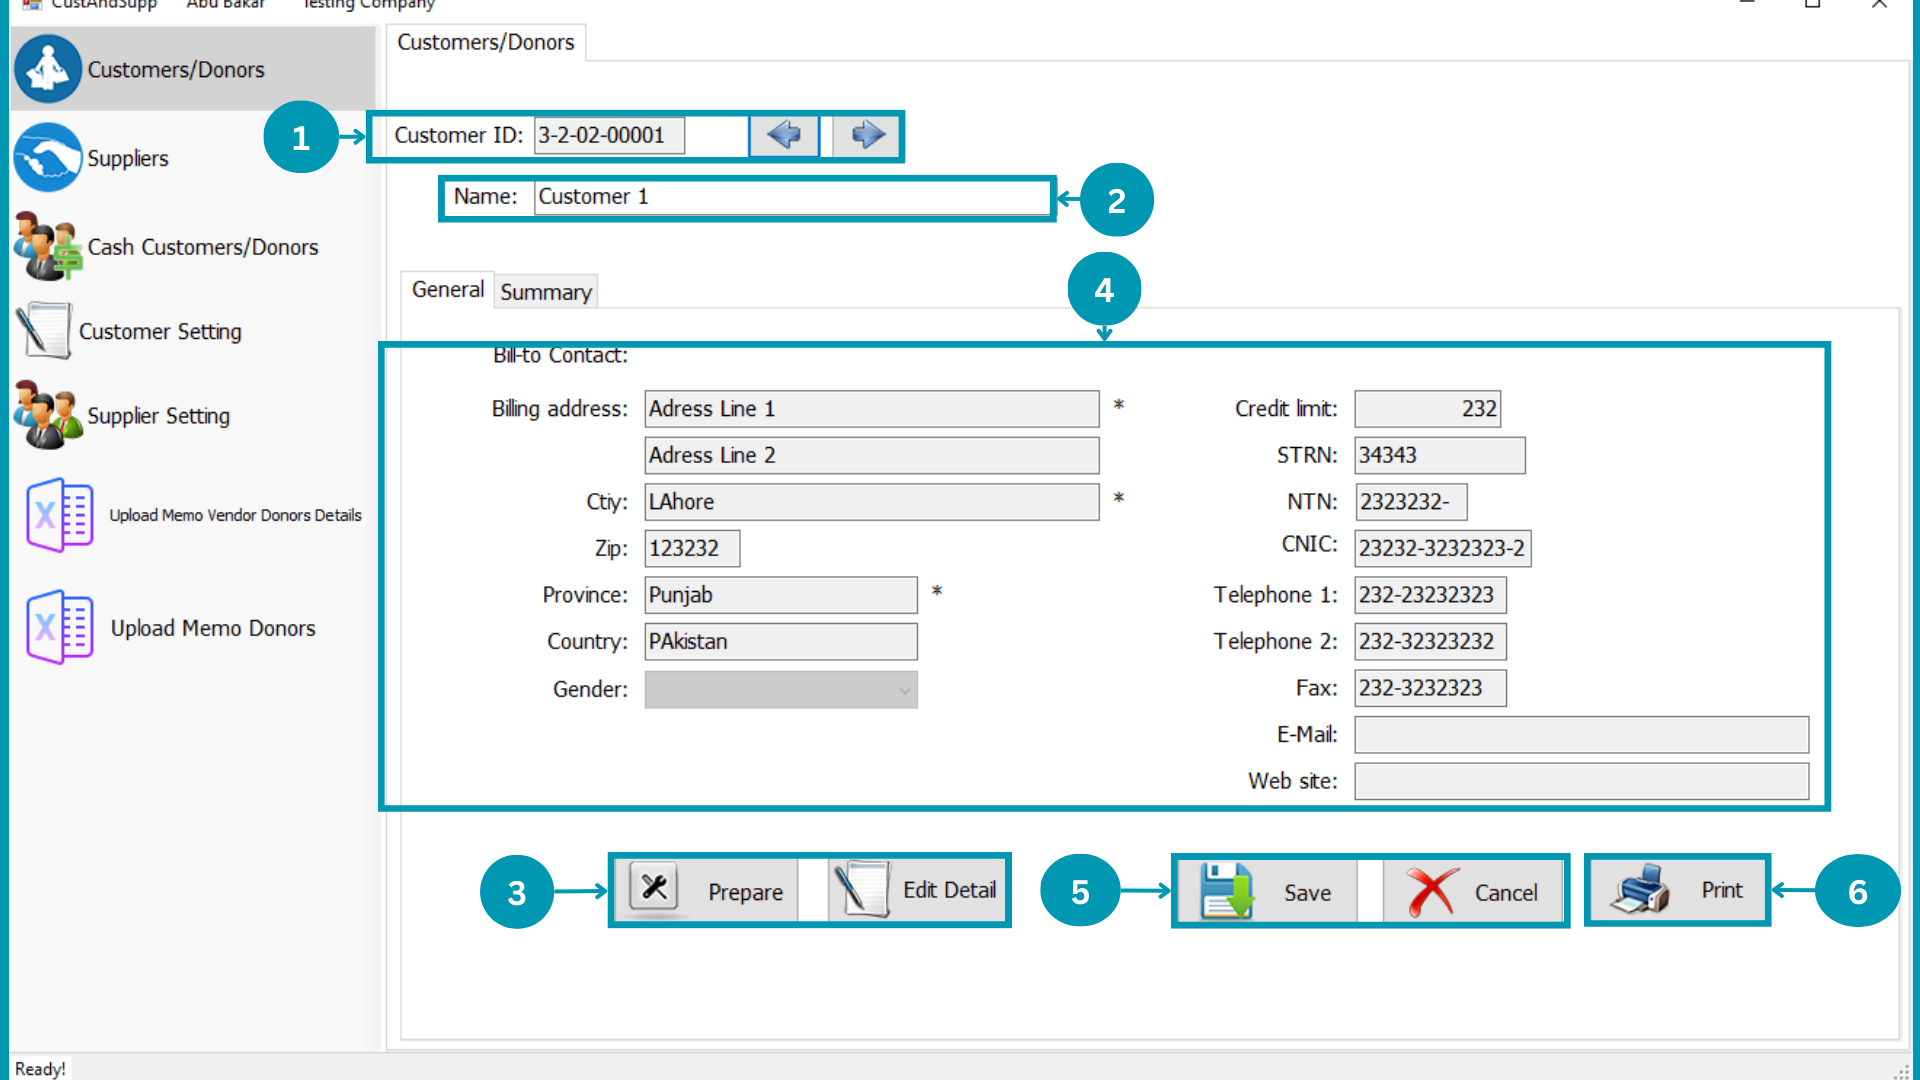
| 01 |  Forward and Backward Customers list, Initially it will be on One. Forward and Backward Customers list, Initially it will be on One.
|
| 02 | Search Customer by name, and loaded customer name will be displayed here.
|
| 03 |  Select "Prepare" to enter data and "Edit detail" to change customers data. Select "Prepare" to enter data and "Edit detail" to change customers data. |
| 04 | 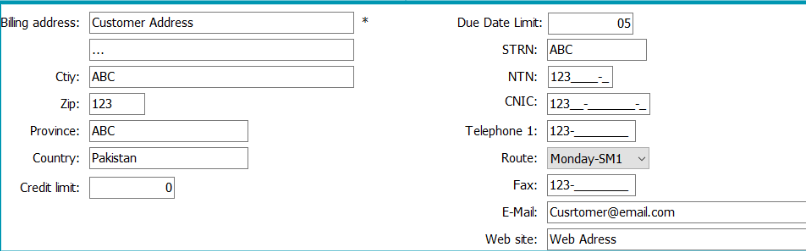 Write Customer details in respective boxes. Write Customer details in respective boxes. |
| 05 | Click the "Save" or "Cancel". |
| 06 | Print the viewing Customers details by Clicking Print.
|
Customers Summary
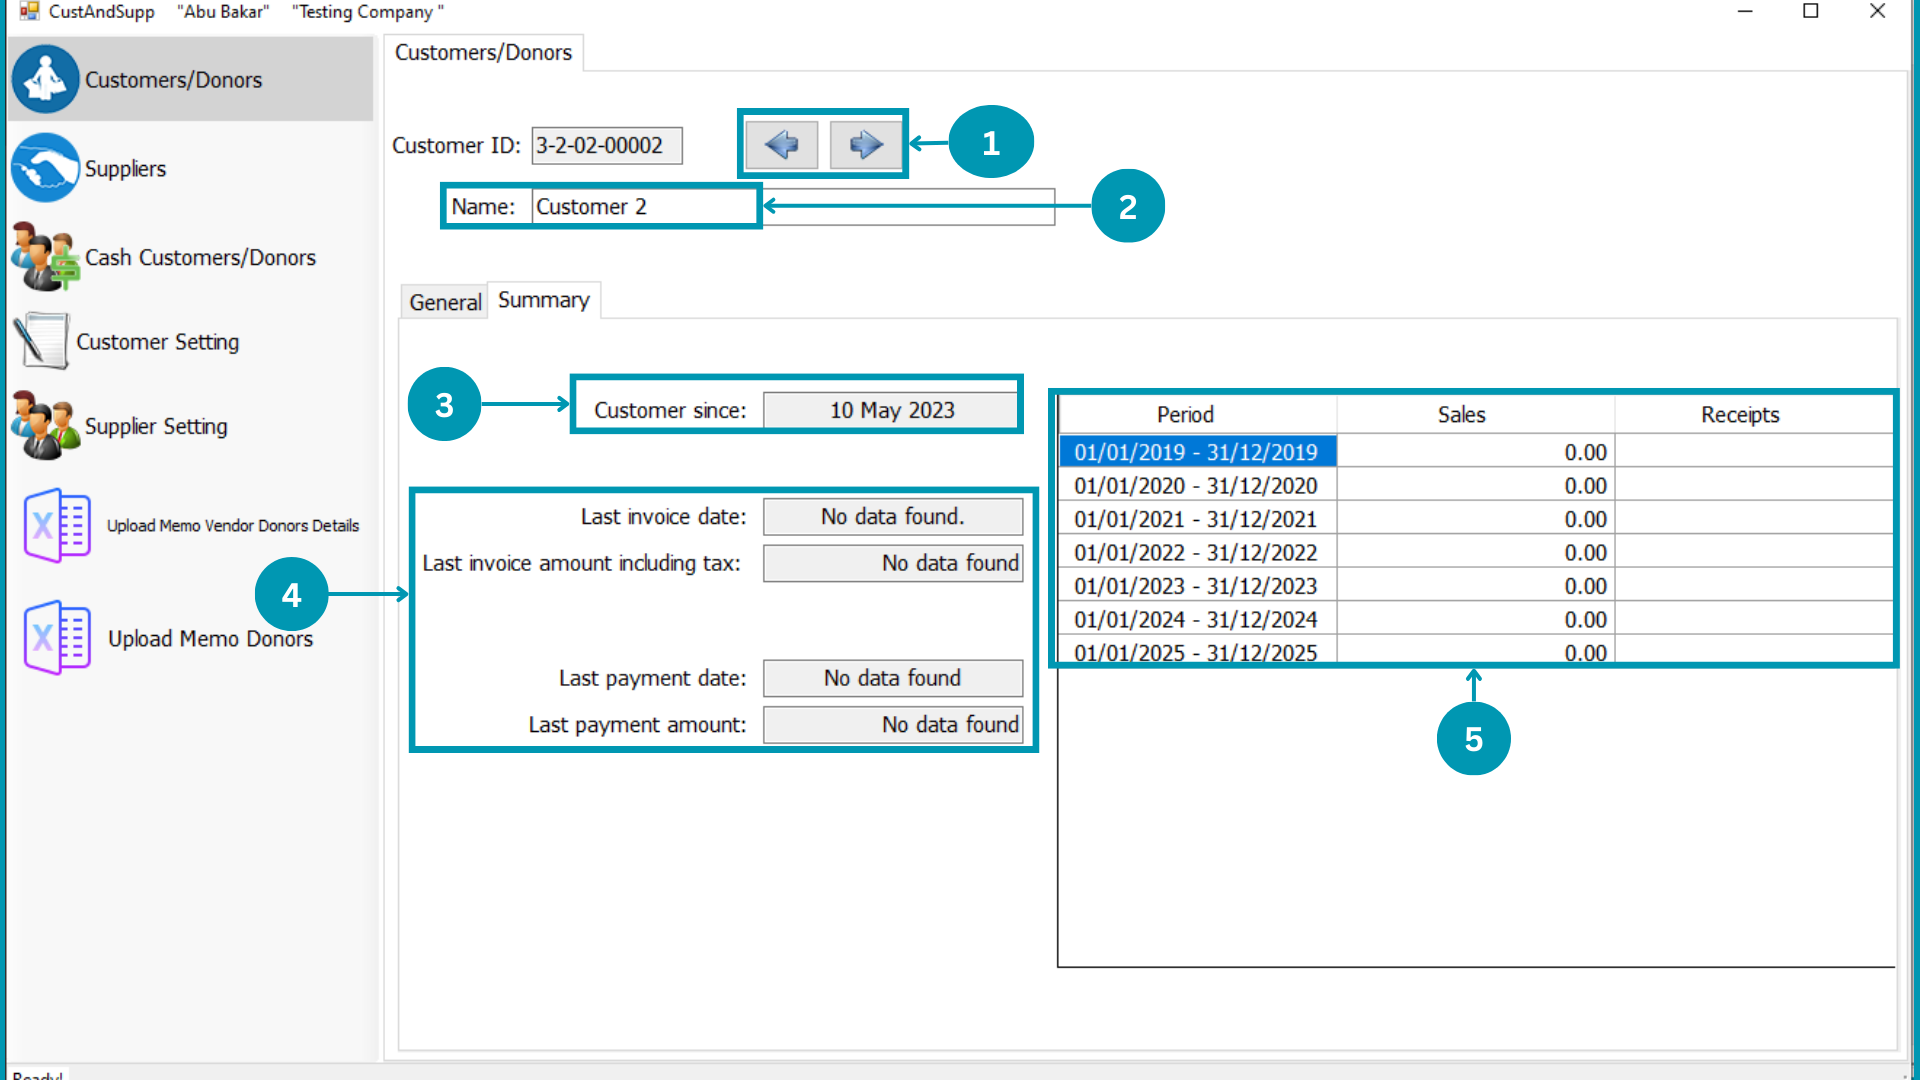
| 01 | Forward and Backward Customers list, Initially it will be on One.
|
| 02 | Search Customer by name, and loaded customer name will be displayed here.
|
| 03 |  Customer Since shows date of customer affiliation. Customer Since shows date of customer affiliation.
|
| 04 | |
| 05 |  Financial period wise Customers data will be shown there. Financial period wise Customers data will be shown there. |
Suppliers
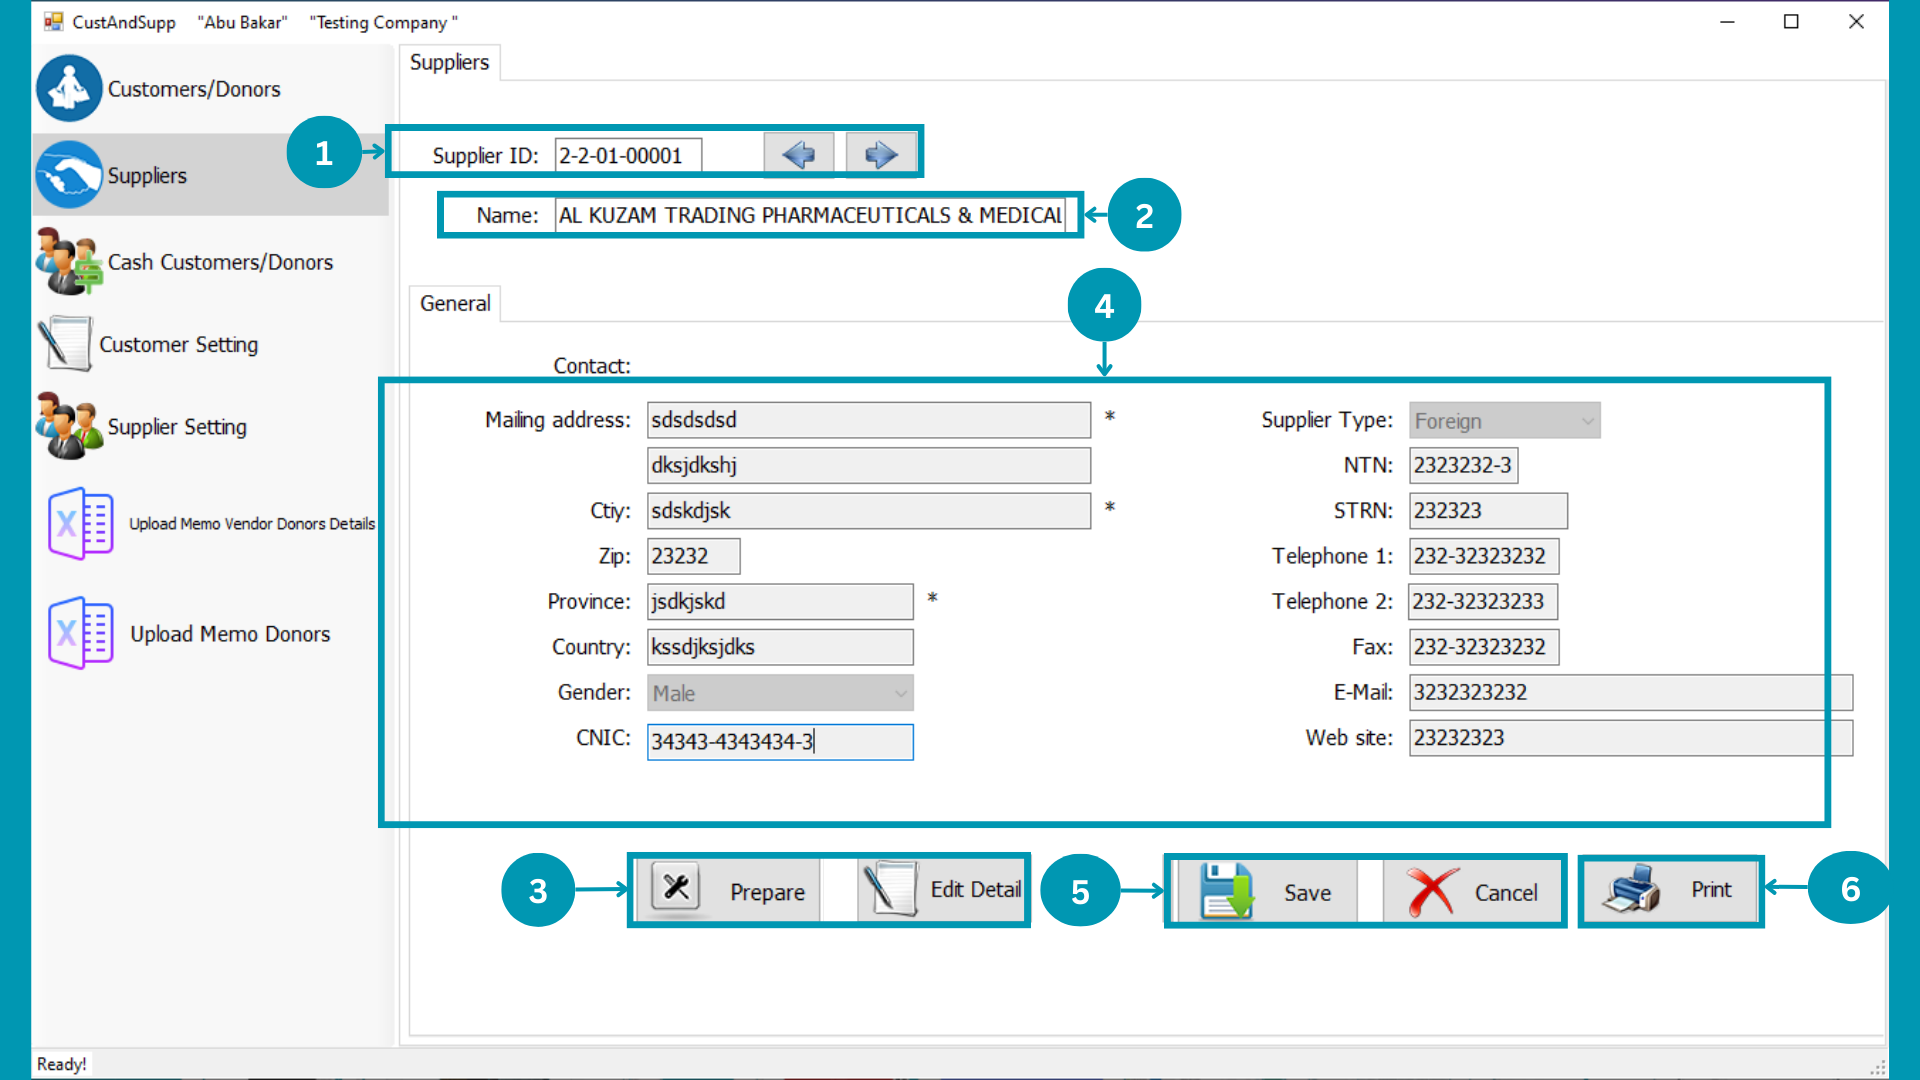
| 01 |  Forward and Backward Suppliers list, Initially it will be on One. Forward and Backward Suppliers list, Initially it will be on One.
|
| 02 |  Search Supplier by name, and loaded customer name will be displayed here. Search Supplier by name, and loaded customer name will be displayed here.
|
| 03 | Select "Prepare" to enter data and "Edit detail" to change Supplier data. |
| 04 |  Write Supplier details in respective boxes. Write Supplier details in respective boxes. |
| 05 | Click the "Save" or "Cancel". |
| 06 | Print the viewing Customers details by Clicking Print.
|
Cash Customer
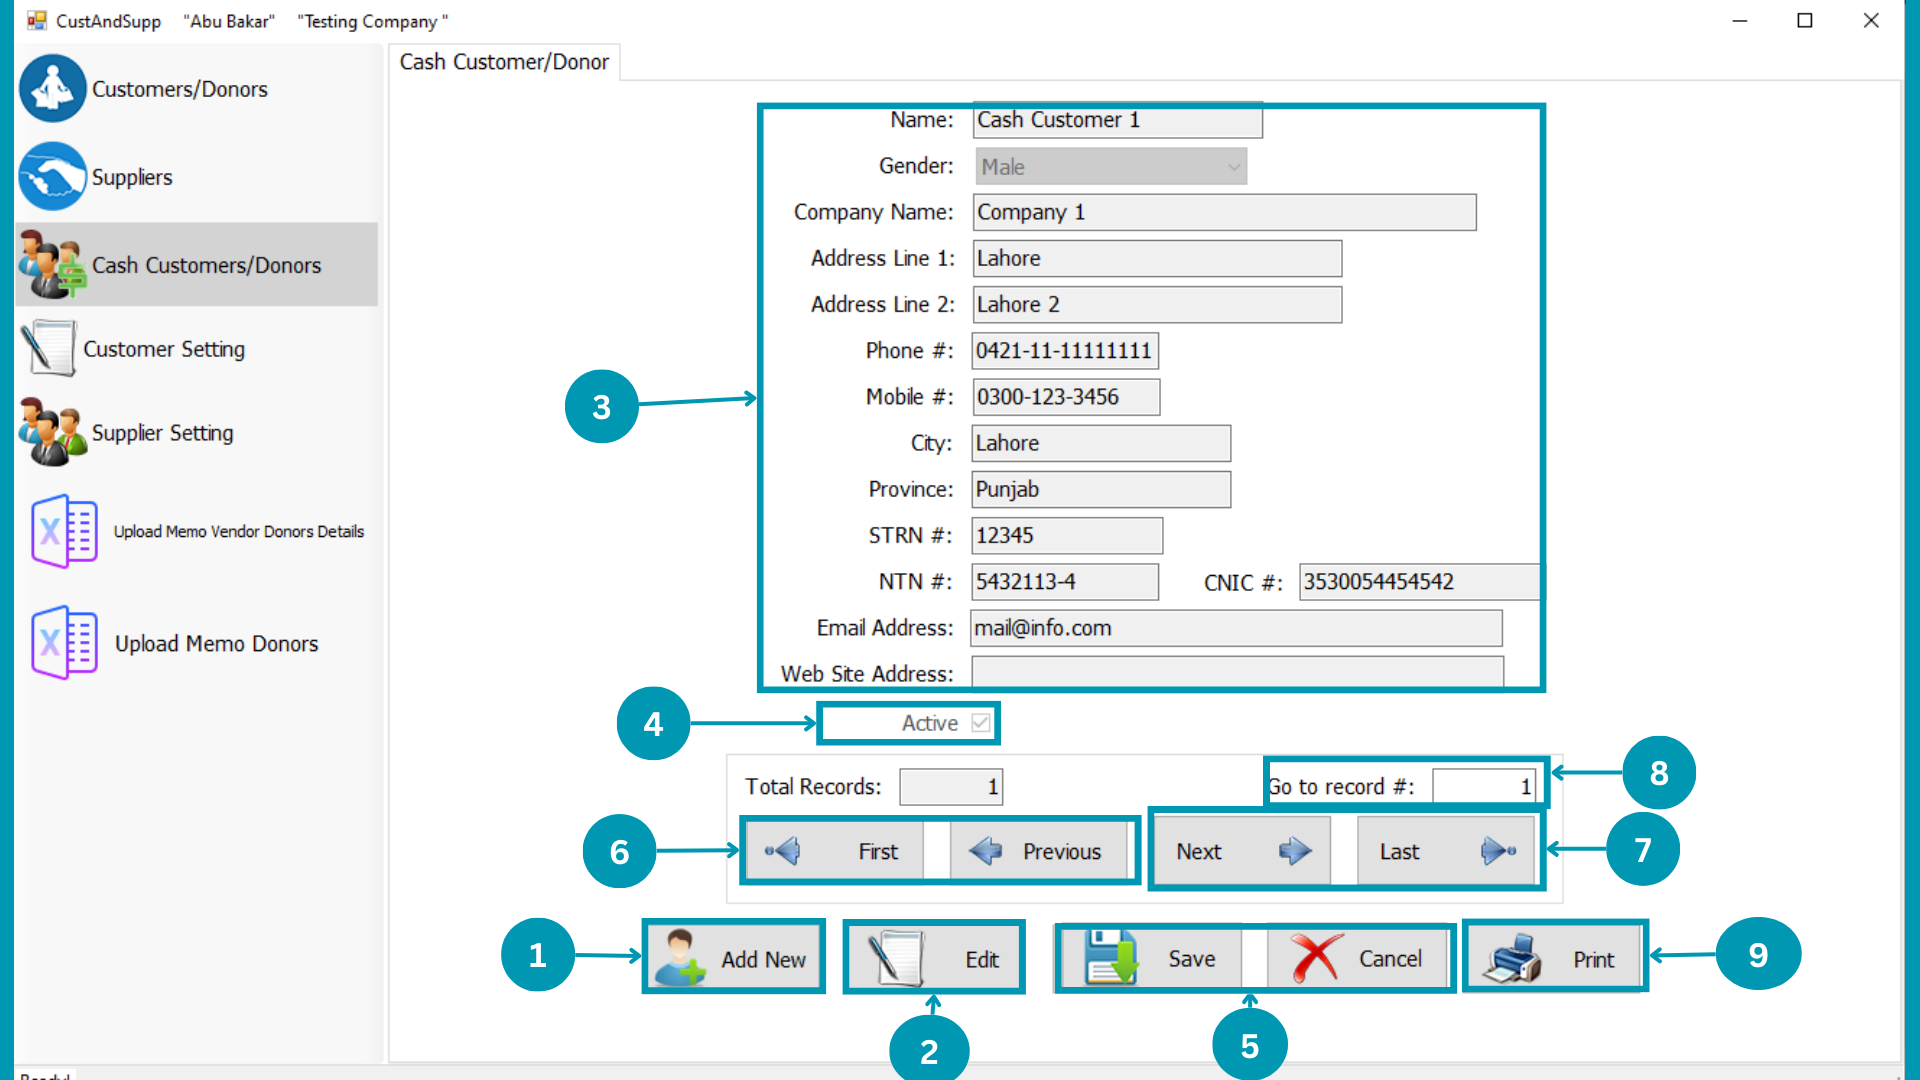
| 01 |  Click Add New to add cash customer. Click Add New to add cash customer.
|
| 02 |  Click Edit to Edit displayed cash customer. Click Edit to Edit displayed cash customer.
|
| 03 |  Write cash customers details in respective boxes. Write cash customers details in respective boxes.
|
| 04 |  Check Active Check Active
|
| 05 | Click the "Save" or "Cancel".
|
| 06 |  Backward the cash customer list through this. Backward the cash customer list through this.
|
| 07 |  forward the cash customer list through this. forward the cash customer list through this.
|
| 08 |  Write the number to go on that number record. Write the number to go on that number record.
|
| 09 | Print the viewing Customers details by Clicking Print.
|
Customers Settings
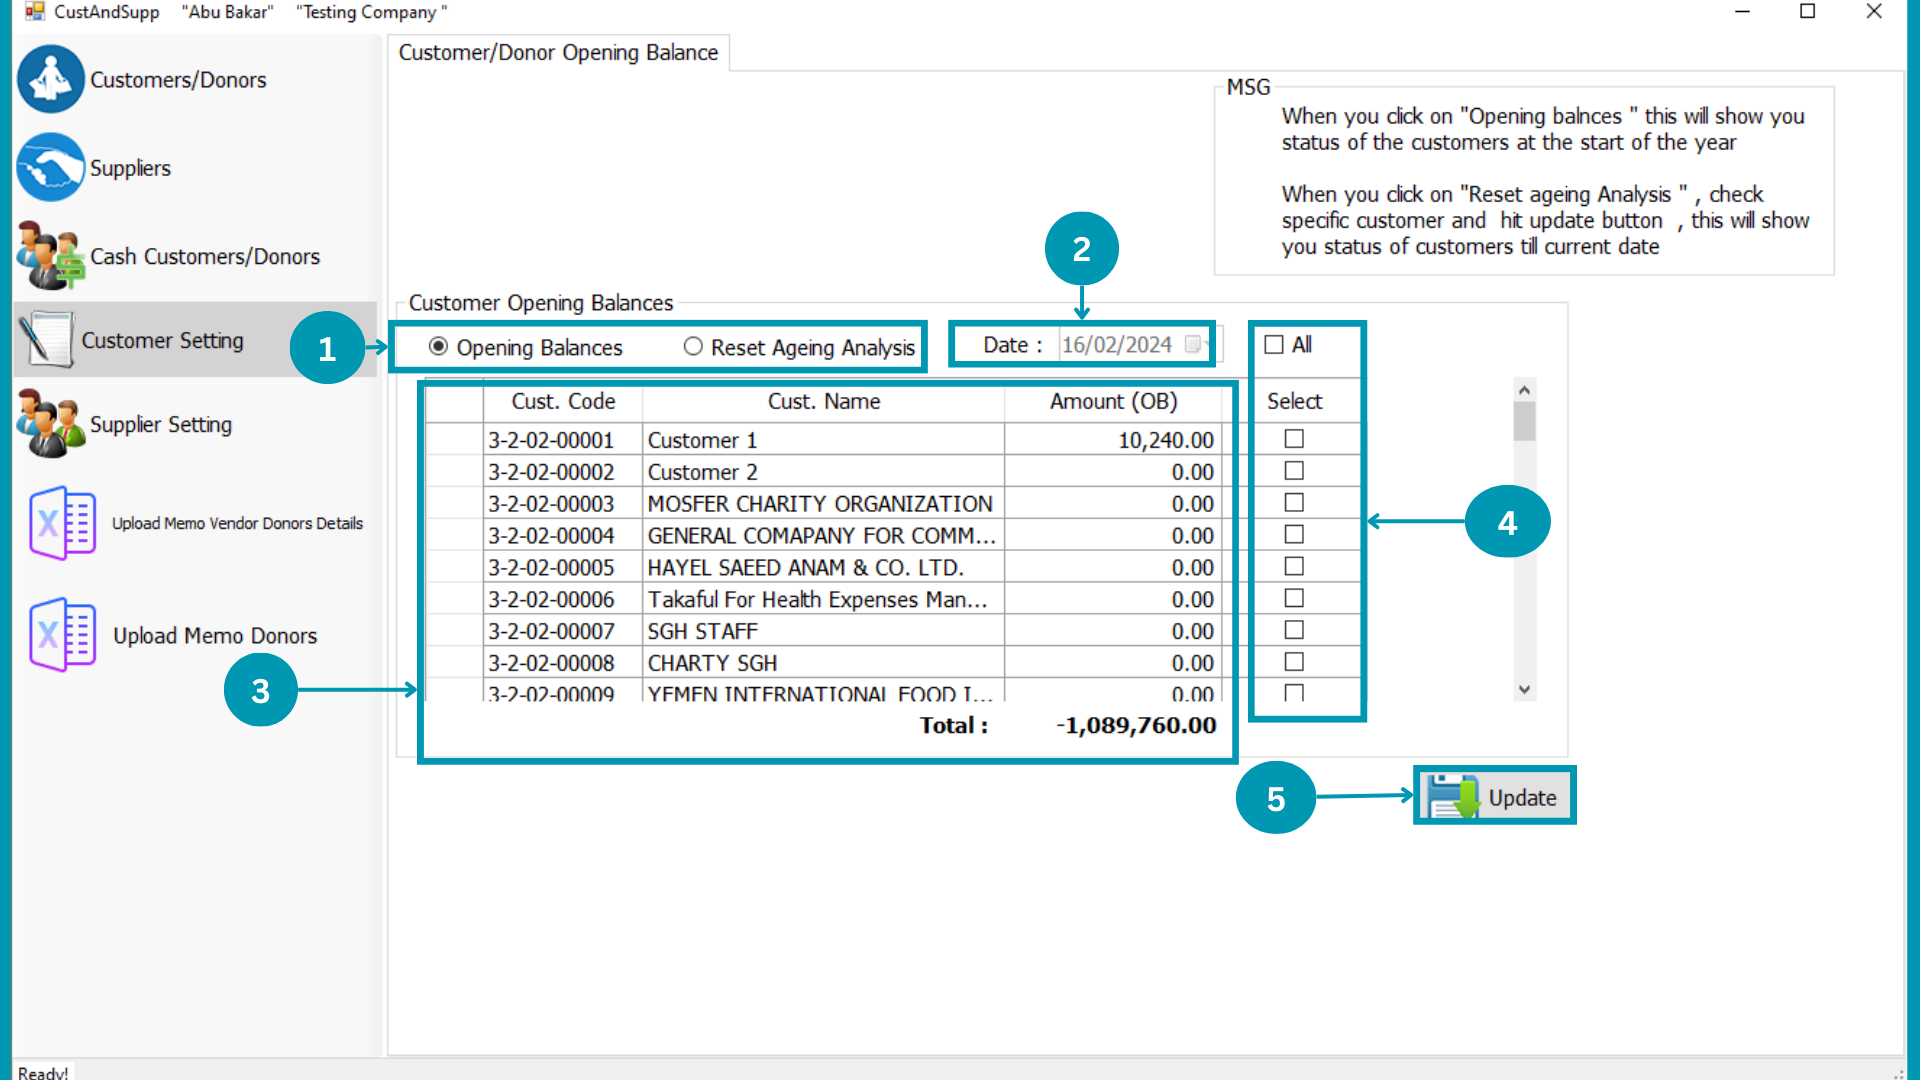
| 01 |  Select Opening Balance/ Reset Ageing Analysis to view customers wise till date. Select Opening Balance/ Reset Ageing Analysis to view customers wise till date.
|
| 02 | Select Transaction date.
|
| 03 |  Customers Name and Amount list will be shown in there. Customers Name and Amount list will be shown in there.
|
| 04 |  Select All by click on "All" check box or Select Selective customers by click on respective select box. Select All by click on "All" check box or Select Selective customers by click on respective select box.
|
| 05 |  Hit
the Update Button. Hit
the Update Button. |
Suppliers Settings
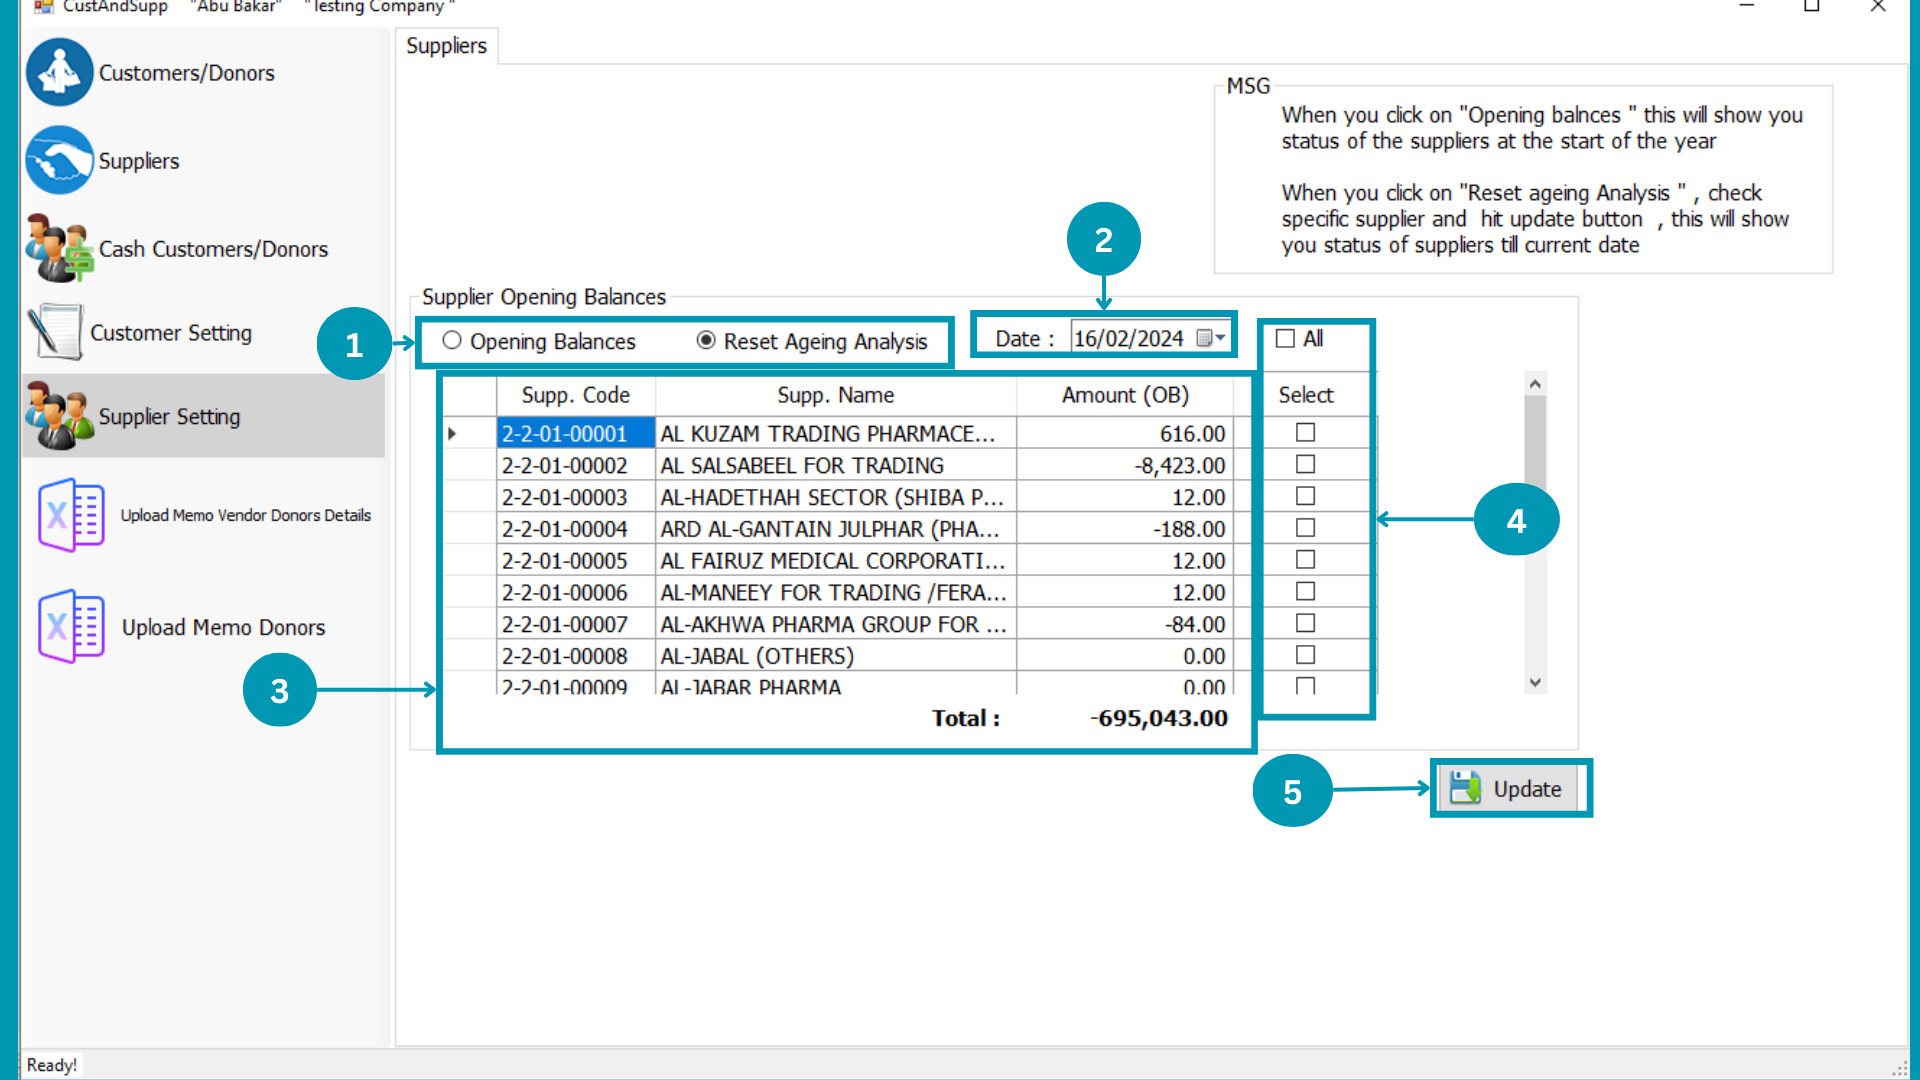
| 01 | Select Opening Balance/ Reset Ageing Analysis to view customers wise till date.
|
| 02 | Select Transaction date.
|
| 03 | Customers Name and Amount list will be shown in there.
|
| 04 | Select All by click on "All" check box or Select Selective customers by click on respective select box.
|
| 05 | Hit
the Update Button. |
Update Memo Vendor Donors
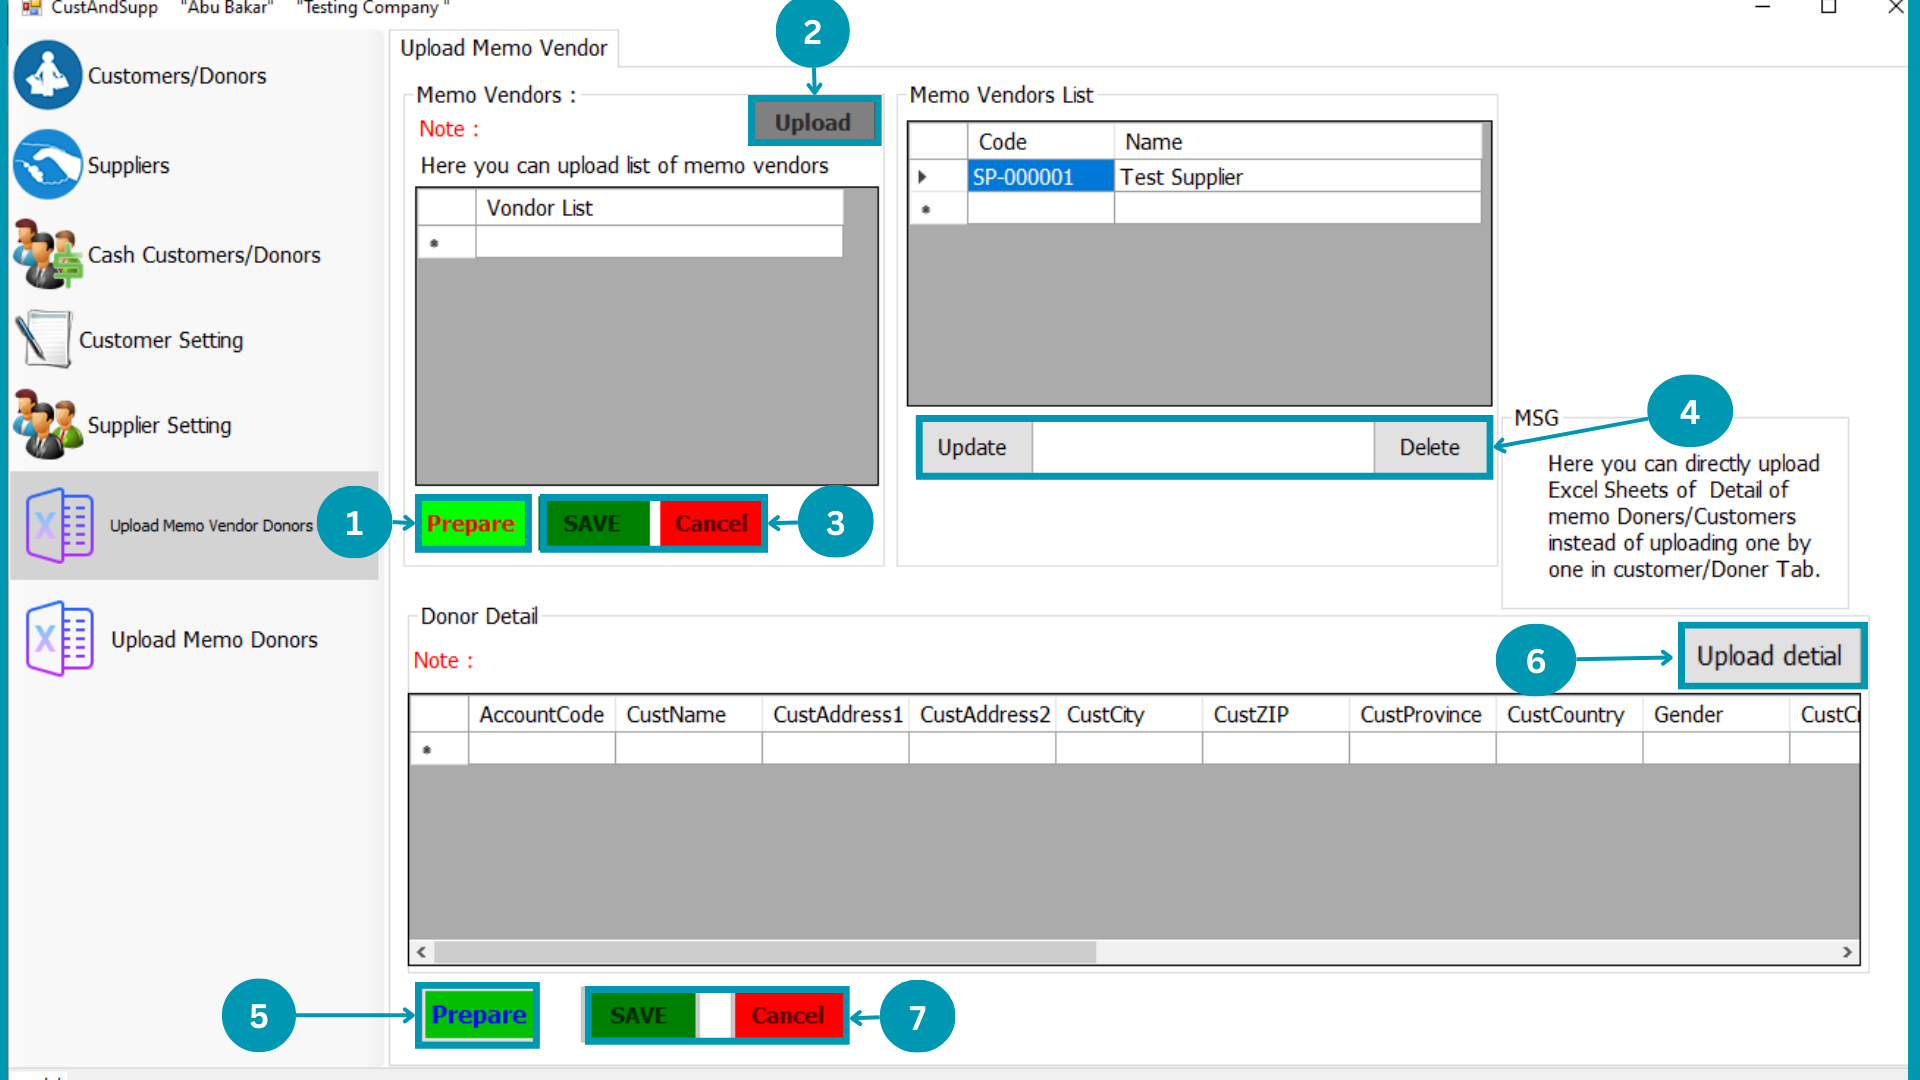
| 01 |  Click on “Prepare” to start data entry. Click on “Prepare” to start data entry. |
| 02 |  Click on upload and choose the file to upload through excel sheet. Click on upload and choose the file to upload through excel sheet.
|
| 03 |  Click on Save or cancel. Click on Save or cancel.
|
| 04 |  Select and change name of Vendors then Click on Update to save uploaded vendors list or delete to remove row. Select and change name of Vendors then Click on Update to save uploaded vendors list or delete to remove row.
|
| 05 | Click on “Prepare” to start Donor detail entry. |
| 06 |  Click on upload and choose the file to upload through excel sheet for donors details. Click on upload and choose the file to upload through excel sheet for donors details.
|
| 07 | Click on Save or cancel to store details.
|
Customers Wise Prices
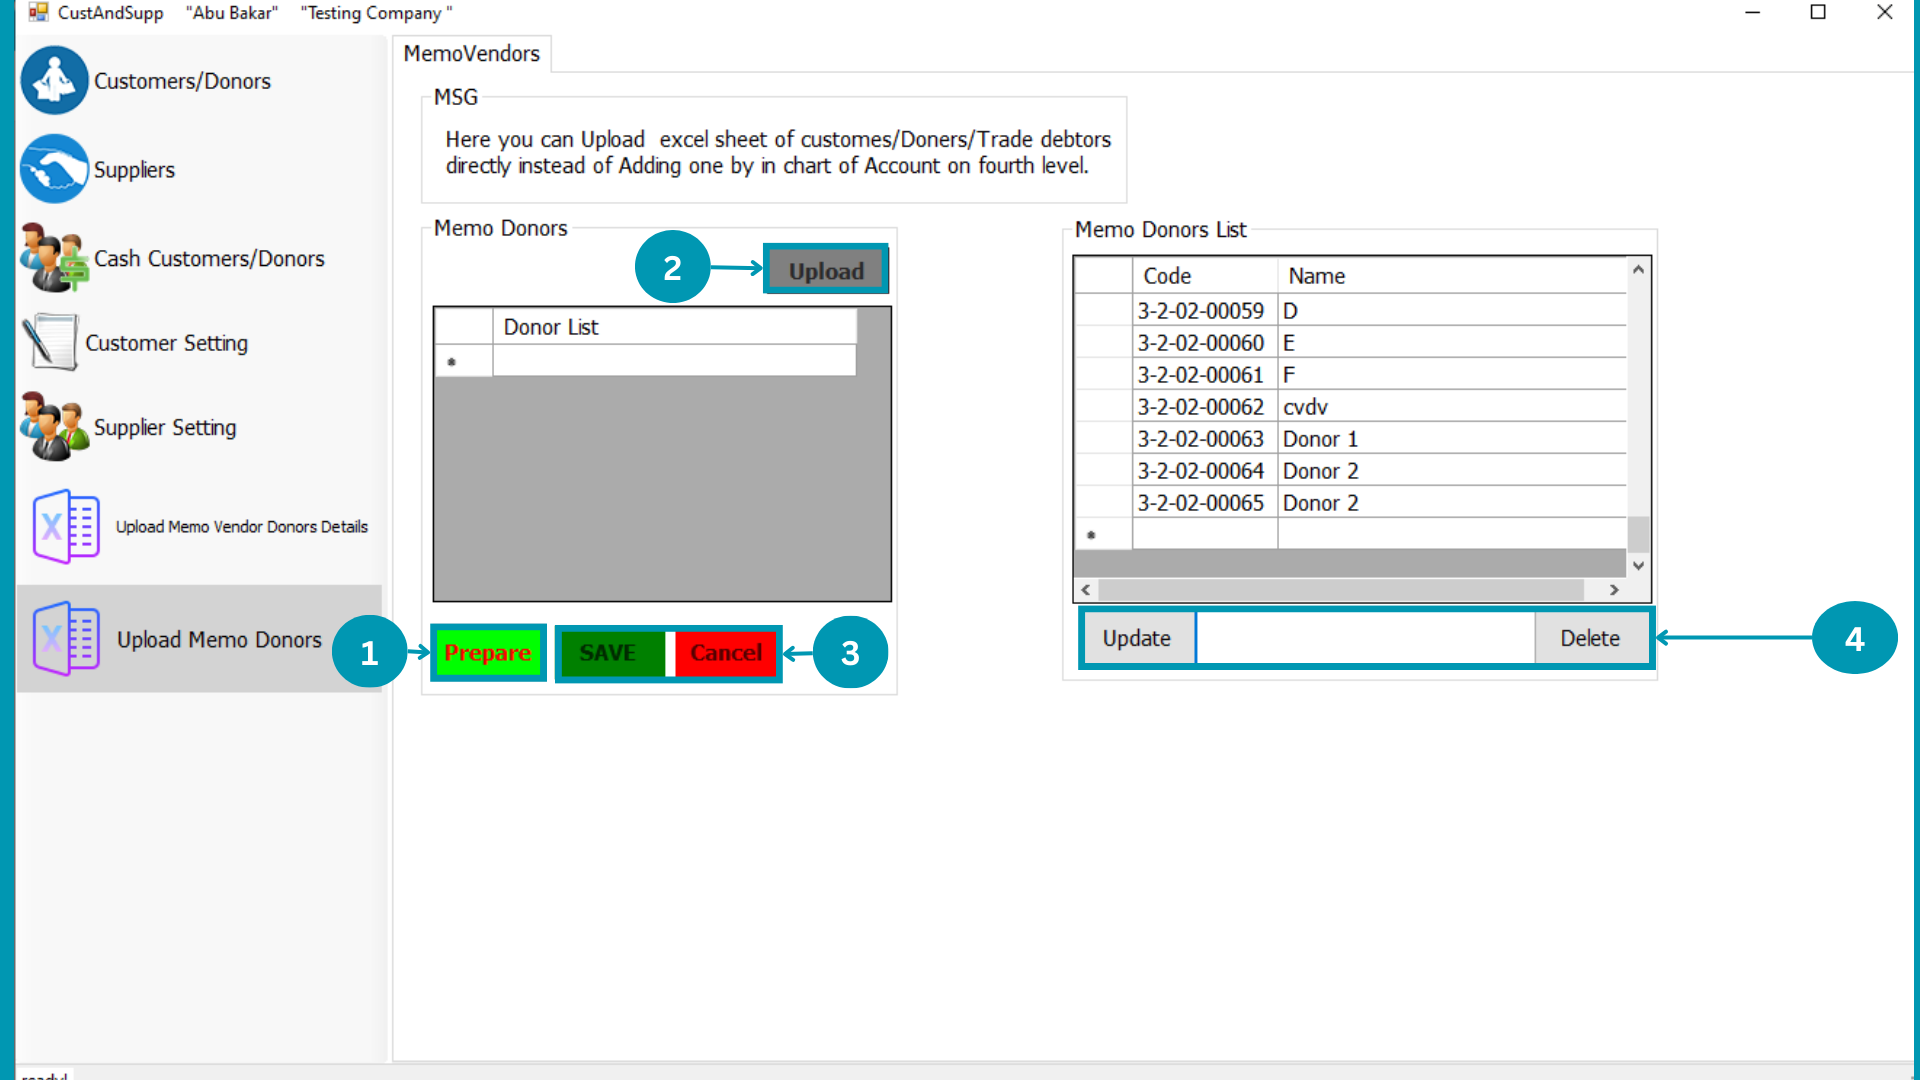
| 01 | Click on “Prepare” to entring Donors etc directly. |
| 02 | Click on upload and choose formated file to upload through excel sheet.
|
| 03 | Click on Save or cancel.
|
| 04 | Select and change name of Donors then Click on Update to save uploaded Donors list or delete to remove row.
|
MAB BIZ SOLUTIONS
Reports
Reports
Categorical reports, sequence of generate and displayed information refrence will be instructed below.
Following pages usage is explained in this segment
- Accounts
- Sale & Expanses
- Consumable
- Payable
Accounts Report
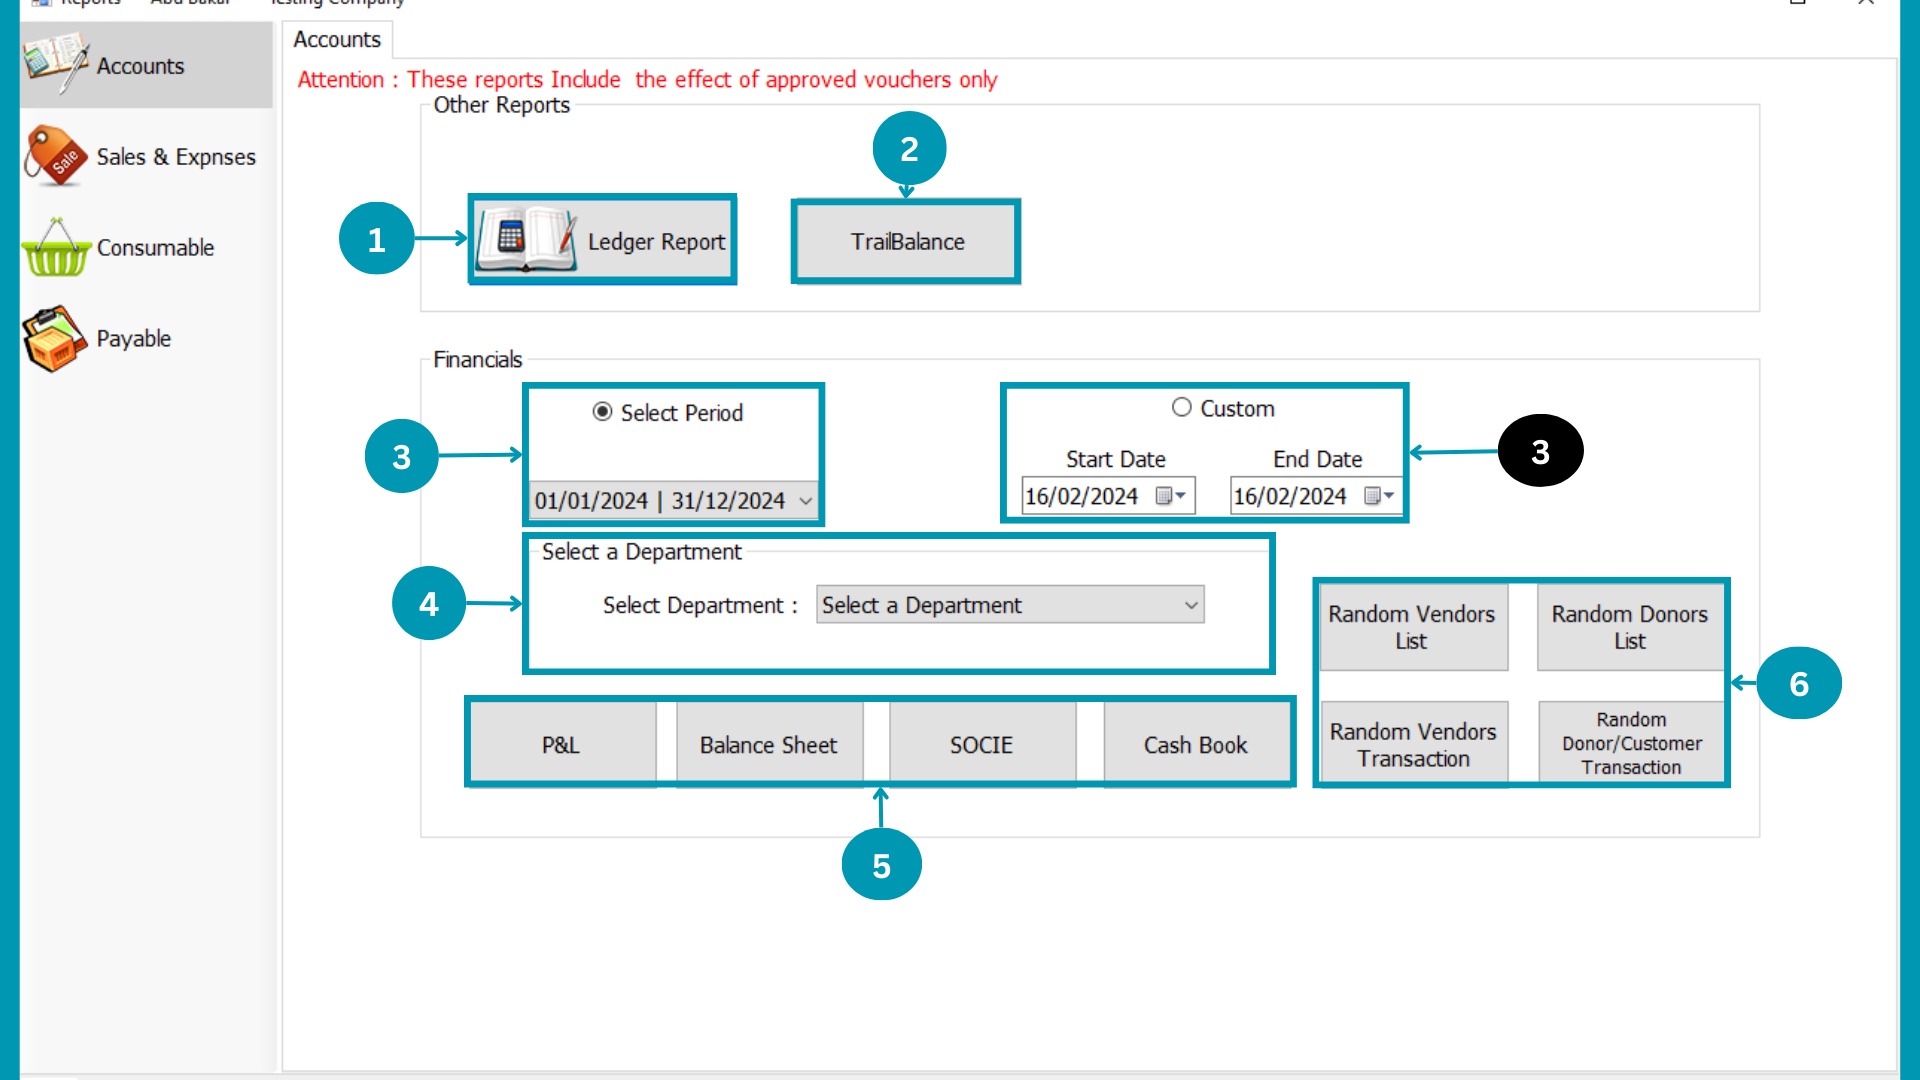
| 01 | 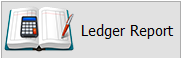 Click On Ledger Report. Click On Ledger Report.
|
| 02 | 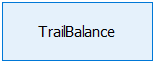 Click on TrailBalance. Click on TrailBalance.
|
| 03 |  Select Period of reports and Custom for a particular tenure. Select Period of reports and Custom for a particular tenure.
|
| 04 | Select
|
| 05 |  Select any from P&L, Balance Sheet, SOICE and Cash Flow for reporting. Select any from P&L, Balance Sheet, SOICE and Cash Flow for reporting.
|
| 06 | 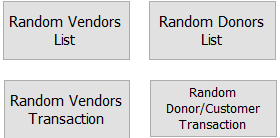 Click on Random Donors or vendors reports to view it. Click on Random Donors or vendors reports to view it.
|
Ledger Report

| 01 |  Select Accounts Type for ledger report. Select Accounts Type for ledger report.
|
| 02 |  Select Custom for particular accounts and Select head to all Accounts of that head. Select Custom for particular accounts and Select head to all Accounts of that head.
|
| 03 |  Select Location or All location will be default. Select Location or All location will be default.
|
| 04 | Select Period of reports and Custom for particular tenure.
|
| 05 |  Select Financial period for Select period and Start to end date for Custom. Select Financial period for Select period and Start to end date for Custom.
|
| 06 |  Click Include Accounts With zero balance if you want add it in reports. Click Include Accounts With zero balance if you want add it in reports.
|
| 07 |  Click on Merge Load if you selected two or more accounts in custom or Click on LOAD. Click on Merge Load if you selected two or more accounts in custom or Click on LOAD.
|
Trial Balance

| 01 | Select Location or All location will be default.
|
| 02 | Select Period of reports and Custom for particular tenure.
|
| 03 | Select Financial period for Select period and Start to end date for Custom.
|
| 04 | 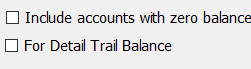 Click on Include Accounts with zero balance and Foe Detail TrailBalance if you want. Click on Include Accounts with zero balance and Foe Detail TrailBalance if you want.
|
| 05 | Hit
the Load Button. |
CashBook
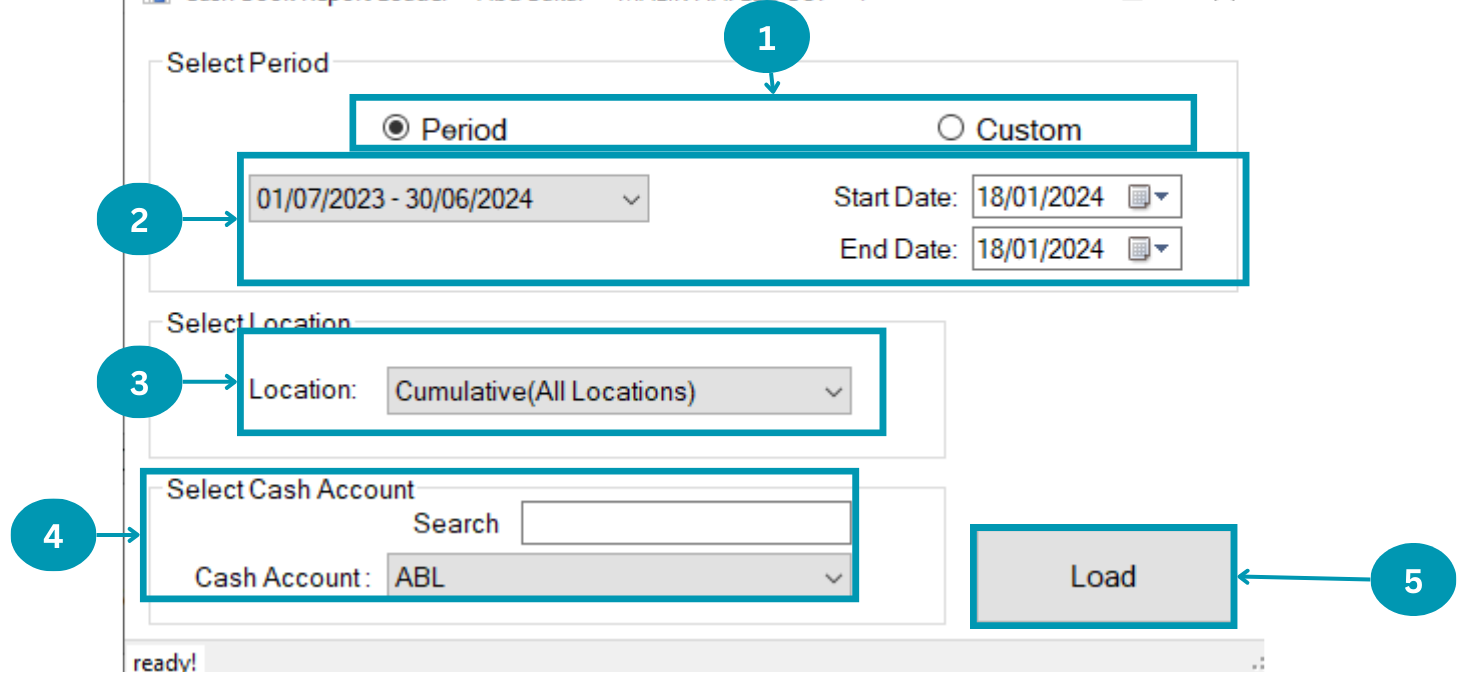
| 01 | Select Period of reports and Custom for particular tenure.
|
| 02 | Select Financial period for Select period and Start to end date for Custom.
|
| 03 | Select Location or All location will be default.
|
| 04 | 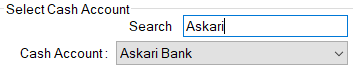 Select Cash Account for Cash Book report. Select Cash Account for Cash Book report. |
| 05 | Click the "Load". |
Sales Report
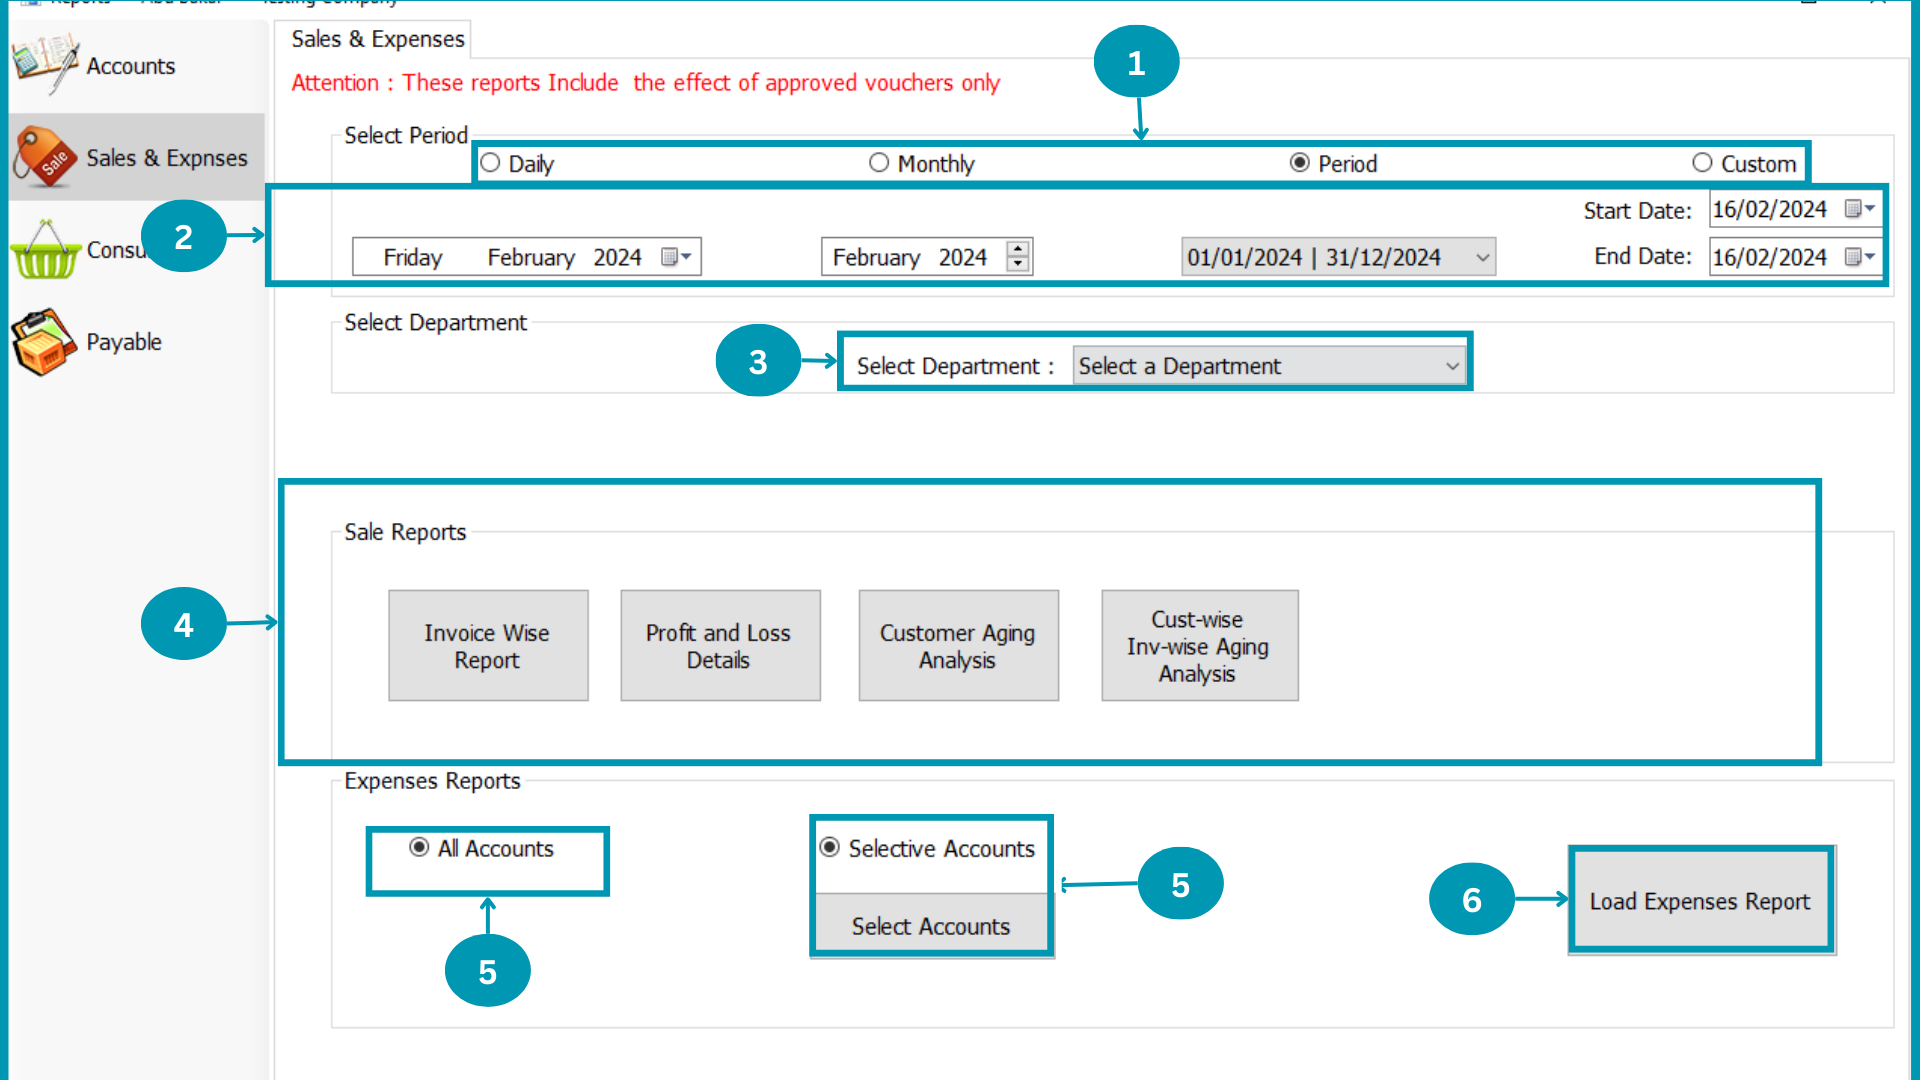
| 01 | Select reporting tenure period.
|
| 02 | Select time frame according to selected period type.
|
| 03 |
|
| 04 |  Choose the sales report's kind which you want to view. Choose the sales report's kind which you want to view.
|
| 05 |  Check the "All Accounts" to view Expenses report of all accounts. Check the "All Accounts" to view Expenses report of all accounts.
|
| 05 |  Check the "Selective Accounts"and select accounts to view the expense report of that accounts. Check the "Selective Accounts"and select accounts to view the expense report of that accounts.
|
| 06 |  Click The "Load Expenses Report " button. Click The "Load Expenses Report " button.
|
Consumable Report
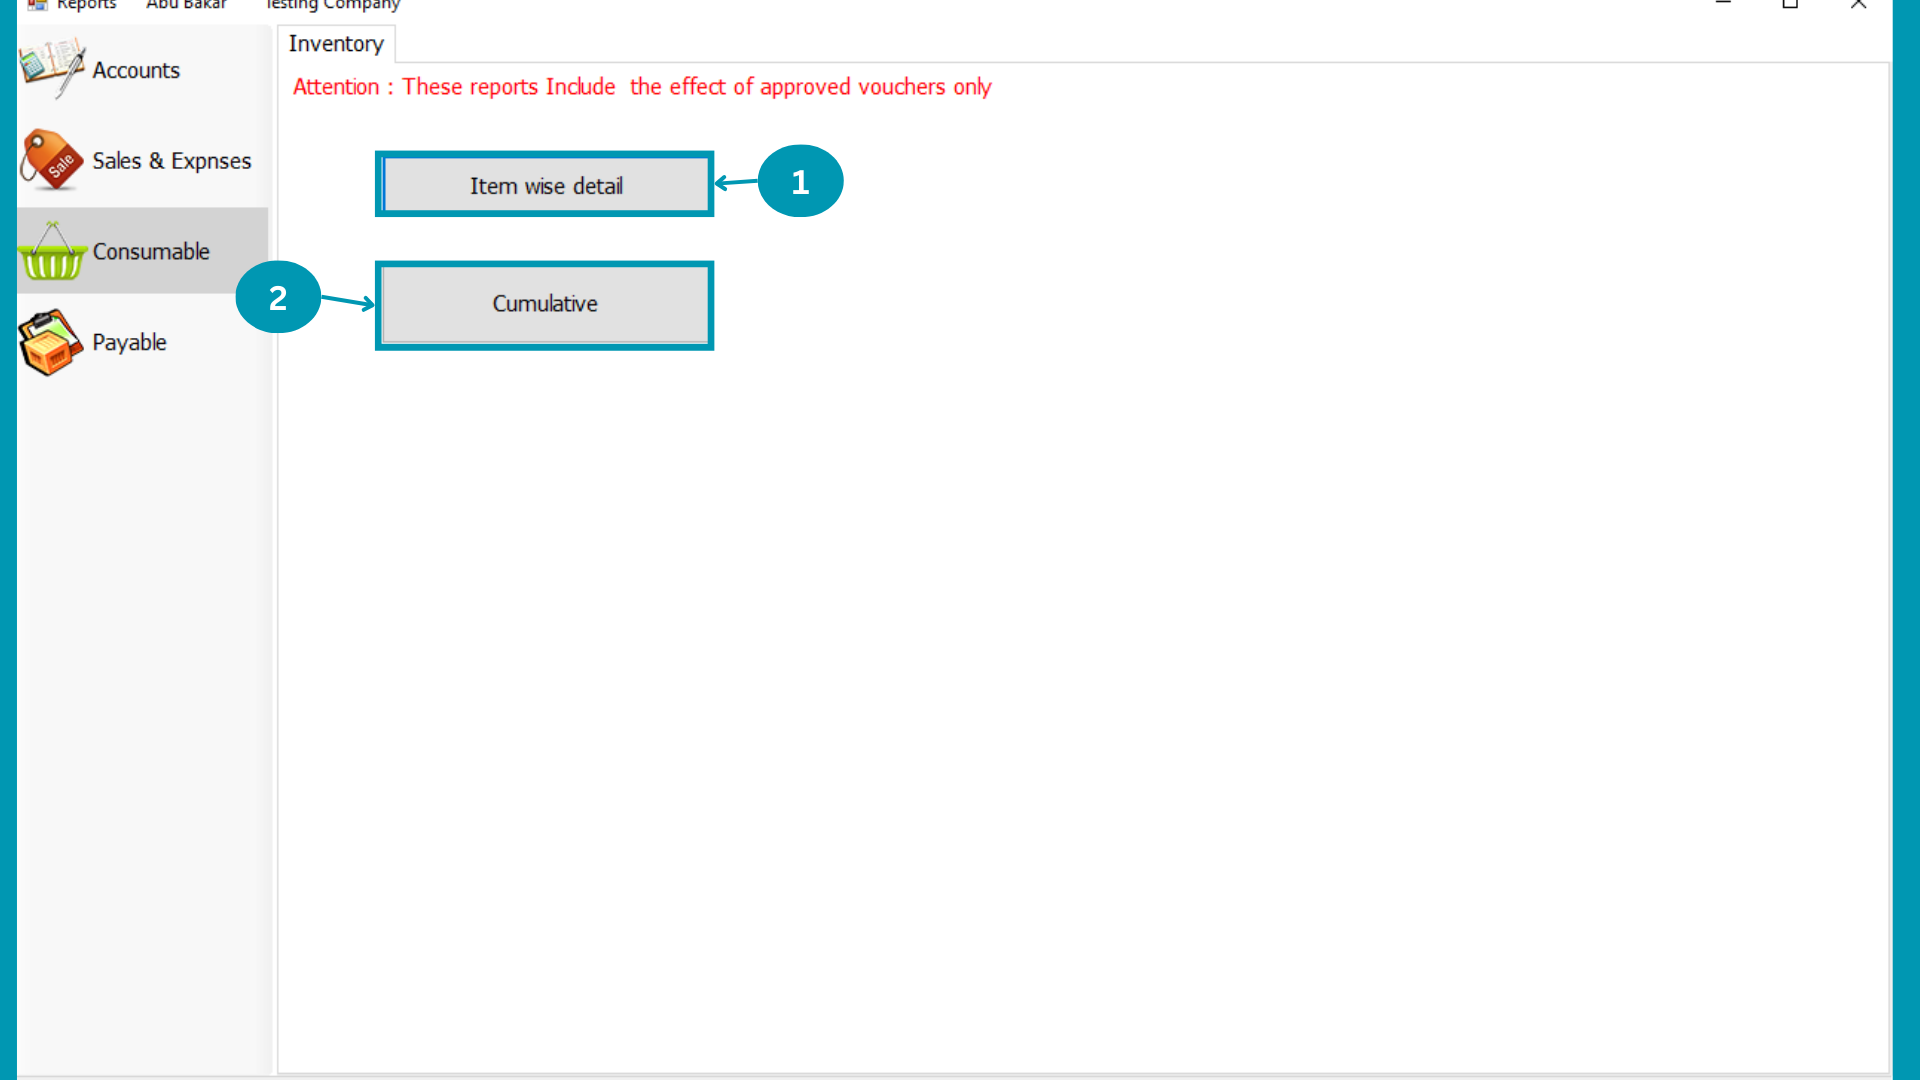
| 01 |  Click on "Item Wise Detail" to view its report. Click on "Item Wise Detail" to view its report.
|
| 02 |  Click on "Cumulative " to view its report. Click on "Cumulative " to view its report.
|
Item Wise detail
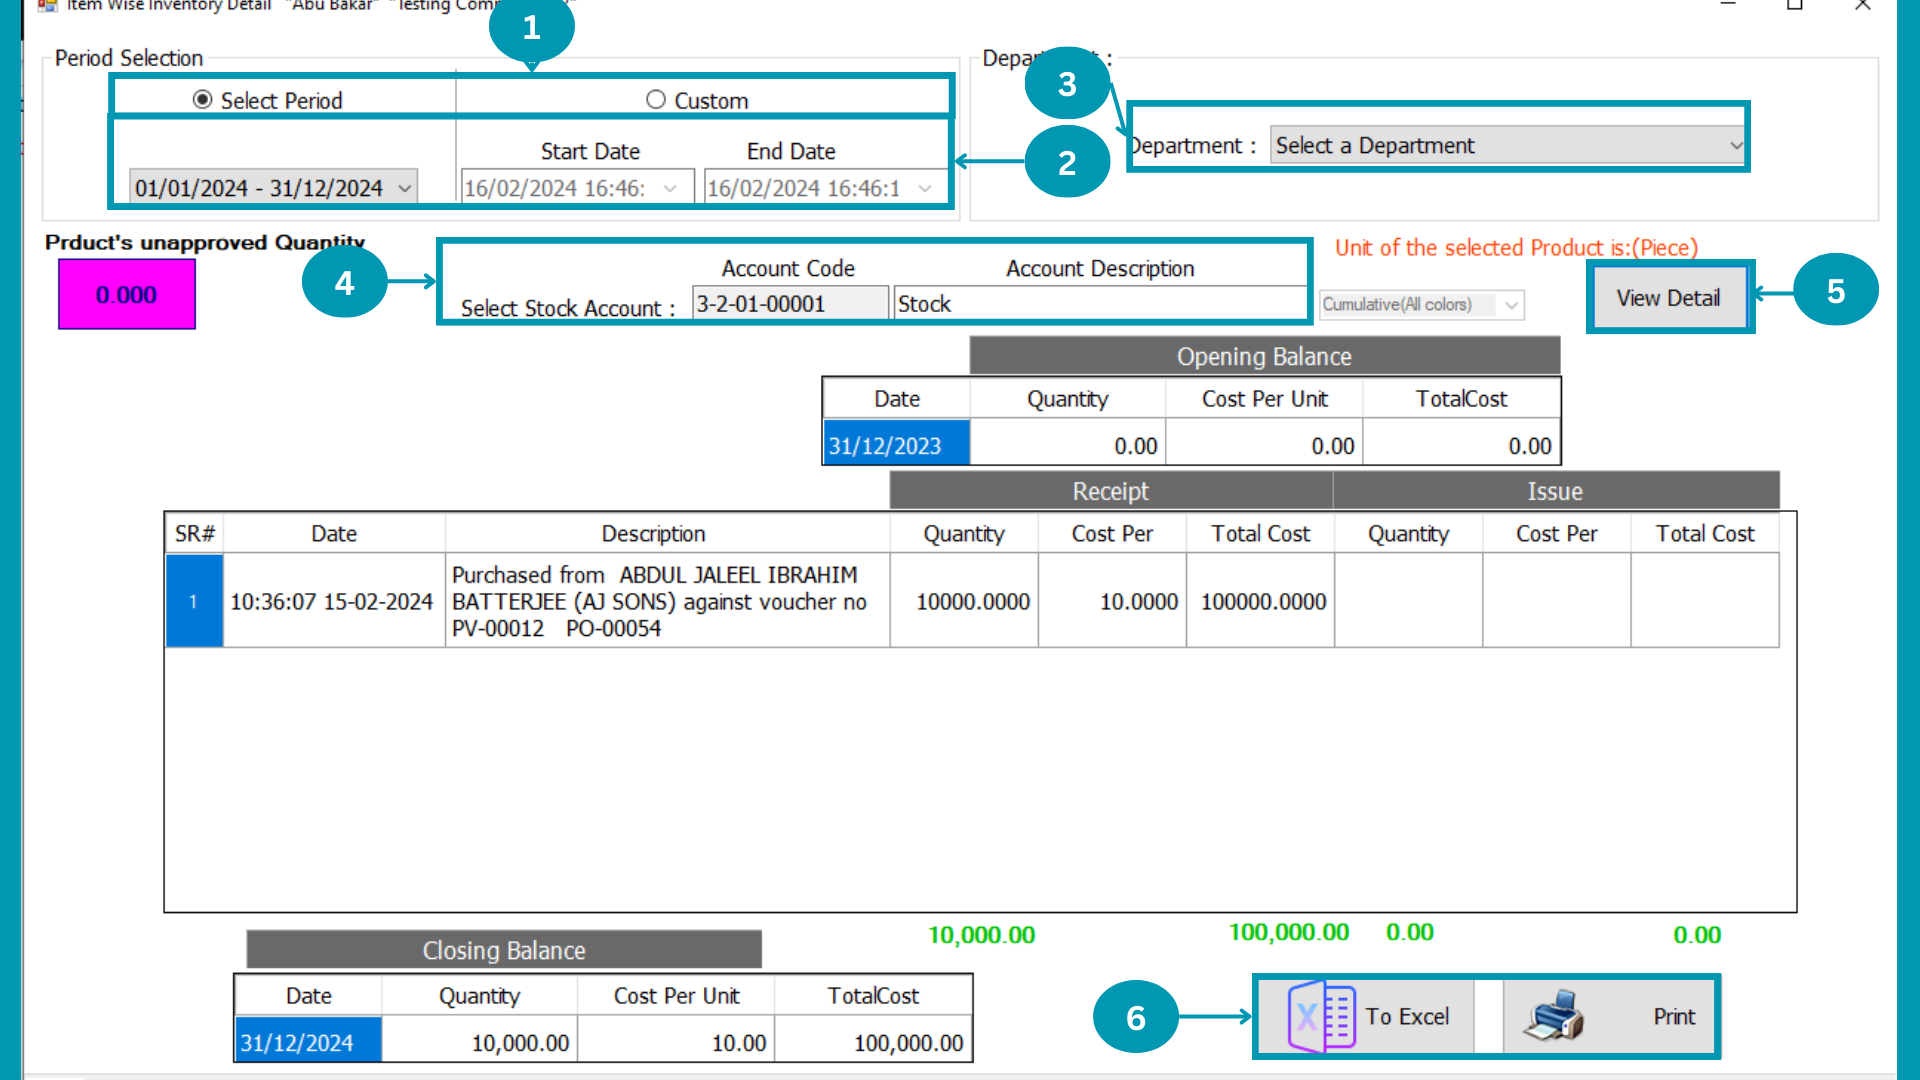
| 01 | Select Period of reports and Custom for particular tenure.
|
| 02 | Select Financial period for Select period and Start to end date for Custom.
|
| 03 |
|
| 04 |  Select Inventory Item to view report. Select Inventory Item to view report. |
| 05 |  Click on "View Detail". Click on "View Detail".
|
| 06 |  Click on "To Excel" to get .xlsx format or Click on "Print" for print. Click on "To Excel" to get .xlsx format or Click on "Print" for print.
|
Cumulative Inventory Report
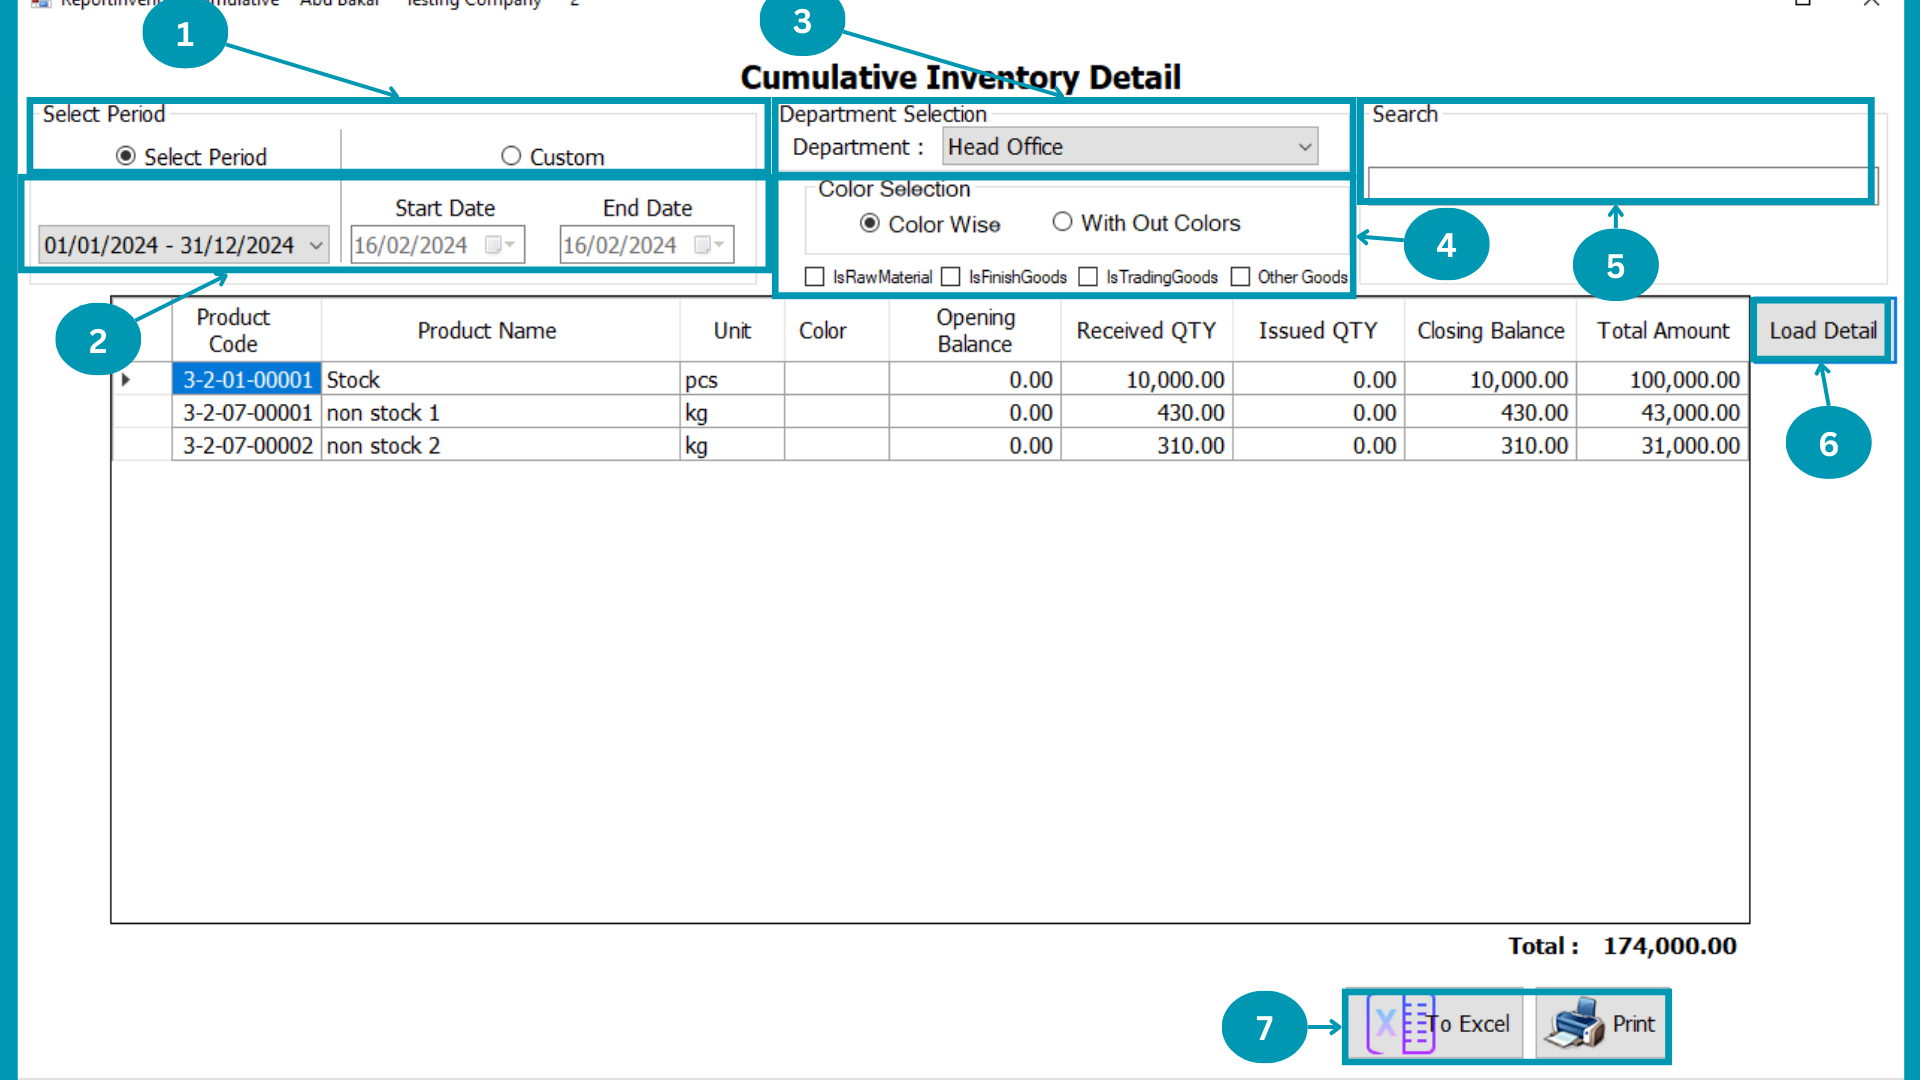
| 01 | Select Period of reports and Select Financial period for this.
|
| 02 | Select Custom for particular tenure and Start to end date for Custom.
|
| 03 | Select Location or All location will be default.
|
| 04 | 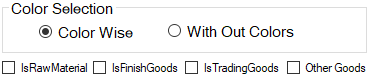 Click on "Color Wise" or "With Out Colors" and inventory type. Click on "Color Wise" or "With Out Colors" and inventory type.
|
| 05 |  Write Product name in search to selective product inventory balance. Write Product name in search to selective product inventory balance.
|
| 06 |  Hit
the Load Detail. Hit
the Load Detail. |
| 07 | Click on "To Excel" to get .xlsx format or Click on "Print" for print.
|
Payable
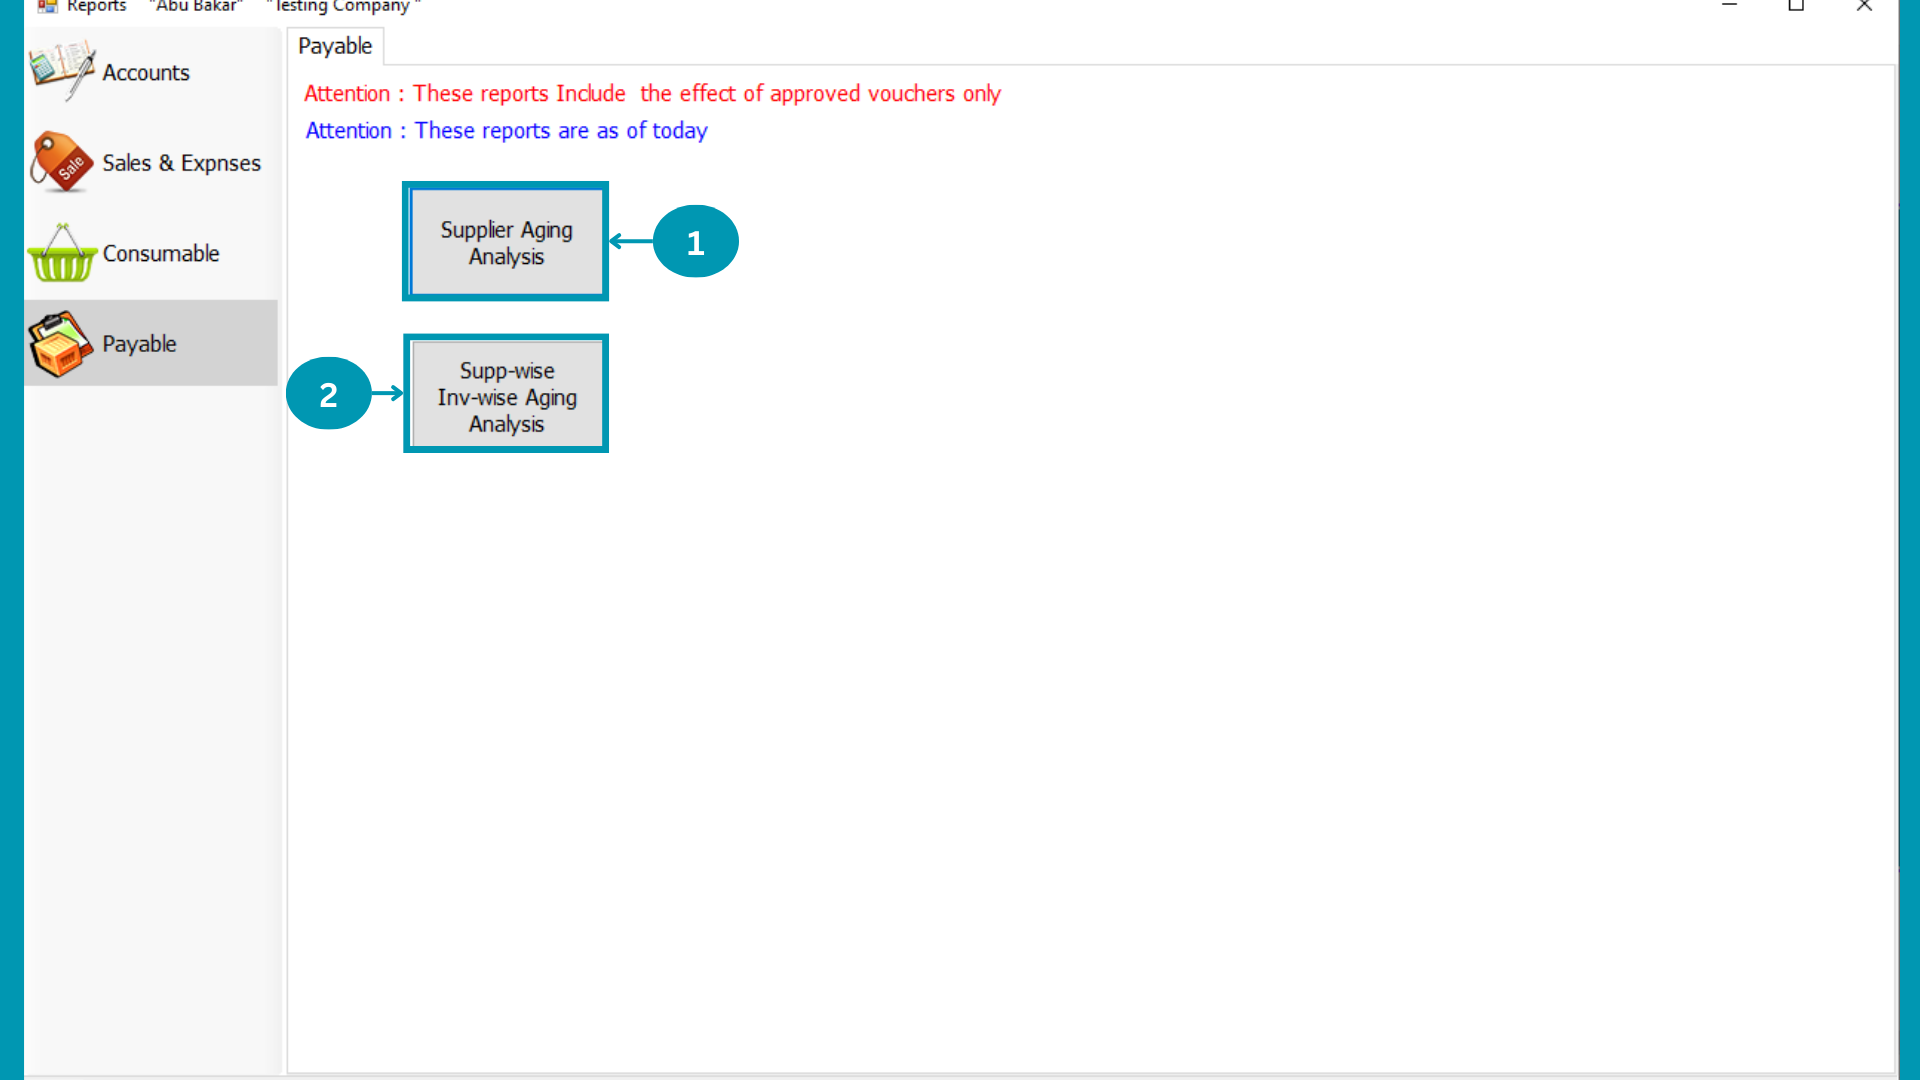
| 01 |  Click on "Supplier Aging Analysis" to view its report. Click on "Supplier Aging Analysis" to view its report.
|
| 02 |  Click on "Sup-wise Inv-wise Aging Analysis " to view its report. Click on "Sup-wise Inv-wise Aging Analysis " to view its report.
|
Supplier Wise report
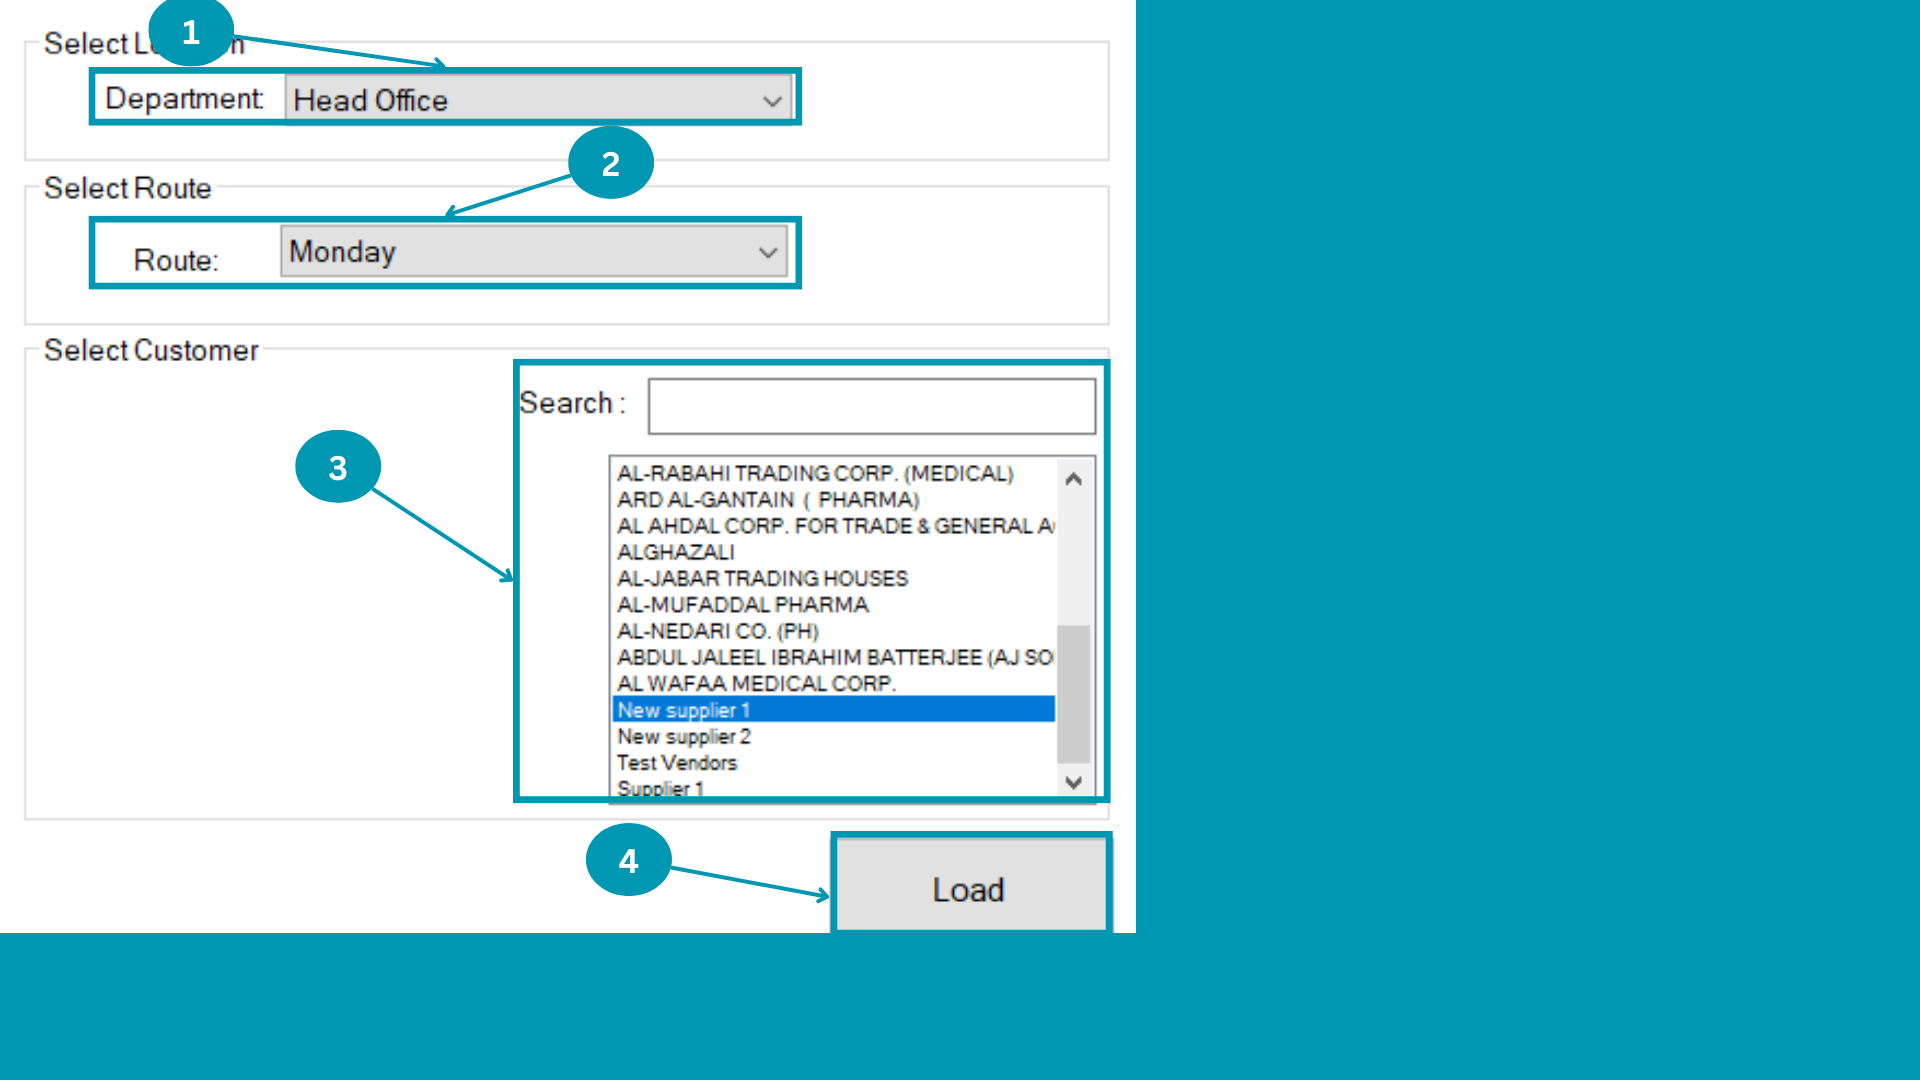
| 01 |
|
| 02 | |
| 03 | |
| 04 | Hit
the "Load". |
Supp Inv report
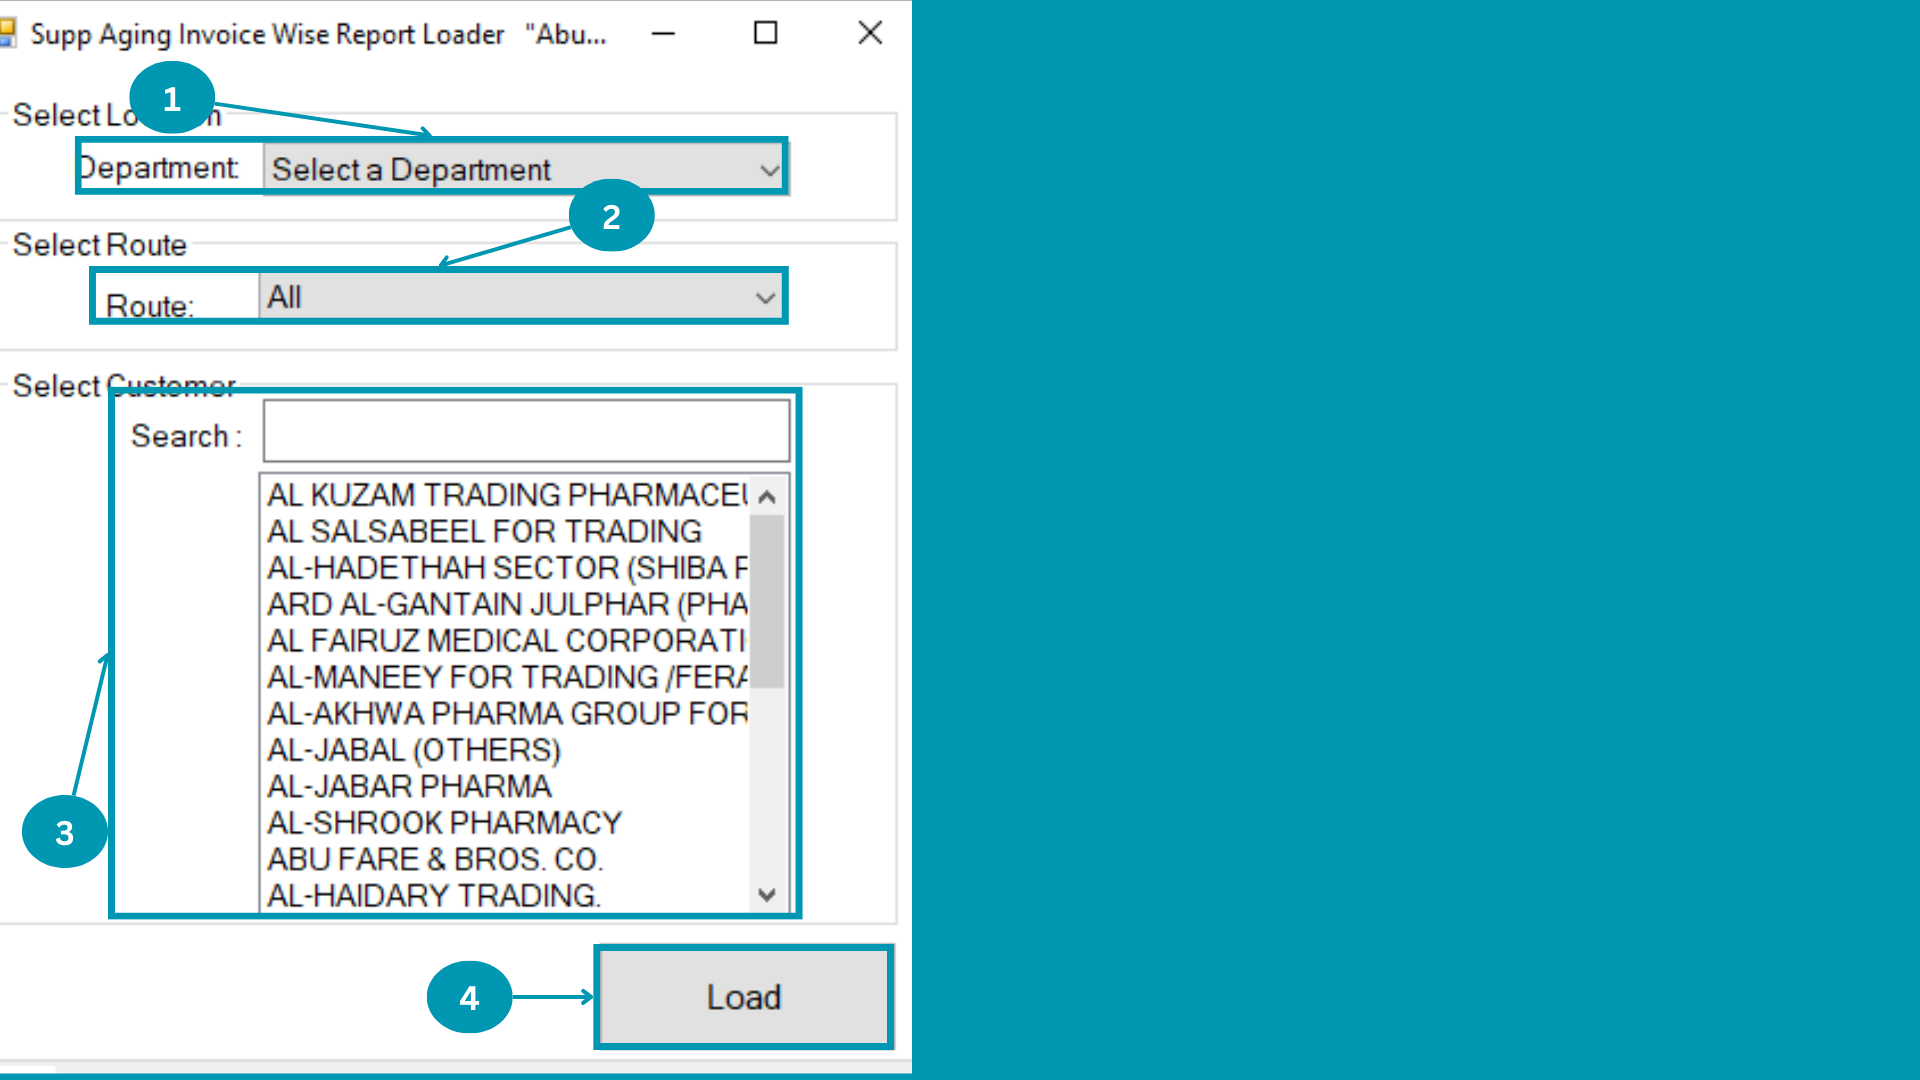
| 01 |
|
| 02 | |
| 03 | |
| 04 | Hit
the "Load". |
MAB BIZ SOLUTIONS
Users Controls
Users Controls
The Admin controls management listed in this page.
Following pages usage is explained in this segment
- Add User
- Change Rights
- Reset Password
- Disable User
- User Depart
Add user
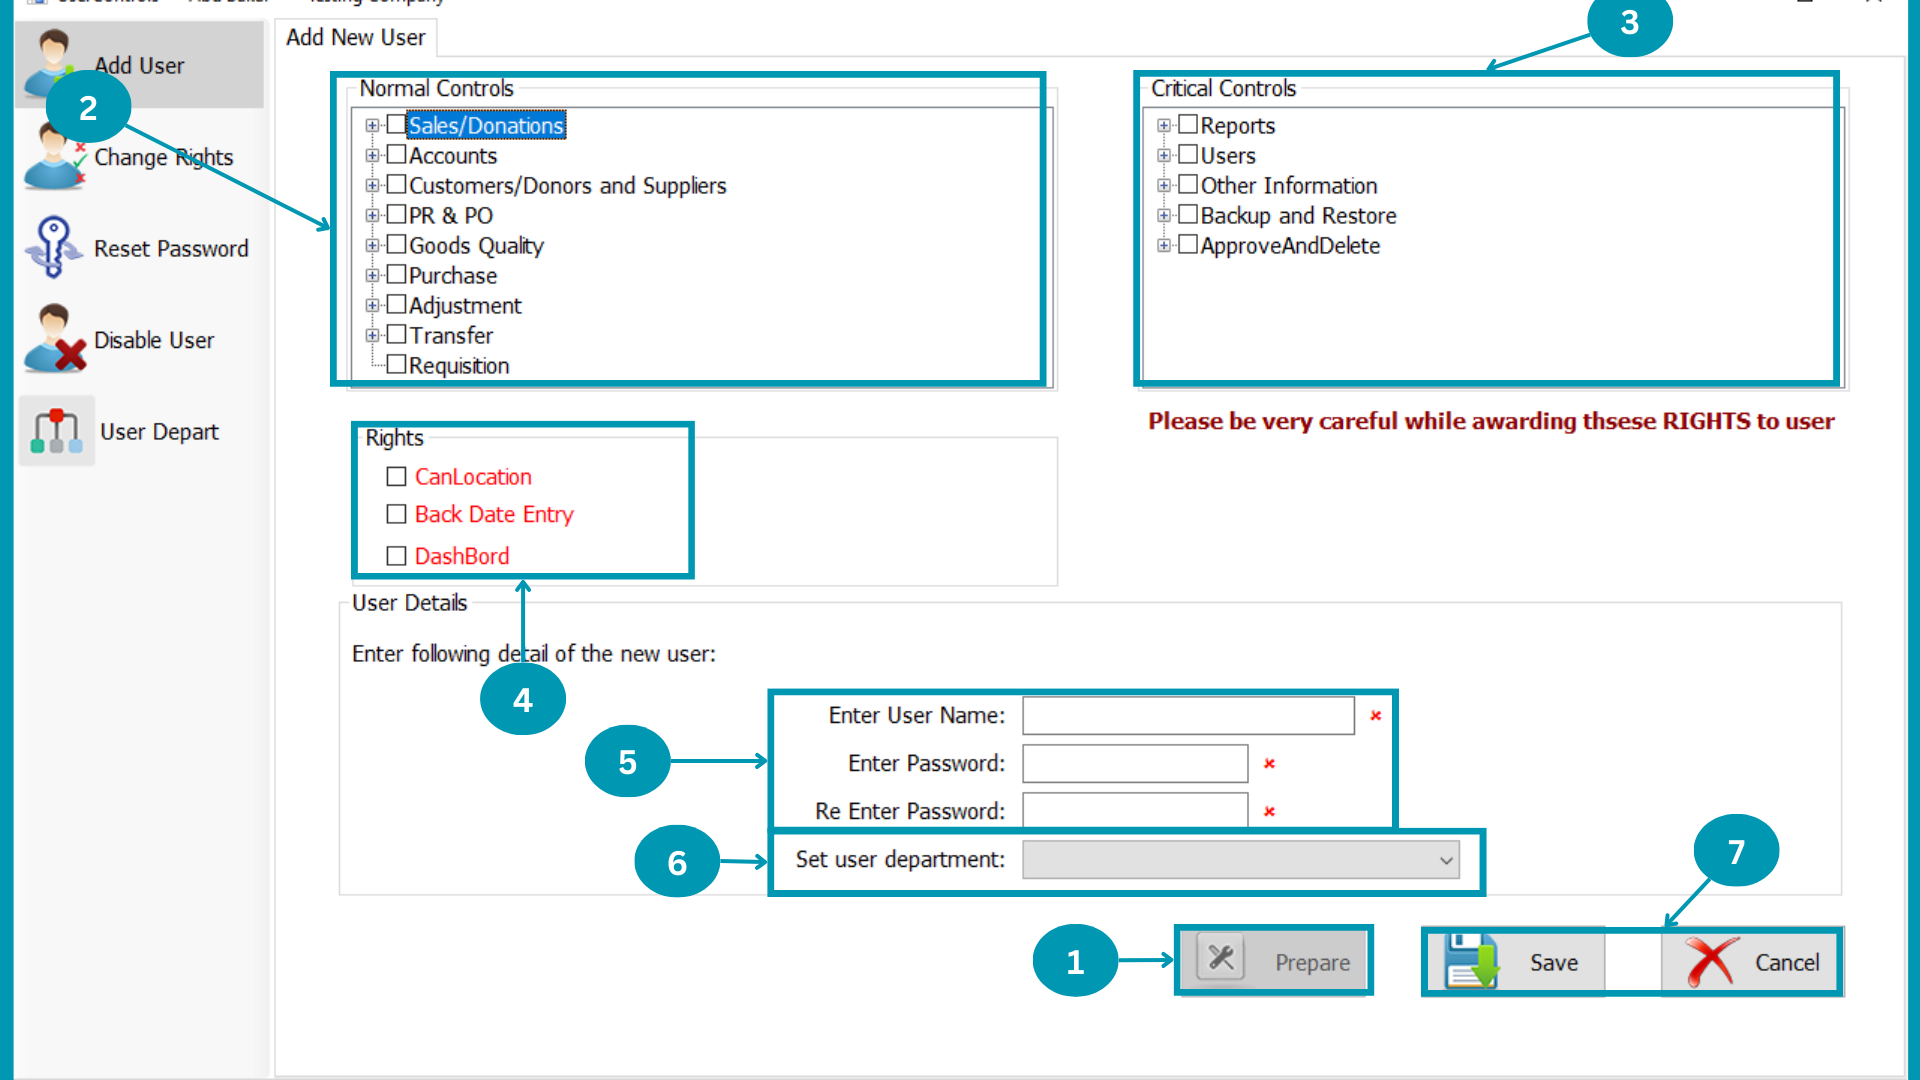
| 01 | Hit the "Prepare" Button.
|
| 02 |  Check the Normal Control you want to allow to selected user. Check the Normal Control you want to allow to selected user.
|
| 03 |  Check the Critical Control you want to allow to selected user. Check the Critical Control you want to allow to selected user.
|
| 04 |  Check the Rights you want to allot to selected user. Check the Rights you want to allot to selected user.
|
| 05 |  Write user name, Password and Re-Enter Password to create new user. Write user name, Password and Re-Enter Password to create new user.
|
| 06 | Choose new added user department.
|
| 07 | Click on "Save" or "Cancel".
|
Change Rights
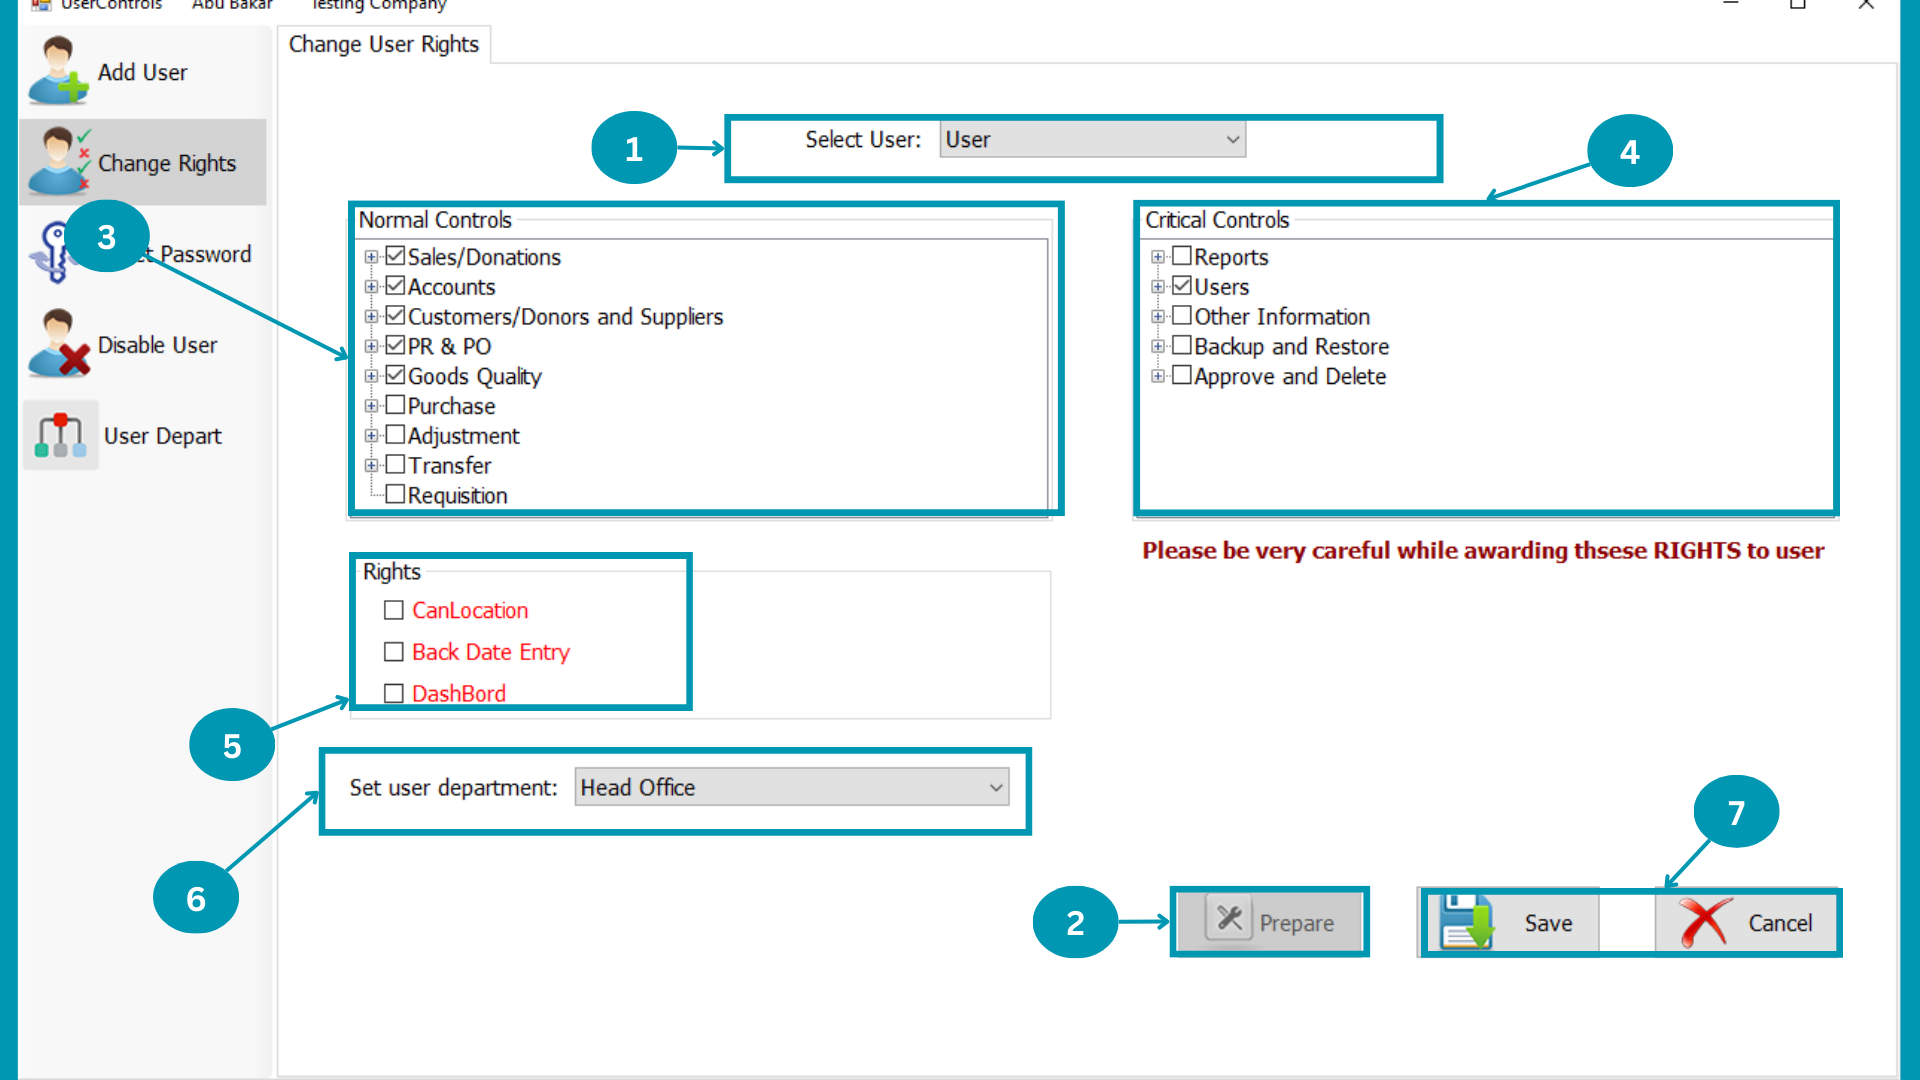
| 01 |  Select User from users list. Select User from users list.
|
| 02 | Hit the "Prepare" Button.
|
| 03 | Check the Normal Control you want to allow to selected user.
|
| 04 | Check the Critical Control you want to allow to selected user.
|
| 05 | Check the Rights you want to allot to selected user.
|
| 06 | Choose user department.
|
| 07 | Click on "Save" or "Cancel".
|
Reset Password
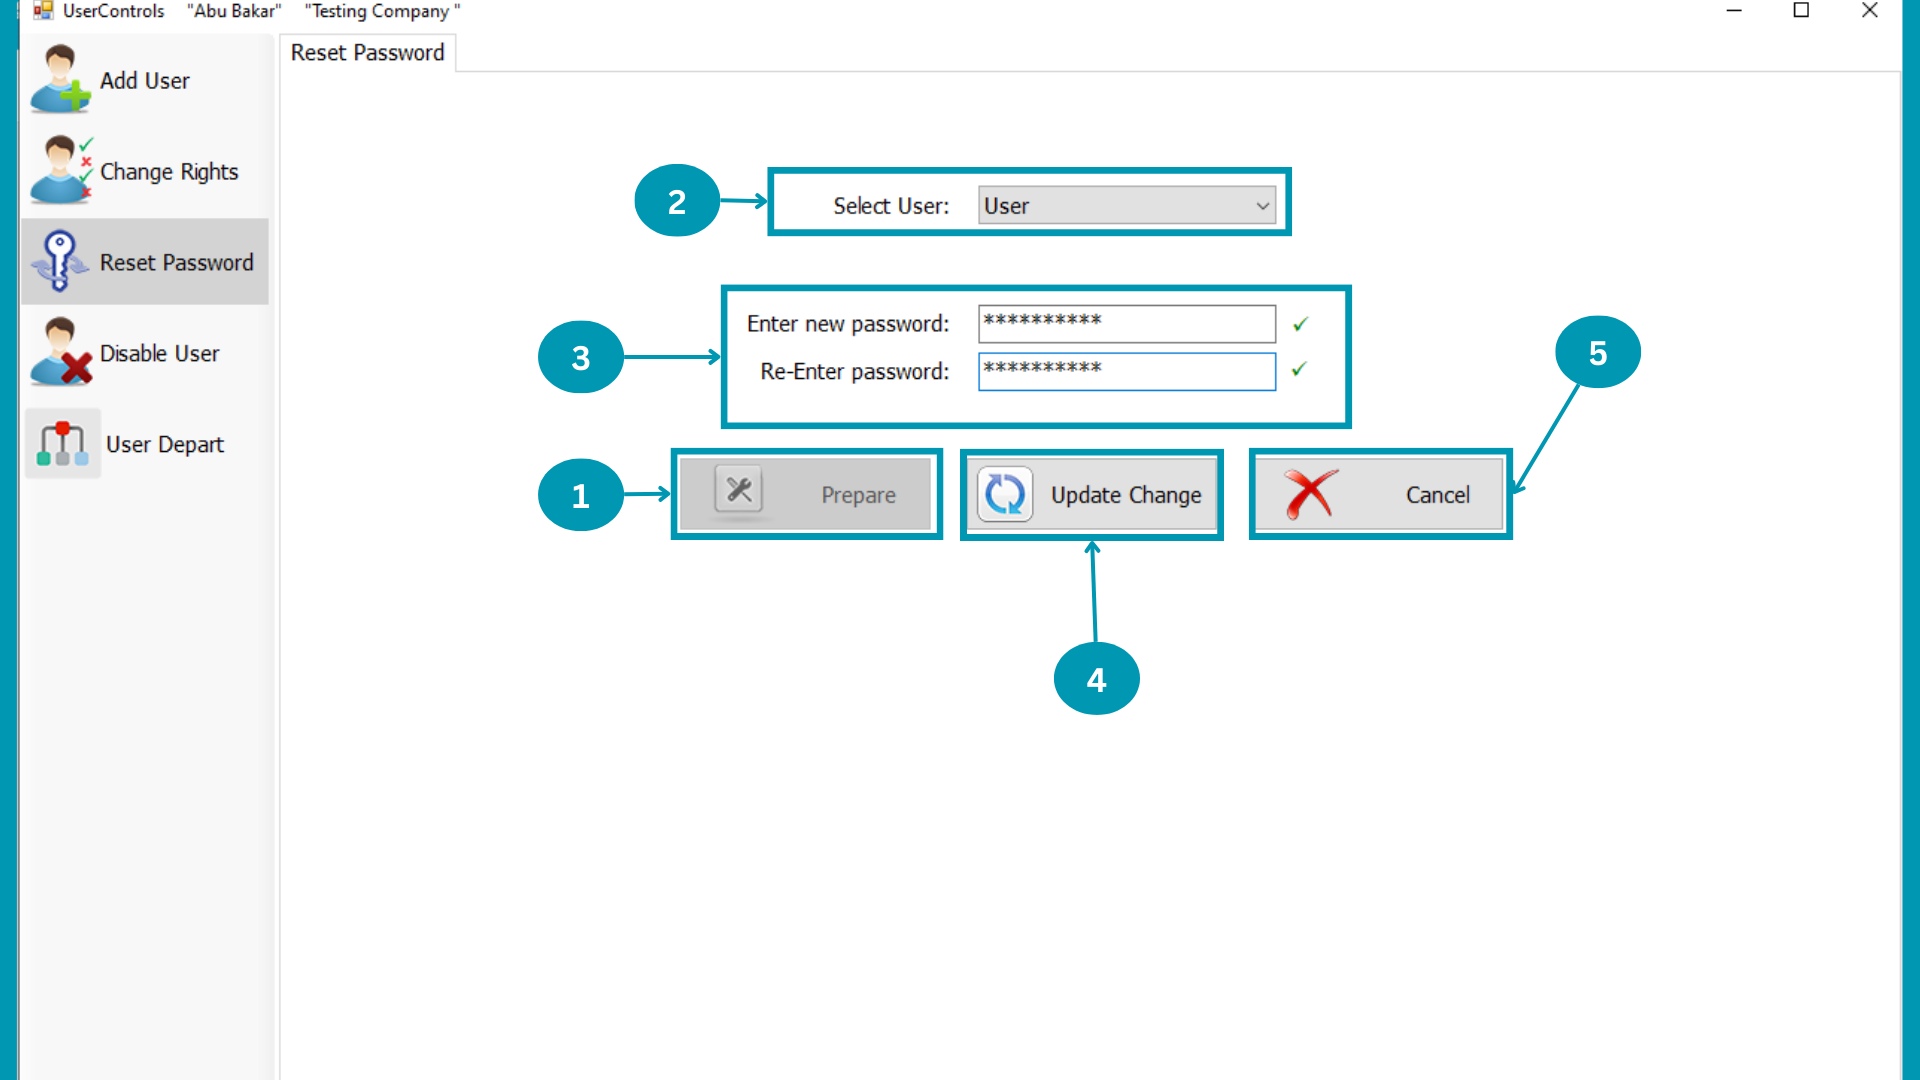
| 01 | Hit the "Prepare" Button.
|
| 02 | Select User from users list.
|
| 03 | 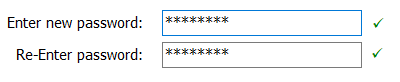 Write New Password on Enter New Password and Re-Enter Password to change password. Write New Password on Enter New Password and Re-Enter Password to change password.
|
| 04 |  Click on Update Change to save the change in password of selected user. Click on Update Change to save the change in password of selected user.
|
| 05 |  To cancel changes click on cancel. To cancel changes click on cancel.
|
Disable User
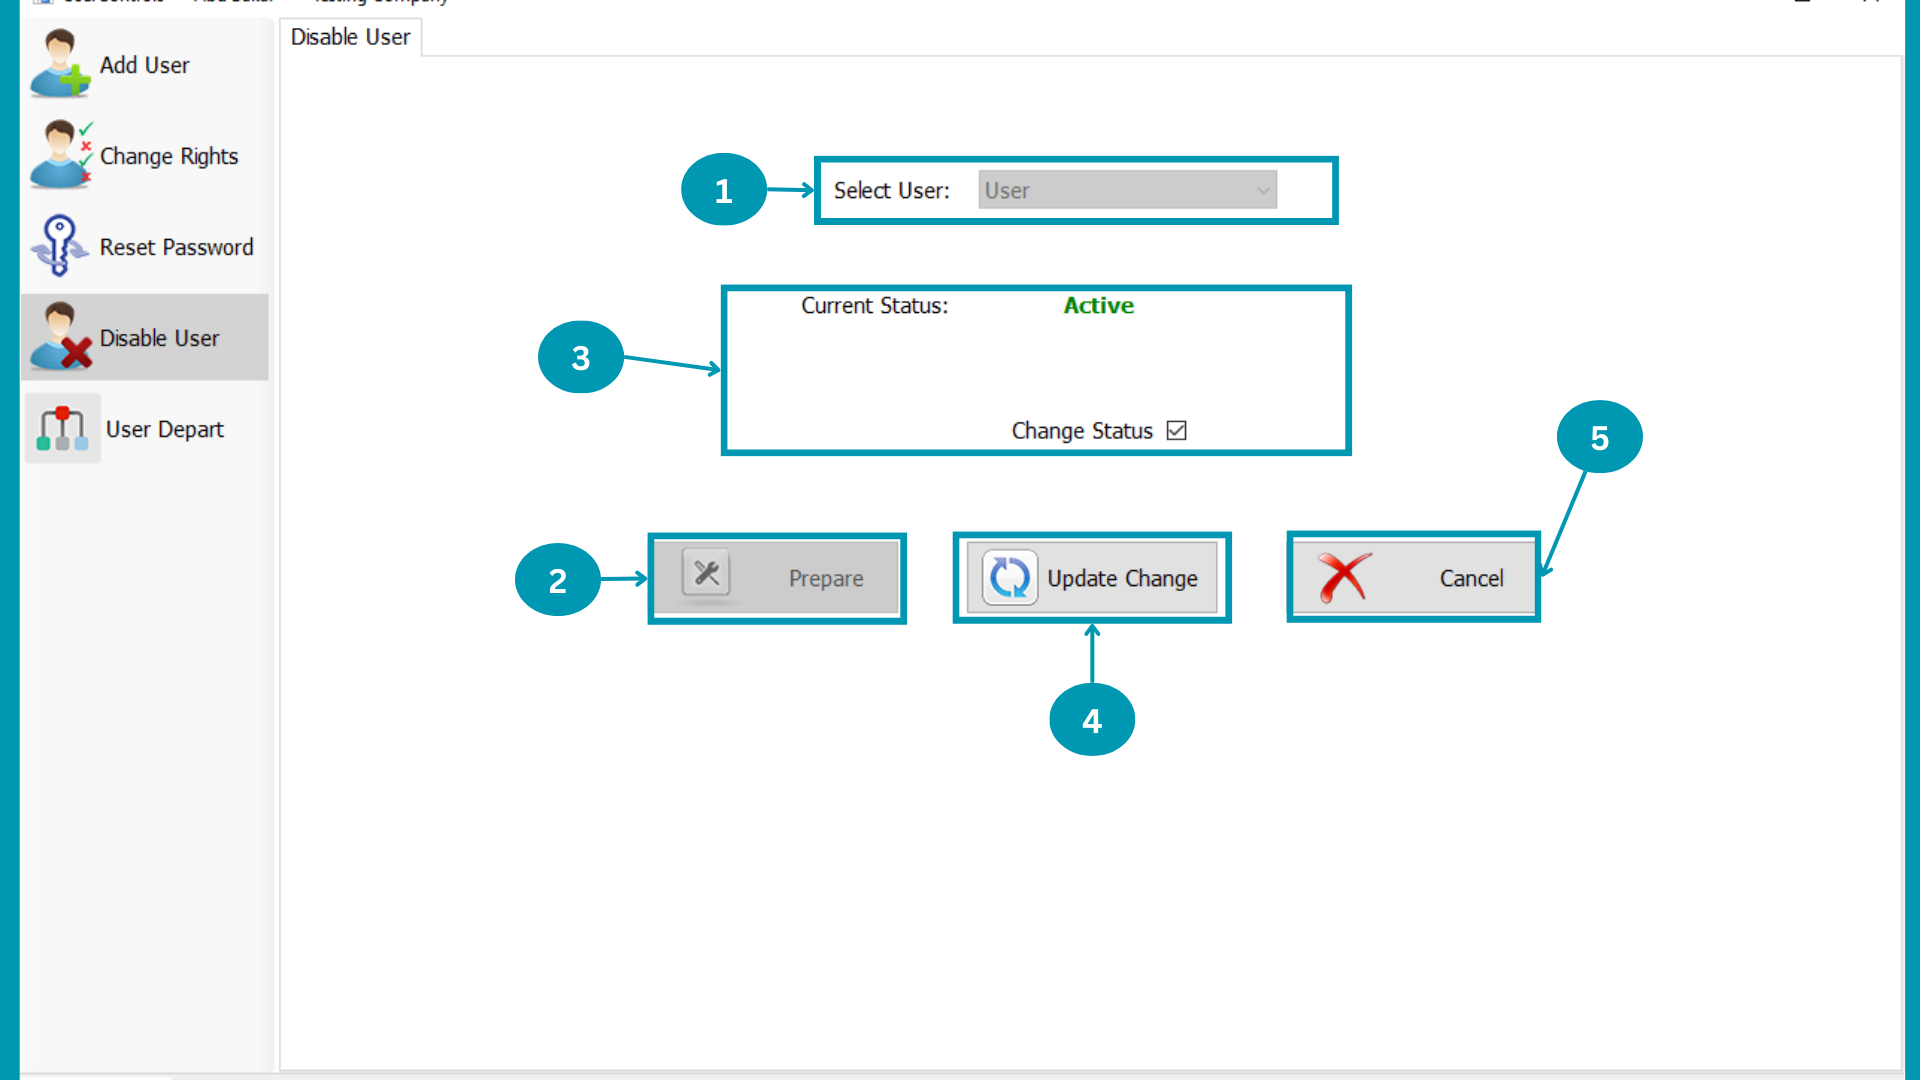
| 01 | Select User from users list.
|
| 02 | Hit
the prepare Button. |
| 03 |  Current status of Selected user will displayed here. Current status of Selected user will displayed here.
|
| 04 |  Check the change Status box to Active or disable the user. Check the change Status box to Active or disable the user.
|
| 05 | Click on Update Change to save the change in status of selected user.
|
| 05 | Hit
the Cancel Button.
|
User department
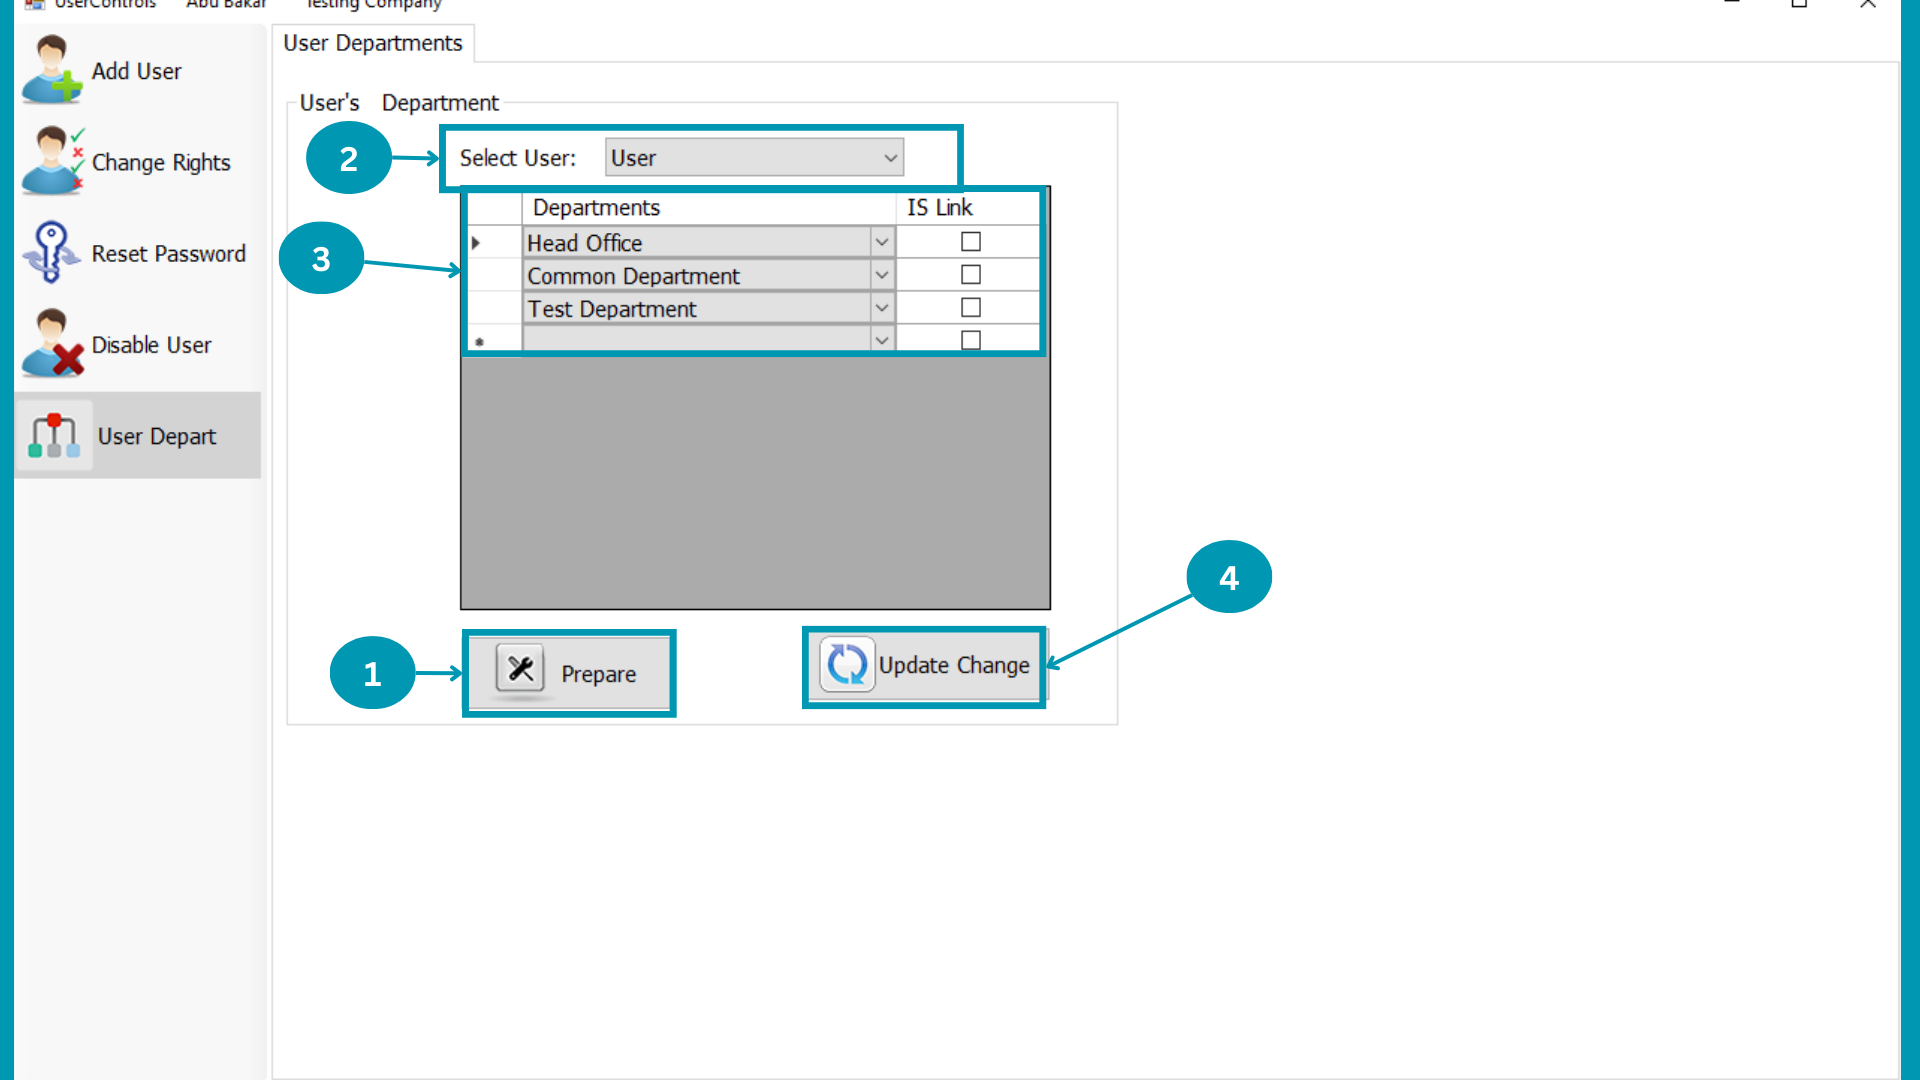
| 01 | Hit
the prepare Button. |
| 02 | Select User from users list.
|
| 03 | 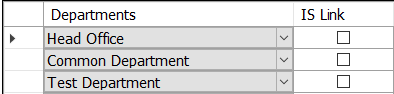 After select the user click departments Is link box to allow user to link department amoung them. After select the user click departments Is link box to allow user to link department amoung them.
|
| 04 | Click on Update Change to save the change in status of selected user.
|
MAB BIZ SOLUTIONS
Other Info & Controls
Other Info & Controls
The Settings relates to productions of raw material and sales of production are avalible in Other Info & Controls
Following pages usage is explained in this segment
- Location
- Department
- Company Info
- Financial Periods
- Invoice Description
- Ageing Criteria
- Excel Formats
- Recorder Level
- Add Units
Location
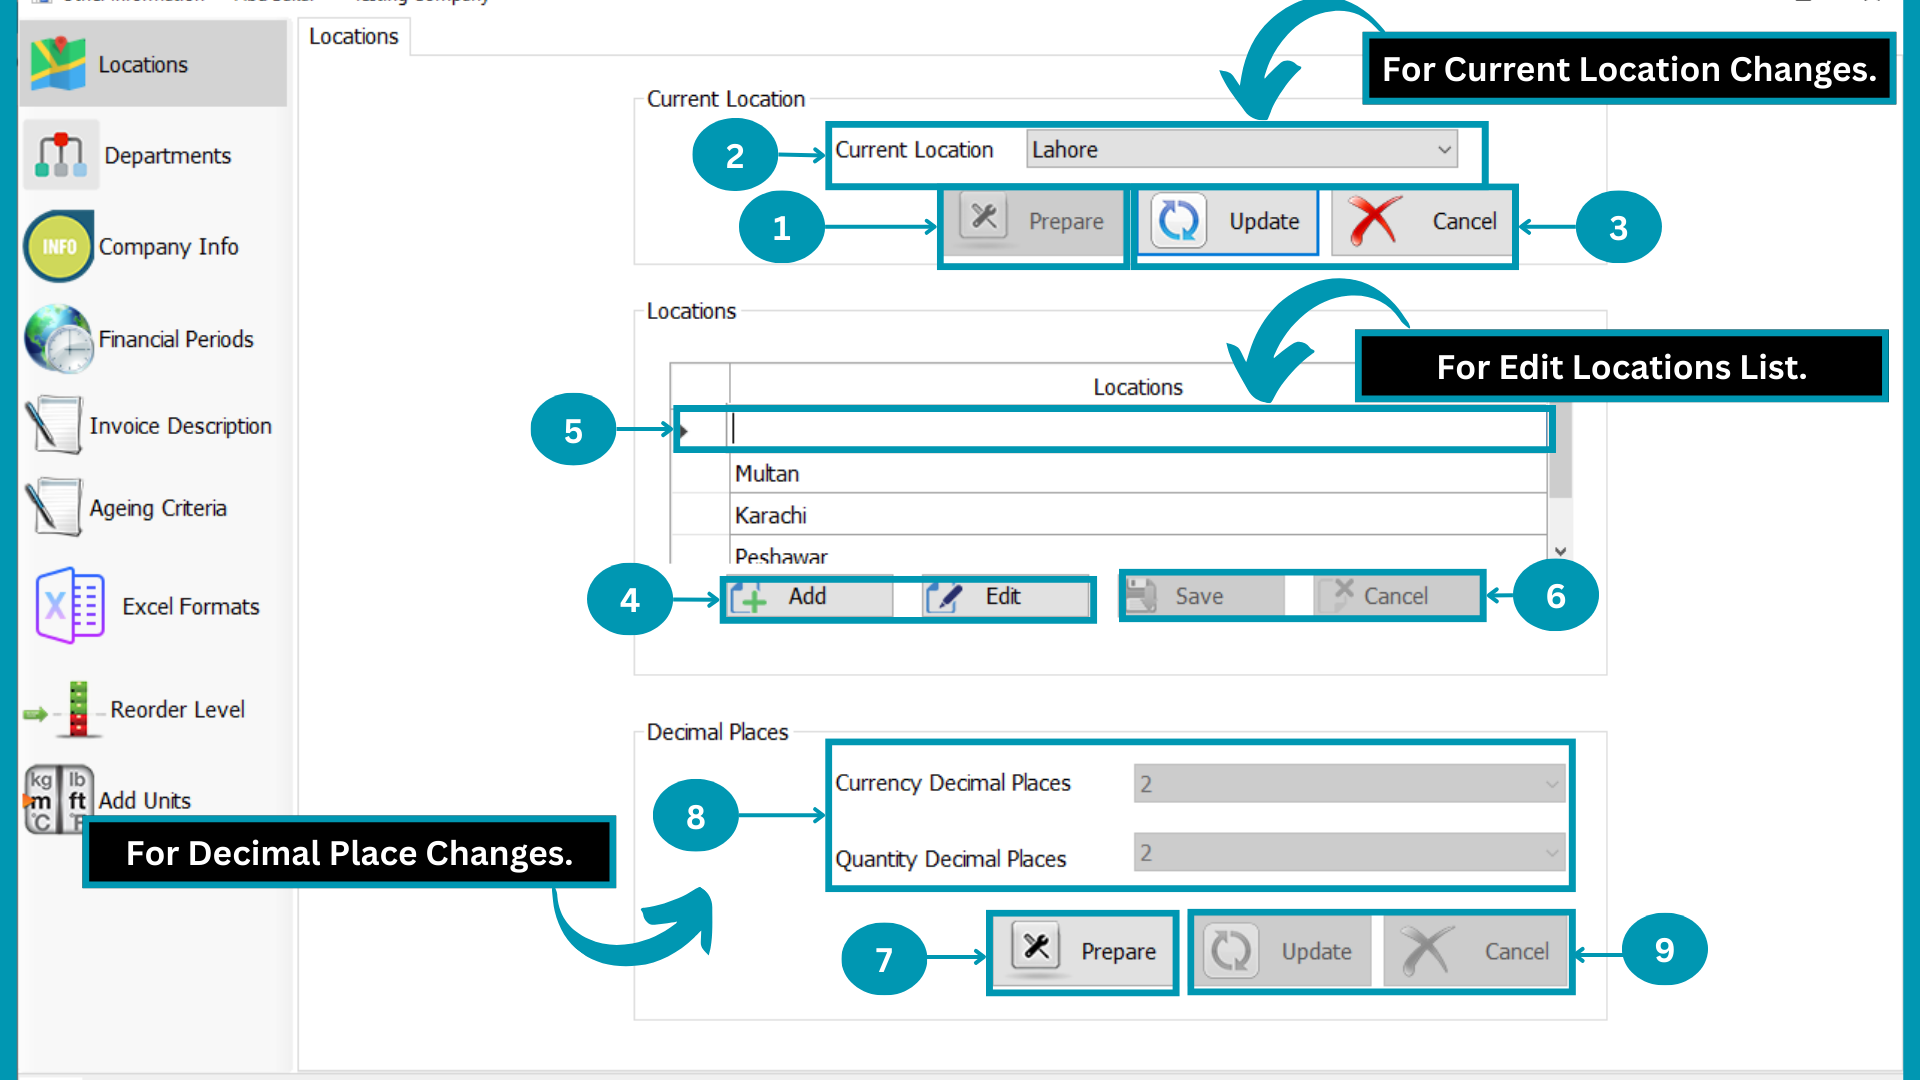
| 01 | Click On Prepare.
|
| 02 |  Select the current location. Select the current location.
|
| 03 |  Hit the Update or cancel button. Hit the Update or cancel button.
|
| 04 | Select Add to enter new location or Edit to rename the existing location.
|
| 05 | 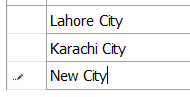 If you clicked ADD write new location name in new row and select and rename the existing location for edit. If you clicked ADD write new location name in new row and select and rename the existing location for edit.
|
| 06 | Click on "Save" or "Cancel".
|
| 07 | Click On Prepare.
|
| 08 |  Select changed decimal places location in Currency or Quantity. Select changed decimal places location in Currency or Quantity.
|
| 09 | Hit the Update or cancel button.
|
Department
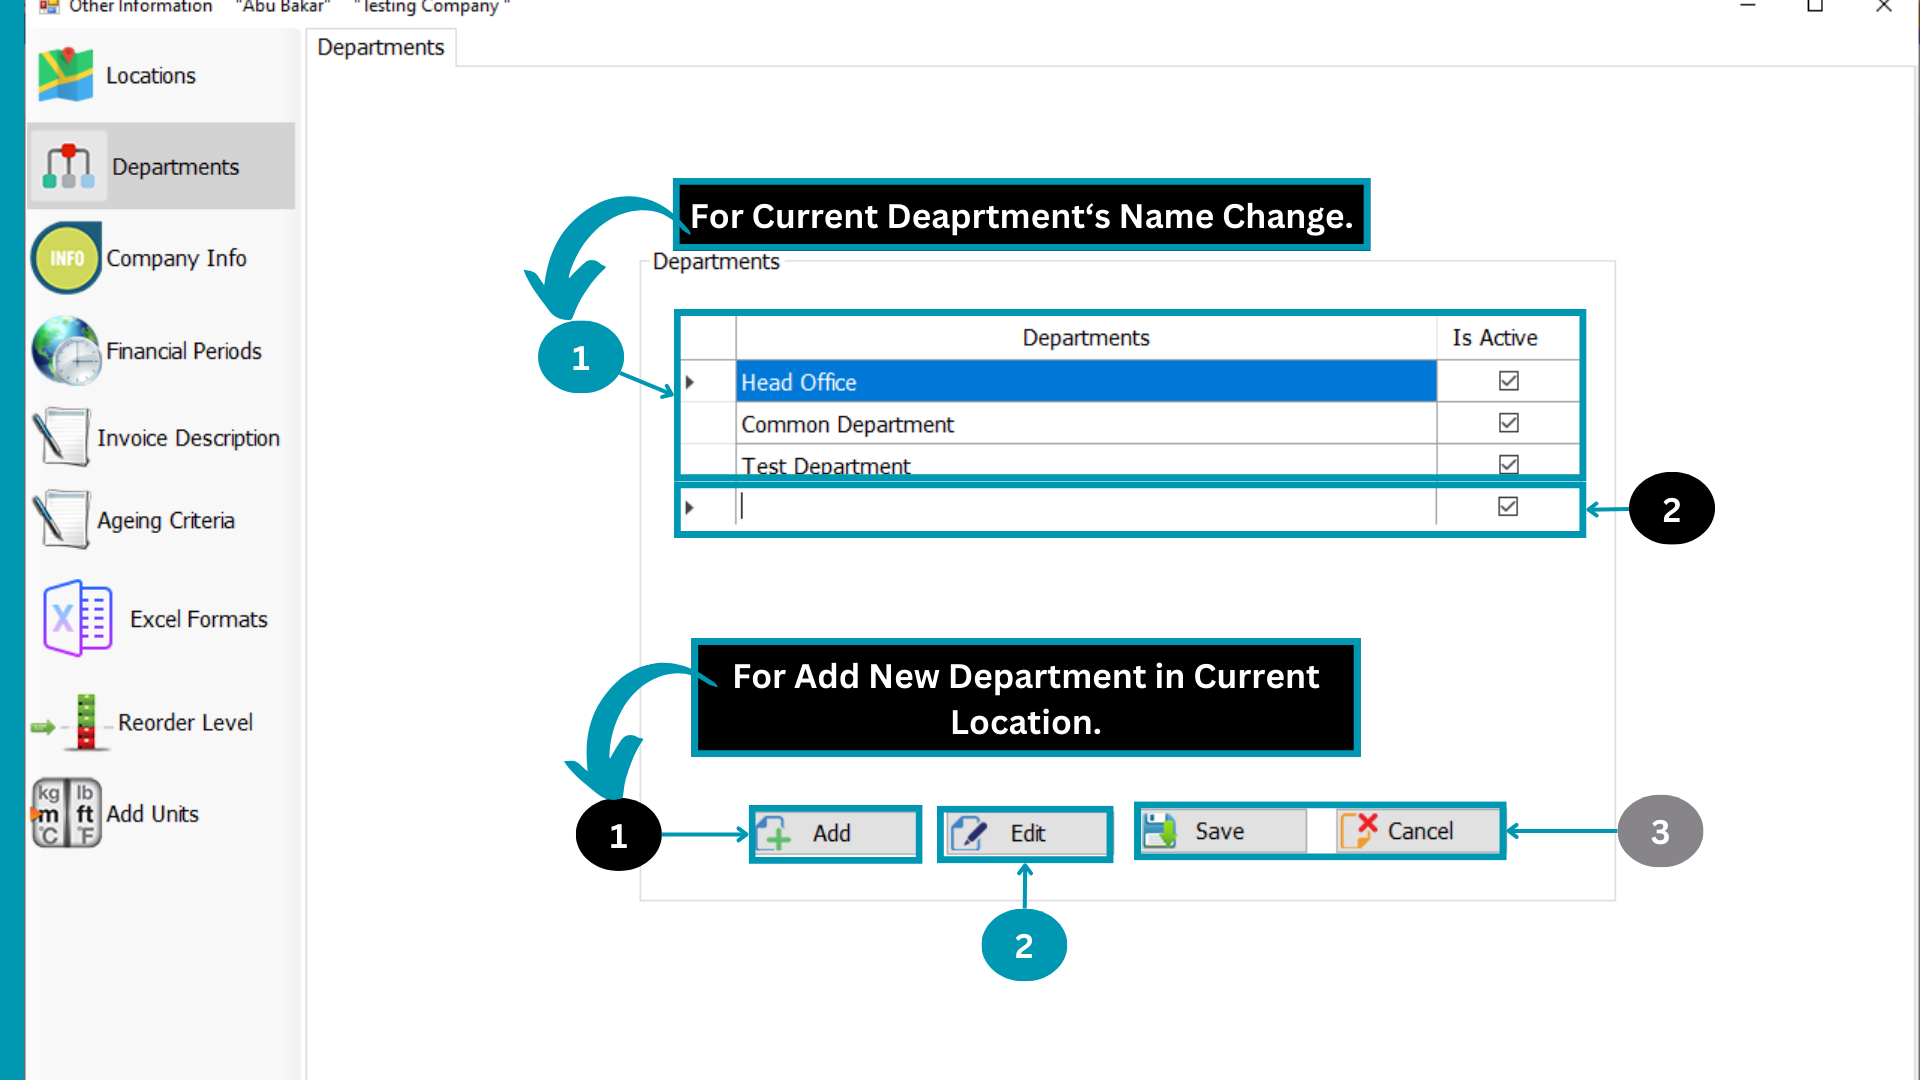
| 01 |  Click Add if you want to add new department and select the listed department to edit its name. Click Add if you want to add new department and select the listed department to edit its name.
|
| 02 |  If you selected the Add department then write new departments name and in case edit replace new name of deparment with old. If you selected the Add department then write new departments name and in case edit replace new name of deparment with old.
|
| 03 | Click on "Save" or "Cancel".
|
Company Info
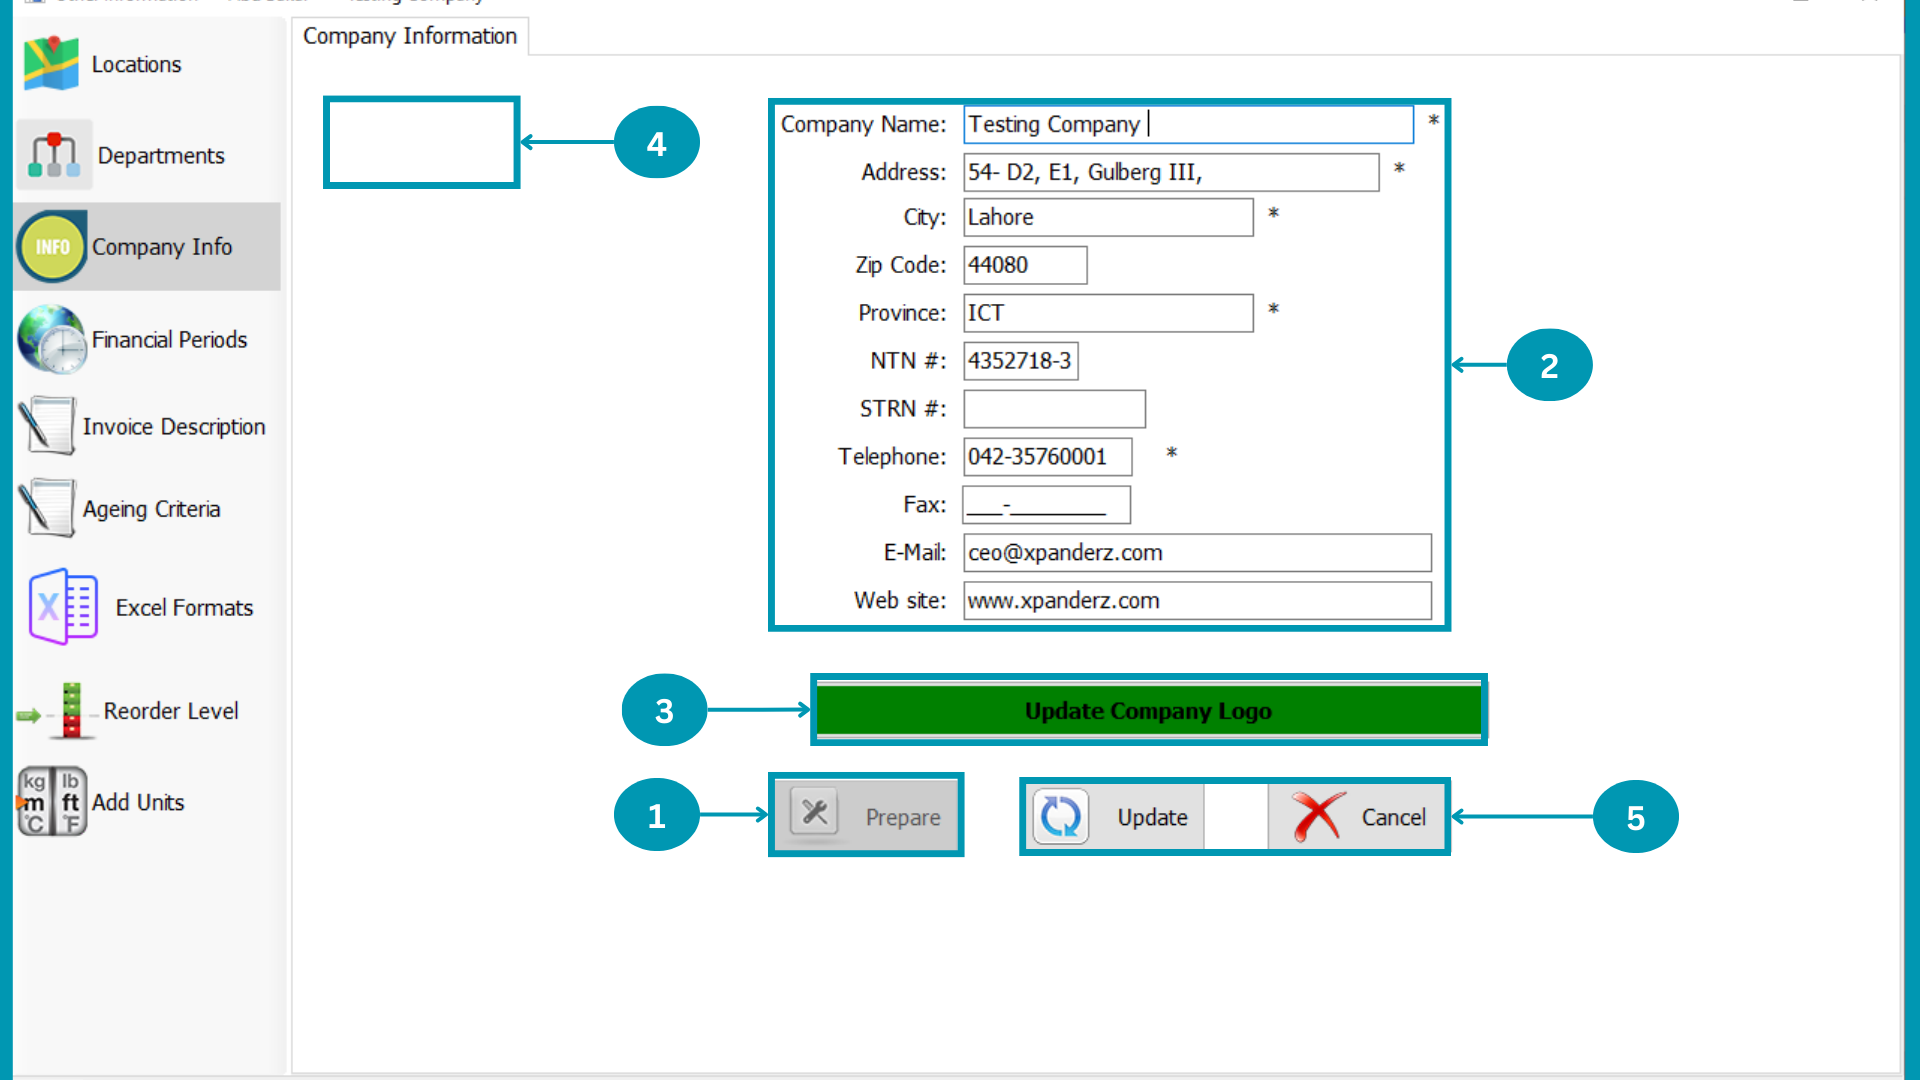
| 01 | Click On Prepare. |
| 02 |  Update the company info which you want. Update the company info which you want.
|
| 03 |  Click the update Company logo to select logo from PC , it has to be in ".PNG" format. Click the update Company logo to select logo from PC , it has to be in ".PNG" format.
|
| 04 | |
| 05 | Click on Update to save or Click on Cancel.
|
Financial Period
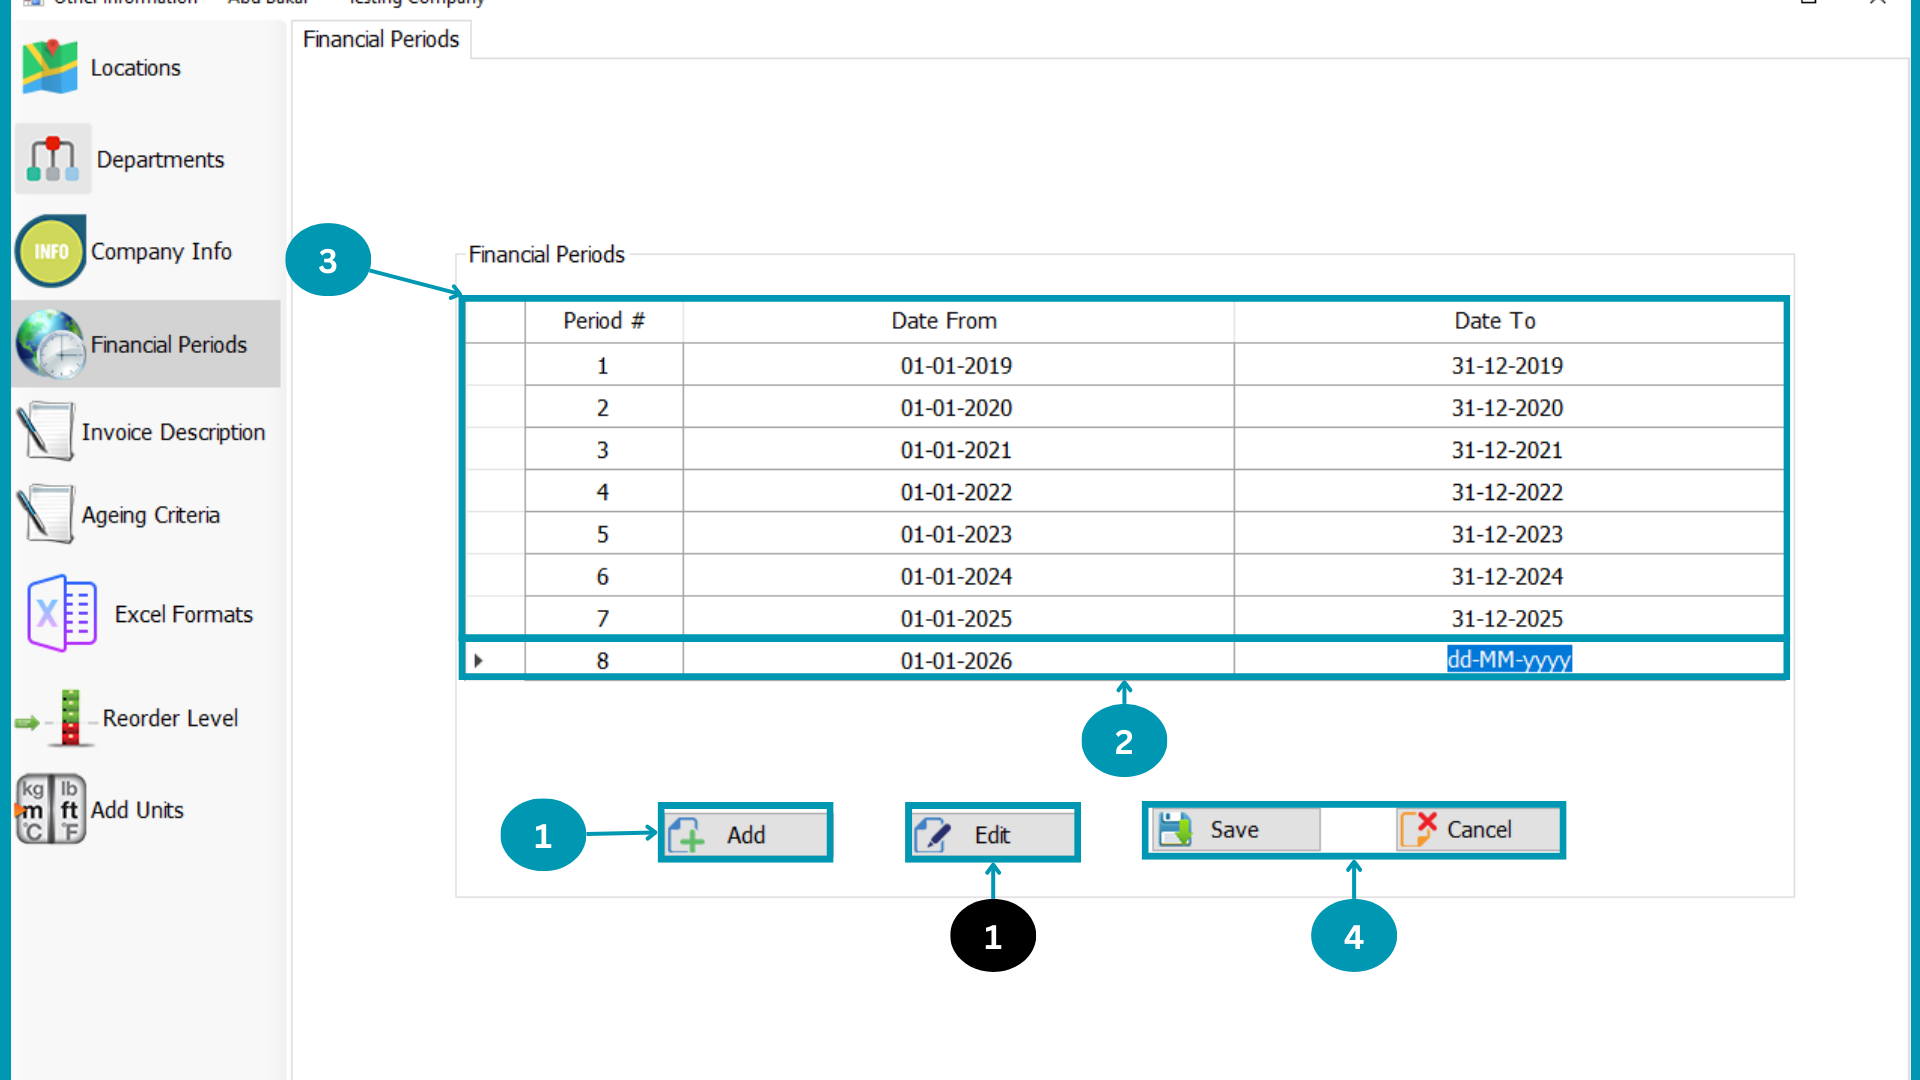
| 01 |  Select Add to enter new financial period or Select Edit to change existing financial period. Select Add to enter new financial period or Select Edit to change existing financial period.
|
| 02 |  Write Financial period Start date and end Date or default start will be next to last period end date. Write Financial period Start date and end Date or default start will be next to last period end date.
|
| 03 | |
| 04 | Hit the "Save or Cancel". |
Invoice description
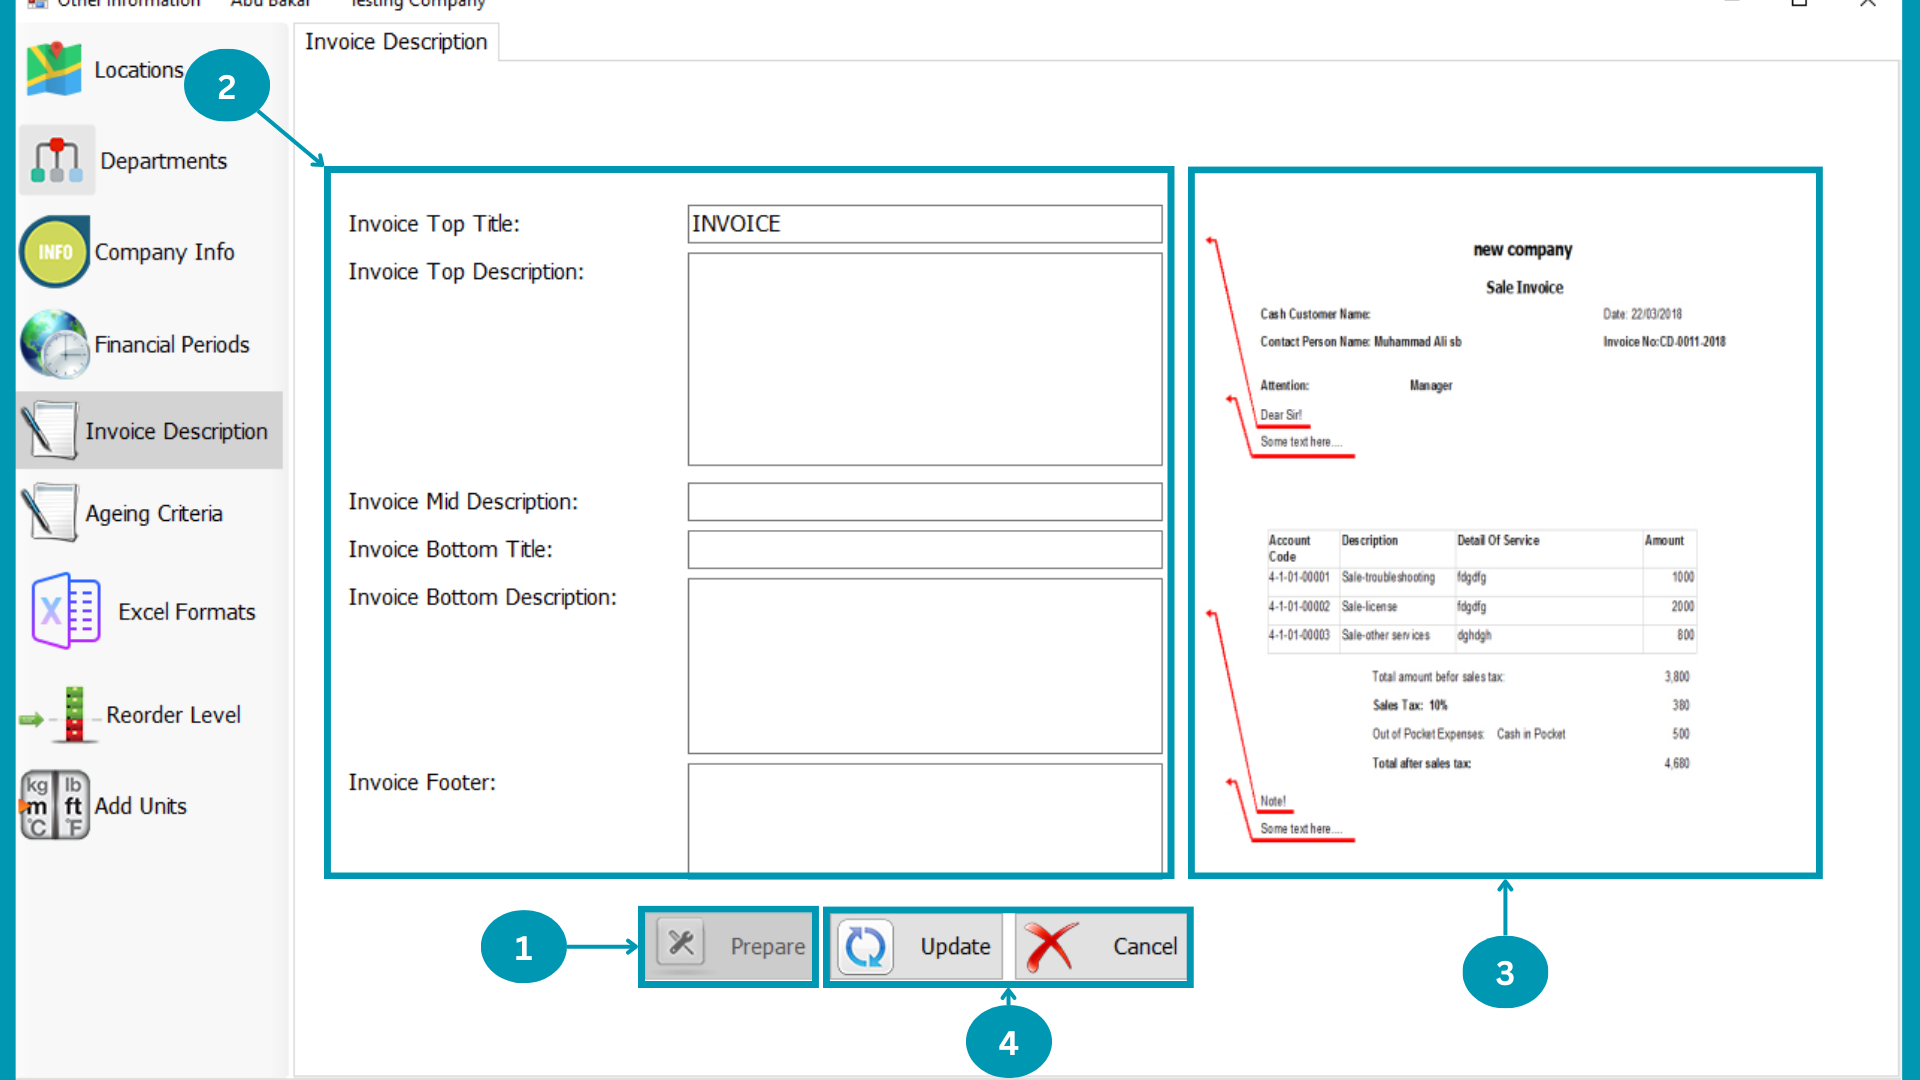
| 01 | Click On Prepare. |
| 02 | 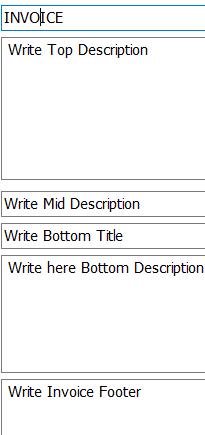 Write Invoice details in respective rows to show on Invoice print. Write Invoice details in respective rows to show on Invoice print.
|
| 03 | 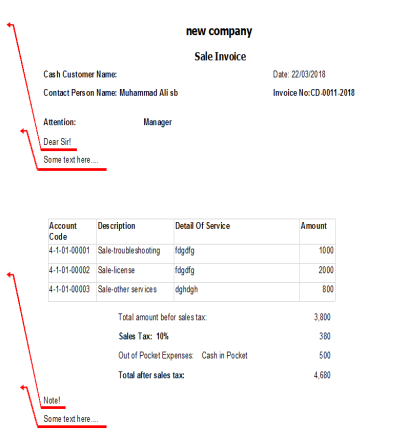 The Invoice sample print is paste beside for ease of description writing. The Invoice sample print is paste beside for ease of description writing.
|
| 04 | Hit the "Update or Cancel". |
Aging Analysis Criteria
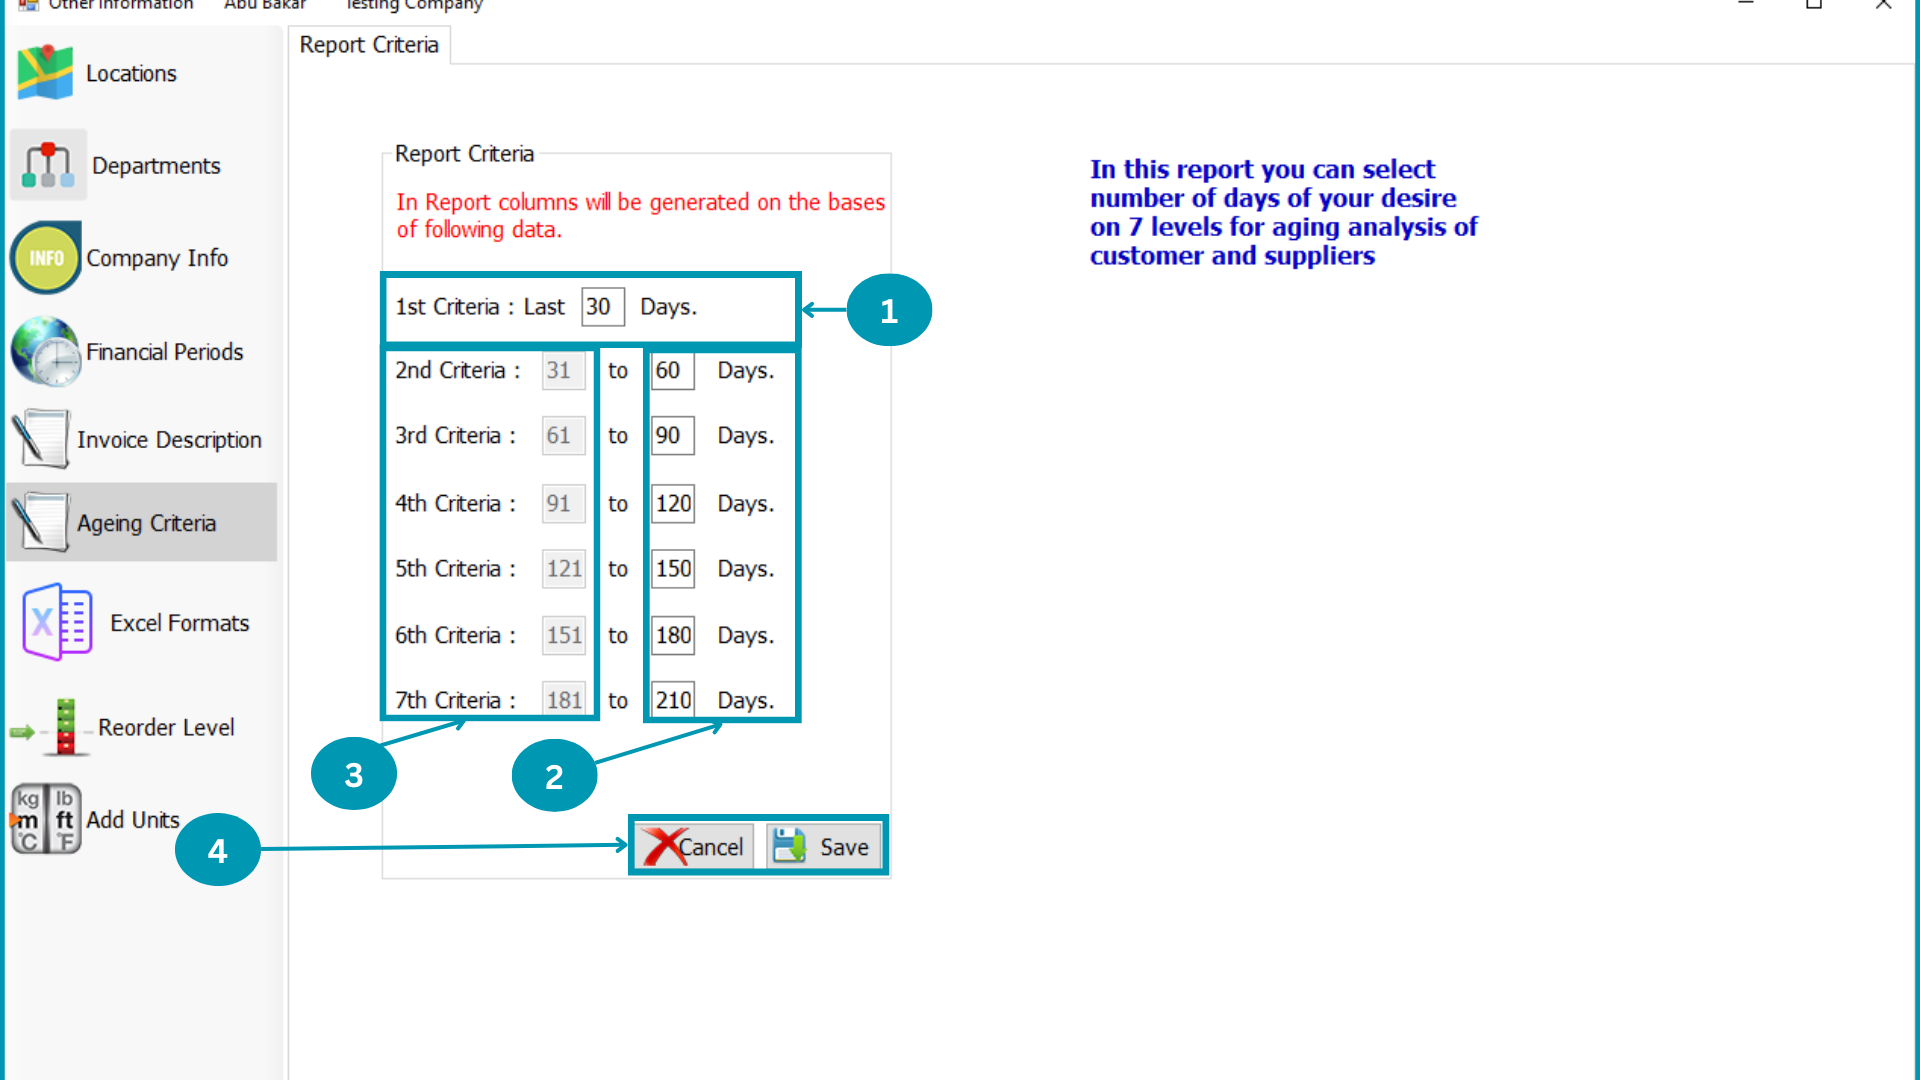
| 01 |  Enter 1st Criteria days for Aging Analysis reporting. Enter 1st Criteria days for Aging Analysis reporting.
|
| 02 |  Enter Next Reporting criteria end day in 2ns box of that row. Enter Next Reporting criteria end day in 2ns box of that row.
|
| 03 |  The Start Day of next aging analysis reporting will be next day of last rows end day. The Start Day of next aging analysis reporting will be next day of last rows end day.
|
| 04 | Hit the "Save or Cancel". |
Excel Formats

| 01 |  JV templates is avalible there download it and fill to enter Journal Vouchers BatchWise entry. JV templates is avalible there download it and fill to enter Journal Vouchers BatchWise entry.
|
| 02 | 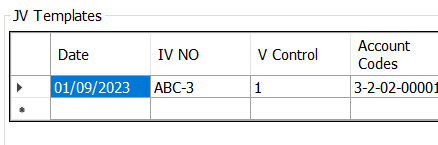 The Downloaded Format For Journal Vouchers Batch Wise will look like this. The Downloaded Format For Journal Vouchers Batch Wise will look like this.
|
| 03 | BR, CR and CP templates is avalible there download it and fill to enter Journal Vouchers BatchWise entry.
|
| 04 | 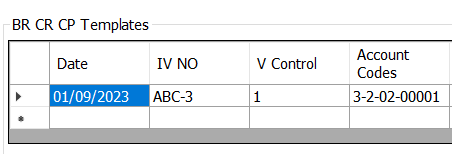 The Downloaded Format For BR, CR and CP Batch Wise will look like this. The Downloaded Format For BR, CR and CP Batch Wise will look like this.
|
| 05 | BP templates is avalible there download it and fill to enter Journal Vouchers BatchWise entry.
|
| 06 | 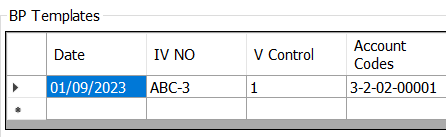 The Downloaded Format For BP Batch Wise will look like this. The Downloaded Format For BP Batch Wise will look like this.
|
recorder level
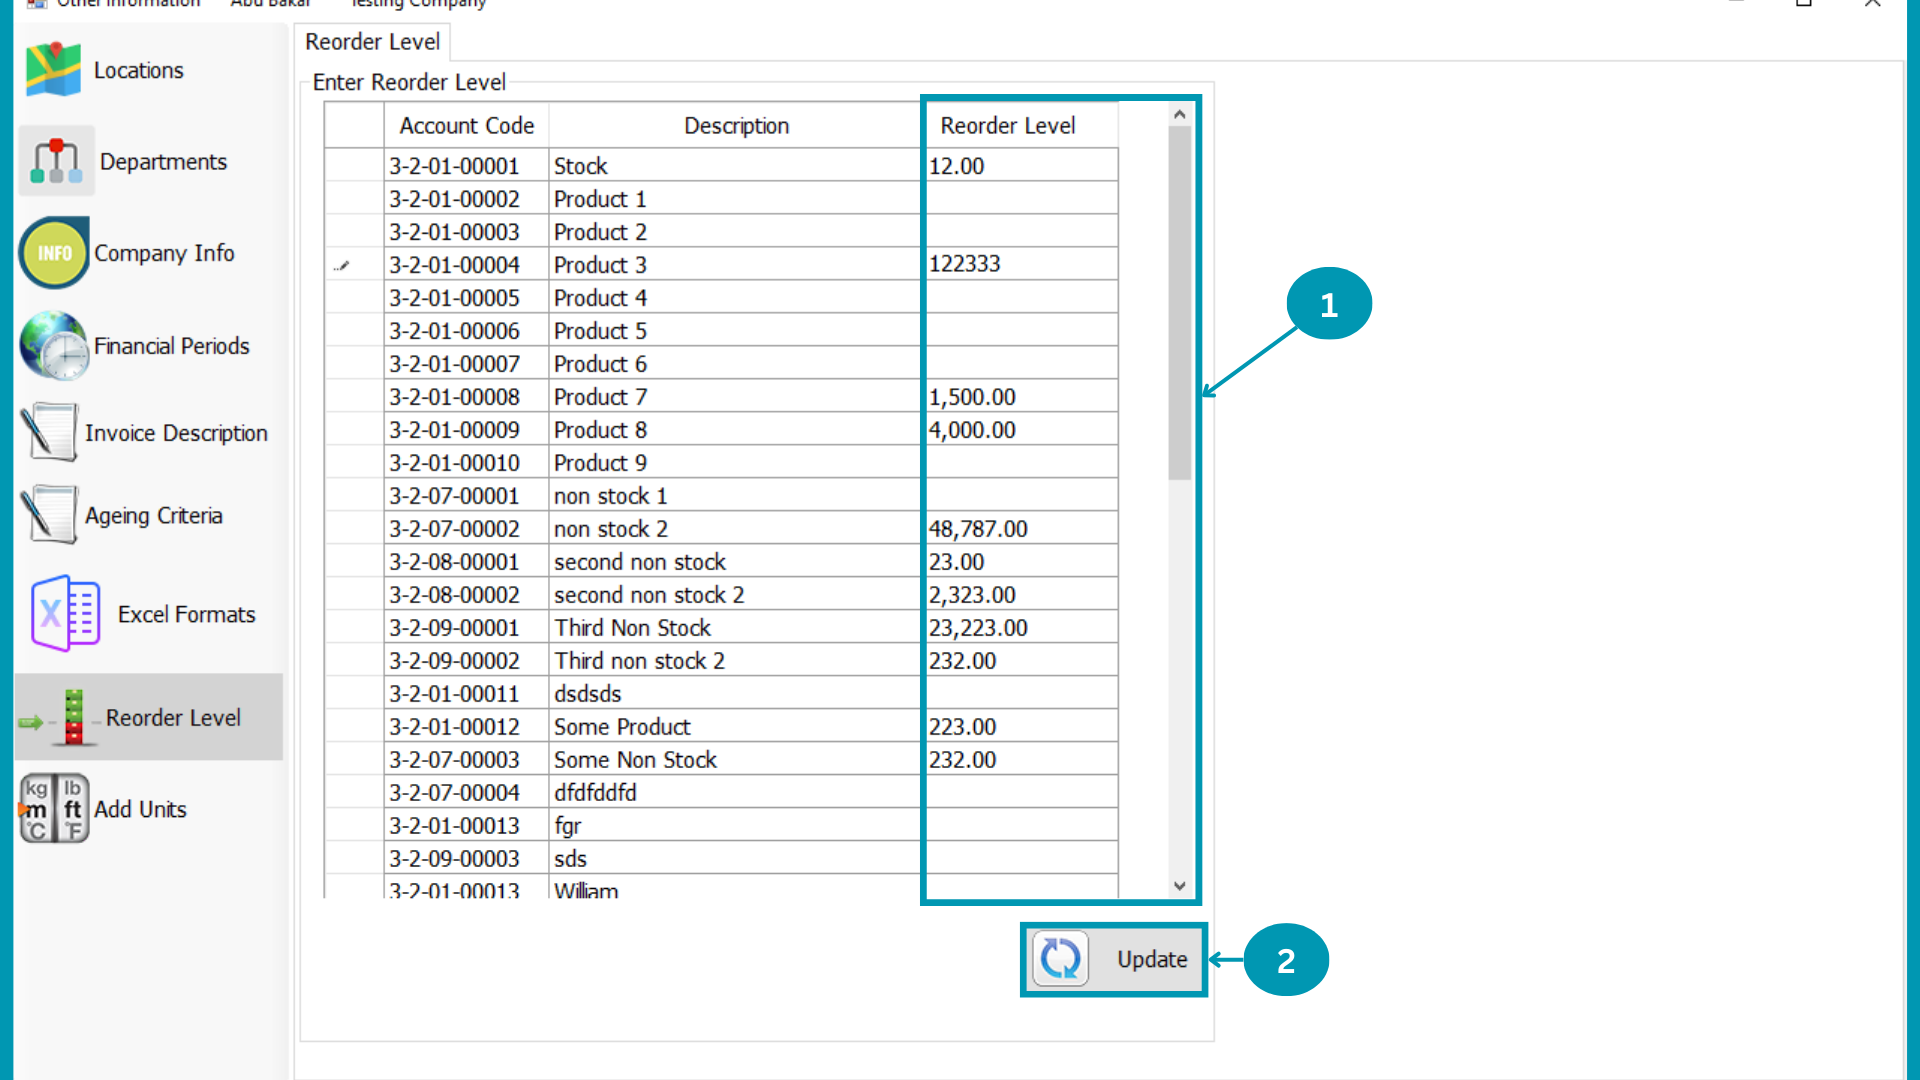
| 01 |  Write the reorder level for the Raw-materials and finished goods along with the corresponding quantity Write the reorder level for the Raw-materials and finished goods along with the corresponding quantity
|
| 02 |  Click on update. Click on update.
|
Add Units
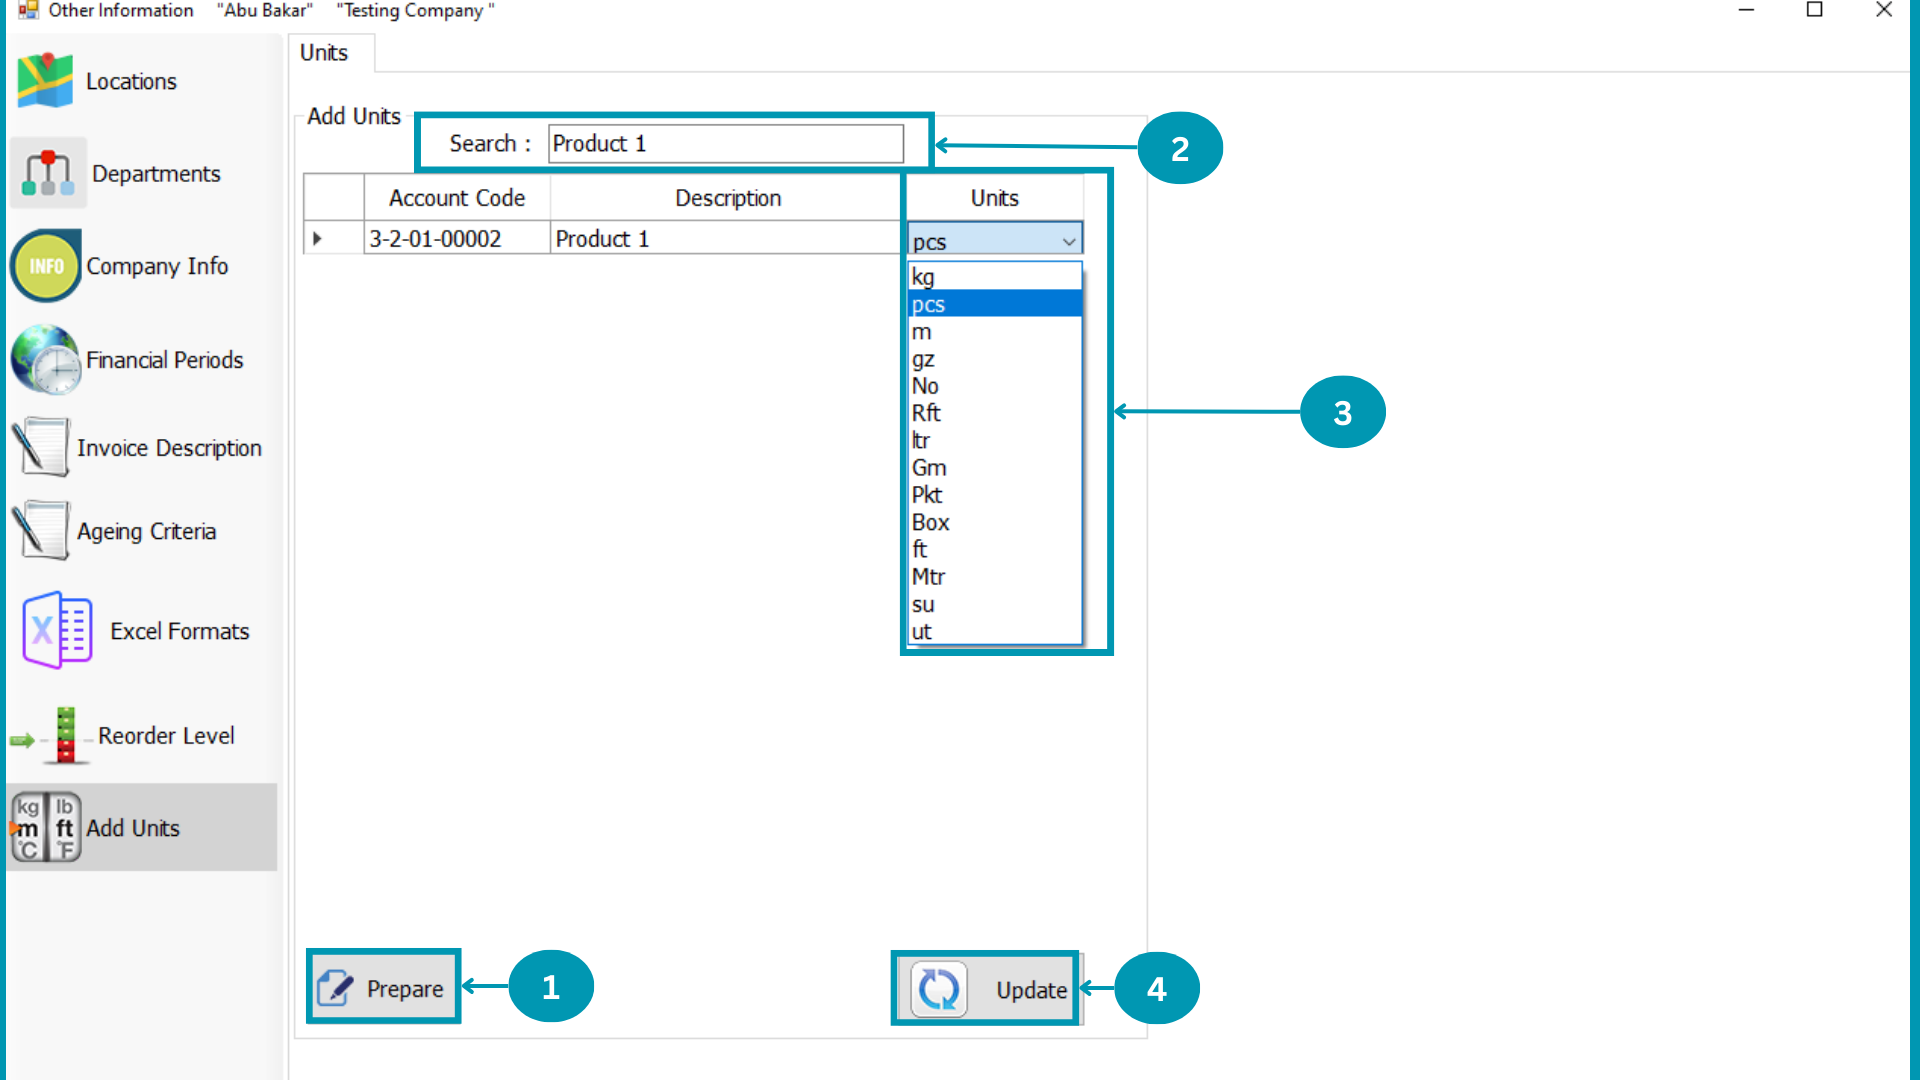
|
The Product Units will be add in Chart of Accounts Assets/ Current Assets stock or Non-Stock Products there only you can change Unit.
|
|
| 01 | Click on Prepare.
|
| 02 |  Search the product by its name for unit updation. Search the product by its name for unit updation.
|
| 03 |  Select Unit from units list. Select Unit from units list.
|
| 04 | Click the Update Button.
|
MAB BIZ SOLUTIONS
Logout
Logout
Click on Logout to exit or remove log-out account from the ERP.
MAB BIZ SOLUTIONS
Perfomance Managment
Perfomance Managment
Perfomance Managment module shows the categoric performed on employees on time sheet. The employees will select the perfomance category type and time which he spend on that and also will write description of perfomance which will further acessable by Admin to monitor induiduality.
Perfomance Managment Page

| 01 | |
| 02 | 
|
| 03 | 
|
| 04 | 
|
| 05 | 
|
| 06 | 
|
Category-I

| 01 | 
|
|---|---|
| 02 | 
|
| 03 | 
|
| 04 | 
|
| 05 | 
|
| 06 | 
|
| 07 | 
|
| 08 | 
|
| 09 | 
|
| 10 | 
|
Category-II

| 01 |
|
|---|---|
| 02 | 
|
| 03 | 
|
| 04 |
|
| 05 |
|
| 06 |
|
| 07 |
|
| 08 |
|
| 09 |
|
| 10 |
|
Time Sheet

| 01 | 
|
|---|---|
| 02 | 
|
| 03 | 
|
| 04 | 
|
| 05 | 
|
| 06 | 
|
| 07 | 
|
| 08 | 
|
| 09 | 
|
| 10 | 
|
MAB BIZ SOLUTIONS
Attendence Managment
Attendence Managment
Attendence Managment module shows the categoric performed on employees on time sheet. The employees will select the perfomance category type and time which he spend on that and also will write description of perfomance which will further acessable by Admin to monitor induiduality.
Perfomance Managment Page
| 01 | |
| 02 |
|
| 03 |
|
| 04 |
|
| 05 |
|
| 06 |
|
Category-I
| 01 |
|
|---|---|
| 02 |
|
| 03 |
|
| 04 |
|
| 05 |
|
| 06 |
|
| 07 |
|
| 08 |
|
| 09 |
|
| 10 |
|
Category-II
| 01 |
|
|---|---|
| 02 |
|
| 03 |
|
| 04 |
|
| 05 |
|
| 06 |
|
| 07 |
|
| 08 |
|
| 09 |
|
| 10 |
|
Time Sheet
| 01 |
|
|---|---|
| 02 |
|
| 03 |
|
| 04 |
|
| 05 |
|
| 06 |
|
| 07 |
|
| 08 |
|
| 09 |
|
| 10 |
|